Table of Contents
Advertisement
Available languages
Available languages
Quick Links
Perfect for flags, signs, gardens, driveways, parking lots, outdoor storage spaces,
decks, porches, or any large outdoor area where lighting is needed.
ASSEMBLY & OPERATING INSTRUCTIONS
IMPORTANT: READ ALL INSTRUCTIONS CAREFULLY BEFORE USE
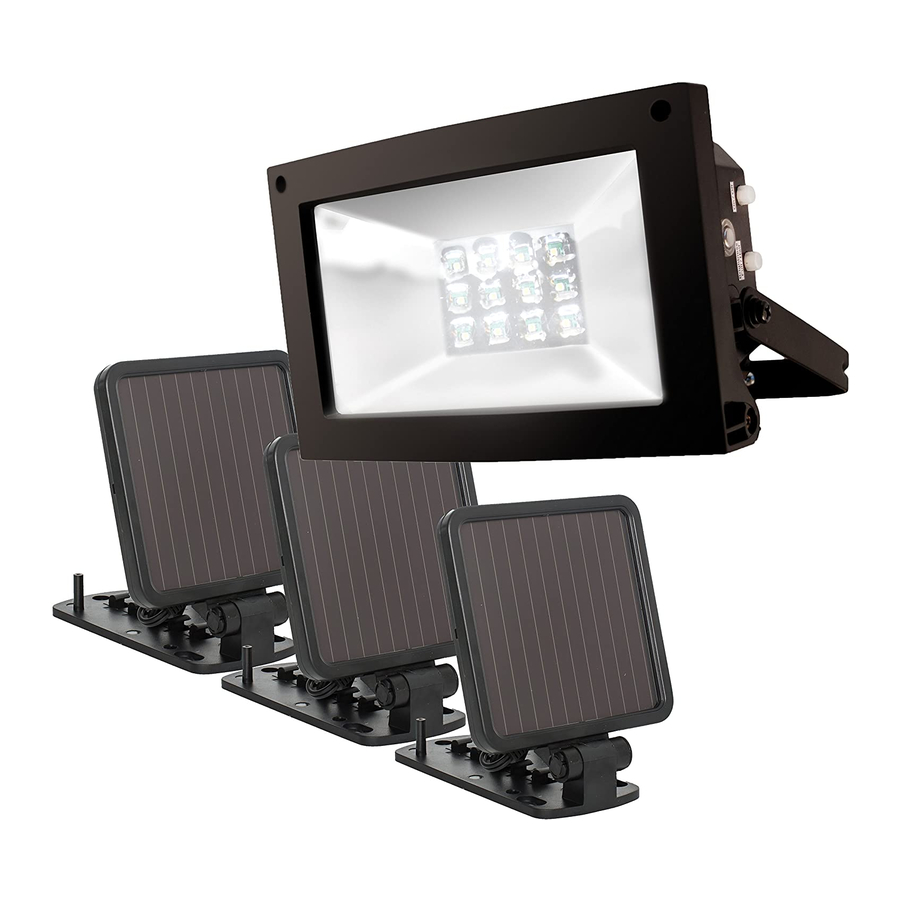
ABOUT YOUR SOLAR POWERED FLOOD LIGHT
Your MAXSA Solar Powered Flood Light converts sunlight into electricity during the day,
enabling the 12 LED lights to turn on automatically at night. With this light, walking into the
dark will no longer be a problem. You can also save the environment by conserving energy
with these energy-efficient solar powered LED lights.
Your Solar Powered Flood Light will activate automatically when it gets dark and can light
for up to 6 hours at full power and up to 12 hours at half power / brightness when the
battery is fully charged. The unit includes 3.7V 2X2200 mAh rechargeable Lithium Ion
batteries.
Model #: 40331
Advertisement
Table of Contents

Related Manuals for MAXSA 40331


Summary of Contents for MAXSA 40331
- Page 1 IMPORTANT: READ ALL INSTRUCTIONS CAREFULLY BEFORE USE ABOUT YOUR SOLAR POWERED FLOOD LIGHT Your MAXSA Solar Powered Flood Light converts sunlight into electricity during the day, enabling the 12 LED lights to turn on automatically at night. With this light, walking into the dark will no longer be a problem.
-
Page 2: Included Parts
Carefully remove and identify all the parts from their protective packaging and lay them out in front of you. INCLUDED PARTS: 12 screws and 12 anchors for mounting the 3 solar panels Solar panel angle pivot 9 foot power cables Solar panel (3) Mounting bracket Solar panel... - Page 3 MOUNTING TO A FLAGPOLE To mount on a flagpole, position the flagpole mounting bracket supplied against the flagpole and run the two supplied metal bands through the bracket as shown. *CAUTION: Do not tighten the metal bands until your Solar Powered Flood Light is where you want it as they cannot be re-opened.
-
Page 4: Maintenance Tips
BEFORE THE FIRST USE OF YOUR SOLAR POWERED FLOOD LIGHT Charge the batteries without activating the unit. Turn the power switch on the main body of your Solar Powered Flood Light to the OFF setting. Leave the switch in this position for 3 days while the solar panels are in direct sunlight. -
Page 5: Troubleshooting
TROUBLESHOOTING PROBLEM POSSIBLE SOLUTIONS • Ensure that the on/off switch on the main body has been turned to the ON position. • Ensure that the batteries have been fully charged in direct sunlight for 3 sunny days (refer to the “Before First Time Use of Your Solar Powered Flood Light”... -
Page 6: One-Year Limited Warranty
Fairfax Station, VA 22039; USA within the warranty period, and if the product is defective, MAXSA Innovations, LLC will at its option repair or replace such. This warranty shall constitute the sole liability of MAXSA Innovations, LLC concerning the product. MAXSA... -
Page 7: Description Du Produit
ATTENTION: Il FAUT LIRE TOUTES LES INSTRUCTIONS AVANT L'UTILISATION DESCRIPTION DU PRODUIT Votre MAXSA Projecteur Solaire transforme la lumière du soleil en électricité pendant la journée pour permettre la lumière 12 DEL de briller au soir. Il n’y a plus un problème d’aller à... -
Page 8: Pièces Incluses
Il faut sortir toutes les pièces de leur emballage de protection et les identifier PIÈCES INCLUSES 12 vis et 12 ancrages pour monter les panneaux solaires Pivot du panneau solaire Câble électrique de 275cm 3 Panneaux solaires Support de Support du montage panneau solaire Interrupteur ON/... - Page 9 serrez pas 'oubliez pas MONTAGE DES PANNEAUX SOLAIRES Nous recommendons que les panneux solaires sont vers le sud pour maximum lumière du soleil. Depuis la direction de le soliel change dans chaque saison, nous recommendons que les panneux solaires sont monter comme en dessous. Après monter le projecteur sur la surface désirée, raccorder le panneau solaire au projecteur par brancher le câble électrique dans...
-
Page 10: Conseils De Maintenance
AVANT LA PREMIÈRE UTILISATION DU PRODUIT 1. Chargez les batteries sans les activer. Il faut éteindre le projecteur par tourner l’interrupteur à la position OFF. 2. Laissez l’interrupteur dans cette position tout en plaçant le panneau au soleil. Faites les deux pendant trois jours pour assurer qu’il y aura une charge complète avant la première utilisation. - Page 11 RÈSOLUTION DES PROBLÈMES TYPIQUES PROBLÈME RESOLUTIONS POSSIBLES • Vérifiez que vous avez tourné l’interrupteur ON/OFF sur le corps du projecteur à la position ON. • Chargez les batteries au soleil pendant 3 jours ensoleillés (comme dit la section « avant la première utilisation du projecteur solaire »...
- Page 12 GARANTIE LIMITÈE D'UNE (1) ANNÈE GARANTIE LIMITEE D’UNE (1) ANNÈE : MAXSA Innovations, LLC garantit au client que ce produit ne présente aucun défaut de matériel ou de fabrication avec l’utilisation normale pour une période d’une année suivant l’achat. Si le client rend le produit, qui doit être défectueux, à...
Need help?
Do you have a question about the 40331 and is the answer not in the manual?
Questions and answers