Table of Contents
Advertisement
Quick Links
Keithley Instruments
28775 Aurora Road
Cleveland, Ohio 44139
1-800-833-9200
tek.com/keithley
Introduction
The Model 4299-1 Single-Unit Rack-Mount Kit contains the hardware required to mount one half-rack
instrument in a standard 48.3 cm (19 in.) rack. Typical installation is for one Series 2600A or 2600B System
SourceMeter
instrument.
®
Parts list
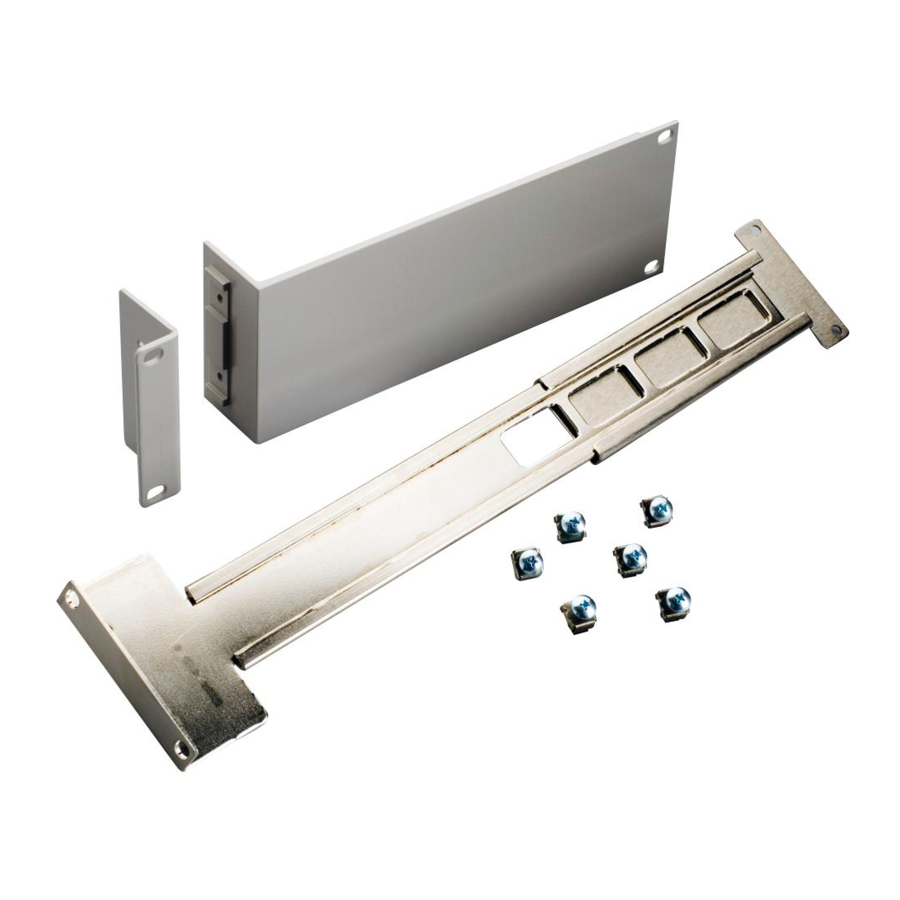
Refer to the table below for a list of parts included in the kit.
Quantity
Description
1
Front rack-ear
1
Rear rack-mount bracket
1
Rack-mount extension arm
1
Half-rack front panel
6
Cage nut
4
#8-32 × 3/8 in. Phillips pan-head screw
2
#10-32 × 3/8 in. Phillips pan-head SEMS screw
6
#10-32 × 5/8 in. Phillips truss-head screw
Tools required
Medium (#2) Phillips screwdriver
3/8-inch wrench
Flat-bladed screwdriver or cage-nut installation tool
Installation overview
Review the
Installation precautions
Select a location in the rack:
a. Clear as much space as possible around the selected rack location.
b. Remove the cabinet side panels from the rack.
Prepare the instrument
Install mounting hardware
Prepare the rack
Install the instrument
PA-908 Rev. F April 2021
Rack-Mount Kit Installation Instructions
(on page 2).
(on page 2).
(on page 3).
(on page 6).
(on page 7) in the rack.
*PPA-908F*
Model 4299-1 Single-Unit
Keithley part number
2602-355
2602-334
2602-335
2602-363
FA-274
8-32×3/8PPH
10-32×3/8PPHSEM
10-32×5/8PHTRSH
1
Advertisement
Table of Contents

Related Manuals for Keithley 4299-1


Summary of Contents for Keithley 4299-1
- Page 1 Cleveland, Ohio 44139 1-800-833-9200 tek.com/keithley Introduction The Model 4299-1 Single-Unit Rack-Mount Kit contains the hardware required to mount one half-rack instrument in a standard 48.3 cm (19 in.) rack. Typical installation is for one Series 2600A or 2600B System SourceMeter instrument.
-
Page 2: Installation Precautions
Model 4299-1 Single-Unit Rack-Mount Kit Installation Instructions Installation precautions Observe the following safety precautions while installing instruments. Turn off instrument power and unplug all cables before installing an instrument in a rack. Failure to remove power before installation may cause personal injury or death from electrical shock. -
Page 3: Install Mounting Hardware
Model 4299-1 Single-Unit Rack-Mount Kit Installation Instructions 2. After you align the arrows (2), pull the ends of the handle (1) away from the case. 3. Remove the screw that secures each mounting ear (3). 4. Pull down and out to remove each ear. - Page 4 Model 4299-1 Single-Unit Rack-Mount Kit Installation Instructions To install the mounting hardware on the instrument: 1. Select the side that will be closest to the rack rail (see note above). 2. Secure the rear rack-mount bracket (2602-334) to the side of the instrument using two Phillips pan-head SEMS screws (#10-32 ×...
- Page 5 Model 4299-1 Single-Unit Rack-Mount Kit Installation Instructions 4. Secure the half-rack front panel (2602-363) to the other side of the instrument using two Phillips pan-head screws (#8-32 × 3/8 PPH). Figure 5: Attach the rack ear and half-rack front panel...
-
Page 6: Prepare The Rack
Model 4299-1 Single-Unit Rack-Mount Kit Installation Instructions Prepare the rack 1. Install the cage nuts (FA-274) into the front rack holes for the front rack-ear and the half-rack front panel (see the following figure). 2. Install the cage nuts (FA-274) into the rear rack holes for the rack-mount extension arm (2602-335) on the same side as the front rack-ear (2602-355). -
Page 7: Install The Instrument
Model 4299-1 Single-Unit Rack-Mount Kit Installation Instructions Install the instrument When rack mounting restricts access to the main power cord, provide a separate main power disconnect device, located close to the equipment and within easy reach of the operator. Failure to disconnect all power when needed may expose personnel to hazardous voltages, which, if contacted, could cause personal injury or death. -
Page 8: Safety Precautions
Keithley products are designed for use with electrical signals that are measurement, control, and data I/O connections, with low transient overvoltages, and must not be directly connected to mains voltage or to voltage sources with high transient overvoltages. - Page 9 (note that selected parts should be purchased only through Keithley to maintain accuracy and functionality of the product). If you are unsure about the applicability of a replacement component, call a Keithley office for information.
Need help?
Do you have a question about the 4299-1 and is the answer not in the manual?
Questions and answers