Table of Contents
Advertisement
Quick Links
Advertisement
Table of Contents

Related Manuals for AVer CP10


Summary of Contents for AVer CP10
- Page 1 CP10 Collaboration Controller User Manual...
- Page 2 The information contained in this documentation is subject to change without notice. In no event will AVer Information Inc. be liable for direct, indirect, special, incidental, or consequential damages arising out of the use or inability to use this product or documentation, even if advised of the possibility of such damages.
- Page 3 ©2021 AVer Information Inc. All rights reserved. All rights of this object belong to AVer Information Inc. Reproduced or transmitted in any form or by any means without the prior written permission of AVer Information Inc. is prohibited. All information or specifications are subject to change without prior notice.
- Page 4 Contact Information Global European Headquarters AVer Information Inc. AVer Information Europe B.V. AVer Information Inc. https://www.aver.com https://www.avereurope.com https://www.averusa.com 8F, No.157, Da-An Rd., Westblaak 140, 3012KM, 668 Mission Ct., Tucheng Dist., Rotterdam, Netherlands Fremont, CA 94539, USA New Taipei City 23673,...
-
Page 5: Table Of Contents
Connecting CP10 to Internet................... 3 System Configuration ....................7 (A) ........................7 (B) ........................8 How to Pair a Computer with CP10 while Running Zoom Rooms Controller Application....................... 9 CP10 Main Page ....................11 Scan and Connect AVer USB Cameras ..............17 AVer PTZ App ...................... - Page 6 Audio ...................... 30 Tracking Mode ..................31 Setting and System ..................34...
-
Page 7: Package Contents
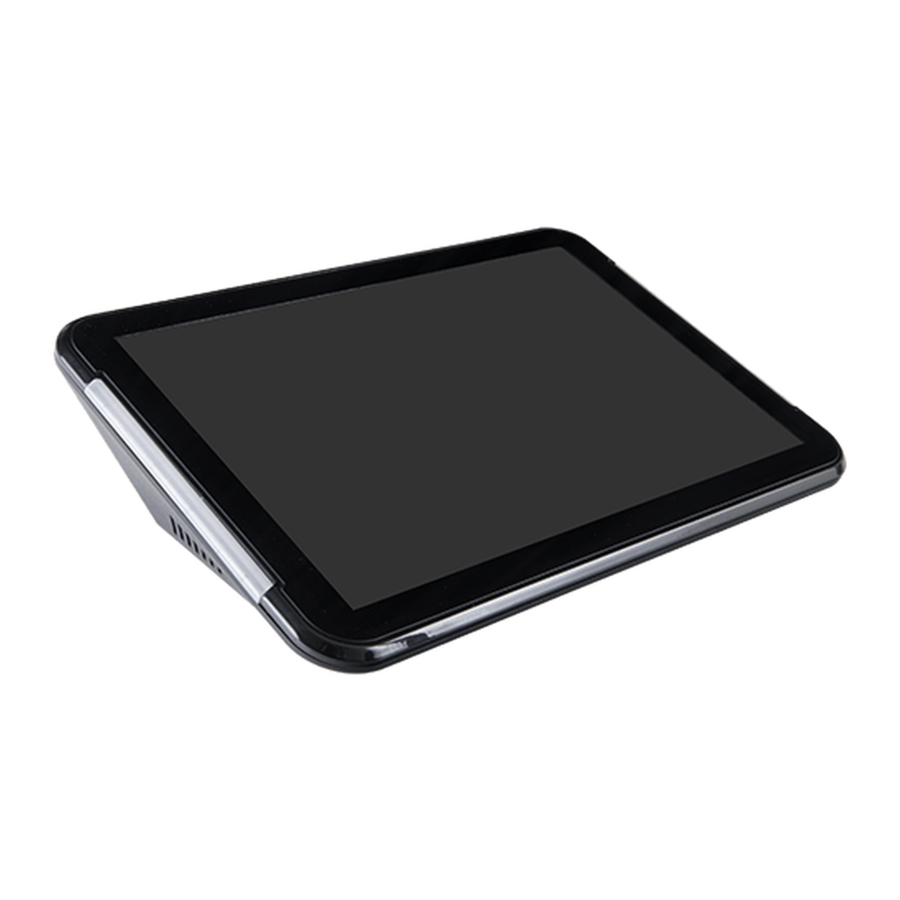
Package Contents CP10 Quick Guide Warranty Card Optional Accessories 1-port PoE+ Injector Wall Mount Bracket Overview Touchscreen Status LEDs PoE+ Port* USB 2.0 Type A Port** Kensington Lock *Please use CAT 5e FTP cable (not included). *Power over Ethernet plus (PoE+), compatible with IEEE 802.3AT. -
Page 8: Power Connection
(optional) LAN (not included) LAN port on the wall With a PoE+ switch: Connect the CP10 to a PoE+ switch using a LAN cable. Please use the PoE+ switch to ensure stable power supply. LAN (not included) PoE+ Switch... -
Page 9: Led Status
Unpack CP10 and power it to connect it to internet (see Power Connection on page 2). CP10 will bring up Zoom Rooms app once powered on. You will need to go back to main page to configure the IP address of the CP10. While in Zoom Rooms screen, please swipe two fingers on the left 2/3 of the screen for 1~2 times within 3 seconds to leave Zoom Rooms and access the main page. - Page 10 Tap Network & internet > Ethernet > Ethernet Ip mode > static. Configure the Static IP and click Connect.
- Page 11 To go back to the setting page, tap arrow icon on the top. If your network is working, please follow below steps to sync time. Tap System > Date & time. Enable “Use network-provided time” first and tap “Time zone” to select your time zone. You will see the time change to your local time.
- Page 12 If your network is NOT working, please follow below steps to sync time. Tap System > Date & time. Disable “Use network-provided time” first and tap “Time” to adjust the time. You will see the time change to your local time. Please swipe two fingers on the left 2/3 of the screen for 1~2 times within 3 seconds to leave the internet setting page and access the main page.
-
Page 13: System Configuration
System Configuration This configuration is for running Zoom Rooms controller app in CP10. All the USB cameras in the market (following UVC/UAC protocol) can work with CP10 while running Zoom Rooms controller app. USB Camera CP10 USB Cable Ethernet Ethernet... - Page 14 This configuration is for running AVer PTZApp in CP10 and controlling AVer cameras. This case is for meeting room PC running other VC software, such as Skype or Teams and using CP10 to control AVer camera. [Note] PTZApp in CP10 first supports CAM520 Pro/ CAM520 Pro2/ VC520 Pro/ VC520 Pro2/ VB130, AVer cameras with Ethernet connection.
-
Page 15: Application
1. Install Zoom Rooms Conference Room application on the computer. 2. Open Zoom Rooms app on the computer. 3. Open the Zoom Rooms app on CP10. (Zoom Rooms app is pre-installed in CP10. When you power on CP10, it will launch Zoom Rooms app automatically.) 4. - Page 16 6. On CP10, tap Sign In. 7. Sign in as an account owner, admin, or user with Zoom Rooms privileges to start the ZOOM meeting and use CP10 to control USB camera device.
-
Page 17: Cp10 Main Page
You will see pre-installed Zoom Rooms and AVer PTZ app*. Tap AVer PTZ app to open it. When you want to close the AVer PTZ app and return to the main page, swipe two fingers on the left 2/3 of the screen 1~2 times within 3 seconds. - Page 18 Tap Add and select an app to add to the main page.
- Page 19 To delete the app, tap and hold the app until the x icon appears and select the x icon. [Note] Zoom Rooms and AVer PTZ apps cannot be deleted. Tap the setting icon to open setting page.
- Page 20 There are four items: Settings: Set up CP10 system, including IP address, languages, panel sleep timer, device sound and CP10 device information, etc. Firmware Update: There are two ways to update CP10 firmware. This button is to update FW online.
- Page 21 [Note] DO NOT unzip the firmware file. Software Update: You can online update AVer PTZApp and Zoom Rooms apps. Device Password: The default password is aver4321. Set up the CP10 password to avoid end-users changing any settings of CP10 without IT people’s authorization.
-
Page 23: Scan And Connect Aver Usb Cameras
Tap Scan button to search all the USB cameras. The cameras will appear. Make sure that you’ve changed the camera IP address to be under the same network as CP10. To change IP address of USB camera, please follow the following steps. - Page 24 To review the information of device, tap the triangle. To minimize the information, tap the triangle again.
- Page 25 Tap Set IP to set the camera’s IP. The Web page access password of camera needs to be entered to continue. (If you have not set up web page access password, the default is aver4321.)
- Page 26 5. New IP and set IP pencil icon will appear. If the device has a camera, the live view icon will also appear. The Set IP icon becomes Setting, indicating the device is configurable.
- Page 27 6. Tap the live view icon to open the camera live view.
- Page 28 If there are more than one AVer USB camera under the same network, all the devices will be listed on the screen of CP10. Tap the star icon to select the auto bring up device. The next time AVer PTZ app is opened, the main page of AVer PTZ app will be skipped and the selected...
- Page 29 Tap Setting to enter the setting page of the camera. If it is the first time accessing the camera, you will be required to input camera’s default web page password (aver 4321) and set a new account and password.
- Page 30 When you try to access the setting page of the camera at a later time, you will be asked to input new account and/or password (depending on device).
-
Page 32: Aver Ptz App
AVer PTZ App User can control the camera direction, zoom in/out, and preset selection. Back to main page Preset position name column Live view icon Functions list Zoom in/out and manual frame Preset selection... -
Page 33: Set Up The Preset
Set up the Preset User can set 10 preset positions. Tap the live view icon to turn on camera live view while adjusting settings. Select the preset number frame (0~9). Use ▲ , ▼ , , and zoom in/out buttons to adjust the camera screen view to desired position. - Page 34 Select “Set Preset” button to save the preset. The system will capture the preset screen view and display in preset number frame. Tap pencil icon to edit name of preset frame. Tap other icon to save the edited name. To set another preset, repeat the above steps.
-
Page 35: Select The Preset Point
Select the Preset Point Preset positions need to be set. Select the preset point and the live screen will move to the preset screen view. - Page 36 Audio For AVer USB cameras with audio function such as VC520 Pro2 and VB130, user can use either Phone In or Bluetooth function at a time. Tap the Phone In icon to enable the function. When Phone In is enabled, the icon becomes blue.
- Page 37 Tracking Mode The current tracking mode, such as Auto Frame, will appear here. To change the tracking mode, please tap Setting icon to access. The tracking function varies based on each camera. Please refer to each camera’s user manual for more information. If the tracking mode is set at Auto Frame, tap On/Off to enable/disable the tracking function.
- Page 38 It is required to input device password to access other setting pages or tap Home to leave PTZ App*. This mechanism is to avoid end-users adjusting settings without IT people’s authorization. *To set up device password, please access setting button on the main page and enter Device Password item to set it up.
- Page 40 Setting and System The video icon will turn on camera live view while adjusting any settings. Setting and System content vary based on each camera. Please refer to each camera’s user manual for more information. IP icon shows the IP address of the camera. Live screen preview Press the icon to show people count number.
Need help?
Do you have a question about the CP10 and is the answer not in the manual?
Questions and answers