Table of Contents
Advertisement
Available languages
Available languages
Quick Links
Installation Guide
Caster Kit
for CST16AC and CST20AC
Charging Station Towers
Models: CSTCASTERKIT16, CSTCASTERKIT20
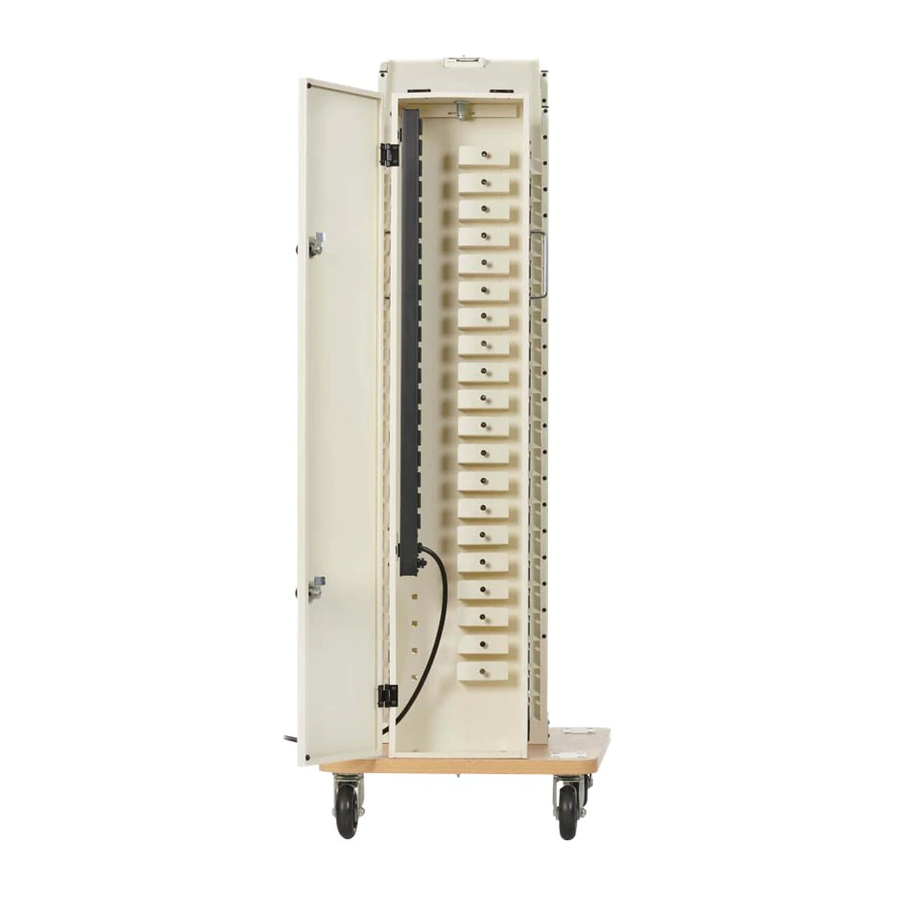
CST16AC (16-slot)
model shown.
Español 7 • Français 13
WARRANTY REGISTRATION
Register your product today and be
automatically entered to win an ISOBAR
surge protector in our monthly drawing!
tripplite.com/warranty
1111 W. 35th Street, Chicago, IL 60609 USA • tripplite.com/support
Copyright © 2019 Tripp Lite. All rights reserved.
1
Advertisement
Table of Contents

Related Manuals for Tripp Lite CSTCASTERKIT16


Summary of Contents for Tripp Lite CSTCASTERKIT16
- Page 1 Español 7 • Français 13 WARRANTY REGISTRATION Register your product today and be automatically entered to win an ISOBAR surge protector in our monthly drawing! tripplite.com/warranty 1111 W. 35th Street, Chicago, IL 60609 USA • tripplite.com/support Copyright © 2019 Tripp Lite. All rights reserved.
-
Page 2: Important Safety Instructions
Important Safety Instructions WARNING! Do not attempt to install casters with equipment inside the charging station cabinet. Remove all electronic devices and power adapters from the charging station cabinet before installing casters. Failure to heed this warning may result in damage to the charging station and equipment or personal injury. •... -
Page 3: Installation
Installation Note: CST16AC (16-slot) model shown. Installation instructions are the same for the CST20AC (20-slot model). Remove all electronic devices, power adapters, power adapter shelves, and the AC power distribution unit from the charging station. Attach the door to the charging station’s rear panel. - Page 4 Installation Close the rear door. Lay two pieces of the packing foam shipped with the unit on the floor, or lay a blanket on the ground. With the help of an assistant, grab a handle on each side and carefully set the charging station atop the packing foam/blanket with the rear panel facing the floor.
- Page 5 Installation Align the hole pattern on the caster base assembly with the hole pattern on the charging station and attach using the included hardware. Note: Only the front portion of the charging station can attach to the caster base assembly at this time. Proceed to the next step. With the help of an assistant, grab a handle on each side and carefully set the charging station upright.
- Page 6 AC power distribution unit inside the charging station. Refer to the CST16AC/CST20AC Owner’s Manual for more information. Tripp Lite has a policy of continuous improvement. Specifications are subject to change without notice. Photos and illustrations may differ slightly from actual products.
-
Page 7: Guía De Instalación
Torres de Estación de Carga CST16AC y CST20AC Modelos: CSTCASTERKIT16, CSTCASTERKIT20 *Se muestra el modelo CST16AC (16 ranuras). English 1 • Français 13 1111 W. 35th Street, Chicago, IL 60609, EE. UU. • tripplite.com/support Copyright © 2019 Tripp Lite. Todos los derechos reservados. -
Page 8: Instrucciones De Seguridad Importantes
Instrucciones de Seguridad Importantes ¡ADVERTENCIA! No intente instalar ruedas con equipo dentro del gabinete de la estación de carga. Retire todos los dispositivos electrónicos y adaptadores de corriente del gabinete de la estación de carga antes de instalar las ruedas. Hacer caso omiso de esta advertencia puede dar lugar a daños a la estación de carga y a los equipos o a lesiones personales. -
Page 9: Instalación
Instalación Nota: Se muestra el modelo CST16AC (16 ranuras). Las instrucciones de instalación son iguales para CST20AC (modelo de 20 ranuras). Retire todos los dispositivos electrónicos, adaptadores de corriente, repisas para adaptadores de corriente, unidad de distribución de energía de CA de la estación de carga. - Page 10 Instalación Cierre la puerta trasera. Coloque en el suelo dos piezas de la espuma de embalaje que recibió con la unidad o coloque una manta en el suelo. Con la ayuda de un asistente, sujete una manija en cada lado y coloque cuidadosamente la estación de carga encima de la espuma de embalaje/manta con el panel trasero orientado al suelo.
- Page 11 Instalación Alinee el patrón de orificios en el conjunto de la base de la rueda con el patrón de orificios en la estación de carga y fije utilizando los accesorios incluidos. Nota: Solo la parte delantera de la estación de carga puede fijarse al conjunto de la base de las ruedas en este momento. Continúe con el paso siguiente.
- Page 12 CA dentro de la estación de carga. Para más información, consulte el Manual del Propietario del CST16AC/CST20AC. Tripp Lite tiene una política de mejora continua. Las especificaciones están sujetas a cambio sin previo aviso. Las fotografías e ilustraciones pueden diferir ligeramente de los productos reales.
-
Page 13: Guide D'installation
CST16AC et CST20AC Modèles : CSTCASTERKIT16, CSTCASTERKIT20 Modèle CST16AC (16 fentes) illustré. English 1 • Español 7 1111 W. 35th Street, Chicago, IL 60609 USA • tripplite.com/support Droits d'auteur © 2019 Tripp Lite. Tous droits réservés. -
Page 14: Consignes De Sécurité Importantes
Consignes de sécurité importantes AVERTISSEMENT! Ne pas tenter de monter les roulettes avec de l'équipement à l'intérieur de l'armoire de la station de chargement. Retirer tous les appareils électroniques et les adaptateurs d'alimentation de l'armoire de la station de chargement avant d'installer les roulettes. Le non-respect de cet avertissement pourrait causer des dommages à la station de chargement et à... - Page 15 Installation Remarque : Modèle CST16AC (16 fentes) illustré. Les instructions d'installation sont les mêmes pour le modèle CST20AC (modèle à 20 fentes). Retirer tous les appareils électroniques, les adaptateurs d'alimentation, les étagères pour adaptateurs d'alimentation et l'unité de distribution de l'alimentation CA de la station de chargement.
- Page 16 Installation Fermer la porte arrière. Placer au sol deux morceaux de la mousse d'emballage expédiée avec l'appareil ou placer une couverture au sol. Avec l'aide d'un assistant, saisir une poignée de chaque côté, puis placer délicatement la station de chargement sur la mousse d'emballage/ couverture avec le panneau arrière face au sol.
- Page 17 Installation Aligner le motif des trous sur l'ensemble de la base des roulettes avec le motif de trous sur la station de chargement, puis fixer en place en utilisant la quincaillerie incluse. Remarque : Seule la partie avant de la station de chargement peut être fixée à l'ensemble de la base des roulettes pour le moment. Passer à...
- Page 18 Installation Ouvrir la porte arrière. En utilisant la quincaillerie incluse, fixer la partie arrière de la station de chargement à l'ensemble de la base de roulettes. S'assurer que toute la quincaillerie est bien serrée et que la station de chargement est solidement fixée à l'ensemble de la base de roulettes.
- Page 20 La politique de Tripp Lite en est une d'amélioration continue. Les caractéristiques techniques sont modifiables sans préavis. Les produits réels peuvent différer légèrement des photos et des illustrations. 1111 W. 35th Street, Chicago, IL 60609 USA • tripplite.com/support 19-07-512 93-3AAC_RevA...
Need help?
Do you have a question about the CSTCASTERKIT16 and is the answer not in the manual?
Questions and answers