
Related Manuals for Roberts SOUND 48


Summary of Contents for Roberts SOUND 48
- Page 1 SOUND 48 DAB / DAB+ / FM stereo clock radio with CD, Bluetooth, USB playback / charging Please read this manual before use...
-
Page 2: Table Of Contents
Contents Features Selecting a track Menu options CD Repeat function Dimmer CD Intro function Controls (Front) CD random play Controls (rear view) Creating a playlist (program play) Connect to the mains Checking and editing a program Switch on your clock radio USB mode Select a DAB radio station Setting alarms... -
Page 3: Features
Features • DAB / DAB+ / FM RDS wavebands • Four alarms - wake to buzzer, radio, USB or CD • MP3 / WMA / AAC playback for CD • Adjustable sleep and snooze timers • MP3, AAC, WAV and FLAC playback for USB •... -
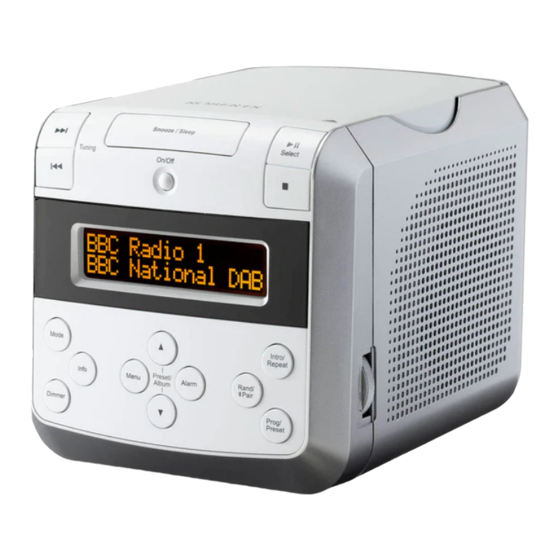
Page 4: Controls (Front)
Controls (Front) 1 Alarm button 2 Preset / Album Down button 3 Menu button 4 Info button 5 Dimmer button 6 Mode button 7 Preset / Album Up button 8 LCD display 9 On / Off button 10 Tuning Down / Rewind button 11 Tuning Up / Fast-forward button 12 Snooze / Sleep button Mode... -
Page 5: Controls (Rear View)
Controls (rear view) 21 Auxiliary input socket 22 Headphone socket 23 USB playback / charge socket 24 DC input socket 25 Wire DAB/FM aerial 26 Loudspeaker x 2... -
Page 6: Connect To The Mains
Use only the mains adaptor provided with the product, or a genuine replacement provided by Roberts Radio. The use of alternative adaptors will invalidate the guarantee. Switch on your clock radio Press the On/Off button to switch on the clock radio. After each use the clock radio will remember the mode used and then switch on in that mode the next time it is used. -
Page 7: Select A Dab Radio Station
Select a DAB radio station If needed, press the Mode button until the DAB mode is selected. Mode Press the Tuning Up or Down buttons to step through the list of available DAB stations. Press the Select button to select the station. Adjust the Volume. -
Page 8: Display Options
Display options Info When in DAB, FM, USB and Bluetooth modes your clock radio has a range of display options. Press the Info button to cycle through the various options. Manual tuning - DAB Mode Menu Manual tuning allows you to tune your clock radio to a particular DAB frequency in Band III. -
Page 9: Dynamic Range Control (Drc) Settings - Dab
Dynamic Range Control (DRC) settings - DAB Menu The DRC facility can make quieter sounds easier to hear when your radio is used in a noisy environment. There are 3 DRC settings. When in DAB mode, press Menu. Press Tuning Up or Down until the display shows 'DRC'. Press Select. The current DRC value will be marked with an asterisk. -
Page 10: Search Tuning - Fm
Search tuning - FM Fully extend the wire aerial. Press the Mode button until FM is selected. Mode Give a long press on Tuning Up or Down for several seconds. Your clock radio will scan upwards (low to high frequency) or downwards (high to low frequency) and will stop automatically when it finds a station of sufficient strength. -
Page 11: Preset Stations
Preset stations You may store your preferred DAB and FM radio stations to the preset station Mode memories. There are 40 memory presets in your clock radio, 20 DAB and 20 FM. To store a preset station Prog/ Switch on your clock radio. Preset Press Mode to select DAB or FM and tune to the required station. -
Page 12: Bluetooth Mode
● When a Bluetooth enabled device such as your Sound 48 clock radio is in a 'discoverable' state other Bluetooth devices can detect, pair with or connect to it. -
Page 13: Playing Audio Files In Bluetooth Mode
Pair button on the clock radio. Your Sound 48 clock radio will become 'discoverable' by other devices. If you no longer want your Bluetooth device to be paired with your clock radio you will need to delete the 'Sound 48' pairing on the device. Please refer to the device's Bluetooth documentation. -
Page 14: Compact Discs
Use only Digital Audio CDs which have the symbol. The Sound 48 is able to play CD-R and CD-RW discs containing MP3 / WMA / AAC files with a maximum of 255 files per folder. An MP3 / WMA Never write on a CD or attach any sticker to the CD. Always hold the / AAC CD should not contain more than a combined total of 999 files CD at the edge and store it in its box after use with the label facing up. -
Page 15: Inserting A Cd
Inserting a CD To open or close the CD compartment, press and release the right hand front corner on the top panel. Put the CD on the spindle, print side facing upwards until it clicks into place and then gently close the CD compartment. Playing a CD Switch on your clock radio and press the Mode button until 'CD' is selected. -
Page 16: Cd Bookmark
CD Bookmark The CD Bookmark feature allows you to stop the playback of a CD and then to continue playback from the same point at a later time. Even if you put the clock radio into Standby mode or change the radio function, the next CD play operation will start from the point where playback was previously stopped. Note: that if mains power is removed and restored the Bookmark setting will be cancelled and the CD will then play from the beginning. -
Page 17: Cd Repeat Function
CD Repeat function Whilst the CD is playing press the Intro / Repeat button. The clock radio will step through the following options: Audio CD: Repeat 1 Repeat ALL Normal Play MP3 / WMA / AAC CD: Repeat 1 Repeat Folder Repeat Normal Play The display will show the currently selected repeat mode. -
Page 18: Creating A Playlist (Program Play)
Creating a playlist (program play) Prog/ Preset By programming the player you can play up to 20 tracks in any desired order. Whilst the CD is in Stop mode, press the Prog / Preset button to enter program mode. The display will show 'P-01'. Select the first track using the Tuning Up or Down buttons. -
Page 19: Usb Mode
Sound 48. Memory must use the FAT or FAT 32 filing system in order to operate in the Sound 48. Note: Playback control in USB mode is similar to CD-MP3/WMA/AAC mode (see pages 14-16). -
Page 20: Setting Alarms
Setting alarms Your clock radio has 4 alarms which can be set to wake you by DAB, FM radio, USB, CD or beep type alarm. Each alarm can be set to sound, weekdays, weekends, everyday or once. Note: The alarms can only be set with the clock radio in standby mode. Alarms will be retained in the event of a power failure. -
Page 21: Snooze
Snooze Press the Snooze button to silence the alarm for the number of minutes specified. Snooze / Sleep To cancel snooze, press the On / Off button. To adjust the snooze time, switch on the clock radio and select ‘Snooze time’ in the ‘System’... -
Page 22: Automatically Updating The Clock
Automatically updating the clock Your clock radio will usually set the clock time using the DAB signal. Alternatively you may set the clock manually. Menu Press On/Off to switch on your clock radio. Press Menu. Using the Tuning Up or Down and Select buttons to choose 'System' (in DAB mode only), 'Time/Date', 'Auto Update' and then choose an update option from, DAB, FM No Update or Any. -
Page 23: System Reset
System reset If your clock radio fails to operate correctly, or some digits on the display are missing or incomplete carry out the following procedure. Menu Switch on your clock radio. Press the Menu button. Press Tuning Up or Down until 'System' (in DAB mode only) appears on the display. -
Page 24: Auxiliary Input (Line In) Socket
Auxiliary input (line in) socket A 3.5mm stereo Auxiliary Input socket is provided on the rear of your clock radio to permit an audio signal to be fed into the unit from an external audio device such as iPod, MP3 or CD player. Mode Connect a stereo or mono audio source (for example, iPod, MP3 or CD player) to the Auxiliary Input socket. -
Page 25: Bluetooth Information
Bluetooth information WiFi networks and cordless phones generally use similar radio frequencies Bluetooth connectivity performance may vary depending on the connected to Bluetooth and may interfere with one another. If any interference is Bluetooth devices. Please refer to the Bluetooth capabilities of your device noticed, then try relocating the clock radio or one of the other devices. -
Page 26: Safety
Safety • The AC/DC adaptor or clock radio shall not be exposed to dripping or splashing and that no objects filled with liquids, such as vases, shall be placed on the AC/DC adaptor or clock radio. Do not allow this clock radio to be exposed to water, steam or sand. Do •... -
Page 27: Specifications
Specifications Circuit features Power Requirements Headphone socket 3.5mm dia Auxiliary input socket 3.5mm dia Mains (adaptor) AC 100 - 240V 50/60Hz DC input 5V 1.5A centre pin positive (+) Aerial System Wire aerial 5V / 1A Wire aerial Bluetooth standards A2DP, AVRCP For mains adaptor details see the quick start guide supplied Bluetooth codec supported... -
Page 28: Guarantee
In the event that it is not possible to return the product to the Roberts dealer from whom it was purchased, please contact Roberts Radio using the contact details on the www.robertsradio.com website.
Need help?
Do you have a question about the SOUND 48 and is the answer not in the manual?
Questions and answers