IKA RV 10 control Operating Instructions Manual
Hide thumbs
Also See for RV 10 control:
- Operating instructions manual (236 pages) ,
- Service manual (11 pages) ,
- Operating instructions manual (13 pages)

Related Manuals for IKA RV 10 control


Summary of Contents for IKA RV 10 control
- Page 1 IKA RV 10 control IKA RV 10 auto Operating instructions 取扱説明書 使用说明 คำ � แนะนำ � กำ � รใช้ ง ำ � น 사용 설명서 Petunjuk pengoperasian...
-
Page 2: Device Setup
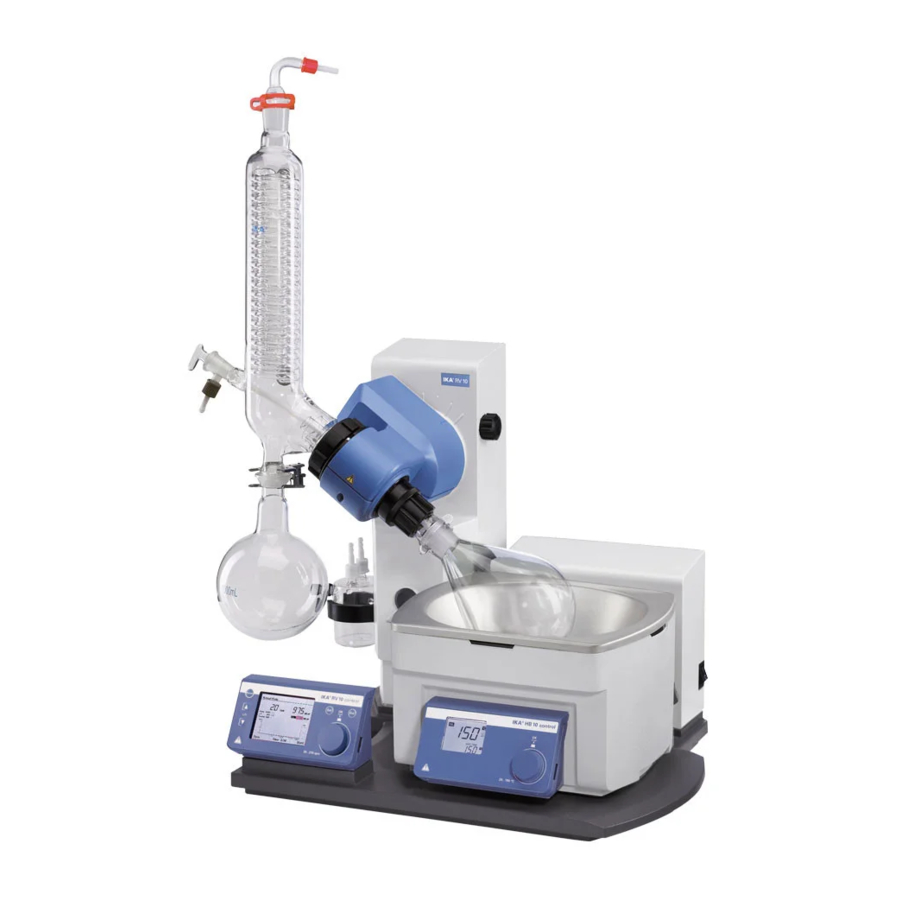
RV 10 auto drive RV 10 auto 主机 드라이브 RV 10 auto Heating bath 가열 배스 加热锅 Bracket 真空缓冲回流瓶支架 브래킷 Woulff bottle 응축물 플라스크 真空缓冲回流瓶 Glassware 유리 제품 玻璃组件 ชุ ด ขั บ RV 10 auto ドライブ RV 10 auto Drive RV 10 auto อ่... - Page 3 电源开关 "Power" switch "电源"按键 "Power" key 上升按键 "" Lift position "" key 下降按键 "" Lift position "" key "转速"按键 “Rotating speed” key "通风"按键 "Vent" key "真空"按键 "Vacuum" key "菜单"按键 "Menu" key "返回"按键 "Back" key 启动/停止按钮 Start/Stop knob 「電源」 スイッチ "전원" 스위치 「電源」...
-
Page 4: Table Of Contents
2011/65/EU and conforms with the following standards or normative documents: EN 61010-1, EN 61010-2-051, EN 61326-1, EN 60529 and EN ISO 12100. A copy of the complete EU Declaration of Conformity can be requested at sales@ika.com. Explication of warning symbols Indicates an imminently hazardous situation, which, if not avoided, will result in death, serious injury. -
Page 5: Safety Instructions
Safety instructions For your protection • Refer to the operating instructions for the accessories, e.g. • Read the operating instructions completely before starting up vacuum pump, heating bath. and follow the safety instructions. • Position the positive pressure outlet of the vacuum pump under •... -
Page 6: Intended Use
• Socket must be earthed (protective ground contact). If the safety lift does not work, please contact the IKA Service • Removable parts must be refitted to the appliance to prevent department. -
Page 7: Unpacking
RV 10 control V x x x x x x x x x x x x RV 10 control V-C x x x x x x x x x x x x RV 10 control FLEX x x x x x x x x x x x... -
Page 8: Vacuum Control
To do so, connect the vacuum to the minimum time difference from detection of the pressure pump (e.g. IKA Vacstar digital pump) to the port on the rear of value, the target value comparison for switching the vacuum valve the rotary evaporator. -
Page 9: Setting Up
Setting up Drive RV 10 auto Loosen transportation lock! Insert the bottle and attach the supplied hose connectors to the bottle CAUTION Set the drive at an angle of approx. 30° • Remove the clamping device for the angle setting of the rota- •... - Page 10 Heating bath Refer to the chapter “Operation“ in the CAUTION heating bath instruction manual! • Place the heating bath on the stand of the rotation drive and push it into the left position. Note: Data is exchanged between the drive unit and the heating bath by means of an infrared link (1).
- Page 11 First use • Insert vapor tube (1). • Insert the vacuum seal (2). Pay attention to the correct positon of the vacuum seal! • Slide the union nut (3b) over the flange on the condenser (3a). • Also slide the annular spring (3c) over the flange on the con- denser (3a).
- Page 12 Mounting the glassware Note: Observe "Drawings for mounting the glassware" on page 154. Item Designation Quantity RV 10.1 non-coated RV 10.2 non-coated RV 10.3 non-coated RV 10.4 non-coated RV 10.5 non-coated RV 10.6 non-coated RV 10.10 coated RV 10.20 coated RV 10.30 coated RV 10.40 coated RV 10.50 coated...
- Page 13 Connect the pump's vacu- um inlet directly to the RV 10 pump hose connection. • Connect the pump controller cable to RV 10 control. Note: When connecting the ...
- Page 14 • Insert the valve connector cable (RV 10.5001, RV 10.4002) into the appropriate socket. Connect the speed-vacuum control pump. As a result, the RV 10 control automatically switches to normal speed-vacuum control operation. • Connect the water outlet hose (supplied) by pushing it onto the nipple until the stop inside the connection socket is reached.
-
Page 15: Commissioning
An information prompt then appears to download the IKA firmware update tool. Explanation of symbols on the working screen The symbols displayed change depending on the status and set- tings of RV 10 auto. - Page 16 Menu structure Factory settings Evaporator Modes Automatic Bath medium.............. Water Start temperature............60 °C Manual...................... 1013 mbar Pump %...................... 50% Volume Solvent............... Acetic acid Target................. 100 ml Efficiency..............80% Adjustment..............- Program..................... - Solvent..............Acetic acid 100% Drying................ - Start after... mm:ss...............
- Page 17 Factory settings Flow control..................... Advanced Bath medium................... Water Cooler power limit..................900 w Max power of cooler................0 w Value..........00:10 Interval Rotation Interval mode Value........00:10 Activate................... - Speed limit Minimum..................5 rpm Maximum..................300 rpm Timer function Timer Time hh:mm:ss............
- Page 18 Factory settings Service Venting valve............- Valves Vacuum valve............- Water valve.............. - Pump........................... - Temperature adjustment....................- Settings Language English................ Deutsch................- Français................- Español................- Italiano................- Português................. - Pусский язык..............- 中文................- 한국어................- 日本語................- Pressure Units mbar........
-
Page 19: Manual
Menu (details) 1. Evaporator Modes Duration: Set the duration of the cleaning process. Pump speed: The set pump speed in the cleaning menu is used to set the speed of the pump during the cleaning process. Higher speed causes partial vacuum in NOTICE the glassware if the system is closed. - Page 20 Advanced Calculator Flow control: This setting can be deactivated in the manual mode It helps you to calculate the boiling point (vapor temperature) of if dry ice is used instead of a cooler. solvent, heating bath temperature and pressure. If one of the 3 Bath medium: Select either water or oil as the medium for the values has been defined, the other 2 values will be given.
- Page 21 5. Program Last measurement Save as: Save the distillation sequence as a program. Edit: Edit the selected program parameters. Start to edit the selected program parameters by pressing on menu option “Edit” with start/stop knob. The user can edit, insert or delete one selected program segment in the program.
- Page 22 Example of saving the last measurement 6. Safety Continue after power failure If this option is activated the measurement will continue after a break caused by a power failure. This option is only available in Automatic, 100 % and Volume mode. Activate: If tick is shown the option is activated.
- Page 23 Note: If non-original accessories are used that are not supplied • Move the lift to the bottom position and check the position by IKA, then it is possible that the 50 mm travel range provided of the heating bath in relation to the evaporation flask. When by the heating bath will not be sufficient.
-
Page 24: Interfaces And Outputs
PC. With a suitable terminal or commu- Install the driver by running the setup file. Then connect the IKA nication program these commands can be transmitted directly to device through the USB data cable to the PC. The data commu- the rotary evaporator. -
Page 25: Maintenance And Cleaning
• For cleaning disconnect the mains plug! If your appliance requires repair, return it in its original packaging. • Use only cleaning agents which have been approved by IKA to Storage packaging is not sufficient when sending the device - also clean IKA devices. -
Page 26: Error Messages
Error messages Any malfunctions during operation will be identified by an error message on the display. Once a serious error message has been displayed, the lift moves to the top end position and the device can no longer be operated. Proceed as follows in such cases: - switch off device using the mains switch, - carry out corrective measures,... -
Page 27: Warranty
- send the device for repair, including a short description of the fault. Warranty In accordance with IKA warranty conditions, the warranty period The warranty does not cover worn out parts, nor does it apply is 24 months. For claims under the warranty please contact... -
Page 28: Technical Data
Technical Data Operating voltage range (100...240) ± 10% Rated voltage 100...240 Frequency 50/60 Power input without heating bath Power input operation “standby” Speed 0/5...300 Speed tolerance ± 1(Set speed < 100 rpm) ± 1(Set speed ≥ 100 rpm) Speed display digital Dimensions of visible display area (W x H) 70 x 52... - Page 29 源语言: 德语 目录 页码 接口与输出 Device setup 符号说明 维护与清洁 安全说明 选配件 正确使用 故障信息 开箱 保修 实用信息 技术参数 真空控制 玻璃组件安装图 安装 软管系统连接图 调试 Solvent table (excerpt) 符号说明 表示会产生直接伤害的情况, 如果不加以避免将导致死亡或严重人身伤害。 危险 表示会产生潜在伤害的情况, 如果不加以避免将导致死亡或严重人身伤害。 警告 表示会产生潜在伤害的情况, 如果不加以避免将导致人身伤害。 小心 提示实际应用, 如果不加以避免将导致仪器受损。 注意 危险 - 当心烫手! 危险...
- Page 30 当首次使用或在长期未启用的情况下, 请进行如下操作: 按升 • 根据蒸馏物的量和类型选择蒸馏装置的尺寸, 冷凝管必须正 降系统的功能按键通过马达使升降机在最高点和最低点之间 常工作, 请监控冷却器出口处冷却液的流速。 往复升降几次, 之后切断电源。 • 为了防止压力的累积, 在常压状态下操作时, 玻璃组件应保 持通气, 例如冷凝管保持开口。 若检查发现升降系统运行异常, 请联系IKA公司的客服部门。 • 请注意气体、 蒸汽、 或其他物质可以通过冷凝管上部开口溢 蒸发仪最大承重 (蒸发瓶和样品) 为 3.0 kg! 超过该承重的操作 出产生危险, 为了避免产生危险, 请采取合适的措施, 例如向 则潜在蒸汽管破裂的危险! 下连接冷却管和洗气瓶或其它有效的提取装置。 测试升降系统是否可将蒸发瓶和样品提起时请确保仪器电源 • 玻璃蒸发瓶不可一面受热, 加热阶段, 旋转蒸发瓶必须转动。...
- Page 31 • 开启自动操作前请常规检查蒸发过程。 请勿在非熟悉的蒸发 过程中启用自动操作模式。 以下情况除适用于手动操作外, 还适用于自动操作: - 100% 蒸馏, - 体积和(或)定量蒸馏 正确使用 • 应用 • 使用区域 在研究、 教学、 商业或工业领域中的实验室式的室内环境。 配合 IKA 推荐选配件, 该仪器适用于: - 快速柔和蒸馏液体 出现下列情况时我们将无法确保使用者的安全: - 蒸馏溶液或悬浮液 - 如果使用了非厂家提供或推荐的选配件, - 结晶、 合成或清洁精细化学品 - 如果仪器操作有误或者违反了厂家的操作规范, - 干燥粉末或者颗粒状物质 - 溶剂回收 - 如果仪器或者电路板被第三方非法修改。...
- Page 32 RV 10 control V x x x x x x x x x x x x RV 10 control V-C x x x x x x x x x x x x RV 10 control FLEX x x x x x x x x x x x...
- Page 33 自动化体积定量蒸馏: 仪器需首先进行预热, 这可通过进行样 RV 10 auto: 旋转蒸发仪标配速度调节真空泵, 内部排气阀和 品蒸馏实现。 压力测量室。 RV 10 control (真空): 通过内置真空控制器也可实现外部双位 控制真空。 该情况必须使用到 RV 10.4002 实验室真空系统电 磁阀。 真空控制 RV 10 control RV 10 auto 使用真空泵可使玻璃组件内部产生真空。 真空泵以恒速进行运 通过速度-真空控制可避免双位控制的不精确性。 行, 速度通常不可调。 要实现速度-真空控制, 必须用到带速度控制功能的真空泵; 此 当达到目标真空度时, 吸入管会被切断。 鉴于与真空值检测、 真...
- Page 34 安装 RV 10 auto 主机 松开运输锁定装置 安装缓冲回流瓶并将随机附送的软管连接器连接到缓冲回流 瓶 小心 将旋转机构角度设定为 30°左右 • 逆时针旋转并松开升降支臂右侧的旋转机构角度锁定装置 • 一手按住升降架顶部, 另一手逆时针旋开并卸下仪器背部的 固定螺丝 (1)。 (1) (轻轻按下并向外旋转凸出部分)。 • 将旋转机构角度设定为 30° 左右。 • 运输锁定装置取下后, 升降架将缓慢升至顶端位置, 行程约 140 mm。 • 连接电源线至电源插口 (2) 以接通电源。 调节基座 注意: 基座的四个支脚中只有一个是可调的。 • 然后顺时针拧紧锁定装置以固定旋转机构头部角度, 防止意 外转动。...
- Page 35 加热锅 请见加热锅使用说明中的“操作”部 小心 分! • 将加热锅放于旋转蒸发仪的底座上并将其推至最左侧位置。 注意: 马达和加热锅之间通过红外线接口 (1) 进行数据交换, 接口须清洁并且没有外物遮挡才能确保数据传输正常进行。 玻璃组件 注意: 请参考玻璃组件的使用说明以保证安全操作实验室玻 璃组件! • 通过锁定按钮可将锁定装置锁定或解锁。 如果红色标记可见, 那么锁定装置则处于解锁状态; 如果红 色标记不可见, 那么锁定装置则处于锁定状态。 分别推动锁定按钮至两末端可锁定或解锁锁定装置。 安装冷凝管密封圈 CLICK • 将冷凝管密封圈置于冷凝管并按安装说明安装玻璃组件。 • 按指示标志逆时针转动锁定装置 60° 从而打开锁定装置。 此 时红色标记可见。 • 将蒸汽管安装到位。 • 顺时针转动锁定装置 60° 进行锁定。 • 推动锁定按钮至末端, 此时红色标记应被覆盖并处于隐藏状 态。...
- Page 36 首次使用 • 放入蒸汽管(1)。 • 放入密封圈(2)。 注意密封圈的正确放置位置! • 安装接管螺母(3b)在冷凝管(3a)上。 • 安装环形弹簧(3c)在冷凝管(3a)上。 • 使冷凝管(3a) 置于密封圈(2)上。 • 用手拧紧固定螺母(3b)。 以 120 rpm 的转速运行仪器 20 分 钟。 最后, 手动再次拧紧螺母(3b)。 注意: 请按玻璃组件安装说明进行安装。 若正确安装冷凝管, 并已拧紧旋转马达上的冷凝管连接螺母 以将其固定, 则无需使用支撑架。 使用支撑架的目的仅是为了防止冷凝管扭转。 若支撑架安装不当, 尼龙搭扣带的强 小心 力可能会使玻璃组件内部产生应力, 从而导致玻璃冷凝管破裂。 冷凝管安装完毕后, 将支撑架连接到旋转马达。 请确保冷凝管 与升降系统是相互平行的。 安装竖直冷凝玻璃组件固定装置...
- Page 37 安装玻璃组件 注意: 请查阅本使用说明第 154 页的"玻璃组件安装图"。 编号 名称 数量 RV 10.1 非镀防爆膜 RV 10.2 非镀防爆膜 RV 10.3 非镀防爆膜 RV 10.4 非镀防爆膜 RV 10.5 非镀防爆膜 RV 10.6 非镀防爆膜 RV 10.10 镀防爆膜 RV 10.20 镀防爆膜 RV 10.30 镀防爆膜 RV 10.40 镀防爆膜 RV 10.50 镀防爆膜 RV 10.60 镀防爆膜...
- Page 38 RV 10.3_30 RV 10.5_50 RV 10.1_10 RV 10.2_20 RV 10.4_40 RV 10.6_60 注意: 请查阅本使用说明第 156 页的 "软管系统连接图"。 RV 10 control 操作 RV 10 auto 操作 • 安装 RV 10.4002 真空阀到随机附送的支架上, 并将其与真 • 正常使用速度控制型真空泵时, 无需使用其他的真空阀。 将 空软管连接。 泵的真空软管直接连接到压力传感器的连接管上。 • 连接泵控制器的信号线到仪器。 注意: 连接泵控制器的信号线...
- Page 39 供水相关的技术参数。 RV 10.5001 水压调节阀会大大降低流速, 因此其不适用于 在冷凝系统使用。 • 将水管连接到玻璃冷凝管(短管(1) = 位于下面的出口; 长管 (2) = 位于上面的入口), 并将其固定到位。 • 分别地将阀连接信号线(RV 10.5001, RV 10.4002)插入合适 的插口。 连接速度-真空控制泵。 这样, RV 10 control 则可自动地切换 到正常的速度-真空控制操作模式。 • 将排水管 (随机配送) 按入喷嘴直至到达里面的连接插孔处。 注意: 请确保冷凝管的入口和出口正确地连接。 如果未按说明和图解进行安装入水管和出水管, 则自动蒸馏 无法进行, 因为这会导致进水管和排水管的水温测量值错误。 冷凝管入口 • 连接压力传感器和缓冲回流瓶, 并用随机附送的真空软管使...
- Page 40 调试 出厂时的工作界面 开启仪器后, 屏幕显示仪器名称和软件 最后, 屏幕自动显示工作界面。 版本并持续此界面几秒钟。 随后, 屏幕显示提示信息, 提示下载 IKA 固件更新工具。 工作界面符号解释 工作界面显示的符号根据RV 10 auto的不同状态和设置而有所 变化。 符号 名称 描述 蓝牙 该符号表示仪器正在通过蓝牙与电脑进行通信。 若没有使用蓝牙, 屏幕则不再显示该符号。 该符号表示仪器正在通过USB数据线进行通信。 若没有使用USB数据线与工作站通信, 屏幕则 不再显示该符号。 限值 该符号表示是否已达到设定值的最小或最大限值。 温度传感器 启用温度显示于屏幕的功能时该符号会出现。 PC 控制 该符号表示仪器被连接到一台电脑并受该电脑控制。 程序控制 该符号表示仪器受所选程序控制。 旋转 该符号表示仪器处于连续运转模式并指示了旋转的方向。 干燥...
-
Page 41: Manual Minimum
菜单结构 出厂设置 Evaporator Modes Automatic Bath medium.............. Water Start temperature............60 °C Manual...................... 1013 mbar Pump %...................... 50% Volume Solvent............... Acetic acid Target................. 100 ml Efficiency..............80% Adjustment..............- Program..................... - Solvent..............Acetic acid 100% Drying................ - Start after... mm:ss............... 30:00 Cleaning Duration mm:ss............... -
Page 42: Pressure
出厂设置 Flow control..................... Advanced Bath medium................... Water Cooler power limit..................900 w Max power of cooler................0 w Value..........00:10 Interval Rotation Interval mode Value........00:10 Activate................... - Speed limit Minimum..................5 rpm Maximum..................300 rpm Timer function Timer Time hh:mm:ss............ - Page 43 出厂设置 Service Venting valve............- Valves Vacuum valve............- Water valve.............. - Pump........................... - Temperature adjustment....................- Settings Language English................ Deutsch................- Français................- Español................- Italiano................- Português................. - Pусский язык..............- 中文................- 한국어................- 日本語................- Pressure Units mbar........
-
Page 44: Manual
菜单 (明细) 1. Evaporator (蒸发仪) Modes (模式) Limits (限值) Automatic (自动): 在该模式中, 系统会通过检查进水和出水之 Manual(手动): 该菜单选项使用户可以设置允许操作的真空范 间的温差来检测实际蒸发温度(沸点)。 介质温度默认设置为 60 围。 °C, 用户可手动设置介质温度。 如果预期蒸发温度(沸点)高于 Pump % (泵%): 该菜单选项使用户可以设置允许操作的泵速 90 °C, 请将介质由水改为油, 并使用高沸点介质, 例如硅油。 在 度范围。 该模式下, 系统会在当加热锅达到设定温度时自动启动测量, 温差低于阈值, 水流速必须处于 30-100 L/h 内, 升降系统自动 下降。... - Page 45 Calculator (计算器) Advanced (高级选项) 该菜单允许用户计算溶剂沸点(蒸发温度), 加热锅温度和压 Flow control (流速控制): 若使用干冰代替冷凝管, 则可在手动 力。 三项参数值只要定义了其一项, 系统则会自动计算出另两 模式下取消激活该设置。 项参数值。 Bath medium (加热锅介质): 选择水或油作为加热锅的加热介 质。 如果以水作为加热介质, 请选择水, 加热温度范围则为 20 °C 至 90 °C。 如果以油作为加热介质, 请选择油, 加热温度范围 Actions after distillation (蒸馏后的操作) 则为 20 °C 至 180 °C。 Cooler power limit (冷凝率阈值): 该菜单选项用于限制冷凝...
- Page 46 5. Program (程序) 上一次测量 Save as(另存为): 保存蒸馏过程为一程序。 Edit(编辑): 编辑所选程序的参数。 通过启动/停止按钮按下“Edit(编辑)”菜单选项, 开始编辑所选 的程序参数。 用户可以在程序中编辑、 插入或删除一个选中的 程序段。 在程序中, 用户至少定义一个程序段中的时间参数, 则相应程序会出现对号(√)提示。 Program 1 - 10 (程序 1 - 10) 在该菜单中, 用户可定义 10 个压力-转速-时间程序。 另外, 用 Delete (删除): 删除选定程序。 如果通过启动/停止按钮按下菜 户可以在程序中自定义激活或取消激活间歇模式。 单选项“删除”来删除了一个选中的程序, 那么所有程序参数将 如果间歇模式被激活, 间歇模式设置中运行和停止的时间数 会被清空。...
- Page 47 保存上一次测量的示例 6. Safety (安全) Continue after power failure(电源中断后测量继续进行) 如果启用了该功能, 那么测量过程在电源中断后恢复供电时 会继续进行。 该功能仅在自动-100 %-体积蒸馏模式下有效。 Activate(激活): 如果出现对号, 则表示该功能已被激活。 Time(时间): 如果在设定的时间内恢复供电, 则测量会继续进 行。 Password (密码) 用户可设置一个秘密来保护主菜单的设置。 输入密码 0 0 0 可 使所设置的密码失效。 7. Service(服务) Valves(阀) 通过该菜单选项可以独立地打开或关闭所连接的阀。 Pump(泵) 在无需进行实际蒸馏的情况下, 用户可手动启动或停止真空 泵。 进行服务功能测试, 可通过服务菜单直接打开或关闭随机配 送或选配的开关阀和真空泵。 Temperature adjustment(温度调节) 在无蒸汽液化的情况下,...
- Page 48 请参考使用说明安装IKA HB 加热锅! 小心 温度差别产生应力! 注意: 如果所使用的非IKA原装配件, 加热锅外移 50 mm的距 • 将升降架降至最低位置并检查加 离可能会不够, 尤其是使用 3 升蒸发瓶或者泡沫截止瓶时。 热锅位置与蒸发瓶位置是否合适。 使用大型蒸发瓶 (2 或 3 推荐选用 IKA RV 10.3000 延伸底板, 可将加热锅外移 150 升) 时, 需调整旋转机构角度, 加热锅位置可能需要向右移动 mm。 50 mm。 • 向加热锅加入加热介质直到蒸发瓶浸入深度 2/3。 • 开启主机并逐渐增大转速。 注意: 避免蒸发瓶旋转造成水花。...
- Page 49 - 十进制分隔符表现为数字的“点”(.) (代码: hex 0x20E)。 注意: 请注意实验室软件系统所需的使用条件、 使用说明以及 上述指令以尽可能的接近NAMUR工作组的推荐规范(NAMUR 推 帮助系统。 荐的用于实验室控制设备电子元器件模拟输出和信号传输的接 口, rev. 1.1)。 USB 接口 NAMUR 指令和其他 IKA 指令在仪器和电脑之间的信息传递过 通用串口 (USB) 系统用于将仪器与电脑连接。 支持 (USB) 的设 程中仅仅是低级的命令。 利用合适的终端程序或信息程序可以 备可以在运行过程中相互连接 (热插拔) 并且自动识别所连接 将这些指令直接传输到仪器。 IKA 实验室软件可以方便地控制 的仪器及其属性。 仪器并可在 Windows 界面下收集信息, 包括绘制特征图, 马达转...
- Page 50 请务必定期地进行常规检查玻璃冷凝管上的密封圈, 如有需 康有害的物料残留。 要, 请及时更换。 维修时, 请向I K A 公司索取“ 消除污染证明” 或从官方网站 (www.ika.com)下载打印。 清洁 如需维修服务,请使用原包装箱妥善包装后将仪器寄回。 如原 • 清洁仪器须断开电源! 包装不存在时请采用合适的包装。 • 清洁 IKA 仪器时请仅用 IKA 公司认可的清洁液: 含活性剂的 注意: 针对玻璃组件的索赔, 请联络您的供货商且勿将玻璃组 水溶液和异丙醇 件寄回我们公司。 • 清洁仪器时请佩戴防护手套。 • 清洁时, 请勿将电子设备放置于清洁剂中。 升降系统 • 清洁时, 请勿让潮气进入仪器。 操作前请常规检查升降系统!...
- Page 51 故障信息 操作过程中出现的故障可通过仪器屏幕中出现的故障信息加以识别。 仪器出现故障时, 升降系统自动提升至最高位置, 仪器将停止运转。 按如下操作排除故障: - 使用电源开关关闭仪器 - 执行故障排除措施 - 重启仪器 故障信息 故障影响 故障原因 故障排除 压力无变化 压力梯度分析未显示任何偏 泵没有运行。 检查泵控制信号线的连接。 差。 检查泵电源。 开启泵。 未连接真空软管。 检查真空软管连接 (泵, 接收瓶)。 RV 10.4002 阀控制信号线断 检查 RV 10.4002 阀控制信号线的连 开。 接。 软管系统出现故障。 检查真空软管连接是否正确 (IN / OUT/ VENT)。...
- Page 52 开启加热锅。 加热锅未带红外线接口。 PCB 损坏。 检查加热锅。 联系维修部门。 存储器(EEPROM)故障 读写 EEPROM 时出错。 EEPROM 失效。 联系维修部门。 存储器故障 读写内部闪存出错。 读写内部闪存出错 联系维修部门。 如果上述方式无法排除仪器故障或者出现其他故障信息, 请采取如下措施: - 联系IKA公司维修部门; - 将仪器附故障说明发送至IKA公司检视维修。 保修 根据IKA公司保修规定本机保修 2 年。 保修期内如果有任何问 保修不包括零件的自然磨损, 也不适用于由于过失、 不当操 题请联络您的供货商, 您也可以将仪器附发票和故障说明直 作或者未按使用说明书使用和维护引起的损坏。 注意: 针对玻璃组件的索赔, 请联络您的供货商且勿将玻璃组 接发至我们公司, 经我方事先确认后运费由贵方承担。 件寄回我们公司。...
- Page 53 技术参数 操作电压 (100...240) ± 10% 额定电压 100...240 频率 50/60 输入功率(无加热锅时) 输入功率(待机状态时) 转速 0/5...300 转速偏差 ± 1( 设定转速< 100 rpm) ± 1(设定转速 ≥ 100 rpm) 转速显示 数显型 可视区域尺寸 (W x H) 70 x 52 显示 TFT-显示 多语言选项 是 左右转动/间歇操作 是 平稳启动 是...
- Page 54 소스 언어: 독일어 목차 페이지 Device setup 인터페이스 및 출력 경고 기호 설명 유지관리 및 세척 안전 지침 부속품 올바른 사용법 오류 메시지 포장 풀기 품질 보증 유용한 정보 기술 데이터 진공 제어 유리 제품 장착 도면 고정 호스 시스템 연결 도면 Solvent table (excerpt) 시운전...
- Page 55 안전 지침 사용자의 안전을 위한 수칙 • 증류의 수량 및 유형을 채택하여 증류장비의 용량을 • 시작하기 전에 사용 설명서를 읽고 안전 지침을 선택합니다. 냉각기가 제대로 작동해야 하여야 하며 따르십시오. 냉각기 출구에서도 냉각수 유량을 점검 할 수 있습니다. • 모든 사용자들이 이용할 수 있는 장소에 사용 설명서를 •...
- Page 56 키를 눌러 리프트를 위쪽 및 아래쪽 위치로 여러 번 이동하며 모터를 사용합니다. 장비 보호를 위하여 • 기기에 명시된 전압과 주 전압과 일치해야 합니다. 안전 리프트가 작동하지 않을 경우, IKA 서비스 부서에 • 소켓은 접지되어야 합니다 (보호용 접지 점점). 문의하시기 바랍니다. • 이동식 부품은 이물질 또는 액체 등의 침투를 방지하기...
- Page 57 RV 10 control V x x x x x x x x x x x x RV 10 control V-C x x x x x x x x x x x x RV 10 control FLEX x x x x x x x x x x x...
- Page 58 수동 및 반자동 증발 작동 모드의 전체 범위를 제공하는 것 용수 공급 라인을 통해 밸브 메커니즘으로 이물질이 유입되 이외에, RV 10 control 회전 증발기는 완전 자동 및 수량 조 지 않도록 RV 10.5002 용수 필터를 사용할 수 있습니다. 절 증발 프로세스에도 사용할 수 있습니다. 완전 자동 작동...
- Page 59 고정 드라이브 RV 10 auto 운송 잠금장치를 푸십시오! 용기를 삽입하고 제공된 호스 커넥터를 용기에 부착합니다. 주의 약 30° 각도로 드라이브 세팅 • 회전 드라이브의 각도 설저을 위해 리프트 우측면의 널링 • 윗 면에서 손으로 리프트를 지탱하고 기기의 뒷면에 있는 나사를 반시계방향으로 돌려 체결장치를 제거합니다. (널 나비...
- Page 60 가열 배스 가열 배스 사용 설명서의 "작동" 장 주의 을 참조하십시오! • 가열 배스를 회전 드라이브의 스탠드 위에 놓고 왼쪽으로 밀어 넣습니다. 참고: 적외선 링크(1)를 통해 드라이브 장치와 가열 배스 간 에 데이터가 교환됩니다. 적외선 빔이 검출기까지 명확히 조 준될 때에만 안정적인 통신이 보장됩니다. 유리...
- Page 61 최초 사용 • Vapor tube(1)를 삽입합니다. • 컨덴서씰(2)을 삽입합니다. 진공 씰의 올바른 위치에 주의 를 기울이십시오! • 컨덴서(3a)의 플랜지 위로 유니언 너트(3b)를 밀어 넣습니 다. • 또한 앵귤러 스프링(3c)을 컨덴서(3a)의 플랜지 위로 밀어 넣습니다. • 컨덴서(3a)를 씰(2)의 상단에 배치합니다. • 나사산 플랜지에 유니언 너트(3b)를 손으로 조입니다. 120 rpm으로...
- Page 62 유리 제품 장착 참고: 154페이지의 "유리 제품 장착 도면"을 참조하십시오. 항목 명칭 수량 RV 10.1 비코팅 RV 10.2 비코팅 RV 10.3 비코팅 RV 10.4 비코팅 RV 10.5 비코팅 RV 10.6 비코팅 RV 10.10 코팅 RV 10.20 코팅 RV 10.30 코팅 RV 10.40 코팅...
- Page 63 • 속도-진공 제어 펌프를 사용한 일반적인 진공 작업에는 추 고 진공 호스를 밸브에 연결합니다. 가 밸브가 필요하지 않습니다. 펌프의 진공 주입구를 RV 10 펌프 호스 연결부에 직접 연결합니다. • 펌프 컨트롤러 케이블을 RV 10 control에 연결합니다. 참고: 펌프 컨트롤러 케이블 ...
- Page 64 합니다. • 밸브 커넥터 케이블(RV 10.5001, RV 10.4002)을 적절한 소켓 에 삽입합니다. 속도-진공 제어 펌프를 연결합니다. 그러면 RV 10 control이 자동으로 일반 속도-진공 제어 작동으로 전 환됩니다. • 연결 소켓 내의 정지부에 도달할 때까지 니플에 대고 눌러서 용수 배출 호스(제공)를 연결합니다.
- Page 65 장치의 스위치를 켠 후 몇 초 동안 시 동으로 나타납니다. 작 화면이 나타납니다. 장치 이름과 소 프트웨어 버전이 표시됩니다. IKA 펌웨어 업데이트 도구를 다운로드 하라는 정보 프롬프트가 나타납니다. 그 다음,디스플레이에 작업 화면이 자 작업 화면의 기호 설명 표시되는 기호는 RV 10 auto의 상태 및 설정에 따라 다릅니...
-
Page 66: Manual Minimum
메뉴 구조 공장 출고시 설정 Evaporator Modes Automatic Bath medium.............. Water Start temperature............60 °C Manual...................... 1013 mbar Pump %...................... 50% Volume Solvent............... Acetic acid Target................. 100 ml Efficiency..............80% Adjustment..............- Program..................... - Solvent..............Acetic acid 100% Drying................ - Start after... -
Page 67: Pressure
공장 출고시 설정 Flow control..................... Advanced Bath medium................... Water Cooler power limit..................900 w Max power of cooler................0 w Value..........00:10 Interval Rotation Interval mode Value........00:10 Activate................... - Speed limit Minimum..................5 rpm Maximum..................300 rpm Timer function Timer Time hh:mm:ss............ - Page 68 공장 출고시 설정 Service Venting valve............- Valves Vacuum valve............- Water valve.............. - Pump........................... - Temperature adjustment....................- Settings Language English................ Deutsch................- Français................- Español................- Italiano................- Português................. - Pусский язык..............- 中文................- 한국어................- 日本語................
-
Page 69: Manual
메뉴(세부 정보) 1. Evaporator (증발기) Modes (모드) 세척 프로세스 동안 펌프의 속도를 설정하는 데 사용됩니다. 더 높은 속도는 시스템이 닫혔을 때 유리 제품에 부분적인 진공을 형성합니다. 고속 세척은 펌프막의 수명에 영향 주의사항 을 줍니다. Clean now (지금 세척): 수동으로 세 척... - Page 70 Advanced (고급) Calculator (계산기) Flow control (흐름 제어): 냉각기 대신 드라이 아이스가 사용 용제의 끓는점(증기 온도), 가열 배스 온도 및 압력을 계산하 된 경우 수동 모드에서 이 설정이 비활성화될 수 있습니다. 는 데 도움이 됩니다. 3개 갑 중 하나가 정의된 경우, 나머지 Bath medium (배스...
- Page 71 5. Program (프로그램) Last measurement (마지막 측정) Save as (다른 이름으로 저장): 증류 시퀀스를 프로그램으로 저장합니다. Edit (편집): 선택된 프로그램 매개변수를 편집합니다. 시작/중지 노브로 메뉴 옵션 “편집”을 눌러 선택된 프로그램 매개변수 편집을 시작합니다. 사용자는 프로그램에서 선택 Program 1 - 10 (프로그램 1 - 10) 된...
- Page 72 마지막 측정 저장의 예 6. Safety (안전) Continue after power failure (정전 후 계속) 이 옵션이 활성화되면 정전으로 인한 중단 이후 측정이 계속 진행됩니다. 이 옵션은 자동, 100 % 및 부피 모드에서만 사 용할 수 있습니다. Activate (활성화): 체크표시가 나타나면 해당 옵션이 활성화 된...
- Page 73 서 가열 배스의 위치를 점검합니다. 더 큰 증발 플라스크(2 사용할 때 적용됩니다. ~ 3리터)를 사용하는 경우나, 회전 드라이브의 각도에 따 IKA RV 10.3000 연장 플레이트를 사용하여 가열 배스 이동 범 라 가열 배스를 오른쪽으로 50 mm 이동할 수 있습니다. 위를 150 mm까지 늘리십시오.
- Page 74 운로 드하고, 설치 파일을 실행하여 드라이버를 설치합니다. 데이터를 수집하는 데 편리한 도구를 제공하며, 그래픽 입력 그런 다음 USB 데이터 케이블을 통해 IKA 장치를 PC 에 연결 기능이 포함되어 있습니다(예: 모터 속도 램프). 합니다. 데이터 통신은 가상 COM 포트를 통해 이루어집니...
- Page 75 모 및 전단이나 통계적 장애율만이 적용됩니다. - 기기 유형 - 일련 번호, 유형판 참조, 유리컨덴서의 씰을 정기적으로 점검하여 필요하면 교체해 - 예비 부품의 위치 번호 및 설명, www.ika.com 참조, 야 합니다. - 소프트웨어 버전. 세척 • 세척 전에 주전원 콘센트에서 장치를 분리하십시오.
- Page 76 오류 메시지 영향 원인 해결 방법 압력 변화 없음 압력 변화도 분석에 편차가 펌프가 가동 중이 아닙니다. 펌프 제어 케이블 연결을 점검하십시 표시되지 않습니다. 오. 펌프 전원 공급을 점검하십시오. 펌프를 켜십시오. 진공 호스가 연결되지 않았 진공 호스 연결을 점검하십시오(펌프, 습니다. 용기).
- Page 77 - 정비 부서에 문의합니다, - 고장에 대한 간략한 설명과 함께 기기를 수리를 위해 보냅니다. 품질 보증 IKA 품질 보증 조건에 따라 품질 보증 기간은 24개월입니다. 품질 보증은 마모된 부품에는 적용되지 않으며, 부적절한 품질 보증에 따른 클레임 시에는 해당 지역 딜러에 문의해...
- Page 78 기술 데이터 (100...240) ± 10% 작동 전압 범위 100...240 정격 전압 50/60 주파수 전원 입력(가열 배스 불포함) 전원 입력 작동 "대기" 0/5...300 속도 ± 1(설정 속도 < 100 rpm) 속도 공차 ± 1(설정 속도 < 100 rpm) 속도 표시 디지털 가시...
- Page 79 ソース言語 : ドイツ語 目次 ページ Device setup インタフェースと出力 警告シンボルの説明 メンテナンスと清掃 安全のための注意事項 アクセサリー 正しい使用 エラーメッセージ 開梱 保証 役に立つ情報 技術データ 真空コントロール フラスコのモニタリング図 セッ トアップ ホース類の接続図 試運転 Solvent table (excerpt) 警告シンボルの説明 ただちに危険な状況を示します。 回避しないと、 死亡や重傷をもたらします。 危険 危険を生じる可能性のある状況を示します。 回避しないと、 死亡や重傷をもたらす可能性があります。 警告 危険を生じる可能性のある状況を示します。 回避しないと、 傷害をもたらす可能性があります。 注意 回避しないと、...
- Page 80 安全のための注意事項 人体の保護のために • 蒸留物質の量と種類は、 蒸留設備のサイズに合わせます。 ク • 操作を開始する前に取扱説明書をすべて読み、 安全のため ーラーは正しく作動すること。 クーラー出口のクーラント流量 の注意事項に従ってください。 をモニターします。 • 取扱説明書は全員がアクセスできる場所に保管してくださ • ガラス機器は、 通常の圧力で動作する場合 (クーラーの開放 い。 出口など) 圧力が溜まるのを防ぐため、 必ず換気します。 • 本デバイスは、 訓練を受けたスタッフのみが使用してくださ • 気体、 蒸気、 微粒子物質の危険物質が、 クーラーの出口から い。 放出することがあるので注意してください。 この危険を防ぐ • 安全のための注意事項、 ガイドライン、 職業衛生 ・ 安全およ ため、...
- Page 81 ィングバスに降ろすことは避けくだ さい。 回転駆動を始める前に必ず、 まずナスフラスコをヒーティングバ スに降ろします。 そうしないと高温の 媒体 (水もしくはオイル) が飛散しま す。 正しい使用 • 使用 • 使用範囲 IKA が推奨するオプション品と一緒に使用すると、 装置は 研究所、 教育機関、 商業、 企業内にある実験施設等、 屋内で 下記のことが可能です。 の使用に適してます。 - 液体の素早い穏やかな蒸留, - 溶液と懸濁液の蒸発, 以下の場合は、 ユーザーの安全は保証されません : - 細かい化学物質の結晶化、 合成、 洗浄, - 製造元によって供給または推奨されたものではないアク - 粉末と粒状物質の乾燥, セサリーとともに本デバイスを稼働した場合。...
- Page 82 RV 10 control V x x x x x x x x x x x x RV 10 control V-C x x x x x x x x x x x x RV 10 control FLEX x x x x x x x x x x x...
- Page 83 RV 10 controlの回転式エバポレーターは、 手動および半自動 自動蒸留 : 機器の温度を作動温度まで高めます。 これは、 テス モードの他に、 容量が制御された完全自動プロセスでも使用 ト蒸留を実施することで達成されます。 できます。 完全自動では、 真空コントローラー、 冷却水温度差 測定センサー、 冷却水流量メーターが標準装備されます。 真空 RV 10 auto : RV 10 control 回転エバポレーターは、 速度制御 は、 統合真空コントローラーを使って2点と速度制御されたパ ユニッ ト、 内部換気弁、 および圧力測定チャンバーに標準装備 イプ操作で制御できます。 このデバイスは、 冷却水供給システ されています。 ム (実験室用サーモスタッ トなど) で操作されますが、 給水ライ...
- Page 84 セッ トアップ RV 10 auto 駆動部 輸送ロックの解除 ! ボトルの差し込みと付属のホースコネクターのボトルへの取 り付け。 注意 ドライブを約 30° に設定 • ねじを反時計方向 (ねじ (1) を優しく押して回しながら押す • リフトを適切な高さにして手で支え、 機器の背面のつまみね または引く) に回して、 リフト右側の回転ドライブを角度設 じ (1) を反時計方向に回して取り外します。 定するためのクランプデバイスを取り外します。 • 輸送ロックを取り外すと、 リフトがゆっく りと最上位置まで移動 • 駆動部を約30° の角度に設定します。 します。 距離は約 140 mm です。 •...
- Page 85 ヒーティ ングバス ヒーティングバスの取扱説明書の 「 注意 操作」 章を参照してください。 • ヒーティングバスを回転ドライブ用スタンドの上に置き、 リフ ト位置まで押し込みます。 注記: 赤外線リンク (1) を使ってドライブ本体とヒーティングバ スがデータを交換します。 検出器に対する赤外線の経路を遮 るものがない場合にのみ確実な通信が保証されます。 フラスコ (ガラス) 注意通知: ガラスセッ トの安全なお取り扱いに関してはガラス セッ トの取扱説明書をお読みください。 • ロック ノブは、 ロック可能な装置.をロックする か、 もしくはロ ック解除する時に使用されます。 赤いマークが表示された場合は、 装置のロックが解除され ていることを意味します。 表示されない場合は、 ロック中を 意味します。 ロック可能な装置をロックする時や解除する時はロック ノブ を最後まで押してください。...
- Page 86 最初の使用 • I蒸発管 (1) を差し込みます。 • シーリング (2) を差し込みます。 シーリングの位置に注意し てください ! • ユニオンナッ ト (3b) をコンデンサ (3a) のフランジの上をス ライドさせます。 • 環状ばね (3c) もコンデンサ (3a) のフランジの上をスライド させます。 • コンデンサ (3a) をシーリング (2) の上に置きます。 • ユニオンナッ ト (3b) を手でねじ込みフランジに締め付けま す。 デバイスを 120 rpm で 20 分間作動します。 最後に、 ユニ オンナッ...
- Page 87 フラスコの取り付け 注記: 154ページの 「フラスコのモニタリング図」 を参照してください。 項目 名称 数量 RV 10.1 コーティ RV 10.2 コーティ RV 10.3 コーティ RV 10.4 コーティ RV 10.5 コーティ RV 10.6 コーティ ングなし ングなし ングなし ングなし ングなし ングなし RV 10.10 コーテ RV 10.20 コーティ RV 10.30 コーティ RV 10.40 コーテ...
- Page 88 RV 10.3_30 RV 10.5_50 RV 10.2_20 RV 10.4_40 RV 10.6_60 RV 10.1_10 注記: 156ページの 「ホース類の接続図」 を参照してください。 RV 10 controlの操作 RV 10 autoの操作 • RV 10.4002 マグネチックバルブを取り付けます。 ブラケッ ト • 真空速度コントロールポンプを使用した通常の真空動作で は取付用です。 真空ホースを弁に取り付けます。 はバルブを追加する必要はありません。 ポンプの真空インレ ッ トを直接 RV 10 ポンプホース接続部に接続します。 • ポンプコントローラーケーブルを RV 10 に取り付けます。...
- Page 89 ため、 コンデンサには適していません。 • 水用ホースをガラスコンデンサ (短いホース (1) = 下の出 口、 長いホース (2) = 上の入口) に取り付けてからホースを 所定の位置に固定します。 • バルブ接続ケーブル (RV 10.5001, RV 10.4002) を適切な差込 口に接続します。 真空速度コントロールポンプを接続します。 その後、 RV 10 controlは通常の真空速度コントロールに自動 的に切り替わります。 • 排水用ホース (付属) をニップルの上に押して取り付けます。 こ のとき、 差込口の奥まで押し込みます。 注記: コンデンサの入口と出口が正しく取り付けられているこ とを確認してください。 給水および排水用のホースが手順とおりに取り付けられてい...
- Page 90 試運転 納品時の作業画面 デバイスの電源を入れると数秒後に開 その後、 自動的に作業画面に切り替わります。 始画面が表示されます。 デバイス名と ソフトウェアのバージョンが表示されま す。 IKAファームウェアのアップデートツー ルのダウンロードするための情報プロ ンプトが表示されます。 作業画面の記号の説明 画面に表示される記号は、 RV 10 auto のステータスと設定に応 じて変わります。 記号 内容 説明 Bluetooth この記号は、 RV 10 が Bluetooth® を介してタブレッ トまたは PC と通信していることを意味し ® ます。 Bluetooth® 通信が行われていない場合は、 この記号は表示されません。 この記号は、 RV 10 が USB ケーブルを介して通信中であることを意味します。 USB ケーブルが...
-
Page 91: Manual Minimum
メニュー構造 出荷時設定 Evaporator Modes Automatic Bath medium.............. Water Start temperature............60 °C Manual...................... 1013 mbar Pump %...................... 50% Volume Solvent............... Acetic acid Target................. 100 ml Efficiency..............80% Adjustment..............- Program..................... - Solvent..............Acetic acid 100% Drying................ - Start after... mm:ss............... 30:00 Cleaning Duration mm:ss............... -
Page 92: Pressure
出荷時設定 Flow control..................... Advanced Bath medium................... Water Cooler power limit..................900 w Max power of cooler................0 w Value..........00:10 Interval Rotation Interval mode Value........00:10 Activate................... - Speed limit Minimum..................5 rpm Maximum..................300 rpm Timer function Timer Time hh:mm:ss............ - Page 93 出荷時設定 Service Venting valve............- Valves Vacuum valve............- Water valve.............. - Pump........................... - Temperature adjustment....................- Settings Language English................ Deutsch................- Français................- Español................- Italiano................- Português................. - Pусский язык..............- 中文................- 한국어................- 日本語................- Pressure Units mbar........
- Page 94 メニュー (詳細) 1. Evaporator (エバポレーター) Mode ( モード) 速度が速いと、 システムを閉じたと 注意通知 きにガラス内が不完全真空になりま す。 高速洗浄を行うと、 ポンプ膜の寿 命が短くなります。 Clean now(今すぐ洗浄) : 洗浄プロセスを手動で開始します。 Limits(限界) Automatic ( 自動) : このモードのとき、 システムは入水と排水 の温度差を確認して実際蒸発量を検知します。 液温はデフォル トで 60 ° C に設定されています。 液温は手動で設定できます。 希望する蒸発温度が 90 ° C 以上の場合は、 媒体を水からオイ ルに変更し、...
- Page 95 Flow control(流量制御) : クーラーの代わりにドライアイスを Actions after distillation(蒸留後の動作) 使用する場合、 この設定は、 手動モードで無効にできます。 Bath medium(バス媒体) : 加熱バスの媒体に水かオイルのい ずれかを選択します。 水を使用する場合は水を選択し、 その温 度は 20 ° C ~ 90 ° C で設定します。 オイルを使用する場合はオ イルを選択し、 温度範囲は 20 ° C ~ 180 ° C に設定します。 Cooler power limit(クーラーの電力限界) : この設定はクーラ ーの電力を制限する場合に使用します。...
- Page 96 5.Program(プログラム) 最後の測定値 Save as(名前を付けて保存) : 蒸留シーケンスをプログラムとし て保存します。 Edit(編集) : 選択されたプログラムパラメータを編集します。 開 始/停止ノブで 「編集」 メニューオプションを押すことにより選 択されたプログラムパラメータの編集を開始します。 プログラ プログラム 1~10 ムから選択されたプログラムセグメント1つの編集、 挿入、 削 「プログラム」 メニューでは、 ユーザーが最大10個のユーザー 除ができます。 少なく とも1つのセグメントのプログラム時間 定義プロファイル (圧力、 回転数 rpm、 時間) を作成できます。 を編集するときは、 関連プログラムにチェックマーク(√)が表 さらにユーザーは、 プログラムのインターバルモードの有効/ 示されます。 無効も設定できます。 Delete(削除) : 選択したプログラムを削除します。 開始/停止ノ インターバルモードが有効化されると、...
- Page 97 Units ( 単位) 使われます。 「単位」 オプションでは、 圧力や分量の表示に使用する単位を Bluetooth : 「Bluetooth」 オプションでは、 ユーザーが 「Blue- ユーザーが選択できます。 tooth」 機能を有効/無効にできます。 Labworldsoft 5 Protocol : Labworldsoft 5 で RV 10 control Display ( ディスプレイ) autoで使用するには、 このオプションを有効にする必要があり 「ディスプレイ」 オプションでは、 ユーザーが背景色と作業画 ます。 面の明るさ、 「 ファームウェアのアップデート情報」 の表示を変 更できます。...
- Page 98 注意 注記 : 蒸発フラスコを加熱バスに浸す場合は、 使用する蒸発 照してく ださい ! フラスコの違いや、 加熱バスの温度の違いによってフラスコ に負荷がかからないようにする必要があります。 • リフトを一番下まで移動させ、 蒸発フラスコに対する加熱バ 注記 : IKA に付属品でないアクセサリを使用する場合は、 加 スの位置を確認します。 大きい蒸発フラスコを使用する場 熱バスの移動範囲が 50 ㎜ では足りないことがあります。 これ 合、 または回転ドライブの角度によっては、 加熱バスを右側 は、 発砲ブレーキの付いた 3 リッ トルの蒸発フラスコを使うと に 50 mm 移動することができます。 きに起こ ります。...
- Page 99 バイスと PC 間の通信用に低レベルのコマンドとしてのみ役 イバーを: 立ちます。 適切な端末または通信プログラムにより、 これらの http://www.ika.com/ika/lws/download/usb-driver.zip コマンドはラボデバイスに対して直接送信することができま からダウンロードし、 セッ トアップファイルを実行してドライバ す。 IKA ソフトウェアパッケージ labworldsoft® は、 ラボデバイ ーをインストールします。 続いて、 IKA デバイスを USB データ スを制御し、 MS Windows の下でデータを収集する便利なツ ケーブルを介して PC に接続します。 データ通信が仮想 COM ールを提供します。 これには、 モーター速度傾斜用グラフィカ ポートを介して行われます。 設定、 コマンド構文および仮想 ル入力機能などが含まれます。...
- Page 100 メンテナンスと清掃 本デバイスメンテナンスが不要です。 これは、 構成部品の自然 修理 摩耗と統計故障率の対象となります。 修理には、 健康に有害な物質が含まれていない、 洗浄済みのデ ガラスコンデンサのシールは、 定期的に点検し、 必要に応じて バイスを送付してく ださい。 交換してください。 これには、 IKA から入手できる、 または IKA ウェブサイト (www.ika.com)からダウンロードできる印刷用バージョンの 「 清掃 非汚染証明書」 用紙をご使用ください。 • 清掃の前に、 デバイスを電源から外してください。 ご使用の装置が修理を必要とする場合は、 元の梱包材に入れ • IKAデバイスの洗浄には、 IKAが承認した洗剤(水、 または界 てご返送ください。 本デバイスを送付する場合は、 保管梱包材 面活性剤を含んだ水、 またはイソプロピルアルコール)のみ...
- Page 101 エラーメッセージ 影響 原因 処置 圧力に変化なし 圧力勾配分析でばらつきが表 ポンプが作動していない ポンプ制御ケーブルの接続を確認する 示されない ポンプの電源供給を確認する ポンプの電源を入れる 真 空 ホースが 接 続されてい 真空ホースの接続 (ポンプ、 受容器) を ない 確認する RV 10.4002 バルブコントロー RV 10.4002 バルブコントロールの接続 ルが外されている を確認する ホース類に不具合がある 真空ホースの接続が正しいか確認す る(IN / OUT/ VENT) 受容器が閉じられていない 受容器側を閉じる システムの精度が低 圧力勾配分析でばらつきが表 真空ホースがしっかり接続さ...
- Page 102 き込みエラー き込みエラー 記載された処置では症状を解決できないか、 別のエラーメッセージが表示される場合は、 以下の手順のいずれかを行ってくだ さい : - サービス部門に連絡してください。 - エラー ・ 症状の簡単な説明を付けて、 デバイスを修理のために送付してください。 保証 IKA 保証条件に基づき、 保証期間は 24 ヵ月です。 保証の下で 摩耗したパーツ、 不適切な使用、 不十分なお手入れによる障 請求を行うには、 地域のディーラーにご連絡ください。 また、 納 害、 または本取扱説明書の説明に基づくメンテナンスを行っ 品書および請求の理由を同封の上、 装置を弊社の工場に直接 ていない場合は、 本保証は適用されません。 送付することができます。 輸送費はご負担いただきます。 注記: ガラスセッ ト ・ フラスコについては、 販売店もしくはIKAジ...
- Page 103 技術データ 動作電圧範囲 (100...240) ± 10% 定格電圧 100...240 周波数 50/60 電源入力 (加熱バスを除く ) 電源入力操作 「スタンバイ」 設定回転数範囲 0/5...300 回転数表示 ± 1(設定速度: < 100 rpm) ± 1(設定速度: ≥ 100 rpm) 速度表示 デジタル 表示領域の寸法 (幅×高さ) 70 x 52 ディスプレイ TFTディスプレイ 多言語設定 あり 正転逆転/インターバル操作 あり クイックスタート...
- Page 104 ภาษาต้ น ฉบั บ : ภาษาเยอรมั น สารบั ญ หน้ า การบำ า รุ ง รั ก ษาและการทำ า ความสะอาด Device setup คำ า อธิ บ ายส ั ญ ลั ก ษณ์ ก ารเตื อ น อุ ป กรณ์ เ สริ ม ข้...
- Page 105 ข้ อ แนะนำ า เพื ่ อ ความปลอดภั ย เพื ่ อ การปกป้ องของคุ ณ • ดู ข ้ อ แนะนำ า ในการใช้ ง านสำ า หรั บ อุ ป กรณ์ เ สริ ม เช่ น ปั ๊ มสุ ญ ญากาศ •...
- Page 106 เพื ่ อ ป้ องกั น การแทรกซึ ม ของวั ต ถุ แ ปลหปลอม ของเหลว ฯลฯ หากอุ ป กรณ์ ย กนิ ร ภั ย ไม่ ท ำ า งาน กรุ ณ าติ ด ต่ อ แผนกบริ ก ารของ IKA • ปกป้ องเครื ่ อ งและอุ ป กรณ์ เ สริ ม จากการชนและการกระแทก...
- Page 107 RV 10 control V x x x x x x x x x x RV 10 control V-C RV 10 control FLEX x x x x x x x x x x x RV 10 auto V x x x x x x x x x x x ...
- Page 108 คงที ่ ข องอุ ณ หภู ม ิ อั ต ราการไหลและการควบคุ ม เฉพาะที ่ RV 10 control (สำ า หรั บ สุ ญ ญากาศ): นอกจากนี ้ ย ั ง มี ก ารควบคุ ม เราขอแนะนำ า ให้ ใ ช้ ว าล์ ว ควบคุ ม น้ ำ า RV 10.5001 เมื ่ อ ใช้ ง านโดยตรง...
- Page 109 การติ ด ตั ้ ง ชุ ด ขั บ (Drive) RV 10 auto คลายกุ ญ แจสำ า หรั บ การขนส ่ ง ! ใส ่ ข วดและติ ด ตั ว ต่ อ ท่ อ อ่ อ นที ่ จ ั ด มาให้ เ ข้ า กั บ ขวด ข้...
- Page 110 อ่ า งทำ า ความร้ อ น ดู บ ท “การปฏิ บ ั ต ิ ง าน“ ในคู ่ ม ื อ คำ า แนะนำ า ข้ อ ควรระวั ง ของอ่ า งทำ า ความร้ อ น • วางอ่ า งท ำ า ความร้ อ นบนขาตั ้ ง ของช ุ ด ขั บ การหม ุ น และดั น อ่ า งนี ้ ไ ป ที...
- Page 111 การใช้ ค รั ้ ง แรก • ใส ่ ท ่ อ นำ า ไอ (1). • ใส ่ ท ี ่ ป ิ ดผนึ ก สุ ญ ญากาศ (2). ใส ่ ใ จตำ า แหน่ ง ที ่ ถ ู ก ต้ อ งของที ่ ป ิ ด ผนึ...
- Page 112 การติ ด ตั ้ ง เครื ่ อ งแก้ ว หมายเหตุ : ส ั ง เกตแบบสำ า หรั บ การต่ อ เครื ่ อ งแก้ ว " ในหน้ า 154 รายการ ชื ่ อ ปริ ม าณ RV 10.1 ไม่ เ คลื อ บ RV 10.2 ไม่...
- Page 113 ต่ อ ทางเข้ า ส ุ ญ ญากาศของ ปั ๊ มโดยตรงไปยั ง การเชื ่ อ มต่ อ ท่ อ อ่ อ นของปั ๊ ม RV 10 • ต่ อ สายตั ว ควบคุ ม ปั ๊ มไปยั ง RV 10 control หมายเหตุ : เมื...
- Page 114 น้ ำ า • ปล่ อ ยการเชื ่ อ มต่ อ ท่ อ อ่ อ นโดยใช้ เ ครื ่ อ งมื อ ที ่ จ ั ด มาให้ • ต่ อ ทางเข้ า น้ ำ า ไปยั ง การจ่ า ยน้ ำ า (ร่ ว มกั บ วาล์ ว ตั ว ควบคุ ม น้ ำ า RV 10.5001 ทางเลื...
- Page 115 จ า ก นั ้ น ข้ อ ค ว า ม เ ตื อ น จ ะ ป ร า ก ฏ เ พื ่ อ ดาวน์ โ หลดเครื ่ อ งมื อ อั พ เดตเฟิ ร์ ม แวร์ IKA หลั...
- Page 116 โครงสร้ า งของเมนู การตั ้ ง ค่ า จากโรงงาน Evaporator Modes Automatic Bath medium.............. Water Start temperature............60 °C Manual...................... 1013 mbar Pump %...................... 50% Volume Solvent............... Acetic acid Target................. 100 ml Efficiency..............80% Adjustment..............- Program..................... - Solvent..............Acetic acid 100% Drying................
- Page 117 การตั ้ ง ค่ า จากโรงงาน Flow control..................... Advanced Bath medium................... Water Cooler power limit..................900 w Max power of cooler................0 w Value..........00:10 Interval Rotation Interval mode Value........00:10 Activate................... - Speed limit Minimum..................5 rpm Maximum..................300 rpm Timer function Timer Time...
- Page 118 การตั ้ ง ค่ า จากโรงงาน Service Venting valve............- Valves Vacuum valve............- Water valve.............. - Pump........................... - Temperature adjustment....................- Settings Language English................ Deutsch................- Français................- Español................- Italiano................- Português................. - Pусский язык..............- 中文................- 한국어................
-
Page 119: Manual
เมนู (รายละเอี ย ด) 1. Evaporator (เครื ่ อ งระเหย) Modes (โหมด) Duration (ระยะเวลา): ตั ้ ง ระยะเวลาของกระบวนการทำ า ความ สะอาด Pump speed (ความเร็ ว ของปั ๊ ม): ความเร็ ว ของปั ๊ มที ่ ต ั ้ ง ไว้ ใ น เมนู... - Page 120 Advanced (ขั ้ น สู ง ) Calculator (ตั ว คำ า นวณ) Flow control (การควบคุ ม การไหล): สามารถปิ ดการใช้ ง านการ ส ิ ่ ง นี ้ ช ่ ว ยคุ ณ ในการคำ า นวณจุ ด เดื อ ด (อุ...
- Page 121 5. Program (โปรแกรม) การวั ด ครั ้ ง สุ ด ท้ า ย Save as (บั น ทึ ก เป็ น): บั น ทึ ก ลำ า ดั บ การกลั ่ น เป็ นโปรแกรม Edit (แก้ ไ ข): แก้ ไ ขพารามิ เ ตอร์ ข องโปรแกรมที ่ เ ลื อ ก เริ...
- Page 122 ตั ว อย่ า งของการบั น ทึ ก การวั ด ครั ้ ง สุ ด ท้ า ย 6. ความปลอดภั ย Continue after power failure (ต่ อ เนื ่ อ งหลั ง จากกระแสไฟฟ้ า ขั ด ข้ อ ง) หากเปิ ดใช้ ง านตั ว เลื อ กนี ้ การวั...
- Page 123 • เคลื ่ อ นอ ุ ป กรณ์ ย กไปที ่ ต ำ า แหน่ ง ล่ า งส ุ ด และตรวจสอบต ำ า แหน่ ง โดย IKA ดั ง นั ้ น เป็ นไปได้ ว ่ า ช่ ว งการเคลื ่ อ นที ่ 50 มิ ล ลิ เ มตรที ่ อ ่ า ง...
- Page 124 คำ า ส ั ่ ง NAMUR และคำ า ส ั ่ ง ที ่ จ ำ า เพาะต่ อ IKA ทำ า หน้ า ที เ ่ ค ำ า ส ั ่ ง ระดั บ ต ่ ำ า...
- Page 125 สม่ ำ า เสมอและเปลี ่ ย นหากจำ า เป็ น. เปื ้ อน” ที ่ ค ุ ณ สามารถรั บ ได้ จ าก IKA หรื อ ดาวน์ โ หลดเวอร์ ช ั น สำ า หรั บ พิ ม พ์ จ ากเว็ บ ไซต์ IKA ที ่ www.ika.com.
- Page 126 ข้ อ ความแสดงข้ อ ผิ ด พลาด จะมี ก ารระบุ ก ารทำ า งานผิ ด ปกติ ใ ด ๆ ในระหว่ า งการใช้ ง านโดยข้ อ ความแสดงข้ อ ผิ ด พลาดบนหน้ า จอ เมื ่ อ มี ก ารแสดงข้ อ ผิ ด พลาดร้ า ยแรง อุ ป กรณ์ ย กจะเคลื ่ อ นไปที ่ ต ำ า แหน่ ง ปลายบนสุ ด และจะไม่ ส ามารถใช้ ง านอุ ป กรณ์ น ี ้ ไ ด้ อ ี ก ต่ อ ไป ดำ...
- Page 127 - ส ่ ง อุ ป กรณ์ เ พื ่ อ รั บ การซ่ อ มแซม พร้ อ มคำ า อธิ บ ายส ั ้ น ๆ เกี ่ ย วกั บ ความบกพร่ อ ง การรั บ ประกั น ตามเงื ่ อ นไขการรั บ ประกั น ของ IKA ระยะการรั บ ประกั น คื อ 24 ผิ ด ชอบค่ า ใช้ จ ่ า ยในการจั ด ส ่ ง...
- Page 128 ข้ อ มู ล ด้ า นเทคนิ ค ช่ ว งแรงดั น ไฟฟ้ าในการใช้ ง าน (100...240) ± 10% แรงดั น ไฟฟ้ าที ่ เ กี ่ ย วข้ อ ง 100...240 ความถี ่ 50/60 กำ า ลั ง ไฟฟ้ าขาเข้ า โดยไม่ ม ี อ ่ า งทำ า ความร้ อ น กำ...
- Page 129 Bahasa sumber: Jerman Daftar Isi Halaman Device setup Antarmuka dan output Penjabaran simbol-simbol peringatan Pemeliharaan dan pembersihan Petunjuk keselamatan Aksesori Pemakaian yang benar Pesan kesalahan Pembukaan kemasan Garansi Informasi yang berguna Data teknis Kontrol vacuum Gambar pemasangan perkakas dari kaca Memasang Gambar penyambungan sistem selang Pengangkatan...
- Page 130 Petunjuk keselamatan Untuk perlindungan Anda • Rujuklah petunjuk pengoperasian untuk akseseori, mis. pompa • Baca instruksi pengoperasian secara lengkap sebelum vacuum, bak pemanas. menyalakan dan ikuti petunjuk keselamatan. • Hanya gunakan perangkat di bawah pembuangan yang semua • Simpan instruksi pengoperasian di tempat yang dapat diakses sisinya tertutup, atau perangkat pelindung sepadan.
- Page 131 Pemakaian yang benar • Penggunaan Keselamatan pengguna tidak dapat dijamin: Bersama aksesori yang direkomendasikan IKA. perangkat ini - ka perangkat dioperasikan bersama aksesori yang tidak diser- cocok untuk: takan atau direkomendasikan oleh pihak produsen.
- Page 132 RV 10 control V x x x x x x x x x x x x RV 10 control V-C x x x x x x x x x x x x RV 10 control FLEX x x x x x x x x x x x...
- Page 133 RV 10 control (untuk vacuum): Kontrol vacuum dua posisi juga Kami rekomendasikan untuk menggunakan katup regulator air RV tersedia untuk aplikasi yang sistem vacuum in-housenya tersedia. 10.5001 ketika beroperaasi langsung di luar saluran pasokan air.
- Page 134 Memasang Drive RV 10 auto Longgarkan kunci pengangkutan! Masukkan botol dan pasang konektor selang yang disertakan ke botol. KEHATI-HATIAN Atur drive pada sudut kurang lebih 30° • Pegang lift dengan tangan Anda pada posisi tinggi dan melepas • Lepas perangkat pengeleman untuk pengaturan sudut drive sekrup (1) dengan memutar berlawanan dengan arah jarum sudut pada sisi kanan lift dengan memutar sekrup tonjol berla- jam pada bagian belakang peralatan.
- Page 135 Bak pemanas Rujuklah pada “Operasi“ dalam buku KEHATI-HATIAN petunjuk instruksi bak pemanas! • Tempatkan bak pemanas pada stand drive rotasi dan dorong ke posisi kiri. Catatan: Data dipertukarkan antara unit drive dan bak pemanas melalui tautan inframerah (1). Harap perhatikan bahwa komuni- kasi yang andal hanya dijamin ketika tumbukan sinar inframerah memiliki garis pandang yang jelas terhadap detektor.
- Page 136 Pemakaian pertama • Masukkan tabung uap air (1). • Masukkan segel vacuum (2). Perhatikan posisi segel vacuum yang benar! • Geser baut union (3b) di atas flensa pada kondensor (3a). • Geser juga pegas annular (3c) di atas flensa pada kondensor (3a).
- Page 137 Memasang perkakas dari kaca Catatan: Perhatikan “Gambar pemasangan perkakas dari kaca” pada halaman 154. Item Penugasan Jumlah RV 10.1 non-lapis RV 10.2 non-lapis RV 10.3 non-lapis RV 10.4 non-lapis RV 10.5 non-lapis RV 10.6 non-lapis RV 10.10 berlapis RV 10.20 berlapis RV 10.30 berlapis RV 10.40 berlapis RV 10.50 berlapis...
- Page 138 RV 10.2_20 RV 10.4_40 RV 10.6_60 Catatan: Perhatikan “Gambar penyambungan sistem selang” pada halaman 156. Operasi RV 10 control Operasi RV 10 auto • Pasang vacuum RV 10.4002, dalam bracket yang disediakan • Tidak diperlukan katup tambahan untuk operasi normal vacuum untuk tujuan ini dan sambungkan selang vacuum ke katup.
- Page 139 • Lepaskan sambungan selang • Sambungkan inlet pasokan (dengan menggunakan alat yang diserta- tup regulator air RV 10.5001 opsional). Silakan meru- kan. juk pada data teknis berkenaan dengan pasokan air. Katup regulator air RV 10.5001 tidak cocok untuk digunakan untuk pemakaian pada unit kondensor karena akan mengurangi secara besar kecepatan alir.
- Page 140 Nama per- angkat dan versi perangkat lunak ditam- pilkan. Kemudian muncul petunjuk informasi un- tuk mengunduh alat pembaruan firmware IKA. Penjelasan simbol-simbol pada layar aktif Simbol-simbol yang ditampilkan di layar berubah bergantung pada status dan pengaturan RV 10 auto. Simbol...
-
Page 141: Maximum
Struktur menu Pengaturan pabrik Evaporator Modes Automatic Bath medium.............. Water Start temperature............60 °C Manual...................... 1013 mbar Pump %...................... 50% Volume Solvent............... Acetic acid Target................. 100 ml Efficiency..............80% Adjustment..............- Program..................... - Solvent..............Acetic acid 100% Drying................ - Start after... mm:ss............... -
Page 142: Pressure
Pengaturan pabrik Flow control..................... Advanced Bath medium................... Water Cooler power limit..................900 w Max power of cooler................0 w Value..........00:10 Interval Rotation Interval mode Value........00:10 Activate................... - Speed limit Minimum..................5 rpm Maximum..................300 rpm Timer function Timer Time hh:mm:ss............ - Page 143 Pengaturan pabrik Service Venting valve............- Valves Vacuum valve............- Water valve.............. - Pump........................... - Temperature adjustment....................- Settings Language English................ Deutsch................- Français................- Español................- Italiano................- Português................. - Pусский язык..............- 中文................- 한국어................- 日本語................- Pressure Units mbar........
- Page 144 Menu (rincian) 1. Evaporator Modes (Mode) tetapkan pada menu pembersihan digunakan untuk mengatur kecepatan pompa selama proses pembersihan. Kecepatan yang lebih tinggi menye- PEMBERITAHUAN babkan vacuum parsial pada perkakas dari kaca jika sistem ditutup. Pembersihan kecepatan tinggi memen- garuhi masa pakai selaput pompa. Automatic (Otomatis): Pada mode ini, sistem akan mendeteksi Clean now (Bersihkan sekarang:): Ini memulai proses pember- penguapan sebenarnya dengan memeriksa selisih suhu antar in-...
- Page 145 Advanced (Lanjut) Calculator (Kalkulator) Flow control (Kontrol aliran): Pengaturan ini dapat dinonaktif- Membantu Anda menghitung titik didih (suhu uap air) larutan, kan pada mode manual jika dry ice yang digunakan dan bukannya suhu bak pemanas dan tekanan. Jika salah satu dari 3 nilai telah pendingin.
- Page 146 5. Program Pengukuran terakhir Save as (Simpan sebagai): Simpan rangkaian penyulingan sebagi sebuah program. Edit: Mengedit parameter program yang dipilih. Mulai mengedit parameter program yang dipilih dengan menekan opsi menu “Edit” dengan kenop mulai/berhenti. Pengguna bisa Program 1 - 10 mengedit, menyisipkan atau menghapus satu segmen program Di bawah menu “Program”, 10 profil waktu rotasi tekanan yang yang dipilih dalam program.
- Page 147 Edit waktu Contoh menyimpan pengukuran terakhir 6. Safety (Keselamatan) Continue after power failure (Teruskan sesudah kegagalan daya) Jika opsi ini diaktifkan pengukuran akan berlanjut sesudah jeda dikarenakan kegagalan daya. Opsi ini hanya tersedia pada mode Otomatis, 100 % dan Volume. Activate (Aktifkan): Jika centang ditampilkan opsi diaktifkan.
- Page 148 Catatan: Jika aksesori non-orisinil yang digunakan tidak diserta- • Gerakkan lift ke posisi bawah dan periksa posisi bak pemanas kan oleh IKA, maka ada kemungkinan kisaran jarak 50 mm yang dalam kaitannya dengan bejana penguapan. Ketika menggu- disediakan oleh bak pemanas tidak akan cukup. Ini berlaku khu-...
- Page 149 Kemudian mengumpulkan data yang menggunakan MS Windows, dan men- sambungkan perangkat IKA melalui kabel data USB ke PC. Ko- cakup fitur entri grafis, jalur cepat motor misalnya. munikasi data dilakukan melalui port COM virtual. Komunikasi,...
- Page 150 Karena itu, gunakan form “Decontamination Certificate” yang Pembersihan dapat Anda peroleh dari IKA atau bisa diunduh versi cetaknya dari • Lepas perangkat dari komponen utama sebelum pembersihan. situs web IKA di www.ika.com. • Gunakan hanya zat pembersih yang telah disetujui oleh IKA un- Jika peralatan Anda membutuhkan perbaikan, kembalikan ke tuk membersihkan perangkat IKA.
- Page 151 Pesan kesalahan Akibat Sebab Koreksi Tidak ada perubahan Analisis gradasi tekanan tidak Pompa tidak beroperasi Periksa sambungan kabel kontrol pompa tekanan menunjukkan adanya penyim- Periksa catu daya pompa pangan Aktifkan pompa Selang vacuum tidak tersam- Periksa sambungan selang vacuum bung (pompa, penerima) Kabel kontrol katup RV 10.4002 Periksa sambungan kabel kontrol katup...
- Page 152 - Hubungi bagian servis. - Kirim perangkat untuk diperbaiki, termasuk uraian singkat kerusakan. Garansi Sesuai dengan ketentuan IKA garansi, masa garansi 24 bulan. Anda berhak atas biaya pengiriman. Garansi tidak mencakip Untuk klaim yang masih dalam garansi silakan hubungi dealer komponen yang aus, juga tidak berlaku bagi kesalahan yang setempat.
- Page 153 Data teknis Kisaran voltase pengoperasian (100...240) ± 10% Voltase yang diberi nilai 100...240 Frekuensi 50/60 Input daya tanpa bak pemanas “Siaga” operasi input daya Kecepatan 0/5...300 Toleransi kecepatan ± 1(Atur kecepatan < 100 rpm) ± 1(Atur kecepatan < 100 rpm) Layar kecepatan digital Dimensi bidang tampilan yang tampak (W x H)
-
Page 154: Drawings For Mounting The Glassware
Drawings for mounting the glassware RV 10.1 non-coated RV 10.2 non-coated RV 10.10 coated RV 10.20 coated 12 (4x) 13 (4x) 12 (2x) 13 (2x) RV 10.3 non-coated RV 10.4 non-coated RV 10.30 coated RV 10.40 coated... - Page 155 13 (4x) 12 (4x) 13 (4x) 12 (4x) RV 10.6 non-coated RV 10.5 non-coated RV 10.60 coated RV 10.50 coated...
-
Page 156: Drawings For Connecting The Hose System
Drawings for connecting the hose system RV 10 auto Water Vacuum Water in RV 10 control Vacuum pump Water RV 10.1 non-coated RV 10.10 coated Water out RV 10 auto Water Vacuum Water in RV 10 control Vacuum pump Water RV 10.2 non-coated... - Page 157 RV 10 auto Water Vacuum Water in RV 10 control Vacuum pump Water RV 10.3 non-coated RV 10.30 coated Water out RV 10 auto Vacuum Vacuum pump RV 10 control RV 10.4 non-coated RV 10.40 coated...
- Page 158 RV 10 auto Water Water in Vacuum RV 10 control Vacuum pump Water RV 10.5 non-coated RV 10.50 coated Water out RV 10 auto Water Water in Vacuum RV 10 control Vacuum pump Water RV 10.6 non-coated RV 10.60 coated...
-
Page 159: Solvent Table (Excerpt)
Solvent table (excerpt) Solvent Formula Pressure for boiling point 40 °C in mbar (For HB approx. 60 °C) Acetic acid Acetone Acetonitrile N-Amylalcohol n-Pentanol n-Butanol tert. Butanol 2-Methyl-2-Propanol Butylacetate Chlorobenzene Chloroform CHCI Cyclohexane Dichloromethane atm. press. Methylenechloride atm. Press. Diethylether atm. - Page 160 VIETNAM IKA Vietnam Company Limited Phone: +84 28 38202142 eMail: sales.lab-vietnam@ika.com Discover and order the fascinating products of IKA online: www.ika.com IKAworldwide IKAworldwide /// #lookattheblue @IKAworldwide Technical specifications may be changed without prior notice.
Need help?
Do you have a question about the RV 10 control and is the answer not in the manual?
Questions and answers