Table of Contents
Advertisement
MicroLoop
Operating Manual
Federal (USA) law restricts this device to sale by or on
the order of a physician or licensed practitioner.
Micro Direct, Inc.
803 Webster Street
Lewiston, ME 04240
1-800-588-3381
www.mdspiro.com
105-62
Issue 1.2
June 2016
Mail In Yellow Warranty Card
Receive 25 PFT Filters
FREE!!
Advertisement
Table of Contents

Related Manuals for Micro Direct MicroLoop


Summary of Contents for Micro Direct MicroLoop
- Page 1 MicroLoop Operating Manual Federal (USA) law restricts this device to sale by or on the order of a physician or licensed practitioner. Micro Direct, Inc. 803 Webster Street Lewiston, ME 04240 1-800-588-3381 www.mdspiro.com 105-62 Issue 1.2 June 2016 Mail In Yellow Warranty Card...
- Page 2 Indications for Spirometry Spirometry has been used extensively to measure lung function capability and to recognize and treat many diseases associated with the impairment of healthy lung functions. Spirometry today provides great insight into the status of any person’s health. Generally speaking, spirometry is a simple diagnostic tool used to define a subject’s lung condition.
-
Page 3: Table Of Contents
Table of Contents Introduction ..................1 Contraindications ................2 Warning and Cautions ..............2 Overview ..................4 Intended Use .................. 5 Getting Started ................5 Calibration Check (Verification) ........... 16 Customization ................18 Administration Mode ..............19 Switching Off ................20 Charging Procedure .............. -
Page 4: Introduction
MicroLoop feature. The MicroLoop is supplied with a cradle that may be connected with the USB cables supplied, to a PC. The cradle also connects to the mains adapter so that the MicroLoop’s batteries may be charged while it is placed in the cradle. -
Page 5: Contraindications
Test results may be uploaded to a PC using the Spirometry PC Software and patient details may be downloaded to the MicroLoop. Contraindications Acute disorders affecting test performance (e.g. vomiting, nausea, vertigo) ... - Page 6 CAUTION: Read the manual before use. WARNING: The instrument is not suitable for use in the presence of explosive or flammable gases, flammable anesthetic mixtures or in oxygen rich environments. CAUTION: Mouthpieces are single patient use. If used on more than one patient, there is a risk of cross-infection.
-
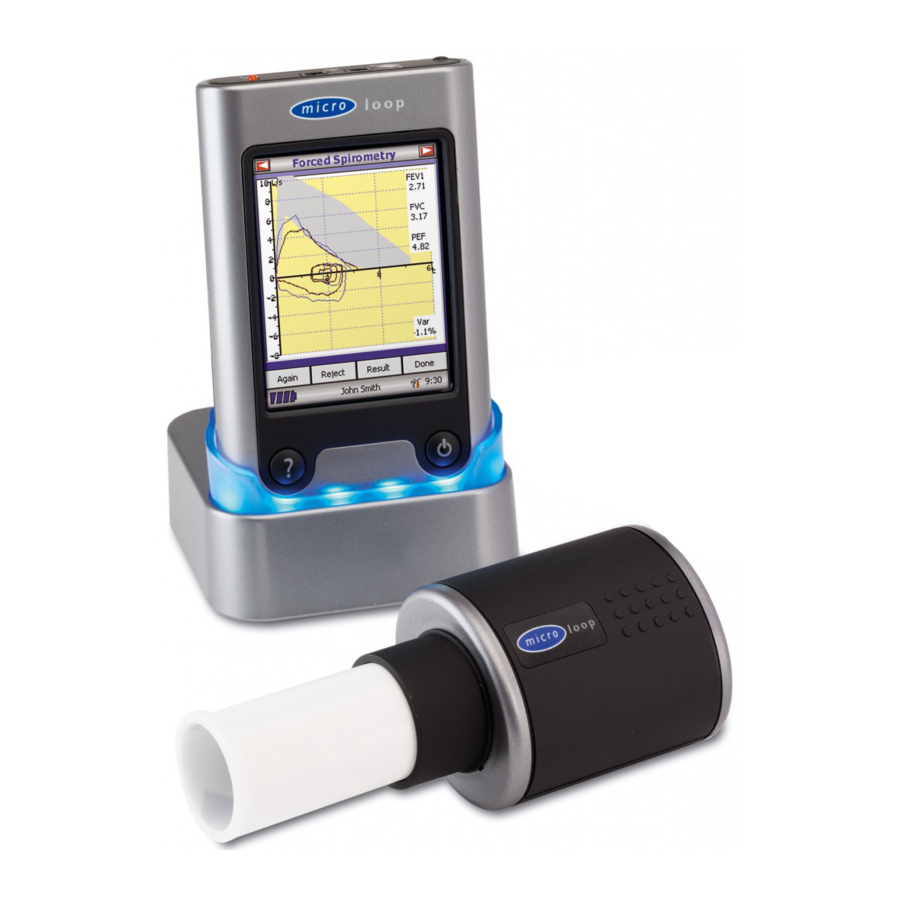
Page 7: Overview
Overview The MicroLoop uses a touch screen with icons representing each function available. A stylus, housed in the left hand side of the unit, is provided for icon screen activation. Touch the displayed time to adjust time and date. Unused icons may be disabled by touching the blue background and selecting from the list displayed. -
Page 8: Intended Use
Intended Use The MicroLoop spirometer is intended for prescription use only, to measure the maximal volume and flow of air that can be moved in and out of a patient’s lungs. The system is intended for use with pediatric (4 to 17 years of age) and adult (18 to 99 years of age) patients in hospitals, physician offices, laboratories and occupational health testing environments. - Page 9 Please ensure that the turbine transducer is plugged in to either of the two sockets on the top of the instrument. Select the ‘Patients’ icon to enter the patient database. The required patient may be selected from the stored patient list.
- Page 10 patient database, use the on screen keyboard to type a unique patient ID and then touch the enter key. You will then be prompted for Last Name, First Name, Sex, Ethnic Origin, Height, Weight, date of Birth and Factor. A factor can be applied when testing individuals other...
- Page 11 Once all the patient details are added, the patient is added to the database and the main menu is displayed with the patient name displayed at the bottom of the screen. From the main menu select required test, touching the icon with the stylus. If the displayed patient is not required for testing then touch the patients name and options to...
- Page 12 All the active indices are displayed for any of the maneuvers selected together with an option to review the volume/ time curves. active indices listed changed using customization option. Select ‘Done’ to proceed to the Spirometry Main Menu. From this menu the results of the test may be viewed, saved and notes may be added.
- Page 13 If forced spirometry is selected default graph will displayed. This changed by touching the arrows the screen. Flow/Volume, Volume/time or child incentive default displays may be selected using the customize option from the main menu. When the spirometry maneuver has been completed options to repeat the test, reject the test, view results...
- Page 14 Once tidal breathing is complete, the display will change and an audible beep heard to instruct the patient to start rapid, fast breathing. The start button should be touched using the stylus to start registering the MVV maneuver.
- Page 15 The current maneuver will be displayed in black. During the maneuver, the breath rate (BR) will be displayed in green if the breath rate is acceptable (> 65 breaths per minute). If the breath rate falls below this level, it will be displayed in red to show the operator that the patient needs to be instructed to breathe harder...
- Page 16 Once the test has finished, the display will show current test (shown in black – if more than one maneuver has been performed, the best maneuver will also be displayed in blue) the MVV rate, the % variation between maneuvers, the breath rate and the ATS quality warning for the test session.
- Page 17 Select ‘Back’ to return to testing and the current maneuver. NOTE: If the breathing rate is insufficient (less than 65 breaths per minute) then the BR value will be displayed in red – an MVV value will be calculated and a message displayed that the MVV results was extrapolated from a...
- Page 18 Once testing is complete, the MVV main menu will be displayed. Select ‘Post 1’ to perform a post medication test following the same procedures as the pre test. You are also able to ‘View Results’, ‘Print Results’, add ‘Notes’ and “Save’ the results by touching the appropriate icon.
-
Page 19: Calibration Check (Verification)
Calibration Check (Verification) The spirometer is calibrated to read in liters at Body Temperature, Barometric Pressure Saturated with water vapor (BTPS). The calibration should remain stable indefinitely, unless the transducer is physically damaged, and the unit should not require re-calibration. However, to ensure the correct functioning of the unit, we do recommend that a calibration check (verification) is performed periodically and after the transducer was removed for cleaning. - Page 20 The calibration error should be less than 3.5% (3% percent for the MicroLoop and .5 percent for the syringe). If a greater error is shown, repeat the procedure ensuring that the...
-
Page 21: Customization
Customization The ‘Customize’ option from the main menu may be used to configure many of the features of your MicroLoop and are divided into system, spirometry and MVV options. System options allow you to configure the following: Language Height and weight units... -
Page 22: Administration Mode
Administration Mode Administration mode allows the administrator to restrict the availability of functions to the user by disabling icons on main menu. example, after the unit has been configured administrator’s requirements, disabling of the ‘Customize’ icon will prevent any further adjustment user. -
Page 23: Switching Off
USB cable. Charging Procedure The MicroLoop’s internal batteries are discharged when shipped from the factory and should be fully charged on first use. Plug the AC adapter into the mains supply and plug the adapter output plug into the power input socket on the cradle. -
Page 24: Pc Connection Using Spcs
The batteries will take approximately 4 hours to become fully charged. Note: Turn off the mains supply or remove the MicroLoop from the charger once the battery display shows fully charged. Leaving the MicroLoop on charge in the cradle may diminish the battery life. -
Page 25: Looking After Your Spirometer
Check the AC charger for compatibility with local power rating. Product Lifetime The MicroLoop spirometer is designed for a product lifetime of 7 years. Cleaning Instructions Disinfection of contaminated parts is only effective after having them carefully pre-cleaned. -
Page 26: Cleaning Accessories
CAUTION: Do not wipe the touch screen. Cleaning Accessories With the use of a SpiroSafe filter (#3385) or a MicroCheck one- way valve safety mouthpieces (#3395) for each patient, cleaning for the components in patient’s gas path is recommended once a month. -
Page 27: Servicing
There is no routine maintenance required for the MicroLoop and there are no user serviceable parts in this instrument. Please return the unit to Micro Direct or an authorized agent if servicing is required. If your unit requires service or repair, please see page 36 for... - Page 28 Battery does not hold a Exhausted charge battery Mains charger Replace the mains fault charger MicroLoop not Reposition unit in the seated in cradle correctly, when cradle correctly charging the orange light will be illuminated Stylus does not register Touch screen...
-
Page 29: Safety Designation Per Iec 60601-1
Note: When you connect other equipment to the unit, always make sure that the whole combination complies with the international safety standard IEC 60601-1 for medical electrical systems. During measurements, connect the MicroLoop only to printers and computers that comply IEC 60601-1 / ANSI/AAMI ES60601-1:2005 / CAN/CSA-C22.2 No. 60601-1:14. -
Page 30: Electromagnetic Compatibility (Emc) To En60601-1:2007
(including other medical devices). The purpose of this testing is to ensure that the MicroLoop is not likely to adversely affect the normal operation of other such equipment and that other such equipment is not likely to adversely... - Page 31 (which are referenced in the accessories section of this manual). None of the MicroLoop cables should be extended in length by the user. If any cables are extended by the user or non approved...
- Page 32 Guidance and Manufacturer’s Declaration – Electromagnetic Emissions The MicroLoop is intended for use in the electromagnetic environment specified below. The customer or the user of the MicroLoop should assure that it is used in such an environment Emission Test Compliance...
- Page 33 Guidance and Manufacturer’s Declaration – Electromagnetic Immunity The MicroLoop is intended for use in the electromagnetic environment specified below. The customer or the user of the MicroLoop should assure that it is used in such an environment. Immunity...
- Page 34 RF transmitters, an electromagnetic site survey should be considered. If the measured field strength in the location in which the MicroLoop is used exceeds the applicable RF compliance level above, the MicroLoop should be observed to verify normal operation. If...
- Page 35 MicroLoop The MicroLoop is intended for use in an electromagnetic environment in which radiated RF disturbances are controlled. The customer or the user of the MicroLoop can help prevent electromagnetic interference by maintaining a minimum distance...
-
Page 36: Symbols
Symbols Type B device In accordance with Directive 93/42/EEC Disposal in compliance with WEEE Consult the instructions for use Caution: Consult the accompanying document Manufacturer Date of Manufacture Serial Number Direct Current Single Patient Use Federal U.S. law restricts this device to sale by or Rx only on the order of a physician (Rx only) -
Page 37: Specifications
Specifications General >2000 tests including Flow/Volume loops and Storage : Volume/Time curves Color 1/4VGA LCD. Display: Input 100 to 240V, 50 to 60Hz. Power supply: Output 5V 2.0A (Class 1) Type:MENB1010A0500F02 Rechargeable Lithium Ion Polymer 3.7V Battery Pack: 1600mA-hours. Approximately 30 hours with a fully charged new Battery Life: battery 4.7”... - Page 38 Forced inspiratory flow at 75% of inhaled volume (FIF75) Forced expiratory flow at 50% of volume as a percentage of FIF50 (FEF50/FIF50) The time taken between 25% and 75% of the forced expired volume (MET2575) Forced Expiratory Time (FET) Tidal Volume (TV) Expiratory reserve volume (ERV) Inspiratory reserve volume (IRV) Inspiratory capacity (IC)
-
Page 39: Consumables / Supporting Products
Battery TDX1048 Turbine Transducer ASS1206 Transducer Head Assembly 48-70 Protex Disinfectant Wipe (100/canister) To place an order for consumables / supporting products, for service/repair or for general questions please contact Micro Direct Toll Free: 1-800-588-3381 Telephone: 207-786-7808 Fax: 207-786-7280 Email: sales@mdspiro.com... -
Page 40: Icd-10 Codes For Spirometry
ICD-10 Codes for Spirometry Diagnosis Code Acute Bronchitis J20.0-J20.9 Allergic Rhinitis, Other J30.81-J30.89 Allergic Rhinitis, Unspecified J30.9 Vasomotor and Allergic Rhinitis J30.0-J30.5 Asthma, Mild, Intermittent J45.20-J45.22 Asthma, Mild, Persistent J45.30-J45.32 Asthma, Moderate, Persistent J45.40-J45.42 Asthma, Severe, Persistent J45.50-J45.52 Asthma, Unspecified J45.901-J45.909 Cough Variant Asthma J45.991... - Page 41 Pulmonary, Fibrosis J84.10 Respiratory conditions due to inhalation of chemicals, gases, J68.0-J68.9 fumes and vapors Respiratory conditions due to J70.9 unspecified external agent Sarcoidosis of the Lung D86.0 Sarcoidosis of the Lung with D86.2 sacoidosis of the lymph nodes Bronchiolitis, Acute J21.0-J21.9 Bronchitis, Not Specified as Acute or Chronic...
- Page 42 Occupational exposure to Z57.31 environmental tobacco smoke** Personal history of Z87.891 nicotine dependence** Smoking (tobacco) complicating pregnancy, O99.330-O99.335 childbirth, and the puerperium** Wheezing R06.2 **Use additional code after the primary diagnosis to identify any tobacco use, dependence or exposure to tobacco smoke Rev.
Need help?
Do you have a question about the MicroLoop and is the answer not in the manual?
Questions and answers
the microloop wont print out the calibration, there seems to be an error
The Micro Direct MicroLoop may not print the calibration if the calibration error exceeds the allowed limits (more than 3.5% for expiration and inspiration, 3% for the MicroLoop, or 0.5% for the syringe). In such cases, the procedure should be repeated, ensuring smooth syringe operation. If the error remains high, the turbine transducer should be inspected and cleaned if needed.
This answer is automatically generated