
Related Manuals for Pentair SlimLite 56400


Summary of Contents for Pentair SlimLite 56400
- Page 1 SLIMLITE WHITE LED LIGHT FOR SWIMMING POOLS INSTALLATION USER’S GUIDE IMPORTANT SAFETY INSTRUCTIONS READ AND FOLLOW ALL INSTRUCTIONS SAVE THESE INSTRUCTIONS SLIMLITE Pool Light Installation and User’s Guide...
-
Page 2: Table Of Contents
Technical Support: Phone: (800) 831-7133 - Fax: (800) 284-4151 www.pentair.com Contents IMPORTANT WARNING AND SAFETY INSTRUCTIONS....... 3-4 SlimLite White Pool Light Pool Overview ............5 SlimLite Light Assembly - Removal / Installation (in an existing pool).... 2 Circuit Board - Removal / Installation............. 7-8 Wide and Narrow Angle Lens Adjustment ............ -
Page 3: Important Warning And Safety Instructions
All Niche and Light installations must conform with all codes. The SlimLite light can only be used with Pentair niches P/N 56503 (3/4” bushing) or P/N 59504 (1” bushing). If local codes mandate a cord seal, use Cord Seal Kit (P/N 670044). - Page 4 UL Listing Mark is not considered by UL to have been produced under UL’s Listing and Follow-Up Service for the associated usage location. CAUTION - The SlimLite Light fixture must only be used with Pentair fixture housings (niches) as noted above.. If the SlimLite light fixture is installed into other niches, the installation will not carry U L approval and will void all warranties.
-
Page 5: Slimlite White Pool Light Pool Overview
Replace the SlimLite Pool Light assembly (in an existing pool). See page 6-13. For SlimLite Pool Light installation instructions (for a new pool, please refer to the Pentair IntelliBrite 5G manual (P/N 620278) Replacing the SlimLite Pool Light circuit board (See page 7-8) ... - Page 6 SLIMLITE POOL LIGHT DISASSEMBLY INSTRUCTIONS (IN AN EXISTING POOL) Removal and Installation of the SlimLite Light assembly When replacing the SlimLite Light assembly, the LENS GASKET (P/N 620400Z) MUST ALSO BE REPLACED - SEE PAGE 14 FOR PART NUMBERS. D A N G E R ! RISK OF ELECTRICAL SHOCK OR ELECTROCUTION Always disconnect power to the pool light at the circuit breaker before servicing the light.
-
Page 7: Circuit Board - Removal / Installation
CIRCUIT BOARD - REMOVAL / INSTALLATION Remove 8 Hex head screws Figure 7. Removing the SlimLite Light Circuit Board Using a ¼” nut driver, carefully remove the four retainer nuts from the light assembly. See Figure 8. Place the nuts aside for reinstallation. See Figure 8. - Page 8 CIRCUIT BOARD - REMOVAL / INSTALLATION Installing the SlimLite Light Circuit Board (See Figure 8) Place the two new thermal strips (provided) over the circuit board studs in the base of the light housing. 10. Place the light circuit board over the base studs and seat the circuit board on top of the thermal strips.
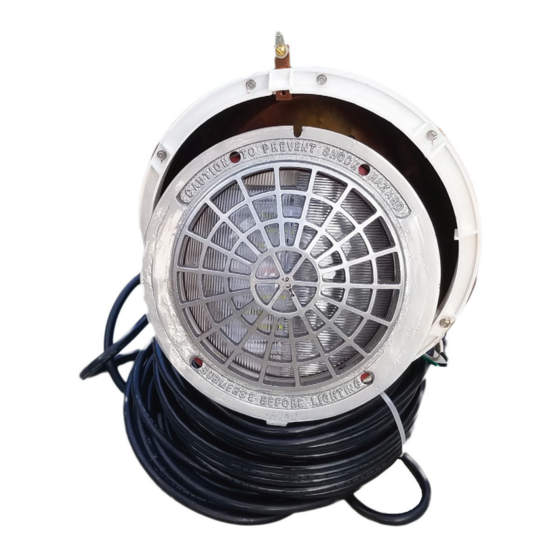
- Page 9 LIGHT REASSEMBLY - INSTRUCTIONS 1. Narrow Bean Lens Position: With the ‘N’ & arrow on the lens pointed to the notch insert the light assembly into the slot of the grille. Be sure the lettering “SUBMERGE BEFORE LIGHTING” appears as shown in Figure 1.
-
Page 10: Wide And Narrow Angle Lens Adjustment
LIGHT REASSEMBLY - INSTRUCTIONS Wide and Narrow Angle Lens Adjustment The SlimLite Light lens geometry provides a choice of “wide” or “narrow” angle light beam to suit various size pools (see page 4). For lights located on either side of the pool, rotate the lens to the ‘wide’ (W) angle position, which will provide a wider angle light beam for greater underwater coverage and light reflection the width of the pool. -
Page 11: Light Assembly - Removal / Installation
LIGHT REASSEMBLY - INSTRUCTIONS 3. With the back of the light still facing up, install the existing (previously removed) Clamp Ring. See Figure 2. Figure 2. 4. Rotate the clamp ring so that the slots on the outer edge line up with the threaded holes of the grille as shown in Figure 3. - Page 12 LIGHT REASSEMBLY - INSTRUCTIONS Note: The red silicon gasket should not be visible between the grille and the light housing once the clamp is on. See detail B. Figure 4. Detail B. 5. Insert one Truss head screw (11) into each of the ‘U’ shaped grooves on the clamp ring as shown in Figure 4.
- Page 13 LIGHT REASSEMBLY - INSTRUCTIONS 6. Hand tighten all eight screws ensuring all screw heads are flush with the top of the clamp ring. Follow the pattern in consecutive order starting from #1 and ending on #8 shown below in Figure 6. BE CAREFUL NOT TO CROSS THREAD THE SCREWS.
-
Page 14: Replacement Part Numbers
SlimLite Light Illustrated Parts List Item # Part # Description 618037 10-24 hex head Mach screw 56925 Locking Ring 620400Z Lens Gasket 56804 Lens 56924 Protective Grille 618052 Star Washer 94215 Pilot Screw (Stainless Steel) (*) The Star Washer (#7) MUST always be used with the Pilot Screw (#8) to ensure proper electrical grounding. - Page 15 SLIMLITE Pool Light Installation and User’s Guide...
- Page 16 10951 WEST LOS ANGELES AVE., MOORPARK, CA 93021 • (805) 553-5000 www.pentair.com All indicated Pentair trademarks and logos are property of Pentair Inc. or its global affiliates in the U.S.A. and/or other countries. Third party registered and unregistered trademarks and logos are the property of their respective owners ©...
Need help?
Do you have a question about the SlimLite 56400 and is the answer not in the manual?
Questions and answers