Table of Contents
Advertisement
Advertisement
Table of Contents

Related Manuals for Matica MC310


Summary of Contents for Matica MC310
- Page 1 USER GUIDE MC310 USER GUIDE...
- Page 2 Refer to the warranty statement provided with the printer for the warranty terms and conditions, and its limitations of liability. Environmental Impact Matica is committed to reducing the environmental impact of its products through improvements in energy efficiency. DIRECTIVE 2002/96/EC ON THE TREATMENT, COLLECTION, RECYCLING AND...
- Page 3 2) Cet appareil doit accepter toutes les interférences, y compris celles qui pourraient entraîner un mauvais fonctionnement de l'appareil. General Note: - This equipment must be used by – Ordinary person / Instructed person / Skilled person MC310 USER GUIDE...
- Page 4 Be sure to follow these cautions to operate the printer safely. These cautions indicate the heated surface & involve the risk of heat injury if person touch with bare hand. These cautions indicate the touch of surface with bare hand is prohibited. MC310 USER GUIDE...
-
Page 5: Table Of Contents
Add Printer Manager Communication .............. 4-5 4.2.1 USB Connection ..................4-5 4.2.2 Ethernet (LAN) Connection ..............4-6 Uninstall Program Tabs ................... 4-7 Matica Printer Manager ..................4-7 Printer Manager ....................4-8 4.5.1 Settings ....................4-8 4.5.2 Tools ......................4-9 4.5.3 About ....................... - Page 6 Cleaning Roller Advanced Cleaning ..............6-5 6.4.1 Roller cleaning Procedure ................ 6-5 Printhead Cleaning ..................6-8 6.5.1 Printhead Cleaning Procedure ..............6-8 Print head replacement procedure ..............6-9 6.6.1 Replacement procedure ................6-9 Options ....................... 7-1 Chip Encoding (Contact and Contactless) ............7-1 Magnetic Encoding ..................
-
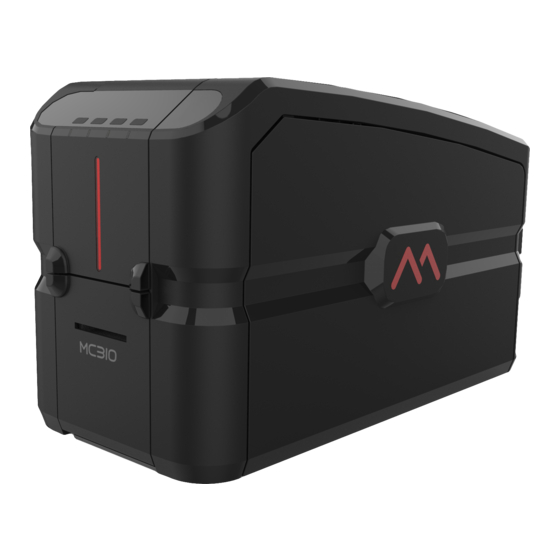
Page 7: Product Overview
If it is returned without its original packaging and any components are damaged during transportation, such components will no longer be covered by the warranty. Matica will also charge for the new packaging which will be required to ship the printer back... -
Page 8: Unpacking The Printer
Power cord • • Power supply USB cable • • Ribbon carrier • Reject bin Note: Contact the dealer immediately if any of the items listed above is missing. Only use the power supply provided with the printer. MC310 USER GUIDE... -
Page 9: Functional Description
3) Operator panel and printer status indicators: ON/OFF key and 3 functional keys 4) LCD display 5) LED light indicating card availability status in the input hopper. 6) Biometric lock option (Only for MC310s, S3110 (Financial version)) MC310 USER GUIDE... -
Page 10: Operator Panel
Input hopper LED – (Shown as 9) Off – indicates there is no card available in printer Red blinking – indicates no. of cards in the hopper are running low. Red – indicates there are cards available in input hopper MC310 USER GUIDE... - Page 11 • LCD Display Sequence for MENU option MC310 USER GUIDE...
-
Page 12: Rear View
ISO CR80 - ISO 7810 (53.98 x 85.60) • Thickness: 0.25 to 1.25 mm (10 to 50 mil) manual gauge adjustment • Magnetic stripe: ISO 7811 • Smart Card Contact: ISO 7816-1,2,3,4 • Smart Card Contactless: ISO 14443A/B. MC310 USER GUIDE User Guide... -
Page 13: Installation Procedures
Installing the Ribbon Original Matica ribbons are to be installed carefully. The ribbon carrier that comes with the printer helps to install the ribbon quickly, easily and accurately. Once the ribbon is in its carrier, the carrier can then be easily dropped into the printer using the red and grey guides. - Page 14 4 ) Ribbon carrier should be positioned inside the Right & Left Guide cores as illustrated below Left Guide Core for Ribbon carrier Right Guide Core for Ribbon carrier 5) Slide the Ribbon carrier back side (Trailer core) inside the backend Guide cores as per below instructions. MC310 USER GUIDE...
- Page 15 6) Slide Ribbon carrier front side (Leading core) inside the front Guide cores as per instructions till it touches the bottom of guide core as illustrated below, 7) Close the Top cover. Note: Ribbon carrier should be assembled without touching/damaging the printer head MC310 USER GUIDE...
-
Page 16: Card Feeding
The output Hopper at the front of the printer can hold a maximum of thirty 0.76 mm thick cards. 3.2.1 Input Hopper (Automatic Card Feeder) 1. Open Front door manually as shown below. 2. Load the cards in the Hopper and then close the door. MC310 USER GUIDE... -
Page 17: Front Slot (Manual Card Hopper)
Cards with thicknesses ranging between 0.25 mm and 1.25 mm (10 - 50 mil) can be processed by the printer. Proceed as follows to adjust the card thickness: 1) Open the printing module compartment cover as per below instructions. MC310 USER GUIDE... -
Page 18: Connecting The Power Supply And Powering On The Printer
Connecting the Power Supply and Powering ON the Printer Connect the power cord to the power outlet (a) to the power supply and then connect the power supply to the printer (b) as shown below. Press the ON/OFF button (c) to power on the printer. MC310 USER GUIDE... -
Page 19: Installing The Software And Configuring The Printer
1) Power on the computer and then insert the USB stick. Copy the installer into the computer desktop. Connect USB of printer to computer and MC310 printer. 2) Double click on the Matica XPS Driver installer .exe application to setup the Wizard. 3) Set up wizard displayed. Click next button. - Page 20 The setup program will provide you several option to install components Full installation: XPS Driver + XPS Print Manager • • Driver only : Only XPS Driver • Custom installation : XPS Driver + XPS Print Manager (optional) MC310 USER GUIDE User Guide...
- Page 21 6) Incase if you want to ‘Add an MC310 printer connected through the network’ then select the checkbox and Click Next to continue with the installation. Network printer selection is not mandatory to continue the setup. Installation process starts, MC310 USER GUIDE...
- Page 22 8) Following windows are displayed upon completion of the installation procedure The installation program also automatically executes the XPS Printer Manager. Click ‘Finish’ button, the computer will restart to complete the installation of Matica XPS driver MC310 USER GUIDE User Guide...
-
Page 23: Add Printer Manager Communication
• 4.2.1 USB Connection 1. Switch on the Printer and Open the Matica Printer Manager application 2. Connect the USB cable provided with the Printer to the Computer and wait for the Printer to appear on the Printer manager window with status ‘Ready’. -
Page 24: Ethernet (Lan) Connection
Connect the LAN cable to the printer & network port 2. Go to Windows start button, Click Matica folder and Click ‘Add MC310 Network’ 3. Below window appears, Add printer port name as per the format appear in below display & click OK. Now printer will appear in network. -
Page 25: Uninstall Program Tabs
Uninstall Program Tabs To uninstall the software: 1) in Windows XP, select Start > Control Panel > Add/Remove Programs > Matica XPS Driver version 1.x.x.x 2) in Windows 7, Windows 8/8.1, Win10 select Start > Control Panel > Programs> Uninstall a Program >... -
Page 26: Printer Manager
About, displays the printer FW version • Click Cancel to close the Printer Manager window 4.5.1 Settings In the Settings menu, you can choose the Language. Current Printer manager version is available only in English MC310 USER GUIDE User Guide 3-13... -
Page 27: Tools
Debug mode enable/disable wizard FONT firmware update wizard • • Printhead replacement, Refer to Chapter 6.7 (Printhead replacement procedure) 4.5.3 About In the About menu, User can check the FW version installed in the printer MC310 USER GUIDE User Guide 3-13... -
Page 28: Printing
2) Click on Margins and Select Custom Margins to open the Page Setup window to Edit the Margins to 0 (Top, Bottom, Right, Left) 3) Select Orientation Landscape 4) In the Paper tab, select the Paper Size option followed by the custom size 8,5cm x 5,6cm (85mm x 56mm) MC310 USER GUIDE User Guide... - Page 29 - Barcode, etc. Once the operation is complete, click File followed by Print. 7) Under Printer section, Select MC310 from the drop down menu 8) Click Printer Properties to customize the print options from this screen 9) To define the Print Orientation, Select either Portrait or Landscape 10) To define the Card path input, Click on ‘Advanced’...
-
Page 30: Double-Side Printing
Double-side Printing 1) Click Printer Properties from Print window to customize the printing options 2) In the Printer Properties window, Select the Dual side print type under the Print on Both sides drop down menu MC310 USER GUIDE User Guide... - Page 31 If Dual-side printing was selected, by clicking the Advanced of Printer Properties the following parameters for the two sides of the card can be selected independently: Color Panel Adjustment (brightness, contrast, sharpness) • Overlay Panel Adjustment • • K Panel /Monochrome Adjustment (greyscale, black text, etc.) MC310 USER GUIDE User Guide...
-
Page 32: Color Settings
In the Menu/Scroll button, Scroll to Advanced setting • Press the Selection button to transit to respective sub-menu Scroll to Test Print only • • Press the Selection button to print the Test card Refer to the Navigation as in chart, MC310 USER GUIDE User Guide... -
Page 33: Printer Maintenance
6 Printer Maintenance Printer Routine Cleaning Four different cleaning processes are implemented in the printers using MC310 Cleaning kit (PR20309601) Standard Cleaning • Suggested frequency Color printing: Each time the ribbon is changed • Mandatory frequency (to prevent voiding the warranty) After every 1,000 prints, Printer will alert the user for ‘Basic Cleaning’... - Page 34 Insert the Longer side of the Extended card in the back slot of the printer as represented in Figure The adhesive surface is on both sides. Insert the Long side of the Extended card in the Back slot MC310 USER GUIDE User Guide...
-
Page 35: Card Path Advanced Cleaning
The printer has an internal counter that stores the number of Standard cleaning procedures performed, • so as to notify when the Advanced Cleaning procedure is required (see the Printer Manager Specifications). A software-guided procedure will assist in carrying out the cleaning operations. • MC310 USER GUIDE User Guide... -
Page 36: Advanced Cleaning Procedure
Select the Printer b. Open the Top cover and Remove the ribbon carrier. c) Close the top cover d) Insert the T-card in the back slot of the printer Insert the T-card in the Back slot MC310 USER GUIDE User Guide... -
Page 37: Cleaning Roller Advanced Cleaning
(Cleaning frequency: After every 1000 prints or even more often based on the working environment) 6.4.1 Roller cleaning Procedure 1) Unplug the printer from the power supply. 2) Open the Top cover 3) Remove the ribbon carrier MC310 USER GUIDE User Guide... - Page 38 5) Once the cover is open below you could see the Flip over Assembly with Cleaning roller (Marked with 2 arrows) Press with 2 fingers to remove only the Cleaning roller from the Flip over assembly, as illustrated below. MC310 USER GUIDE User Guide...
- Page 39 9)Insert the Encoder cover and ribbon carrier back into its position 1.Insert the Encoder cover 2.Insert the Ribbon carrier 10)Close the printing module compartment 11)The roller cleaning procedure is now concluded. MC310 USER GUIDE User Guide...
-
Page 40: Printhead Cleaning
3) Using the cleaning pen that is provided in the Cleaning Kit, clean the printhead by rubbing the pen in the direction indicated by the arrow in the figure below. 4) Close the Top cover 5) The printhead cleaning procedure is now concluded. MC310 USER GUIDE User Guide... -
Page 41: Print Head Replacement Procedure
4) Remove the Printhead as instructed below, a) To remove the print head. Press in the direction indicated by the arrow to loosen the spring and to release this from its housing and Click ‘Next’ to continue in the Printer Manager wizard MC310 USER GUIDE... - Page 42 Click ‘Next’ to continue in the Printer Manager wizard 5) Connect the printer to the power supply, switch on and connect it to a computer with the USB cable Click ‘Next’ to continue in the Printer Manager wizard MC310 USER GUIDE 6-10...
- Page 43 Enter the Print Head Serial number and confirm with the Insert button. 7) Click ‘Finish’ to complete the Printhead replacement operation MC310 USER GUIDE 6-11...
-
Page 44: Options
7 Options Chip Encoding (Contact and Contactless) The Chip Encoder is an optional module for the MC310 Series that allows the encoding of chip cards (smart cards). Available chip encoding modules and related functionalities: • Dual Interface Encoder Module (Contact and Contactless cards) -
Page 45: Magnetic Encoding
Magnetic Encoding The Magnetic Encoder is an optional module for the MC310 Series that allows the encoding of magnetic cards. The following modules are available: • MAG ENCODER Code PR10300001 It allows you to perform the encoding magnetic in ISO/ JIS2 format Install the module according to the instructions contained in the package. -
Page 46: Duplex Activation
Duplex activation The Duplex activation is an optional module for the MC310 Series that allows the printer to print on both side of the cards. The following modules are available: • MC310 Duplex Activation Kit It will enable the printer to print dual side of a card... -
Page 47: Trouble Shooting
Printer has printing problems USER • Make sure that a MC310 printer appears in “Devices and Printer does not start Printers” and that it is active (icon appears in dark grey) printing (no movement) •... -
Page 48: Printer Has Problem With Ribbon
Printer has problem with ribbon USER If the ribbon has tears or • locks with error 14 Chip Encoding problems USER Difficulties or failures in the code reading ATR • MC310 USER GUIDE User Guide... -
Page 49: Ribbons
SCRATCH-OFF MC310 Ribbon, 2000 prints PR20314313 Each Matica ribbon has an RFID tag with ribbon identification data that allows the printer to configure all the counting and optimization parameters and procedures. It is strongly suggested to exclusively use original Matica ribbons. The use of non-original accessories... -
Page 50: Technical Characteristics
Two level encoding protection • Smart Ribbon level memory and management • Smart Ribbon optimization in monochrome printing • Available ribbon: please refer to Matica website: www.maticacorp.com Print Speed • Single-side Monochrome: up to 850 cph • Single-side YMCKO: up to 180 cph •... - Page 51 Min/max operating temperature: 15° - 40 °C (59° F- 104 °F) • Humidity: 20% to 65% non-condensing • Min/max storage temperature: –5° - +70 °C (23° - 158 °F) • Storage humidity: 20% to 70% (non-condensing) (*) Only in some models/options MC310 USER GUIDE 11-2 User Guide...
- Page 52 MC310 USER GUIDE 11-3 User Guide...
- Page 54 Matica - www.maticacorp.com – All rights reserved...
Need help?
Do you have a question about the MC310 and is the answer not in the manual?
Questions and answers