Table of Contents
Advertisement
Advertisement
Table of Contents

Related Manuals for Sangean ATS-909X 2


Summary of Contents for Sangean ATS-909X 2
- Page 1 ATS-909X 2 中文 Version 1...
- Page 2 25 26 17 16 31 30 29 28 27 47 48 C D E J K L...
-
Page 3: Table Of Contents
Table of Contents 5. ADVANCED TUNING FEATURES ....11-13 SETTING THE METER BAND – SW ONLY ..11-12 1. IMPORTANT ............03 SINGLE SIDE BAND (SSB) RECEPTION – IMPORTANT SAFETY INSTRUCTIONS ....03 SW / MW / LW ............12 2. -
Page 4: Important
INTRODUCTION marking label. If you are not sure of the type of power supply to your home, consult your radio dealer, The Sangean ATS-909X2 PLL synthesized receiver Power Company or Sangean. provides the following range of features: AC adaptor: The AC adaptor should be positioned ●... -
Page 5: What's In The Box
WHAT'S IN THE BOX ANT-60 Portable Shortwave Reel Antenna Earphones Sangean ATS-909X2 with carrying bag Power adapter Europe... -
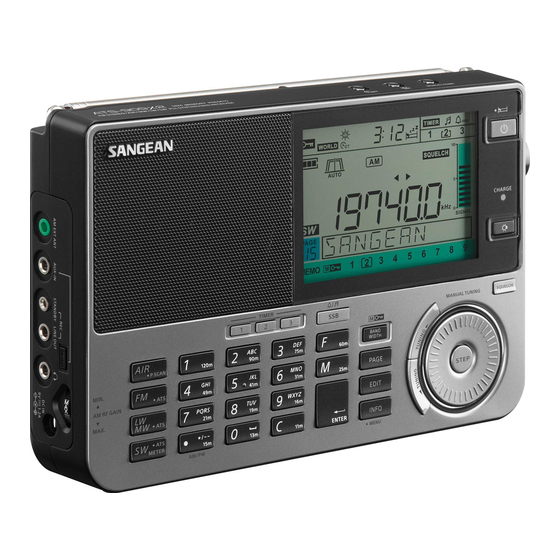
Page 6: Controls
Numeric buttons CONTROLS ● Input digits 0-9 Time Set button ● Select preset stations ● Set the time ● Select SW meter bands Daylight Saving Time button ATS / METER / SW button ● Enable / disable Daylight Saving Time ●... -
Page 7: Information On Display
Decimal point button INFORMATION ON DISPLAY ● Input decimal point Button Lock indicator ● Select AM / PM when the 12-hour clock format is HOME / WORLD indicator selected Daylight Saving Time indicator ● Select SW 15 meter band RDS CT indicator Telescopic antenna PM indicator ●... -
Page 8: Option 2: Using An External Power Adapter
When using rechargeable batteries, place it in the Use the Rotary Tuning knob (16) or Tuning Up / Down NIMH / NICAD (Charger) position. buttons (18) to select your city or a city that is in the same time zone as you are. Close the Battery Compartment (43). -
Page 9: 4. Listening To The Radio
NOTE Use the Rotary Tuning knob (16) or the numeric buttons (19) to change the character and input your When using the ATS feature on the MW / LW / FM band, desired character. the radio will store preset stations based on signal strength. -
Page 10: Using Scan Tuning
USING SCAN TUNING SETTING THE TUNING STEP The scan tuning feature of the ATS-909X2 can be used When using manual tuning, the frequency change per on any band to automatically scan from the current tuning step using the Rotary Tuning knob (16) and the FM frequency to the nearest strong station with a higher / tuning step using the Tuning Up / Down buttons (18) can lower frequency. -
Page 11: Adjusting The Volume
shown on the display and the broadcast will be played in STORING PRESET STATIONS IN MEMORY stereo if headphones are connected or an external device – SW ONLY is connected to the LINE OUT jack (38). The procedure for storing stations on the SW band is NOTE slightly different from the procedure for the other bands The radio can be forced to play FM radio stations in... -
Page 12: Recalling Preset Stations - Sw Only
You can move a preset station in memory by following RECALLING PRESET STATIONS – SW these steps: ONLY Turn on the radio and recall the desired preset station Follow these steps to recall a preset station on the SW as previously described. band: Press the Memo button (24). -
Page 13: Single Side Band (Ssb) Reception - Sw / Mw / Lw
The SW meter band indicator (Q) will now be blinking switch between AM, USB and LSB. The SSB indicator on the display. (G) on the display shows which band is currently selected. Press one of the numeric buttons (19), the Memo After selecting the correct mode, use the STEP button button (24), the Freq button (25) or the Cancel button (31) to select the corresponding meter band. -
Page 14: Performing A Page Scan - Air Only
There are 3 different bandwidth settings available for the If no suitable station can be found the radio will keep AIR and FM bands, while the SW, MW and LW bands scanning the selected page. each have 5 different bandwidth settings: To cancel the page scan, press the AIR button (23) once again. -
Page 15: Other Features
the available settings and to select settings, while the [FM 64-108 M]: Set the FM range to 64- Step button (17) or Enter button (30) can be used start 108 MHz. configuring settings or confirm selected settings. [FM 76-108 M]: Set the FM range to 76- The following settings can be found in the menu: 108 MHz. -
Page 16: When An Alarm Sounds
The TIMER indicator (J), the corresponding Timer number indicator (M) will now no longer be shown on the number indicator (M) and the Alarm source indicator (K display. / L) of the selected alarm source will now blink on the display. -
Page 17: Using The Radio To Charge Batteries
using the signal (see chapter 6 "USING THE MENU" for Battery Compartment (43) with polarities as shown on more information). The RDS CT feature is a convenient the diagram on the cover and inside the compartment. feature that enables you to always have the correct time Place the Battery switch (47) in the NIMH / NICAD set when tuning in to an FM station that broadcasts an (Charger) position. -
Page 18: Using The Aux In Jack
ATS-909X2. The REC. STANDBY jack has the additional benefit of being able to activate certain external recorders, such as Sangean’s DAR-101, using an alarm timer on the ATS-909X2. Refer to your external recorder's user manual to determine whether your external recording device is compatible with timer activated recording. -
Page 19: Specifications
Production month Production year Product code Sangean reserves the right to amend the specifications without notice. DISPOSAL OF YOUR OLD PRODUCT If at any time in the future you should need to dispose of this product please note that: Waste electrical products should not be disposed of with household waste.
Need help?
Do you have a question about the ATS-909X 2 and is the answer not in the manual?
Questions and answers