Table of Contents
Advertisement
1
B E O S O U N D
O U V E R T U R E
P R I N C I P L E S
O F
O P E R A T I O N
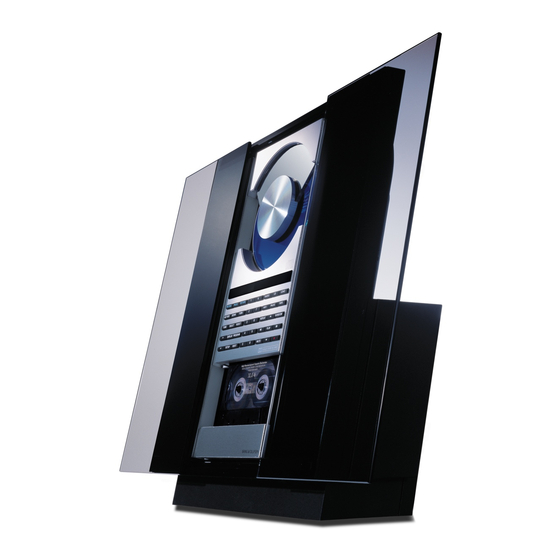
The BeoSound Ouverture is a fully
integrated music system with radio,
compact disc player and tape
recorder all in one unit.
The system can be placed anywhere
you want music – on a wall in the
specially designed wall bracket, on
the specially designed stand, or on a
table or sideboard.
No matter how, whenever you reach
out to operate the BeoSound
Ouverture, the glass doors slide open
as if by magic, inviting you in to the
music...
User's guide
Advertisement
Chapters
Table of Contents

Related Manuals for Bang & Olufsen BeoSound Ouverture


Summary of Contents for Bang & Olufsen BeoSound Ouverture
- Page 1 O U V E R T U R E P R I N C I P L E S O P E R A T I O N The BeoSound Ouverture is a fully integrated music system with radio, compact disc player and tape recorder all in one unit.
- Page 2 The BeoSound Ouverture may be used with various types of active Bang & Olufsen loudspeakers, or it may be used as a music centre in a Bang &...
- Page 3 4 Open to possibilities 6 Principles of operation 9 Using the radio 15 Using the CD player 21 Using the tape recorder 27 Timer programming 33 Nice to know 40 Remote control Using BeoSound Ouverture in a link room with Beo4...
- Page 4 But no matter where you place your BeoSound Ouverture, it will always respond to a wave of your hand. As soon as you reach out to touch the operation panel, the glass doors open automatically, revealing the music system concealed behind the screen.
-
Page 6: O F O P E R A T I O N
LOAD button (top right-hand button). Discs must always be loaded with the text side facing you! The BeoSound Ouverture radio only becomes visible when it is being used. The display then lights up with radio program information. - Page 7 The open doors give you access to the operating panel and the display... Status display The display keeps you informed about what the system is doing and about any on-going operation. Volume buttons ∧ ∨ allow you to raise and lower the volume level.
- Page 8 N O T E S...
-
Page 9: Table Of Contents
Note: Proper FM and AM aerial connections must be made to the BeoSound Ouverture in order for the radio to pick up the stations available in your area. Please refer to the Setting-up guide for details about aerial connections. U S I N G... -
Page 10: Switching Displays
Turn on the radio RADIO then Press repeatedly to change the radio DISPLAY display indication U S I N G T H E R A D I O Switching displays The display can give you three different types of information about the radio program you are listening to: •... -
Page 11: Playing Your Radio Programs
Playing your radio programs To turn on the radio simply press the RADIO button. The program you were last listening to starts playing, and you will see the indication RADIO followed by a program number in the display. If you have given a name to the radio program, or if the radio station you are listening to transmits a name of its own, the display may read out that... -
Page 12: Presetting Radio Stations
The TUNE button gives access to presetting radio stations. When you have pressed TUNE, presetting a radio station is like having a conversation with the BeoSound Ouverture display: The display prompts you to do something; then press to reveal other options. Pressing the PLAY button accepts any information that is currently shown in the display. -
Page 13: Clearing Presets
Document your radio presets here Clearing presets... If you wish to clear (cancel) one of your radio presets, you can do so via the SETUP button. See how to the right... When the program number has been cleared, the display reads CLEARED. Switch on to the radio program you RADIO want to clear,... -
Page 14: Fine Tuning A Radio Station
> Using the radio Switch on to the radio program you RADIO wish to fine tune, then for example program number 5 Press to get access to the tuning TUNE function then PLAY Press again to get access to the fine TUNE tuning function then... -
Page 15: Disc Player
U S I N G T H E C O M P A C T D I S C P L A Y E R 16 Loading a CD Switching displays 17 Playing the CD 18 Playing tracks in random order Playing the CD over and over again 19 Programming a sequence of tracks... -
Page 16: Loading A Cd
U S I N G Raises and lowers the clamp which LOAD holds the CD in place Start playing a CD then Press repeatedly to change the CD DISPLAY display indication T H E C O M P A C T D I S C Loading a CD Pressing the LOAD button raises the... -
Page 17: Playing The Cd
Playing the CD When you press the CD button to start playing, all information on the CD – for example the total number of tracks – will first be registered. Then the CD starts playing from the beginning. While the CD is playing, you can step through the tracks by pressing the step buttons ;... -
Page 18: Playing Tracks In Random Order
> Using the compact disc player Press while the CD is playing to see RANDOM the current setting in the display then Press again to switch the random RANDOM play function on or off Note: The function remains on until you change it via the RANDOM button, or until you switch the system to stand-by. -
Page 19: Programming A Sequence Of Tracks
Programming a sequence of tracks You can program the CD player either to play specific tracks on the CD you have loaded, or to leave out certain tracks. To do so, you must start playing the CD. If you don’t want playing to continue while you program the track sequence, press PAUSE. - Page 20 N O T E S...
- Page 21 U S I N G T H E T A P E R E C O R D E R 22 Loading a tape Switching displays 23 Playing the tape 24 Instant recording on tape 25 Recording specific CD tracks 26 Using Dolby NR noise reduction Cancelling the tape reverse function...
-
Page 22: U S I N G
Start playing a tape TAPE then Press repeatedly to change the tape DISPLAY display indication U S I N G T H E T A P E Loading a tape The tape cassette must be loaded with the tape slot facing downwards – and with the A-side out. -
Page 23: Playing The Tape
Playing the tape Pressing the TAPE button starts the tape recorder. If you press TAPE then 1, the tape will be rewound to the beginning to start playing from the first track. The tape recorder automatically reverses the tape at the end of the first side and, within one second, resumes playing. -
Page 24: Instant Recording On Tape
The buttons you will use for recording are the three buttons with green text: RECORD, PAUSE, and RETURN. Whenever the BeoSound Ouverture is playing, you can start recording directly on the tape in the tape recorder – just press the RECORD button twice. -
Page 25: Recording Specific Cd Tracks
Recording specific CD tracks The system also allows you to start recording from a specific track on a CD. If you press RECORD while a CD is playing, the CD player pauses. You can then key in the track number from which you want the recording to start. -
Page 26: Using Dolby Nr Noise Reduction
AUT REV tape reverse function from ON to OFF, or vice versa Using Dolby NR* noise reduction The BeoSound Ouverture is equipped with the Dolby B NR system. From the factory, the noise reduction system is cut in. If you wish to change this setting, you may do so by pressing the NR button. - Page 27 T I M E R P R O G R A M M I N G 28 Programming Timers 30 Switch on the Timer function! 31 Checking or cancelling your Timers 32 Setting the built-in clock...
-
Page 28: Programming Timers
– for example after you leave for work in the morning. The BeoSound Ouverture memorizes up to 11 such programmings at a time. Once you have pressed the PROGRAM button to get started, programming a new Timer is just like having a conversation with the display... - Page 29 V.TAPE (video tape recorder) displayed, the BeoSound Ouverture must be connected to a Bang & Olufsen video system. When the BeoSound Ouverture is used in certain types of integrated Bang & Olufsen AV systems (see page 39), the Timer Play function will not be available.
-
Page 30: Switch On The Timer Function
PLAY setting Switch on the Timer function! The Timers you have programmed into the BeoSound Ouverture can all be executed with or without the loud- speakers being cut in. For the loudspeakers to be cut in – so that you can hear your Timer Play... - Page 31 Checking or cancelling your Timers You can look up each Timer you have programmed to either check its contents, or to cancel it completely. To do so, you must press the PROGRAM button. When you have pressed PROGRAM, you must first decide which type of Timer it is that you want to look up: RECORD, PLAY, or ST.BY.
-
Page 32: Setting The Built-In Clock
If you want to make use of the Timer function, you must first make sure that the built-in 24 hour clock in the BeoSound Ouverture has been set to the correct time, date and year. The display enables you to check that the clock is set correctly. -
Page 33: N I C E T O K N O W
N I C E K N O W 34 Adjusting sound 36 Playing auxiliary sources 37 Music throughout the house 38 From audio to video – or vice versa... -
Page 34: Adjusting Sound
Select a source… then Press to access the setup function SETUP The display reads SOUND? then Press to access the sound adjustment PLAY function Press repeatedly to display the sound PLAY cue you want Then adjust the sound to your liking... - Page 35 It “boosts” the high and low frequencies, so that the music becomes more dynamic. • When the BeoSound Ouverture is used in a fully integrated Bang & Olufsen AV system (see page 39), sound must be adjusted as described in the guide for your video system.
-
Page 36: Playing Auxiliary Sources
AUX-socket, pressing AUX will open up for the signal into the BeoSound Ouverture. Non-Bang & Olufsen products cannot be operated via the BeoSound Ouverture, but must be operated as usual – directly on the product. Note: Please contact your Bang & Olufsen dealer for complete information about which Bang &... -
Page 37: Music Throughout The House
Ouverture and hear it in the room with your extra speakers or your extra TV. The basic functions offered by the BeoSound Ouverture can even be operated via your BeoLink products – just as if you were operating the system directly, using the remote control. - Page 38 Audio/Video recording The video sound you hear in the Ouverture speakers can be recorded on the tape in the BeoSound Ouverture. To do so, just follow the usual recording procedure. Likewise, the sound you hear in the TV speakers can be recorded on the video tape recorder –...
- Page 39 Note: The operations described on page 38 do not apply to a fully integrated AV system as described on this page. When the BeoSound Ouverture music centre is used in a fully integrated Bang & Olufsen AV system, the video system takes over some of...
- Page 40 • C O N T R O L Using the Beo4 Although designed primarily for close- up operation, the BeoSound Ouverture music system can also be operated from a distance. The Beo4 remote control operates all the primary functions in the BeoSound...
- Page 41 Note: To switch off the random and repeated playing functions in the CD player, you must use the buttons on the BeoSound Ouverture. Note: To switch on an extra source connected to the BeoSound Ouverture AUX-socket, you must find A.AUX* in the Beo4 display, then press GO.
- Page 42 RECORD RECORD See the following page for more information about recording… Using BeoSound Ouverture in a link room with Beo4 Before you start… Please refer to the Setting-up guide for further instruction of how to prepare BeoSound Ouverture for use in a link room.
- Page 43 Recording main room sources… Press to record TV sound only Press to record Satellite sound only Use the number keys to select a TV or Satellite program number Press until LINK* appears on Beo4 LIST then Press to record CD from main room Press to record audio tape from A TAPE main room...
- Page 44 Contact person Dealer Telephone Address BeoSound Ouverture serial number Dear Customer, Your needs as the user of our products are always given careful consideration during the design and development process, and we strive to make our products easy and comfortable to operate.
Need help?
Do you have a question about the BeoSound Ouverture and is the answer not in the manual?
Questions and answers