Table of Contents
Advertisement
Available languages
Available languages
Quick Links
INSTALLATION INSTRUCTIONS FOR PART GMLAN11-100
GMLAN11-100
GM LAN Interface
2006-2012
APPLICATIONS
See inside front cover
KIT FEATURES
• Provides accessory (12-volt 10 amp)
• Retains R.A.P. (Retained Accessory Power)
• Used in amplified or non-amplified sound systems
• Retains chimes
• Provides NAV outputs (parking brake, reverse, mute, V.S.S.)
• Built-in SWC (steering wheel control) interface
• Retains OnStar/OE Bluetooth
• Adjustable volume for chimes and OnStar
• High level speaker input
• USB updatable
• Retains balance and fade
• Retains OE satellite (if equipped)
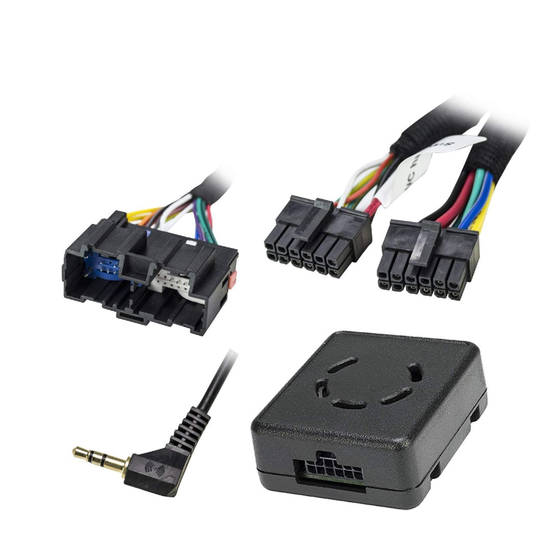
INTERFACE COMPONENTS
GMLAN11-100 harness • 4-pin to 4-pin resistor pad harness
22-pin harness to 30-pin GM LAN harness with stripped leads
TOOLS REQUIRED
• Cutting tool • Crimping tool • Tape • Connectors (example: butt-connectors, bell caps, etc.)
METRA. THE WORLD'S BEST KITS.™
metraonline.com
1-800-221-0932
© COPYRIGHT 2004-2011 METRA ELECTRONICS CORPORATION
Advertisement
Chapters
Table of Contents

Subscribe to Our Youtube Channel
Related Manuals for Metra Electronics Axxess GMLAN11-100


Summary of Contents for Metra Electronics Axxess GMLAN11-100
- Page 1 22-pin harness to 30-pin GM LAN harness with stripped leads TOOLS REQUIRED • Cutting tool • Crimping tool • Tape • Connectors (example: butt-connectors, bell caps, etc.) METRA. THE WORLD’S BEST KITS.™ metraonline.com 1-800-221-0932 © COPYRIGHT 2004-2011 METRA ELECTRONICS CORPORATION...
- Page 2 GMLAN11-100 Applications Note: The GMLAN11-100 is designed to and MUST be used with the GMOS-100i (sold separately). Please refer to GMOS-100i for 16-pin connector instructions. Chevrolet Saturn Cobalt 2007-2011 Aura 2006-2009 2006-2011 2006-2009 Malibu 2008-2012 PontiaC 2007-2008 2009-2010 Solstice 2006-2009 Caution: Metra recommends disconnecting the negative battery terminal before beginning any installation.
-
Page 3: Table Of Contents
GMLAN11-100 Table of Contents Connections to be made – From the 22-way harness ....................4 – From the 30-way harness ....................4-5 – For Non-Amplified Systems ..................5 – For Amplified Systems ....................5 installing the GMlan11-100 ..................... 5 Programming SWC ......................6-8 –... -
Page 4: Connections To Be Made
GMLAN11-100 Connections to be made 1. From the 22-way harness: Connect the 3.5mm jack to the aftermarket radio’s steering wheel control input (if equipped). Note: If using Eclipse, Kenwood, or select JVC radios use the supplied female 3.5mm adaptor. • For Kenwood and select JVC radios: Connect the SWC wire (normally Blue/ Yellow) to the Brown wire of the ASWC. -
Page 5: For Non-Amplified Systems
GMLAN11-100 Connections to be made non-amplified vehicles: • Cut the resistors from the Green, Green/Black, violet, violet/Black right below the heat shrink. • Connect the violet wire to the right rear positive wire of the aftermarket radio. • Connect the violet/Black wire to the right rear negative wire of the aftermarket radio. •... -
Page 6: Programming Swc
GMLAN11-100 Programming SWC Turn on the ignition. The LED will begin to blink rapidly. Turn on the aftermarket radio. The following buttons must be pressed in order: Volume Up PTT/Mute Seek Up Fan Up Band • Each button pressed will be acknowledged by the LED steadily. If any of the above buttons are not present, substitute with Volume Up. -
Page 7: Audio Level Adjustment
GMLAN11-100 Programming SWC audio level adjustment Start your vehicle and turn on the radio having audio playing. Turn your aftermarket radio’s volume up ¾ of the-way. With a small screwdriver adjust the potentiometer clockwise to raise the audio level and counterclockwise to lower the audio level. Once at desired level your audio adjustment is complete. -
Page 8: Remapping The Swc Buttons
GMLAN11-100 Programming SWC Press and hold the “Volume Down” button for 5 seconds to finish programming. The LED will then go off. After a few seconds, the LED will then blink the number of times corresponding to the radio type. Verify that the number of blinks are the same number of times the “Volume Up”... -
Page 9: Resetting Or Forcing Auto Learn On The Swc
GMLAN11-100 Remapping the SWC buttons Next, continue the process of remapping buttons to the SWC in order of the list below. 13 On Hook Volume Up Preset Up Volume Down Preset Down 14 Off Hook 15 Fan Up Seek Up/Next Power 10 Band 16 Fan Down... - Page 10 Notes...
- Page 11 Notes...
- Page 12 Log onto www.installerinstitute.com or call 800-354-6782 for more information and take steps toward a better tomorrow. Metra recommends MECP certified technicians METRA. THE WORLD’S BEST KITS.™ metraonline.com 1-800-221-0932 © COPYRIGHT 2004-2011 METRA ELECTRONICS CORPORATION...
- Page 13 Arnés GM LAN 22-pin arnés a 30-pin con conectores pelados HERRAMIENTAS REQUERIDAS • Cortador • Pelacables • Cinta • Conectores (p. ej., conectores a tope, tapas acampanadas, etc.) METRA. THE WORLD’S BEST KITS.™ metraonline.com 1-800-221-0932 © COPYRIGHT 2004-2011 METRA ELECTRONICS CORPORATION...
- Page 14 GMLAN11-100 Aplicaciones Nota: El GMLAN11-100 está diseñado y debe utilizarse con el GMOS-100i (se vende por separado). Consulte el GMOS-100i para obtener instrucciones para el conector de 16-pin. Chevrolet Saturn Cobalt 2007-2011 Aura 2006-2009 2006-2011 2006-2009 Malibu 2008-2012 PontiaC 2007-2008 2009-2010 Solstice 2006-2009...
- Page 15 GMLAN11-100 Indice Conexiones que se deben hacer – Desde el arnés de 22 vías ....................4 – Desde el arnés de 30 vías .....................4-5 – Vehículos no amplificados ..................5 – Vehículos amplificados ....................5 instalación del GMlan11-100 ................... 5 Programación de SWC ....................6-8 –...
-
Page 16: Conexiones Que Se Deben Hacer
GMLAN11-100 Conexiones que se deben hacer 1. Desde el arnés de 22 vías: Conecte el conector de 3.5mm a la entrada de control del volante de su radio de mercado secundario (si cuenta con dicho equipamiento). Nota: Si usa un radio Eclipse, Kenwood o algunos radios JVC, use el adaptador hembra de 3.5mm suministrado. -
Page 17: Vehículos No Amplificados
GMLAN11-100 Conexiones que se deben hacer vehículos no amplificados: • Corte las resistencias de los cables verde, verde/negro, violeta, violeta/negro justo debajo del termoencogimiento. • Conecte el cable violeta al cable positivo posterior derecho del radio de mercado secundario. • Conecte el cable violeta/negro al cable negativo posterior derecho del radio de mercado secundario. -
Page 18: Programación De Swc
GMLAN11-100 Programación de SWC Encienda la ignición. El foco LED del GMLAN11-100 se encenderá sin parpadear. Encienda el radio. Debe presionar los siguientes botones en el siguiente orden: Volume Up PTT/Mute Seek Up Fan Up Band • Cada vez que presione el botón el foco LED se iluminará sin parpadear. Si alguno de estos botones no está... -
Page 19: Ajuste Del Nivel De Audio
GMLAN11-100 Programación de SWC ajuste del nivel de audio Arranque su vehículo y encienda el radio mientras reproduce audio. Aumente el volumen del radio de mercado secundario hasta llegar a ¾ del máximo nivel. Con un pequeño destornillador, ajuste el potenciómetro hacia la derecha para aumentar el nivel de audio y hacia la izquierda para disminuir el nivel de audio. -
Page 20: Remapeo De Los Botones Swc
GMLAN11-100 Programación de SWC Presione y mantenga presionado el botón de bajar volumen durante 5 segundos para terminar la programación. El foco LED se apagará. Después de unos cuantos segundos, el foco LED parpadeará la cantidad de veces correspondiente al tipo de radio. Este número debe ser igual que el número de veces que el usuario ha presionado el botón de aumentar volumen. -
Page 21: Cómo Restablecer O Forzar El Aprendizaje Automático En El Swc
GMLAN11-100 Remapeo de los botones SWC A continuación, continuar con el proceso de reasignación de botones para el SWC en el orden de la lista de abajo: 13 On Hook Volume Up Preset Up 14 Off Hook Volume Down Preset Down 15 Fan Up Seek Up/Next Power... - Page 22 Notas...
- Page 23 Notas...
- Page 24 Metra recomienda técnicos con certificación del Programa de Certificación en Electrónica Móvil (Mobile Electronics Certification Program, MECP). METRA. THE WORLD’S BEST KITS.™ metraonline.com 1-800-221-0932 © COPYRIGHT 2004-2011 METRA ELECTRONICS CORPORATION...
Need help?
Do you have a question about the Axxess GMLAN11-100 and is the answer not in the manual?
Questions and answers