Table of Contents
Advertisement
Quick Links
User's Manual
Home Beauty Device
Introduction . . . . . . . . . . . . . . . . . . . . . . . . . . . 1
Safety Precautions . . . . . . . . . . . . . . . . . . . . . . 1
When Using Outside of Japan. . . . . . . . . . . 9
Names and Functions of Components. . . . 10
Before Use. . . . . . . . . . . . . . . . . . . . . . . . . . . . 12
How to Use . . . . . . . . . . . . . . . . . . . . . . . . . . . 15
Photo PLUS Shiny
After Treatment . . . . . . . . . . . . . . . . . . . . . . 26
Additional Information . . . . . . . . . . . . . . . . 28
Troubleshooting . . . . . . . . . . . . . . . . . . . 28
Frequently Asked Questions . . . . . . . . . 30
After-sales Service . . . . . . . . . . . . . . . . . . . . 32
M18
To be retained
Advertisement
Table of Contents

Related Manuals for Ya-man Photo PLUS Shiny


Summary of Contents for Ya-man Photo PLUS Shiny
-
Page 1: Table Of Contents
User’s Manual Home Beauty Device Photo PLUS Shiny Introduction ......1 After Treatment ..... . 26 Safety Precautions . -
Page 2: Introduction
Introduction Thank you for purchasing this YA-MAN product. • Please read this User’s Manual carefully for information on how to use the device properly and safely. • After reading the contents hereof, be sure to keep this User’s Manual in an accessible location. - Page 3 DANGER (Use and storage) ● The following individuals should not use the device: Failure to comply may cause electronic medical devices to malfunction. Do not use the device in conjunction with any medical electronic equipment, including: Prohibited pacemakers or other implanted electronic medical devices; artificial heart-lung machines or other electronic life-support medical devices; and electrocardiographs or other worn electronic medical devices.
- Page 4 WARNING (Use and storage) ● ● Do not use the device for a long time over areas where the Do not place heavy items on the device, drop the device skin is thin or areas above bones. (especially during use) or otherwise subject the device to a strong impact.
- Page 5 WARNING (Use and storage) ● Do not use or charge the device in the bathroom or near a bathtub, shower, sink or other vessels filled with water. Failure to comply may cause an electric shock, short circuit, fire or failure of the device. Exposure ●...
- Page 6 WARNING (Use and storage) ● Do not leave the device near fire, in the hot sun, in a bathroom or other high-temperature/high-humidity location or near combustible gas or a flammable object. Do not dispose of the device in a fire or place it near fire or flames. Do not use or charge in a high-temperature area or if the device is hot.
- Page 7 CAUTION (Use and storage) ● Do not wipe the device or charging base with solvents such as alcohol, thinner, benzene, nail polish remover, kerosene, chemicals or polishing powder. Failure to comply may cause a damage to the surface of the device. Prohibited ●...
- Page 8 CAUTION (Use and storage) ● Reapply skincare products or water during treatment to ensure that there is always some moistures between the electrode head and the skin. If there is an insufficient amount of skincare product or water, the stimulation will become weaker, causing skin problems. Mandatory ●...
- Page 9 WARNING (Power supply) ● ● Do not damage, modify or bundle the USB charging cable. Do not wash or submerge the USB charging cable in water. Do not place heavy objects on the USB charging cable or allow it to get Exposure Careless or Failure to comply may cause an electric shock, short circuit, fire or a...
-
Page 10: Table Of When Using Outside Of Japan
When Using Outside of Japan WARNING ● Use only with a 5 V DC USB power supply. Failure to comply may cause a fire, electric shock or a failure of the device. Mandatory compliance ● Be sure to check the plug configuration and the voltage of the power outlet before use. Failure to comply may cause the generation of heat, a fire, or a malfunction of the device. -
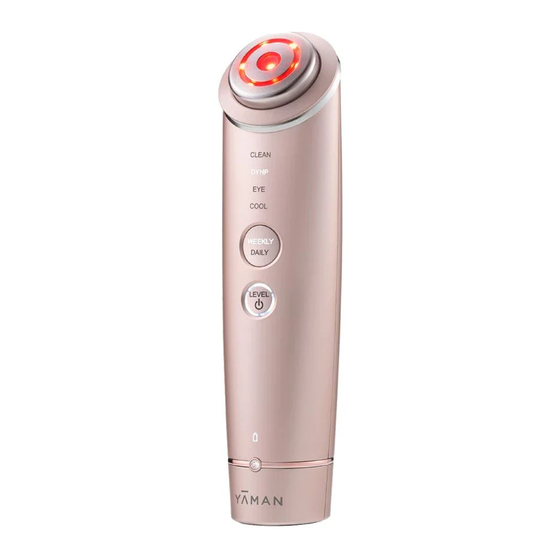
Page 11: Contents Names And Functions Of Components
Names and Functions of Components Main Body ● ● Front view Back view LED Lamps Electrode head Mode lamp Mode button Hand Electrode Level indicator Power/Level button Remaining battery level indicator Charging terminal... - Page 12 Accessories ● ● ● Charging base Cotton stopper USB charging cable (attached to the electrode head of the main body when packaged) (USB Type-C™) Use this stopper to apply a cotton to the electrode head (page 18). * For use exclusively with this product. Do not use attachments other than those provided with the product. * The design and specifications of the device and peripheral accessories are subject to change for improvement purposes without notice.
-
Page 13: Before Use
Before Use Charge the device Using a household power outlet Household power outlet Remaining battery level indicator Charging terminal Charging terminal AC adapter* Charging terminal * Not included with the device. Charging base USB charging cable Using a computer Remaining battery level indicator Charging terminal Charging terminal Charging terminal... - Page 14 Charging The remaining battery level indicator flashes in white. When charging The remaining battery level indicator lights up in white for 5 seconds and then turns off. is complete Approx. 3 hours (room temperature approx. 25° C) Charging time The actual charging time will differ depending on the remaining battery level, the charging environment, and the AC adapter (commercially available) being used. Approx.
- Page 15 Pre-testing on skin When using the device for the first time, always test for its compatibility with your skin. ● ATTENTION Be sure to perform a pre-test in order to prevent skin problems from occurring. ● If a rash, redness, itchiness, stinging sensation, or other abnormality occurs at the pre-testing area, immediately stop the pre-test.
-
Page 16: How To Use
How to Use Precautions Read the items below carefully before use and use only as directed. ● Be sure to perform a pre-test before using the device for the first time (page 14). ● Be sure to move the device on your skin while it is in use. Using the device continuously on the same area may cause burns or other injuries. (except in EYE CARE Mode and COOL Mode) ●... - Page 17 Modes Operating Recommended Mode Function Cotton Recommended cosmetics Level time frequency • EMS Without a cotton Approx. Skin lotion or serum 3 levels Every day • Iontophoresis 3 minutes • LED (Red) • RF Approx. • Ion conduction With a cotton pad Skin lotion 3 levels 3 minutes...
- Page 18 Operating Recommended Mode Function Cotton Recommended cosmetics Level time frequency Treatments • Cool down Without a cotton Approx. Place directly on the skin – 2 to 3 times 3 minutes • LED (Blue) a week *1 If using your regular skincare product, be sure it is water soluble. Do not use oil-based or scrubbing skincare products. Failure to comply may cause product malfunctions or skin problems.
- Page 19 How to attach a cotton pad to the electrode head Remove the cotton stopper from the electrode head. Place a piece of cotton on top of the electrode head and press the cotton stopper down over the cotton. • If the cotton stopper does not fit properly on the electrode head, please use a larger and thinner piece of cotton. Because thick cotton pads are difficult to fix in place, split them in half before use.
- Page 20 Basic method of use Remove makeup and gently cleanse your face. Turn on the device Hold down the Power/Level button (hold down the button for approx. 3 seconds • Remove oil and dirt from your skin so that it is in a clean condition prior or longer).
- Page 21 Select the mode To change the mode, press and hold or briefly press the mode button. If Daily Care is selected, the mode button (DAILY) lights up. If Weekly Care is selected, the mode button (WEEKLY) and the mode lamp for the selected mode light up. (Daily Care) DAILY Mode...
- Page 22 Select the treatment level (intensity) (except in COOL Mode) • Each time you briefly press the Power/Level button, the device will beep once and the level will change. Level 1 (the minimum) Level 2 Level 3 (the maximum) * The lamp on the outside of the button lights up in increments of 1/3. Power/Level button ATTENTION •...
- Page 23 Hold the device with your hand touching the Care for the skin after treatment hand electrode (the silver rim) on the rear. • When you have finished treatment, rub the remaining lotion into your skin before using your usual basic skincare products to condition it. •...
- Page 24 How to use the device on your skin DAILY Mode • Recommended speed for moving the device: approx. 2 cm per second Move the electrode head over the skin in the direction of the arrows shown below. * If the treatment temperature feels too hot, move the head more quickly.
- Page 25 CLEAN Mode DYHP Mode Move the electrode head over the skin in the direction of the arrows shown Move the electrode head over the skin in the direction of the arrows shown below. below. The LED light can be used to treat areas around the eyes and the upper eyelids. Areas you Areas you should not treat...
- Page 26 EYE CARE Mode COOL Mode Press the electrode head repeatedly on your face from the inner corner to the outer corner of Press the electrode head repeatedly on your face as if stamping on the the eye as if stamping on the skin (Press → Release → Move electrode head). Press down on skin (Press →...
-
Page 27: After Treatment
After Treatment How To Clean Clean the device after each use for hygienic reasons. WARNING ● When cleaning the device, check to make sure it is not charging and that the power is switched off. To clean the device and electrode head, wipe Wipe the entire device with a dry cloth and store it them with a damp and well-wrung cloth to after removing all moisture. - Page 28 Storing ● If you will not be using it for an extended period, clean the device before storing it. ● Unplug the USB charging cable when not in use. ● Avoid storing the device near a heater or in a bathroom or other high-temperature/high-humidity location. Also, avoid unstable locations or places where there is exposure to direct sunlight.
-
Page 29: Additional Information
Additional Information Troubleshooting If you perceive any abnormality while using the device, verify the following points before arranging to have it repaired. Problem Possible causes and solutions Press and hold the Power/Level button for approx. 3 seconds or longer (page 19). The device does not turn on The device has run out of power. - Page 30 Symptom Possible causes and solutions Raise the level by pressing the Power/Level button. The EMS feels weak The skin lacks moisture. Moisturize your skin with lotion before use. (or you cannot feel it) You are not applying the device along muscles. Apply the electrode head along muscles (page 23). You are using the device without moving the electrode head.
-
Page 31: Frequently Asked Questions
Frequently Asked Questions As a general guide, when using cotton pads, be sure the entire electrode head is moistened with skin lotion. How much of the skin lotion should I use each time? We recommend adding more skin lotion if you feel there is not enough. The recommended times are: [Daily Care] •... -
Page 32: Product Specifications
Product Specifications Rated input 5 V DC 1.0 A (Charging base) Rated output 9 V DC 0.55 A (Charging base) Power consumption Approx. 4.5 W (when charging) Battery Lithium-ion battery Approx. 3 hours Charging time * The actual charging time will differ depending on the remaining battery level, the charging environment, and the AC adapter (commercially available) being used. -
Page 33: After-Sales Service
After-sales service Rechargeable battery The rechargeable battery is a consumable item. The battery is expected to last 300 charge cycles. If the device no longer operates for more than a short period of time even after the battery has been recharged, the battery may have reached the end of its service life. - Page 34 Removing the battery Remove the screw cover and Remove the Remove the the rubber sheet with a thin, bottom housing back cover sharp object, then remove the screw. Screw Back cover Screw cover Screw Bottom cover Rubber sheet...
- Page 35 Disconnect the battery cable Remove the battery Battery Battery cable ● Caution This image is intended to be used for disposing of the product, not repairing it. Do not disassemble the product except for disposal. Failure to comply may cause a fire, electric shock or other injuries.
- Page 36 Contacts for overseas customers For countries and regions outside Japan, please contact the store where you purchased your product for any inquiries. Alternatively, check the YA-MAN GLOBAL Official Website (https://www.ya-man.com/en/) Official website: https://www.ya-man.com/en/ M18-1-001E...
Need help?
Do you have a question about the Photo PLUS Shiny and is the answer not in the manual?
Questions and answers