Advertisement
Quick Links
Advertisement

Summary of Contents for MAKER MADE 300X
- Page 1 SETTING UP YOUR 300X 3D PRINTER The complete assembly guide by Last Updated 12.23.2020 v1.1...
- Page 2 TABLE OF CONTENTS SECTION 1. Introduction - 3 SECTION 2. What’s in the box - 4 SECTION 3. Assembling the 300x - 6 SECTION 4. Your First Print - 9 SECTION 5. About 3D Printing - 10 SECTION 5. Appendix - 21 This work is licensed under the creative commons Attribution Non commercial-no Derivatives 4.0 International license.
- Page 3 We suggest printing the guide in color, if you want a paper copy to go along with the quick start guide. 2. 300x setup can be broken down into two main parts: building the 300x and starting your first print. There are a few steps involved, so let’s get started! 3.
- Page 4 300X USER GUIDE WHAT’S IN THE BOX? X-AXIS GANTRY Y-AXIS BASE WITH MAGNETIC SPOOL HOLDER (3 PARTS) BUILD SURFACE BLACK M3 SCREEN MOUNT BOLTS BLACK SPOOL HOLDER SCREWS SILVER M4 GANTRY BOLTS (X4) (X2) (X2) SCREEN AND MOUNT ADJUSTABLE PHILLIPS/FLATHEAD 2mm, 2.5mm, 3mm ALLEN...
- Page 5 300X USER GUIDE WHAT’S IN THE BOX? NOZZLE UNCLOGGING TOOL MICROUSB FOR SCREEN POWER USB DRIVE Drew’s Note: Also included is a welcome letter and a quick start guide. We are so excited that you have chosen to 3D print with This work is licensed under the creative commons Attribution Non commercial-no Derivatives 4.0 International license.
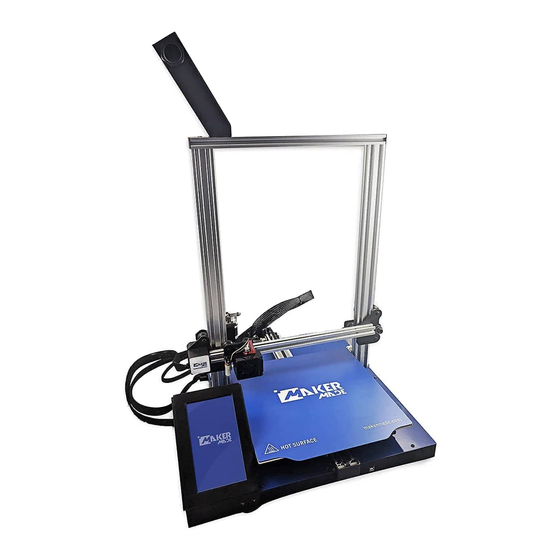
- Page 6 300X USER GUIDE ASSEMBLING YOUR 300X The 300x 3D Printer comes in several pieces to assemble. Drew’s Note: Here is a layout of the practical features of the 300x! Filament Holder Extruder X-Axis Stepper Motor Extruder Stepper X-Axis Limit Switch...
- Page 7 300X USER GUIDE 3D PRINTER ASSEMBLY 1. Unbox 300x and remove all foam from the base. 2. Place X-axis gantry into ports on top of the base, with the silver and black stepper motors toward the back and the nozzle toward the front.
- Page 8 300X USER GUIDE 3D PRINTER ASSEMBLY 7. Plug gantry into base, with connector clip on top. 8. Plug in both Z-axis stepper motors from the back of the printer. The connection will only fit one way. 9. Plug in X-axis stepper motor and smaller limit switch.
- Page 9 15. Follow the on screen instructions for the initial 16. To connect to the 300x wirelessly using a web setup, Wi-Fi, and calibration settings for your new 3D browser, either connect the printer to your Wi-Fi, printer.
- Page 10 Cura, if you want to download it on your computer. To print on your 300x, just tap on your STL file (or click it, if connected through a web browser). Then you need to choose the physical properties of how your model will print. You can change the print profile to “High Quality” for a smoother, higher quality part, although the build will take longer, or “Fast Quality”...
- Page 11 300X USER GUIDE 1. Once Cura is installed, you need to add your 300x. If you already have a machine in Cura, click on its name and choose “Add a non-networked printer”. 2. Now choose “Custom” and select “Custom FFF Printer”.
- Page 12 300X USER GUIDE 3. Now we are ready to add our printer settings! First, we have to add the automatic leveling command. In the “Start G-code” box, click after the command “G28 ;Home”, hit enter on your keyboard, and type “G29” as shown. This command must be...
- Page 13 300X USER GUIDE 5. Click the tab that reads “Extruder 1”. In the box next to “Compatible Material Diameter” replace the numbers with “1.75” as shown. Then click “Next”. Drew’s Note: The correct material diameter is very important! If you don’t change this command, your prints will come out squishy and under-extruded.
- Page 14 7. Click “Custom” and then the chevron in the “Profile” dropdown menu. Drew’s Note: Your 300x will print without loading these profiles. However, it won’t look as nice and will lead to more print failures. I made these profiles to take full advantage of the quality and features of the 300x! 8.
- Page 15 300X USER GUIDE 9. Click “Import” and import these following settings from Dropbox. If you download the whole folder, you will have to unzip it before they will become visible in Cura. 300x Printing Profiles 10. After you import each one you will get a popup that will tell you if they successfully imported.
- Page 16 You can change any setting and even make your own profiles in this settings screen! Drew’s Note: When the 300x is added to Cura this January, you will no longer have to manually add these settings. They will be added automatically when you choose the Maker Made 300x...
- Page 17 You can move (move the model to another place), scale (change the size), or rotate (to rotate the flattest side on the build surface) with the menu options. Drew’s Note: These features are also coming very soon to the 300x onboard slicer! This work is licensed under the creative commons Attribution Non commercial-no Derivatives 4.0 International license.
- Page 18 Drew’s Note: Our web uploading update is coming very soon! When it does, select “Save to File” instead, navigate to http://300x.local to upload the file to the printer on your network. This work is licensed under the creative commons Attribution Non commercial-no Derivatives 4.0 International license.
- Page 19 PART 3: PRINT! The last and most fun step is printing! Once you choose your file to print and slice it, your 300x will heat the nozzle and build plate to melt the filament. When it’s heated, the printer will run the print bed calibration and begin! Make sure your filament is fully loaded and the print sensor is calibrated to the correct height.
- Page 20 (nozzle) temperature, and print speed. Once you narrow down the problem, you can start trying things to fix it! Drew’s Note: The 300x comes with pre-programmed troubleshooting tutorials! Just tap the “tutorial” button in education or you can find them in the menu.
- Page 21 300X USER GUIDE APPENDIX - LINKS Support: support@makermade.com Cura (Slicing Engine): https://ultimaker.com/software/ultimaker-cura 300x Resources: https://makermade.com/3dp-resources/ Makerverse: https://makermade.com/resources/ Marketplace: https://makermade.com/marketplace/ Weekly Beginner Training Link: https://makermade.com/resources/ YouTube Playlists: https://www.youtube.com/c/MakerMadeCNC This work is licensed under the creative commons Attribution Non commercial-no Derivatives 4.0 International license.
Need help?
Do you have a question about the 300X and is the answer not in the manual?
Questions and answers