
Related Manuals for Altana BYK Temp-gard 6p


Summary of Contents for Altana BYK Temp-gard 6p
- Page 1 Measure what you see. temp-gard 6p temp-gard 12p Manual A member of Additives & Instruments...
- Page 2 temp-gard Manual Patent pending 255 021 547 E 1103 www.byk.com/instruments...
- Page 3 Technical & Application Support Application and Technical Seminars Repair & Certification Service BYK-Gardner is part of the Additives and Instrument Division of ALTANA AG, a leading supplier of additives for coatings and plastics. Together, we offer complete and unique solutions for you, our customer.
-
Page 4: Table Of Contents
Table of contents Table of contents 1. System description and Delivery notes ..........5 2. Power supply ................... 7 3. Controls ....................8 4. Getting started ..................9 Starting the temp-gard logger ..............9 Finishing the Measurement ..............10 Transfering Data ..................10 Temperature control ................11 Heatsinks....................11 Special Notes on the Thermal Barrier ...........11... - Page 5 Table of contents Service .......................22 10. Copyright ....................24...
-
Page 6: System Description And Delivery Notes
System description and Delivery notes 1. System description and Delivery notes The temp-gard tem per a ture recorder sys tem mea sures and saves object and air tem per a ture dur ing the cure pro cess. Doc u men ta tion and anal- y s is of tem p er a t ure pro fi les is made easy with the included tem pchart soft ware: all you need to con- trol and opti mize your bak ing pro cess. - Page 7 System description and Delivery notes temp-gard 12p PT-3319 temp-gard 6p PT-3317 Comes com plete with: temp-gard dat a log ger instru ment temp-chart soft ware 1 Ther mal bar rier 1 Set of heat sinks 1 Probe for air tem per a ture, mag net, 3m (PT-3131) 1 Inter face cable to PC 2 AA Alka line bat teries Oper at ing man ual...
-
Page 8: Power Supply
Power supply 2. Power supply Before operating the instrument for the first time, please read the operating manual and take particular notice of the Safety Instructions. Powering the instrument: To operate the instrument, the battery compartment must be fitted with two 1.5-V AA(LR6) batteries. Open the battery compartment with a philips screwdriver and insert the batteries. Ensure that the batteries are correctly oriented in the compartment according to the (+) and (-) marks. -
Page 9: Controls
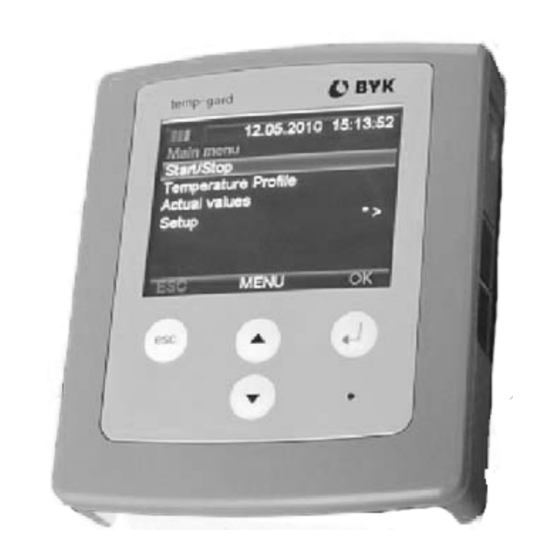
Controls 3. Controls Measurement unit Enter Button: Switch on Select function Start / Stop a measurement esc Button: takes you one level up UP / Down Button: ▲ ▼: Navigation USB Port 1: Transfer via cable USB Port 2: Transfer via USB-Stick Temperature probe connection ports... -
Page 10: Getting Started
Getting started 4. Getting started You can start a measurement • with temp gard as data logger - according to the standard settings for the measurement parameters - change of the measurement parameters in the setup menu measurement parame- ters • by loading an Organizer The measurement with the temp-gard as a data logger is described in the following. -
Page 11: Finishing The Measurement
Getting started Secure all cables and make sure that they cannot get tangled up when travelling through the oven. Place the thermal barrier inside the object and make sure there is enough free space for the thermocouple probes, the cables and the thermal barrier. -
Page 12: Temperature Control
Getting started 4.4 Temperature control On the inside of the battery compartment lid are two thermo-sensitive stickers. They react at a exceeded temperature of 60°C (140°F) respec- tively 65°C (149°F). When these temperatures are exceeded, the color of the stickers turn to black. If the temperature has exceeded 65°C (149°F) please return the instrument to the manufacturer for verification. - Page 13 Getting started cause the housing to deform due to the different cooling rates of the surfaces. Do not remove the cover before the thermal barrier is in place. Since the heat absorbed by the thermal barrier continues to affect the temperature of the heat sink and data logger, remove these parts from the thermal barrier as soon as the test is completed.
- Page 14 Getting started temp-gard Data Loggers Store in a dust free environment. Remove batteries when storing for more than two to three weeks. Return to BYK-Gardner annually for calibration.
-
Page 15: Main Menu
Main menu 5. Main menu The Main menu contains the items: Start / Stop Start / Stop a measurement Temperature Display of temperature curve Profile Actual values Displays the actual temperature data of the connected probes Setup Definition of measurement and instrument parameters 5.1 Start/Stop To start the measurement, place the cursor on the Start/Stop position of the display and press the OK... -
Page 16: Temperature Profile
Main menu 5.2 Temperature profile Temperature profile displays the histogram of the actual measurement. 5.3 Actual values Actual values displays the actual temperature values of the connected probes. 5.4 Setup In the setup menu you can choose between the setup of the Measurement parameters or Instrument. The asterix in the menu item allways leads you to the language selection. -
Page 17: Setup
Setup 6. Setup 6.1 Measurement Parameters You can set: Number of Probes Measurement time Trigger Measurement Interval Unit 6.1.1 Number of Probes Select the number of probes you are going to use. Select the number with the cursor and press the OK button. -
Page 18: Trigger
Setup 6.1.3 Trigger You can choose between temperature and time trigger. That means that the measurement will start after a preselected temerature or time is reached. Click on the appropriate and choose the interval with the cursor. For a measurement without trigger choose „Without Trigger“. -
Page 19: Instrument
Setup 6.2 Instrument In the instrument menu you can choose: Display time Time/Date Language Info 6.2.1 Display time You can set the time interval after which the instrument shuts down automatically. 6.2.2 Time/Date Here you can set Time and Date. -
Page 20: Language
Setup 6.2.3 Language Choose the Language 6.2.4 Info This menu displays the following information about the device: • Version • Serial number • Module version • Maximum internal temperature... -
Page 21: Technical Data
Technical Data 7. Technical Data Accuracy +/- 0.5 °C Resolution 0,10 °C from 0 – 400 °C 0.18 °F from 32 – 752 °F No. of Channels 6 or 12 Memory 20,000 readings per channel Sampling interval 0.1 sec up to 24 hrs Temperature Range 0 –... -
Page 22: Cleaning And Maintenance
Cleaning and Maintenance 8. Cleaning and Maintenance • Do not use any acetone for cleaning the unit! The instrument housing is resistant to a number of solvents, but cannot be guaranteed to withstand all chemicals. You should therefore use a soft, moist cloth for cleaning. For cleaning exces- sive dirt, use propanol. -
Page 23: Service And Certification
Service and Certitication 9. Service and Certification Service Besides the repair of your instrument we offer the following additional services: First diagnosis on the telephone or by e-mail Call us or send us an e-mail and we will try to solve your problem. If this is not successful, please send us the instrument for repair. - Page 24 Service and Certitication Vertragstyp Lampenwechsel Kalibrierung Reinigung der Glasplatte Reinigung der Heizbank Reinigung der Innenteile Reinigung der Lüfter Reinigung der Optiken Reinigung der Säulen Reinigung der Spindel Überprüfung auf Öldichtigkeit Überprüfung der elektr. Funktionen Überprüfung der Geometrien/Optik Überprüfung der Leistungsaufnahme Überprüfung der mech.
- Page 25 Copyright 10. Copyright This instruction manual is an important part of this instrument. It contains es- sential information about setting up, placing in service and use. If you pass the device on to another user, please ensure that the instruction manual is included with the instrument.
- Page 26 255 021 547 E 1103...
Need help?
Do you have a question about the BYK Temp-gard 6p and is the answer not in the manual?
Questions and answers
Добрый день, прибор показывает только актуальные значения температуры, но перестал их записывать