Table of Contents
Advertisement
Quick Links
Advertisement
Table of Contents

Subscribe to Our Youtube Channel
Related Manuals for Skymsen MSL


Summary of Contents for Skymsen MSL
- Page 1 TABLE BAND SAW STAINLESS STEEL MODEL...
-
Page 2: Table Of Contents
SUMMARY 1. Introduction ..................3 1.1Safety ........................3 1.2 Main components ....................5 1.3 Technical Features ....................6 2. Installation and Pre Operation ............6 2.1 Installation ......................6 2.2 Pre Operation ......................7 3. Operation ..................7 3.1 Functioning ......................7 3.2 Operation Procedures .................... -
Page 3: Introduction
1. Introduction 1.1Safety This equipment is potentially dangerous when used improperly. It is necessary to perform maintenance, cleaning and/or any service by a qualified person and with the equipment disconnected from the electrical network. The instructions below should be followed to avoid injury: 1.1.1 read all instructions. - Page 4 IMPORTANT Make sure that the power cord is in perfect condition for use. If the same is not, do the replacement of the damaged cable on the other that meets the technical specifications and safety requirements. This substitution should be performed by a qualified professional and must comply with the local safety standards.
-
Page 5: Main Components
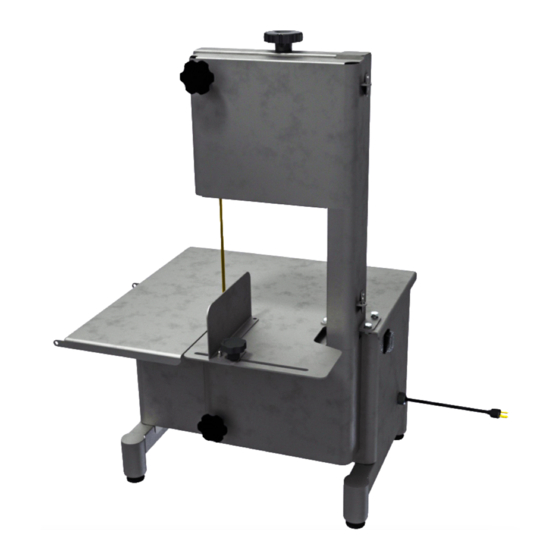
1.2 Main components All components that incorporate the machine are built with materials carefully selected for each role, within the standards of testing and experience Siemsen. PICTURE 01 01-Calibrator Knob of the blade 07-Cutting Regulator 02-on/off switch 08-Fixed table 03-Door 09-Inferior wheel 04-Superior wheel 10-leveling Feet... -
Page 6: Technical Features
1.3 Technical Features TABLE 01 FEATURES UNIT Tensions Frequency Power Height Width Depth Net Weight Gross Weight Cutting Height Cutting Width Open Dimensions (L x P) mm 855x650 Height of the walk to the table 2. Installation and Pre Operation 2.1 Installation 2.1.1 Positioning The equipment must be positioned on a firm and level surface. -
Page 7: Pre Operation
2.1.2 Electrical installation This equipment was developed for 220 Volts (60 Hz). On receiving the machine check tension reported in existing label on the power cord. The power cord has 3 round pins, where one of them is the ground pin-earthed (grounded). It is mandatory that the three points are properly connected before the equipment. -
Page 8: Operation Procedures
3.2 Operation Procedures 3.2.1 Verify that this firm equipment in your workplace. 3.2.2 cutting Regulator To perform several cuts in the same thickness, adjust the regulator to Cut N° 07 (fig. 01) as desired. For this purpose turn the throttle Lever counterclockwise Court releasing the same. -
Page 9: Cleaning And Sanitizing
3.3 Cleaning and Sanitizing IMPORTANT Pull the plug out of the socket before starting the cleaning process. The machine must be totally clean and cleaned: -Before being used for the first time; -After the operation of each day; -Whenever it is not in use for an extended period; -Before putting it into operation after a prolonged downtime. - Page 10 -Taco Remove the bat N° 01 (fig. 04) vertical vertically upward until the complete removal of the same. PICTURE 04 -Blade Turn the handle of the blade Gauge N° 01 (fig. 05) anticlockwise until the blade N° 02 (fig. 05) is free to be removed. PICTURE 05...
- Page 11 -Bottom Steering Wheel Remove the latch N° 01 (fig. 06) firmly grasp the Lower steering wheel and pull the same to the front of the machine until the complete removal of the same as Figure N° 06. PICTURE 06 -Top Steering Wheel After removing the blade firmly grip the steering wheel Top N°...
- Page 12 -Blade Calibrator Turn the handle of the blade Gauge N° 01 (fig. 08) knob counter clockwise until the complete removal of the Stretcher N° 02 (fig. 08). PICTURE 08 -Handle the blade Calibrator Remove the blade Gauge knob N° 01 (fig. 09) vertically of the structure. PICTURE 09 Wash all parts with water and neutral SOAP.
-
Page 13: Cautions With Stainless Steel
IMPORTANT Do not use water jet directly on the equipment. Use a clean cloth or a soft brush to remove waste impregnated. Wash, higienize, rinse and dry all parts. Reassemble all components of the machine in reverse order of disassembly, confirming that all parts have been assembled properly. -
Page 14: General Safety Practices
4. GENERAL SAFETY PRACTICES IMPORTANT If any recommendation is not applicable to your equipment , please ignore it . The following safety instructions are addressed to both the operator of the machine as well as the person in charge of maintenance. The machine has to be delivered only in perfect conditions of use by the Distributor to the user. -
Page 15: Safety Procedures And Notes Before Switching The Machine On
given for each operation step. Every step of the operation shall be taken only if a sign has been made and responded. 4.1.3 Advices * In case of power shortage, immediately switch the machine off.* Use recommended or equivalent lubricants, oils or greases. * Avoid mechanical shocks, once they may cause damages or bad functioning. -
Page 16: Routine Inspection
4.3 Routine Inspection 4.3.1 Advice When checking the tension of the belts or chains, DO NOT insert your fingers between the belts and the pulleys and nor between the chain and the gears. 4.3.2 Precautions Check the motor and sliding or turning parts of the machine in case of abnormal noises. Check the tension of the belts and chains and replace the set when belts or chains show signs of wearing. -
Page 17: Maintenance
4.6 Maintenance 4.6.1 Danger Any maintenance with the machine in working situation is dangerous. TURN IT OFF BY PULLING THE PLUG OFF THE SOCKET DURING MAINTENANCE. IMPORTANT Always remove the plug from the socket in any emergency situation. 4.7 Warning Electrical or mechanical maintenance has to be undertaken by qualified personnel. -
Page 18: Analysis And Problems Solutions
5. Analysis and Problems Solutions 5.1 Problems, causes and solutions This equipment has been designed to require minimum maintenance. However, there may be some irregularities in its functioning, due to natural wear caused by its use. If there is a problem with your equipment, check the following table, where they are described some possible recommended solutions. - Page 19 TABLE 02 PROBLEMS CAUSES SOLUTIONS -The machine is unplugged. -Plug the power cord of the machine into the mains. -Lack of electrical energy. -Check if there is Power -The unit will not turn on. Electric. -Problem with internal or -Call customer service external circuit of the machine.
-
Page 20: Maintenance
6. Maintenance The maintenance must be considered a set of procedures that aims to keep the equipment in optimum operating conditions, resulting in increased service life and safety. * Cleaning – Check item 3.3 of this manual Cleaning. * Wiring-Check all the cables on the decay and all contacts (terminals) on the grip and electric corrosion. -
Page 21: Electric Diagram
7. Electric Diagram ELECTRIC NETWORK 220V / 60Hz ON/OFF SWITCH T1,T5... - Page 22 ___________________________________________________________ ___________________________________________________________ ___________________________________________________________ ___________________________________________________________ ___________________________________________________________ ___________________________________________________________ ___________________________________________________________ ___________________________________________________________ ___________________________________________________________ ___________________________________________________________ ___________________________________________________________ ___________________________________________________________ ___________________________________________________________ ___________________________________________________________ ___________________________________________________________ ___________________________________________________________ ___________________________________________________________ ___________________________________________________________ ___________________________________________________________ ___________________________________________________________ ___________________________________________________________ ___________________________________________________________ ___________________________________________________________ ___________________________________________________________ ___________________________________________________________ ___________________________________________________________ ___________________________________________________________ ___________________________________________________________ ___________________________________________________________ ___________________________________________________________ ___________________________________________________________ ___________________________________________________________ ___________________________________________________________ ___________________________________________________________ ___________________________________________________________ ___________________________________________________________ ___________________________________________________________...
- Page 23 ___________________________________________________________ ___________________________________________________________ ___________________________________________________________ ___________________________________________________________ ___________________________________________________________ ___________________________________________________________ ___________________________________________________________ ___________________________________________________________ ___________________________________________________________ ___________________________________________________________ ___________________________________________________________ ___________________________________________________________ ___________________________________________________________ ___________________________________________________________ ___________________________________________________________ ___________________________________________________________ ___________________________________________________________ ___________________________________________________________ ___________________________________________________________ ___________________________________________________________ ___________________________________________________________ ___________________________________________________________ ___________________________________________________________ ___________________________________________________________ ___________________________________________________________ ___________________________________________________________ ___________________________________________________________ ___________________________________________________________ ___________________________________________________________ ___________________________________________________________ ___________________________________________________________ ___________________________________________________________ ___________________________________________________________ ___________________________________________________________ ___________________________________________________________ ___________________________________________________________ ___________________________________________________________...
- Page 24 METALÚRGICA SIEMSEN LTDA. CNPJ: 82.983.032/0001-19 Rodovia Ivo Silveira - km 12, nº 9525, Galpão 1 - Bairro: Bateas - CEP: 88355-202 Brusque - Santa Catarina - Brasil Fone: +55 47 3211 6000 - Fax: +55 47 3211 6020 www.siemsen.com.br - comercial@siemsen.com.br 55221.6 - INGLÊS Data de Correção: 02/06/2015 - ALÉM DESTAS EQUIPAMENTOS, FABRICAMOS UMA LINHA COMPLETA DE EQUIPAMENTOS.
Need help?
Do you have a question about the MSL and is the answer not in the manual?
Questions and answers