Table of Contents
Advertisement
Available languages
Available languages
Quick Links
Office
Phone: 1-800-503-7534 / 305-868-1603
Fax: 305-866-2704
sales@skyfood.us -
www.skyfood.us
TOLL FREE 1-800-503-7534
Instructions Manual / Manual de Instrucciones
CAUTION!
HAZARDOUS MOVING PARTS
Disconnect Power Before
Cleaning or Servicing
Mini Band Saw / Mini Sierra para Huesos
Model / Modelo
MPL
!ATENCIÓN!
PARTES MOVIBLES PELIGROSAS
Desconecte de la Red Electrica
antes de la Limpieza o Manutención
41423.9 - July / 2013
Advertisement
Table of Contents

Subscribe to Our Youtube Channel
Related Manuals for Skymsen MPL


Summary of Contents for Skymsen MPL
- Page 1 Instructions Manual / Manual de Instrucciones CAUTION! !ATENCIÓN! HAZARDOUS MOVING PARTS PARTES MOVIBLES PELIGROSAS Disconnect Power Before Desconecte de la Red Electrica Cleaning or Servicing antes de la Limpieza o Manutención Mini Band Saw / Mini Sierra para Huesos Model / Modelo Office Phone: 1-800-503-7534 / 305-868-1603 Fax: 305-866-2704...
- Page 3 SUMMARY / INDICE 1. ENGLISH 2. ESPAÑOL...
-
Page 4: Table Of Contents
SUMMARY 1. INTRODUCTION 1.1 Safety 1.2 Main Components 1.3 Technical Characteristics 2. INSTALLATION and PRE OPERATION 2.1 Installation 2.2 Pre Operation 3. OPERATION 3.1 Procedure for Operation 3.2 Cleaning 3.2 Cleaning 3.3 Cautions With Stainless Steel 4. GENERAL SAFETY RULES 4.1 Operation Fundamentals Practices 4.2 Cares and Observations before to Switch On the Saw 4.3 Routine Inspection... -
Page 5: Introduction
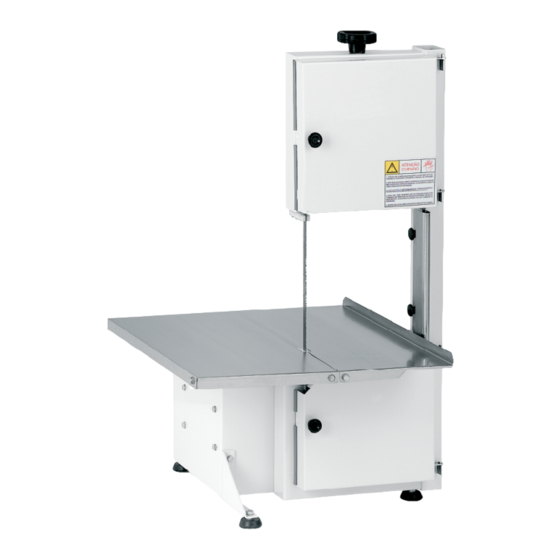
1. Introduction 1.1Safety When misused, the Mini Band Saws model MPL can be potentially DANGEROUS. Maintenance, cleaning or any other service on this machine must be made only by properly trained technicians and the power plug must always be disconnected. For your safety, read the following instructions in order to avoid accidents: 1.1.1 Unplug the machine when you need to remove any removable part... - Page 6 Picture - 01 01- Blade tension control knob 09- Staple 02- Wheel 10- Upper door 03- ON / OFF Switch 11- Pusher (optional) 04- Frame 12- Thickness Guide 05- Blade Guide 13 - Lower door 06- Blade (Width = ½”) 14- Knurled Handle 07- Stationary table 15- Handle Stainless Steel.
-
Page 7: Technical Characteristics
1.3 Thechinical Characteristcs Tabela - 01 Characteristcs Unit MPL (Stainless Steel) Voltage [Hz] Frequency [CV] Power Rating 0,33/0,5 [kW/h] 0,26/0,4 Consumption [Inches] 33 3/8” Height [Inches] Width 20 3/4” [Inches] Depth 20 3/4” Net Weight [lb] [lb] Gross Weight [mm] 9 5/8”... -
Page 8: Pre Operation
2.2 Pre-Operation service company ("Service Company"). Products held at commercial facilities and weighing less than seventy (70) lbs. must be taken or shipped, shipping charges are prepaid, either to SKYFOOD's facility or to a Service Company. Mileage or travel time will NOT be paid. IMPORTANT SKYFOOD offers a limited on-site warranty for products ONLY held at commercial Make sure the blade is set with the correct tension before the operation, by... -
Page 9: Cleaning
(Pic.01). To operate the Mini Band Saw, press the ON / OFF Switch #.03 (Pic.01). Place the product to be processed upon the Stationary Table #.07 (Pic.01) or upon For questions or assistance with products FLEETWOOD by SKYMSEN and SKYMSEN, the optional Sliding Table #.08 (Pic.01), then push it towards the blade #.06 (Pic.01) call SKYFOOD EQUIPMENT Toll Free : 1-800-503-7534, 24h Customer support, or visit leaning it on the Thickness Guide #.12 (Pic.01), this way keeping the desired slice... -
Page 10: Cautions With Stainless Steel
5.2.1 Ajuste Del Regulador de Corte: 3.3 CAUTIONS WITH STAINLESS STEEL El Regulador de Corte No.12 (Fig. – 01) (opcional) fu desarrollado para proveer cortes con el mismo espesor y también para proteger el usuario de accidentes. The Stainless Steel might present rust points, which are always caused by external agents, especially if the cleaning and sanitization is not constant and appropriate. -
Page 11: General Safety Rules
Con un destornillador , saque los tornillos que fijan la tapa trasera inferior y retírela , 4.General Safety Practices para tener acceso a las poleas . Usando una llave de tuerca ( 9/16” ) No. 02 (Fig. 05) afloje los tornillos No.01 (Fig. 05 ) girándolos en sentido anti-horario . En seguida con el auxilio de una palanca de madera No.03 (Fig. -
Page 12: Cares And Observations Before To Switch On The Saw
Problemas Causas Soluções DO NOT modify original characteristics of the machine. La maquina prende, pero correa patinando Ajuste la tensión de la correa de DO NOT remove, tear off or maculate any labels stuck on the machine. If any cuando el producto entra acuerdo con el ítem 5.2 label has been removed or is no longer legible, contact your nearest dealer for replacement. -
Page 13: Operation
Problemas , causas y resoluciones . 4.5 After Finishing The Work Las Mini Sierras Modelos MPL , fueran diseñadas para que necesiten 4.5.1 Precautions un mínimo de manutención . Sin embargo pueden ocurrir algunas Always TURN THE MACHINE OFF by removing the plug from the socket irregularidades en su funcionamiento , debido al desgaste natural causado por before cleaning the machine. -
Page 14: Problems Analysis And Solutions
Al averiguar la tensión de las correas o de las cadenas , NO coloque los dedos entre las correas y las poleas, ni entre las cadenas y sus engranajes . The Mini Band Saws MPL has been designed to operate with minimum maintenance. However, some irregularities may occur during its Cuidados 4.3.2... -
Page 15: Adjustment And Components Replacement
4.1.3 Avisos Problemas Causas Soluções En el caso de falta de energía eléctrica, desligue inmediatamente la llave liga / The machine turns on, * Skidding belt. *Adjust tension of belt but when product gets in desliga. contact with the blade, it Use solamente óleos lubrificantes o grasas recomendadas o equivalentes . - Page 16 4 Nociones Generales de Seguridad NOTE When adjusting the belts, check the alignment of the pulleys. IMPORTANTE Using a screw driver, unscrew the screws and remove the lower rear En el caso de algun item de las NOCIONES GENERALES DE SEGURIDAD no lid, to access the pulleys.
-
Page 17: Electrical Diagran
3.3 Cuidados con los aceros inoxidables 5.2.3 – Cut Regulator Adjustment Los aceros inoxidables pueden presentar puntos de “herrumbre”, que SIEMPRE SON The Thickness Guide #.12 (Pic.01) was developed to help user on PROVOCADOS POR AGENTES EXTERNOS, principalmente cuando el cuidado con la limpieza the cutting task and to improve safety. - Page 18 SUMÁRIO Con la maquina desligada, ajuste el Regulador de corte ) No.12 (Fig.01).Prenda la maquina colocando la llave Prende/Desliga No. 03 (Fig 01) en la posición Prende. Coloque el producto a ser procesado sobre la mesa fija No.07(Fig.01) ó sobre la Mesa Movible (opcional) No.08 (Fig.01), empujándolo en dirección de la hoja No.06(Fig.01) .
- Page 19 La hoja debe estar bien calibrada. Use la manipula No.01 (Fig. 01) girandola en el sentido horario para lograr la tensión correcta de la hoja. Cuando usada incorrectamente , la Sierra para Huesos Modelo. MPL es una Utilice el dibujo abajo para identificar aparentemente la tensión correcta de la hoja , maquina potencialmente PELIGROSA .
- Page 20 1.3 Caracteristicas Tecnicas Figura - 01 Tabela - 01 Caracteristicas Unidad MPL (Acero Inox) Voltage [Hz] Frecuencia [CV] Potencia 0,33 ou 0,5 [kW/h] 0,26 Consumo [mm] Altura [mm] Ancho Profundidad [mm] [kg] Peso Neto 25,5 [kg] Peso Bruto [mm] Ancho de Corte...
Need help?
Do you have a question about the MPL and is the answer not in the manual?
Questions and answers