Advertisement
TYXAL DCP
www.deltadore.com
Notice d'installation
FR
Installation guide
EN
Installationsanleitung
DE
Guida di installazione
IT
Manual de instalación
ES
Instrukcja instalacji
PL
Installatiehandleiding
NL
LS14250 - 3.6 V - 1,2 Ah - Lithium
Autonomie 10 ans - Autonomy 10 years
Consumption stand-by : < 3,5 µA
Consumption : 14,2 mA max.
868,30 MHz et 868,95 MHz
(EN 300 220) 100 m
Ý
-10°C / +70°C
+5°C / +40°C
IP 30
IP
IK 02
75%
33 x 102 x 32 mm
32 x 32 x 110 mm
R&TTE 1999/5/CE
Important product information (Ì)
3
Fixation / Mounting / Montage / Fissaggio / Fijación / Mocowanie / Bevestiging
1
2
D1
D2
Ê Séparez les 2
Ë Tracez et percez
FR
parties du boîtier.
les trous D1 et D2.
Ê Open the unit.
Ë Mark and drill
EN
holes D1 and D2.
Ê Trennen Sie die
Ë Markieren Sie die
DE
Gehäusehälften.
Bohrstellen und
bohren Sie die
Löcher D1 und D2.
Ê Separare le 2
Ë Segnare e fare i
IT
parti della
fori D1 e D2.
scatola.
Ê Separe las 2
Ë Marque y taladre
ES
partes de la
los agujeros D1
caja.
y D2.
Ê Oddzielić 2
Ë Zaznaczyć i
PL
części
wywiercić otwory
obudowy.
D1 i D2.
Ê Scheid de twee
Ë Markeer en boor
NL
delen van de
de gaten D1 en
behuizing.
D2.
Contenu / Contents / Inhalt /
Contenuto / Contenido / Spis
treści / Inhoud
300m
76 gr.
- WARNING -
- WARNING -
3
4
V1
V2
Ø max = 3 mm
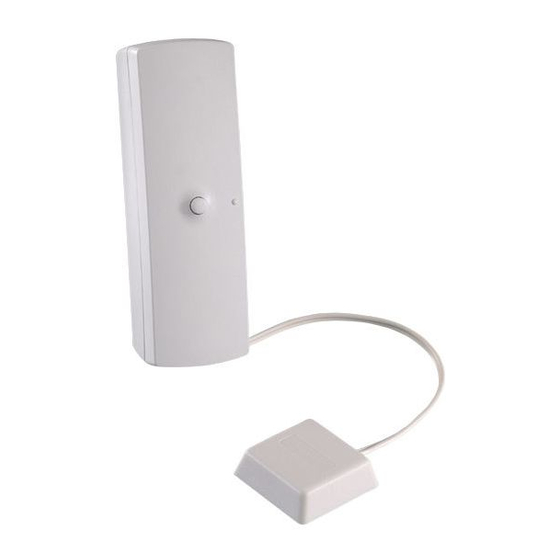
Ì Fixez le socle de
Í Collez le capteur de choc
l'émetteur avec les vis
sur la vitre.
V1 et V2.
Ì Attach the transmitter
Í Fix the impact sensor to
base with the V1 and
the glass.
V2 screws.
Ì Befestigen Sie den
Í Kleben Sie den
Sockel des Senders
Erschütterungssensor auf
mit den Schrauben V1
die Fensterscheibe.
und V2.
Ì Fissare il supporto
Í Incollare il sensore d'urto
dell'emettitore con le viti
sul vetro.
V1 e V2.
Ì Fije el zócalo del emisor
Í Pegue el sensor de golpes
con los tornillos V1 y
en el cristal.
V2.
Ì Przymocować
Í Przykleić czujnik zbicia
podstawę nadajnika
szyby do szyby.
śrubami V1 i V2.
Ì Bevestig de basis
Í Plak de schoksensor op
van de zender met de
het glas.
schroeven V1 en V2.
1
Présentation / Presentation / Beschreibung / Presentazione / Presentación / Prezentacja /
Voorstelling
Le détecteur doit être associé à un système d'alarme DELTA DORE radio X3D.
FR
The detector must be associated with a DELTA DORE wireless X3D alarm system.
EN
Der Melder muss mit einer DELTA DORE Funk-Alarmanlage X3D verbunden werden.
DE
Il sensore deve essere associato ad un sistema d'allarme DELTA DORE radio X3D.
IT
El detector debe asociarse a un sistema de alarma DELTA DORE radio X3D.
ES
Detektor musi być skonfigurowany z radiowym systemem alarmowym DELTA DORE X3D.
PL
De detector moet worden gekoppeld aan een alarmsysteem DELTA DORE radio X3D.
NL
2
Emplacement / Location / Einbauort / Posizionamento / Ubicación / Lokalizacja / Locatie
Instructions
Important
Product
Informations
• Il est conseillé de tester l'emplacement avec minutie pour être sûr de l'efficacité de la protection.
FR
• Pour optimiser l'efficacité, le capteur de choc piézo-électrique (À) doit être installé à 2 ou 3 cm
minimum des montants de la vitre.
• Placez l'émetteur à proximité du capteur (livré avec 0,9 m de câble 2 fils).
• Pour une bonne adhérence : la vitre doit être propre et sèche. L'application sur des vitres à des
températures en dessous de +10°C n'est pas recommandée, appuyez fortement le capteur piézo sur
la vitre.
• Le détecteur de choc doit être placé en intérieur.
• Les vitres feuilletées, enrobées et le plexiglas atténuent les chocs.
• We recommend testing the location beforehand to ensure optimum protection.
EN
• For optimised efficiency, the piezoelectric impact sensor À) must be installed at least 2 or 3 cm away
from the window posts.
• Install the transmitter close to the sensor (delivered with a 0.9 m long 2-wire cable).
• For optimum grip: the glass must be dry and clean. Application on windows at temperatures below
+10°C is not recommended, push the piezo sensor hard against the glass.
• The impact detector must be installed indoors.
• Laminated, coated glass and plexiglass dampen impacts.
• Um effizienten Schutz zu gewährleisten, muss der Installationsort mit Sorgfalt ausgewählt werden.
DE
• Für optimale Effizienz sollte der Piezo-Erschütterungsmelder in mindestens 2 - 3 cm Abstand zum
Fenster- oder Türrahmen installiert werden.
• Bringen Sie den Funksender in der Nähe des Melders an (wird mit 0,9 m 2-adrigem Kabel geliefert).
• Für eine optimale Haftung muss die Scheibe sauber und trocken sein. Von einer Befestigung bei
Temperaturen von unter +10°C wird abgeraten, weil das Klebeband unter diesen Bedingungen nicht
aushärten kann und folglich nicht richtig klebt; drücken Sie den Piezo-Sensor fest auf die Glasscheibe.
• Der Erschütterungs-Melder muss in einem Innenraum angebracht werden.
• Verbundglas, folienbeschichte Scheiben und Plexiglas dämpfen die Eschütterungen.
• Si consiglia di testare accuratamente il posizionamento per accertarsi che la protezione sia efficace.
IT
• Per ottimizzare l'efficacia, il sensore d'urto piezoelettrico (À) deve essere istallato almeno a 2 o 3 cm
dai montanti del vetro.
• Posizionare l'emettitore vicino al sensore (dotato di cavo a 2 fili di 0,9 m).
• Per una buona aderenza, il vetro deve essere pulito e asciutto. E' sconsigliata l'applicazione su vetri a
temperature inferiori ai +10°C, premere forte il sensore piezoelettrico sul vetro.
• Il sensore d'urto deve essere posizionato all'interno.
• I vetri laminati, rivestiti e il plexiglas attenuano gli urti.
• Magna aliqua ut enim ad minim.
ES
• Se aconseja probar minuciosamente la ubicación para estar seguro de la eficacia de la protección.
• Para optimizar la eficacia, el sensor de golpes piezoeléctrico (À) se debe instalar a 2 o 3 cm como
mínimo de los montantes del cristal.
• Coloque el emisor cerca del sensor (se suministra con 0,9 m de cable, 2 hilos).
• Para una buena adherencia: el cristal debe estar limpio y seco. No se recomienda la aplicación sobre
cristal a temperaturas por debajo de 10° C, presione firmemente el sensor piezoeléctrico sobre el
cristal.
• El detector de golpes se debe colocar en el interior.
• El cristal laminado, revestido y el plexiglás mitigan los golpes.
• Zaleca się staranne przetestowanie umiejscowienia w celu upewnienia się o skuteczności ochrony.
PL
• Aby zoptymalizować skuteczność, piezoelektryczny czujnik zbicia szyby (À) musi być zainstalowany
co najmniej 2 lub 3 cm od ram okiennych.
• Umieścić nadajnik w pobliżu czujnika (sprzedawany z przewodem dwużyłowym o długości 0,9 m).
• Aby zapewnić dobrą przyczepność szyba musi być czysta i sucha. Nie zaleca się montowania na
szybach o temperaturze poniżej 10°C, docisnąć mocno czujnik piezoelektryczny do szyby.
• Detektor zbicia szyby musi być umieszczany wewnątrz.
• Szyby warstwowe, powlekane i szkło akrylowe (pleksiglas) osłabiają siłę uderzenia.
• Het is raadzaam om de installatie zorgvuldig te testen om zeker te zijn van de effectiviteit van de
NL
bescherming.
• Om de efficiëntie te maximaliseren, moet de sensor voor de piëzo-elektrische shock (À) ten minste
2 of 3 cm van de stijlen van het glas geïnstalleerd worden.
• Plaats de zender in de buurt van de sensor (met 0,9 m kabel, 2 kabels meegeleverd).
• Voor een goede hechting: het glas moet schoon en droog zijn. Bevestigen op glas bij temperaturen
onder 10 °C wordt afgeraden, druk de piëzo sensor stevig op het glas.
• De schokdetector moet binnen worden geplaatst.
• Gelaagd, gecoat en plexiglas verzachten schokken.
2 à 3 cm
2 à 3 cm
À
Á
Advertisement
Table of Contents

Related Manuals for DELTA DORE TYXAL DCP


Summary of Contents for DELTA DORE TYXAL DCP
- Page 1 Présentation / Presentation / Beschreibung / Presentazione / Presentación / Prezentacja / Voorstelling TYXAL DCP Le détecteur doit être associé à un système d’alarme DELTA DORE radio X3D. The detector must be associated with a DELTA DORE wireless X3D alarm system. www.deltadore.com Der Melder muss mit einer DELTA DORE Funk-Alarmanlage X3D verbunden werden.
- Page 2 Mise en service / Activation / Inbetriebnahme / Messa in funzione / Puesta en servicio / Switchs / Switches / Schalter / Switch / Conmutadores / Wyłączniki / Schakelaars Rozruch / Ingebruikname Á À • Le switch B2 permet le choix du mode de déclenchement (ON : retardé, OFF : immédiat). •...
Need help?
Do you have a question about the TYXAL DCP and is the answer not in the manual?
Questions and answers