Sun-Mar CENTREX 2000 Owner's Manual
Hide thumbs
Also See for CENTREX 2000:
- Owner's manual (13 pages) ,
- Owner's manual (30 pages) ,
- Owner's manual (25 pages)
Table of Contents
Advertisement
CENTREX 2000
Certified to NSF/ANSI Standard 41
Standard 41
Certified for liquid containment,
odours, and solid end products in
both residential and cottage use
CENTREX 2000
OWNER'S MANUAL
Serial No. __________
CENTREX 2000 NE
RATED CAPACITY
Residential & Continuous Use
CENTREX 2000 Electric Units; 4 Adults
CENTREX 2000 NE units: 3 Adults
Weekend & Vacation Use
(Cottage Use)
CENTREX 2000 Electric Units; 7 Adults
CENTREX 2000 NE Units; 6 Adults
Advertisement
Table of Contents
Troubleshooting

Related Manuals for Sun-Mar CENTREX 2000


Summary of Contents for Sun-Mar CENTREX 2000
- Page 1 CENTREX 2000 OWNER’S MANUAL CENTREX 2000 CENTREX 2000 NE RATED CAPACITY Residential & Continuous Use CENTREX 2000 Electric Units; 4 Adults CENTREX 2000 NE units: 3 Adults Certified to NSF/ANSI Standard 41 Weekend & Vacation Use Standard 41 (Cottage Use) Certified for liquid containment, CENTREX 2000 Electric Units;...
- Page 2 Models for which the manual applies: CCEB-02510 Centrex 2000 115V CCNB-02540 Centrex 2000 NE CCEB-02515 Centrex 2000 230V Metal tools will damage the body of the unit.
-
Page 3: Table Of Contents
Familiarise yourself with the CEN- Flies Present TREX 2000 Placement of the Unit Mechanical Installation Troubleshooting 15-17 CENTREX 2000 Rough in Urine Odor In Washroom Dimensions CENTREX 2000 Electric Installation Occasional Urine Odor Outside Strong Sewage Odour Space requirements Fan Noisy... -
Page 4: How Composting Works
Carbon/Nitrogen Ratio Almost all organic material will compost. The proper bulking material and human waste should be added to the composting toilet. In order to maintain a good balance between carbon-rich materials (SUN-MAR Compost Sure Blue) and nitrogen-rich human waste only. -
Page 5: The Centrex 2000
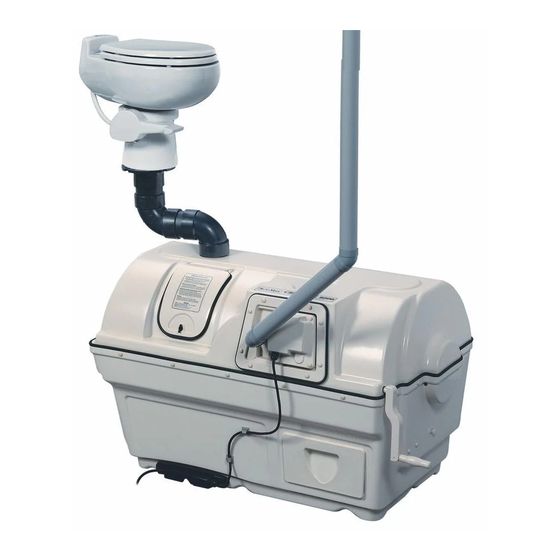
The CENTREX 2000 The key to the success of the CENTREX 2000 lies in it’s three chamber design. Each of the three chambers; patented Bio-drum, compost finishing drawer, and evaporation chamber, have their own independent environments for optimum efficiency. The CENTREX 2000 electric version has a thermostatically controlled heater and fan assembly to help evaporate liquid and should be used where there is a constant electrical supply. -
Page 6: Inspection
Inspection We recommend an inspection of the CENTREX 2000 prior to installation and to make sure you have received all of the parts required as listed below. i ) If there is any visible damage to the carton- nspecting the unit The contents of the carton should be inspected before signing the bill of lading. -
Page 7: Installation
Installation CENTREX 2000 ROUGH IN DIMENSIONS - 5 -... -
Page 8: Centrex 2000 Electric Installation
1) Compost will be removed from the finishing drawer. Ensure that there is at least 17” in front of Space the CENTREX 2000 so that the drawer may be removed from the unit. Required and other 2) Install the unit in a location where the safety drain can be connected. This drain exits from the Installation left side of the unit and must slope downward at all points. -
Page 9: Centrex 2000 Ne Installation
1) Compost will be removed from the finishing drawer. Ensure that there is at least 17” in front of Required and other the CENTREX 2000 NE so that the drawer may be removed from the unit. Installation Considerat-ions 2) Install the unit in a location where the safety drain can be connected. This drain exits from the left side of the unit and must slope downward at all points. -
Page 10: Installation Common To All
Installation Common to All Leading the vent As shown in the installation, the vent stack should end about 30” above the peak of the roof so that it is less subject to downdraft. through the roof Where the pipe is taken through the roof, a roof flashing may be required to seal the installation. -
Page 11: Installing The Waste Pipe
Installing the waste pipe When installing the waste pipe from the toilet to the unit, the following should be considered:- i) The pipe should be either 45 ° or vertical (if composting unit is directly below toilet), or at a 2-3 ° angle (1/8”-1/4” or 3-13mm drop per foot maximum) so that the waste travels with the liquid. -
Page 12: Start Up And Use
When you first start up the CENTREX 2000, it will take approximately 6 weeks at optimum temperatures (70-90 ° F) before you will have sufficient quantities of microbes in the drum to actually achieve a good compost. During this time, the contents of the patent- ed bio-drum start out as Compost Sure Blue and waste. -
Page 13: Ongoing Toilet Maintenance
Ongoing Toilet Maintenance Once your CENTREX 2000 is installed and you have gone through the initial start-up procedure, follows the steps outlined below to keep your composting toilet working optimally. Add one cup of Even if you only use the toilet for urination then at least one cup of Compost Sure Blue Compost Sure Blue per should be added per person per day of use. -
Page 14: Winter Use
Add Water & Microbe Mix Add some warm water to the remaining compost, enough to ensure that it is quite moist. Also, add some Sun-Mar Microbe Mix (two of scoops) to give the compost pile a “kick-start” and rotate the drum several times to mix. -
Page 15: Removing Compost From The Bio-Drum
Compost maybe be removed at any time that you may need more space in the drum and will need to be removed more frequently for heavily used units or where the CENTREX 2000 is the primary residential toilet. - 13 -... -
Page 16: Compost Troubleshooting
-foreign material IMPORTANT: reaches this consistency. added Application of a pesticide in a SUN-MAR composter is not Fungus gnats tend to be a health concern because all SUN-MAR units are vented. attracted to a dry compost, If using pesticides, avoid spilling on the outer shell of the due to the fungus which composter. -
Page 17: Mechanical Troubleshooting
Fan has failed Have your serial number ready and call SUN-MAR for a The fan is a constantly moving replacement. Instructions are included with the replace- part and has a finite service life. -
Page 18: Fan Not Working
Check the power source. If this does not remedy tually have to be changed. the problem, have your serial number ready and Do Not turn on and off daily. call SUN-MAR The amount of liquid varies substantially between Install the overflow drain. Liquid Increased usage. -
Page 19: Liquid Overflow
“Liquid Build up” for solutions. Thermostat Failure Have your serial number ready and call SUN-MAR for a Your thermostat and fan are the replacement. (Detailed instructions are included with the two constantly moving parts on... -
Page 20: Basic Instructions
Attention: the Centrex 2000 electric model must remain plugged in to an electrical outlet continu- ously to function odorlessly. If you will be away from the residence where the composting toilet is installed for longer than three days, the power may be disconnected while the composting toilet lays dormant. - Page 21 ACCESSORY ITEMS FOR THE CENTREX 2000 SUN-MAR has a number of highly specialised composting accessory items. These items may be used to improve composting. Name Description Container Specially selected natural enzyme solution designed to help the “Compost aerobic bacteria convert waste to compost.
-
Page 22: Centrex 2000 Specifications
CENTREX 2000 SPECIFICATIONS CENTREX 2000 EXPLOSION DIAGRAM & PART NUMBERS PP Cover Plate Drain Assembly Drum Locker Knob Access Port Centrex 2000 Drawer Air Intake Vent Bushing Threaded Electric Box Assembly (Electric) Centrex 2000 Tank Nylon Drive Gear Centrex 2000 Heater Tray... - Page 23 SUN-MAR Corp. warrants the original purchaser that this toilet is free from defects in material and workmanship under normal house or cottage use. SUN-MAR Corp. will furnish new parts for any part that fails within three years and five years on the fibreglass tank, provided that our inspection shows that such failure is due to defec- tive material or workmanship.
Need help?
Do you have a question about the CENTREX 2000 and is the answer not in the manual?
Questions and answers