Table of Contents
Advertisement
Quick Links
CENTREX 3000
Certified to NSF/ANSI Standard 41
Standard 41
Certified for liquid containment,
odors, and solid end products in
both residential and cottage use
CENTREX 3000
OWNER'S MANUAL
RATED CAPACITY
Residential & Continuous Use
CENTREX 3000:
CENTREX 3000 NE: 5 Adults
Weekend & Vacation Use
CENTREX 3000:
CENTREX 3000 NE: 8 Adults
Serial No.______________
CENTREX 3000 NE
6 Adults
9 Adults
Advertisement
Table of Contents
Troubleshooting

Subscribe to Our Youtube Channel
Related Manuals for Sun-Mar CENTREX 3000


Summary of Contents for Sun-Mar CENTREX 3000
- Page 1 CENTREX 3000 NE RATED CAPACITY Residential & Continuous Use CENTREX 3000: 6 Adults Certified to NSF/ANSI Standard 41 CENTREX 3000 NE: 5 Adults Standard 41 Weekend & Vacation Use Certified for liquid containment, CENTREX 3000: 9 Adults odors, and solid end products in...
- Page 2 Models for which the manual applies CCEB-02510 Centrex 3000 115V CCNB-02540 Centrex 3000 NE CCEB-02515 Centrex 3000 230V...
-
Page 3: Table Of Contents
TABLE OF CONTENTS The CENTREX 3000 Toilet Compost Troubleshooting The Patented Bio-Drum Compost Too Wet Compost Finishing Drawer Waste Not Breaking Down Evaporation Chamber Lumps In Drum The Collection Chamber Drum Too Full How Composting Works Strong Odor Flies Present What’s In the Box? -
Page 4: The Centrex 3000 Toilet
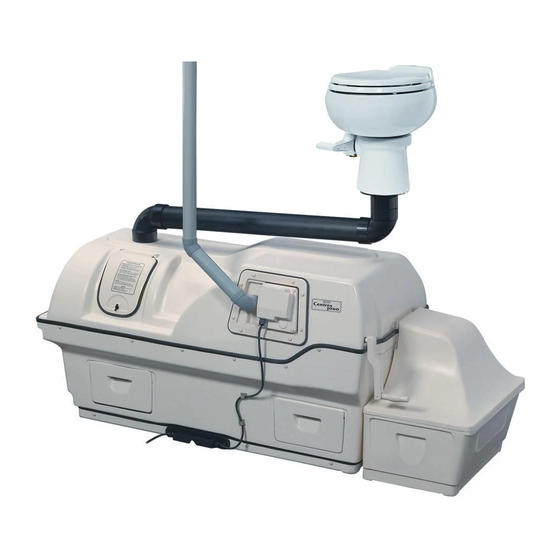
SUN-MAR CENTREX 3000 TOILET The key to the success of the CENTREX 3000 lies in its three-chamber design. Each chamber – the patented Bio-drum ™ the compost finishing drawer, and the evaporation chamber - has their own independent environments for optimum efficiency. -
Page 5: How Composting Works
Almost all organic material will compost with the proper amounts of carbon and nitrogen. In order to maintain a good balance between carbon and nitrogen, only carbon-rich materials (SUN-MAR Compost Sure Blue) and nitrogen-rich human waste should be added to the composting toilet. -
Page 6: What's In The Box
Line the bottom of the collection chamber with the plastic bag (provided). Place the collection chamber base on the right side of the CENTREX 3000 so that the base rests under the opening in the patented bio-drum. Place the top of the collection chamber on the base. SUN- MAR Autoflow technology allows ™... -
Page 7: Installation Faq
Flexible venting should not be used in any 3) How many bends can I put in the vent pipe? application of a CENTREX 3000 toilet, as this will result in odor around the toilet. Electric Systems No more than four 45°... -
Page 8: Rough-In Diagrams
CENTREX 3000 ROUGH IN DIMENSIONS... -
Page 9: Installation Specifications
2) Ensure the CENTREX 3000 is protected from precipitation. 3) To ensure that the CENTREX 3000 is accessible for ongoing maintenance, install the composter in an area with a minimum height of 30”. DIGGING BELOW GROUND TO FACILITATE THE INSTALLATION OF THE CENTREX 3000 IS NOT RECOMMENDED. -
Page 10: Vent Pipe Installation Centrex 2000
30” of vent, including diffusor, needed above the roof line, use guy wires to secure the vent above the roof. A 4” diffuser is included with the CENTREX 3000. This is meant to be installed at the top of the vent stack to encourage updraft. -
Page 11: Centrex 2000 Ne (Non-Electric)
The CENTREX 3000 NE does not have a built-in fan and operates with passive venting. Due to this, bends in the vent stack must be limited to no more than two 45°... -
Page 12: Drain Installation
The Safety Drain Hose For all CENTREX 3000 units, the safety drain must be connected. The safety drain is to remove excess liquid that is not evaporated from the evaporation chamber. *The safety drain is gravity fed, and so, must slope downward at all points. Do not merge sinks, bathtub, etc. -
Page 13: Initial Start-Up And Use
Initial Start-Up Follow these steps when starting up your CENTREX 3000 toilet for the first time, or if you have emptied and need to re-start the compost. Bio-drum™ After installation is complete, do the following: Step 1: Spray Compost Quick: Remove the finishing drawer and spray the whole inner floor of the toilet (evaporation chamber) under the finishing drawer. -
Page 14: Basic Instructions And Ongoing Toilet
Ongoing Toilet Maintenance Once your CENTREX 3000 toilet is installed and you have gone through the initial start-up procedure, follow the steps outlined below to keep your composting toilet working optimally. Even if you only use the toilet for urination, at least one cup of Compost Sure Daily Blue should be added per person per day of use. -
Page 15: Removing Compost From The Bio
The level of compost in the patented Bio-Drum™ should never be more than half full. As a guide, the compost in the drum should be at least 4 inches from the bottom of the drum door. Unlike other Sun-Mar units, the Centrex 3000 uses patented Autoflow technology to remove finished compost to the collection chamber. -
Page 16: Seasonal Usage And Spring Start-Up
Add Water & Microbe Mix Add some warm water to the remaining compost, enough to ensure that it is quite moist. Also, add some Sun-Mar Microbe Mix (two scoops) to give the compost pile a “kick-start” and rotate the drum several times to mix. If your composting toilet is electric, plug it in and use for another season. -
Page 17: Compost Troubleshooting
Remedial Action Prevention Compost Too Compost porosity is poor Ensure that Compost Sure Blue Use Sun-Mar Compost Sure Blue is being used. Drum screen clogged Spray the drum screen with When toilet is in use, turn the Bio Compost Quick. Scrub the drum ™... -
Page 18: Mechanical Troubleshooting
(This is specific to the electric models.) Install a 12volt fan in vent pipe. Downdraft is dependent on wind (CENTREX 3000 NE) Wood stoves or direction as well as natural furnaces installed in a tightly sealed obstructions etc. -
Page 19: Fan Not Working
(NOT recommended to protect your System not occurred in the liquid). This heat can be felt if Centrex 3000 from power surges working/ Lack there is liquid in the chamber. If there is that could cause your heating of Evaporation no warmth rising from the floor of the system to malfunction. -
Page 20: Drum Will Not Turn
If you have any questions, please call Sun-Mar’s customer service number, 1 888 341 0782 ext. 218 before proceeding with any mechanical repairs. The serial number of your composting toilet will be... -
Page 21: Centrex 2000 Explosion Diagram
Centrex 3000 Heating Tray Rubber U Channel Handle Assembly Centrex 3000 Tank 1” (25mm) Drain Assembly Top Centrex 3000 Collection Bin Bottom Centrex 3000 Access Panel and 4” (100ml) Vent Inlet (NE) Thumbscrews Drum Locker Assembly Cover Plate Thermostat Drum Bearing Strip... -
Page 22: Composting Toilet Accessories
ACCESSORY ITEMS FOR THE CENTREX 3000 TOILET SUN-MAR has developed a number of composting accessory items over the years in response to frequent requests from users. These items may serve to improve composting speeds under some circumstances. Name Description Compost Quick Cleans and accelerates the composting action of your Sun-Mar composting toilet. - Page 23 Product Info: (905) 332-1314 - Fax: (905) 332-1315 – Customer Service: 1-888-341-0782 Ext 218 E-mail: compost@sun-mar.com www.sun-mar.com 600 Main St. 5370 South Service Rd. Tonawanda, N.Y. Burlington, ON 14150-0888 L7L 5L1 U.S.A. CANADA PO-MANU0-0824XX JAN 2021 Rev.D20...
- Page 24 SUN-MAR WARRANTY REGISTRATION Complete and return this warranty to register your unit in the Sun-Mar warranty database. Be sure to include your email address if you would like to receive Sun-Mar newsletters and promotions. You can also register online at sun-mar.com/online-warranty-registration/...
Need help?
Do you have a question about the CENTREX 3000 and is the answer not in the manual?
Questions and answers