
Subscribe to Our Youtube Channel
Related Manuals for Vesta Smart Home Security Alarm System


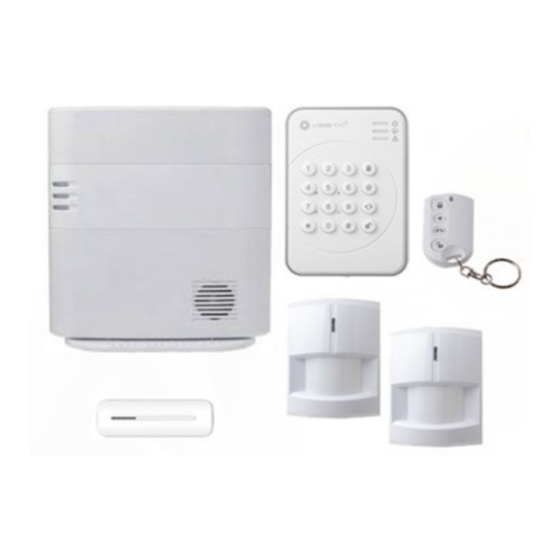
Summary of Contents for Vesta Smart Home Security Alarm System
- Page 1 Vesta Series Smart Anytime Safe Anywhere IP/GSM + GPRS ALARM SYSTEM Home Automation Intelligence IP Installation Guide...
- Page 2 Enrolling Devices to Main Controller 36-37-38-39-40-41-42 E /F/G Adding & Editing Uses Code Main Vesta Controller VESTA HOME - 5 Smart Phone (Execute the APP) 5B/5C Automation : Scene - Room - Group - Automation De- 46 - 47 vice - Rules...
- Page 3 Vesta Australia Smart Home Security Alarm System Installation - Programming - Operating Introduction • • • • • • • • •...
- Page 4 A Location Planning Work out the best places to locate the devices for maximum protection. Having chosen the locations do not mount at this stage. Keypad - Front entry & garage Motion sensor (PIR) Door & window Contacts Diagram illustration is an example only...
- Page 5 B Location Planning continue Choosing Location .— unit and must not be mounted on or near large ground floor can be armed when going to bed at night • entry/exit point reliable operation. •Mount in the middle of the ceiling at the top of a stairwell, or on the centre of hallway ceilings where smoke would most likely be detected.
- Page 6 YELLOW = DEVICE Fault Temper / LOW Battery GREEN = Flashing : Learning Mode YELLOW- Flashing = Mains power Failed BOTTOM LED 3 (Operation Status) YELLOW ON = Network Problems YELLOW Flashing = Disconnected from VESTA Cloud Server GREEN ON = All SYSTEM NORMAL...
- Page 7 Unpack all the parts PIR - Motion detectors Learn/Testing Installing / replacing Batteries in the Motion PIR. Button Step 1. undo the screw at the button of the sensor. Step 2. insert battery supplied (EL123) Step 3. return the back and re –recrew cover. Step 4.
- Page 8 C Unpack all the parts Door/ Window Magnetic Contact Installing / replacing Batteries in the Door /window contacts Step 1. undo the screw at the button of the contact Learn/Testing Step 2. insert AAA battery supplied Button Step 3. return the back and re - screw cover. Step 4.
- Page 9 Unpack all the parts Understanding External Siren - BX32-F1 WARNING! This Siren is very loud, do not trigger the tamper switch during installation. Wear proper ear protection. Battery Compartment Tamper switch Battery and low battery detection • Piezo Screamer The Siren is powered by 2 x 1.5 alkaline D batteries. •...
- Page 10 Step 1. Remove back cover of the Vesta main controller by unscrewing the four screws top and bottom. Step 2. Connect the power plug pack to the 12 volts DC socket on the main Vesta Controller as illustrated in diagram above.
- Page 11 After registering your control panel, you will be able to uti- lize Home Portal™ Server’s functions that include: System status and setting control, device learning and management, security event history, image viewing and report setting. Vesta Home Cloud Internet Internet...
- Page 12 The smartphone applications are available for both Android and iOS smartphones and tablets. Please go to APP Store or Google Play and search Vesta Home 5 AU. The system requirement for Android device is Android 5.0. The system requirement for iOS device is iOS 7.
- Page 13 Step 3. If you have not connected your panel to internet and power on the panel, follow on screen instruction to do so Please ensure your Vesta main controller is powered and operational at this point. VESTA Power Plug Pack...
- Page 14 Initial App and Vesta Cloud Portal Registration Account Registration Step 4. Enter the information required: Account Info: Username: Your account username which will be used to log into the server. The ID must be unique. • Password: Enter a password for the user ac- count •...
- Page 15 Initial App and Vesta Cloud Portal Registration Registration Account info Personal Info: All items under Personal Info are optional. First Name: Last Name: Address: Your physical address City: The city you live in State: The state you are in Zip Code: Your postal zip code Timezone: Select your timezone Click “Next”...
- Page 16 Initial App and Vesta Cloud Portal Registration Registration MAC Address Registration of the MAC Address of the Main Controller • MAC/IMEI: Enter the Control Panel’s MAC address, the MAC address can be found on the label on the Control Panel.
- Page 17 Initial App and Vesta Cloud Portal Registration Operation - LOGGING In https://portal.vesta-australia.com/Vesta/ With a valid Internet connection, enter in your browser to access the web page of home portal server. Step 1. Enter your registered account ID and password and click “Connect” to log into your account.
- Page 18 Initial App and Vesta Cloud Portal Registration Operation - LOGGING In Step 2. You will enter the main page of your account Security The Security page displays current system mode and security sensors/devices learnt in the Control panel for quick...
- Page 19 Initial App and Vesta Cloud Portal Registration Operation - System Area Control Panel with only 1 area will display all sensors and system mode in the area. For Control Panel with more than one area, such as HPGW series, select the operating area to display system mode and sensor for the selected area only: System Mode: The system mode is indicated by the 3 buttons at top of the webpage.
- Page 20 Initial App and Vesta Cloud Portal Registration Operation - System Area System Mode: The system mode is indicated by the 3 buttons at top of the webpage. The current system mode will light up. To change system mode: Step 1. Click on the desired mode button. You will be required to enter one of the Control Panel User PIN Code to confirm the action.
- Page 21 Initial App and Vesta Cloud Portal Registration Operation Step 3. When arming/disarming is complete, the mode button will change accordingly. Sensors The sensor section lists all security function related accessory device in the system. (Home Automation devices are not displayed.) The sensors are listed in order of Zone Number.
- Page 22 Initial App and Vesta Cloud Portal Registration Operation - IP Cam IP Cam List The IP Cam List shows the IP Cameras currently learnt in the Control Panel. Click on the IP Camera Image to go to IP Cam page and view streaming video...
- Page 23 Initial App and Vesta Cloud Portal Registration Operation DEVICE Automation Device - Automation The device subpage lists all available devices which can be displayed according to different categories. Select device category from top row to determine which devices should be displayed.
- Page 24 Initial App and Vesta Cloud Portal Registration Operation HVAC HVAC: Temperature control related devices, such as Temperature Sensor, Thermostat…etc The current mode is displayed in the Mode row on the left. Click ON/OFF at top right to turn on/off the Thermostat.
- Page 25 Initial App and Vesta Cloud Portal Registration Operation - HVAC To program Schedule setting, click “Schedule” to enter Thermostat Schedule configuration page. 1. Click the icon after each weekday to program the schedule for the day. 2. Select Thermostat mode, schedule day and respective setpoints, the click “Submit” to confirm.
- Page 26 Initial App and Vesta Cloud Portal Registration Operation HVAC Room The Room subpage allows you to associate several sensors to create one Room. This feature provides a hassle-free way if you wish to turn a light on in the living room.
- Page 27 Initial App and Vesta Cloud Portal Registration Operation - Room Room The Room subpage allows you to associate several sensors to create one Room. This feature provides a hassle-free way if you wish to turn a light on in the living room.
- Page 28 Initial App and Vesta Cloud Portal Registration Operation Group The Group subpage allows you to control the same type of devices. The user can control over 6 types of devices, including Switch, Dimmer, Hue, Shutter, Radiator, and Thermostat. The group subpage allows you to assign multiple devices into one group in a group for easy control.
- Page 29 Initial App and Vesta Cloud Portal Registration Operation Scene — Continue Create a New Scene. Step 1. Click “Add scene” or the icon to access Add Scene menu. You can create up to 10 Scenes. Step 2. You can enter up to 31 characters as your Scene Name.
- Page 30 Initial App and Vesta Cloud Portal Registration Operation –Scene Apply Scene. You can click the icon after the scene name to bypass the condition setting and manually execute a scene’s action. You may apply 1 Scene at most each time.
- Page 31 Initial App and Vesta Cloud Portal Registration Operation / Rules –continue Create a New List. Step 1. Click “Add rule” or the icon to access Add Rule menu. For M-Series, up to 20 rules can be set up in the Control Panel.
- Page 32 Initial App and Vesta Cloud Portal Registration Operation / Rules –continue Scene Button Pressed: When the Scene Button is pressed to activate sensors in specified zone. Trigger Alarm: Choose to activate a specified Alarm Sensor in specified zone. Schedule: The system will follow the schedule time to respond accordingly.
- Page 33 Initial App and Vesta Cloud Portal Registration Operation / Rules –continue Device Action: To toggle on/off, switch on/on for/on until/off, open, or close a device in specified zone. Group Control: The Group function allows the user to control the same type of devices.
- Page 34 Initial App and Vesta Cloud Portal Registration Operation / Rules –continue Device Action: To toggle on/off, switch on/on for/on until/off, open, or close a device in specified zone. Group Control: The Group function allows the user to control the same type of devices.
- Page 35 Initial App and Vesta Cloud Portal Registration Operation - IP Camera The IP Camera page provides real time video streaming from your IP Cameras IP Cam List: If you have multiple IP Cameras in the Control Panel. Click each IP Camera’s respective image in the IP Cam List to change the currently streaming IP Camera.
- Page 36 Initial App and Vesta Cloud Portal Registration Operation - IP Camera & all Events Event The Event page records all alarm/status event, pictures and video transmitted from the Control Panel. Select the event category to determine what events are displayed All : The Event page will display all received events and picture/video.
- Page 37 Initial App and Vesta Cloud Portal Registration Operation - Settings Setting MASTER INSTALLER CODE – (7982) The Setting page includes Control Panel device, operation and reporting setting options. The page is protected by the panel’s setting codes. 1 Click “Setting” to access Setting page, you will be prompted to enter code.
- Page 38 STEPS 1. Connect panel to the internet router using ethernet cable provided STEP 2 . Go to portal.vesta-australia.com & click New User to register Step 3 . Follow wizard to complete panel registration & when complete, LOGIN with ID: and Password...
- Page 39 Setting up Cloud Account & Enrolling Devices Operation - Enrolling Devices to Main Controller STEP 2. When Setting is selected, the Installer Access code is required to allow you to access the programming section on the Main Controller. ENTER Default Installer Code - 7 9 8 2 STEP 3.
- Page 40 Setting up Cloud Account & Enrolling Devices Operation - Enrolling Devices to Main Controller STEP 4. Once the Installer code is entered, you are now ready to enroll all the devices in the main Controller. At this stage all the Devices should be unpacked, Battery preventative tags removed and devices are now pow- ered by their own batteries LEARNING IN KIT DEVICES STEP 5.
- Page 41 E Setting up Cloud Account & Enrolling Devices Operation - Enrolling Devices to Main Controller STEP 6. Once the device learning button is pressed, the Main Controller will add the device. Simply click the add button to advance to the next step.
- Page 42 1. Area - There are two area’s to assign the devices. Area 1 & Area 2. By (Default), all Devices enrolled will be assigned to Area 1. When the Vesta alarm sys- tem is ARMED, all devices are responsive. Area 2. Is used only if you want the alarm system to partially Arm part of your property.
- Page 43 G Setting up Cloud Account & Enrolling Devices Operation - Enrolling Devices to Main Controller STEP 10. BYPASS - This function allow the Device to be disen- gage from the Alarm system. Please note, if selected ON, the Bypass feature will only apply for a single peri- od of alarm arming.
- Page 44 APP. 8. Once all relent details have been entered, se- lect SUBMIT to register. 9.Simply log out of Vesta Portal and test code by arm and disarming using the new added codes. If Codes are unsuccessful, repeat STEP 11 Again..
- Page 45 To make any adjustments the following steps will grant you access to the following areas. SECURITY - PANEL - CODE - CLOCK - FACTORY RESET Log into the VESTA Portal with ID and Password, Select Security followed by Settings, enter installer master code –7982,...
- Page 46 Your Home Portal Server account may be accessed using smartphone application provided by Vesta Use your Android smartphone or iPhone, search for Vesta Home 5 in Google Play or Apple App Store. Download and install the application. The smartphone applications are available for both Android and iOS smartphone and tablet.
- Page 47 B VESTA HOME 5 APP All Devices The All Devices page displays all learnt-in devices and sensor status. Automation The Automation page includes Scene, Room, Group, Home Automation Device and Rule. Automation The Automation page includes Scene, Room, Group, Home Automation Device and Rule.
- Page 48 VESTA HOME 5 All Devices The All Devices page displays all learnt-in devices and sensor status. Scene The Scene function allows you to set a group of actions which the Control Panel can perform with its Home Automation devices. The user can program the Scene to manually activate a set of devices, or automatically activate them by pre- programmed Rule.
- Page 49 VESTA HOME 5 APP All Devices The All Devices page displays all learnt-in devices and sensor status. Rule The Rule function allows the user to set a list of rules under certain condition (s). Camera The Camera page provides access to IP Camera live streaming video. The Video Doorbell (VDP) function is used to include Video Doorbell into your alarm system.
- Page 50 E VESTA HOME 5 APP Miscellaneous The app miscellaneous page is accessed by pressing the icon at top right corner. The options include: User Info The User Info page displays user ID, password, and registered e-mail address. The user can enter this page to change user password.
Need help?
Do you have a question about the Smart Home Security Alarm System and is the answer not in the manual?
Questions and answers