Centrometal EKO-CK P 20 Technical Manual
Hide thumbs
Also See for EKO-CK P 20:
- Use and maintenance (20 pages) ,
- Technical manual (48 pages) ,
- Technical instructions (20 pages)
Advertisement
Quick Links
Centrometal d.o.o. - Glavna 12, 40306 Macinec, Croatia, tel: +385 40 372 600, fax: +385 40 372 611
ENG
for installation, use and maintenance
of the hot water boiler and equipment
for wood pellet burning
THE FIRST START-UP MUST BE DONE BY AUTHORIZED PERSON
OTHERWISE PRODUCT WARRANTY IS NOT VALID.
TU-PS-10-2020-ENG
TECHNICAL MANUAL
EKO-CK P + Cm Pelet-set 14-90
EKO-CKB P + Cm Pelet-set 14-50
HEATING TECHNIQUE
READY
BOOK 1/2
Advertisement

Related Manuals for Centrometal EKO-CK P 20


Summary of Contents for Centrometal EKO-CK P 20
- Page 1 HEATING TECHNIQUE Centrometal d.o.o. - Glavna 12, 40306 Macinec, Croatia, tel: +385 40 372 600, fax: +385 40 372 611 TECHNICAL MANUAL for installation, use and maintenance of the hot water boiler and equipment for wood pellet burning READY THE FIRST START-UP MUST BE DONE BY AUTHORIZED PERSON OTHERWISE PRODUCT WARRANTY IS NOT VALID.
- Page 2 Technical data - EKO-CK P + Cm Pelet-set 14-50 EKO-CK P 60 EKO-CK P 20 EKO-CK P 25 EKO-CK P 30 EKO-CK P 35 EKO-CK P 40 EKO-CK P 50 Model identifier (TYPE): Cm Pelet-set Cm Pelet-set Cm Pelet-set Cm Pelet-set...
- Page 3 ** set temp. range depends on the selected configuration *** PM = particulate matter, OGC = organic gaseous compounds, CO = carbon monoxide, NOx = nitrogen oxides Contact details: Centrometal d.o.o. - Glavna 12, 40306 Macinec, Croatia Technical instructions EKO-CK(B) P + Cm Pelet set...
- Page 4 Technical data - EKO-CK P + Cm Pelet-set 90 EKO-CK P 90 EKO-CK P 110 EKO-CK P 70 Model identifier (TYPE): + Cm pelet-set 90 + Cm pelet-set 90 + Cm pelet-set 90 Useful heat output at rated heat output - P (kW) Useful heat output at 30 % of rated heat output - P (kW)
- Page 5 ** set temp. range depends on the selected configuration *** PM = particulate matter, OGC = organic gaseous compounds, CO = carbon monoxide, NOx = nitrogen oxides Contact details: Centrometal d.o.o. - Glavna 12, 40306 Macinec, Croatia Technical instructions EKO-CK(B) P + Cm Pelet set...
- Page 6 82.5 82.5 82.5 82.5 Heat output range (kW) 4.2-14 6-20 7.5-25 9-30 10,5-35 12-40 Boiler EKO-CK P 20 EKO-CK P 25 EKO-CK P 30 EKO-CK P 35 EKO-CK P 40 EKO-CK P 50 Burner CPPL-14 CPPL-35 CPPL-35 CPPL-35 CPPL-35 CPPL-50...
- Page 7 ** set temp. range depends on the selected configuration *** PM = particulate matter, OGC = organic gaseous compounds, CO = carbon monoxide, NOx = nitrogen oxides Contact details: Centrometal d.o.o. - Glavna 12, 40306 Macinec, Croatia Technical instructions EKO-CK(B) P + Cm Pelet set...
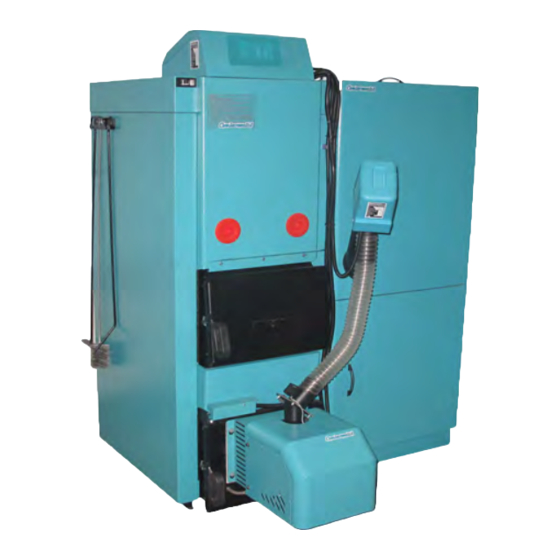
- Page 8 (in this case is necessary to turn supply tube for pellet loading on the burner CD for 180°). 1 - Boiler EKO-CK P 20-60 4 - Pellet tank CPSP 2 - Pellet burner CPPL 14-50 5 - Feeder screw CPPT...
- Page 9 Boiler dimensions - EKO-CK P + Cm Pelet-set 90 NOTE: Pellet tank CPSP can be positioned on the left side Of the boiler (in this case is necessary to turn supply tube for pellet loading on the burner CD for 180°). 1 - Boiler EKO-CK P 70-110 - Pellet feeder screw CPPT-90 2 - Pellet burner CPPL-90...
- Page 10 Boiler dimensions - EKO-CKB P + Cm Pelet-set 14-50 NOTE: Pellet tank CPSP can be positioned on the left side Of the boiler (in this case is necessary to turn supply tube for pellet loading on the burner CD for 180°). 1 - Boiler EKO-CKB P 20-50 4 - Pellet tank CPSP 2 - Pellet burner CPPL 14-50...
-
Page 11: Delivery Status
General 1.0. GENERAL Boilers EKO-CK (B) P + Cm Pelet-set have a modern construction and design, they are made from certified materials with high quality, welded with the most modern welding technology , tested and certified according to the EN 303-5 norm and fulfill all conditions for the connection on the central heating installation. - Page 12 Components 2.0. COMPONENTS 2.1. BOILER BODY Boiler bodies EKO-CK P and EKO-CKB P are hotwater boilers made of steel. The combustion chamber has a big heating surface and a low resistance. The cleaning of this boilers is very simple and possible from the front side. 2.2.
- Page 13 Installation and boiler assembly 3.0. BOILER POSITIONING AND ASSEMBLY The boiler positioning and assembly must be done by an expert. The boiler needs to be positioned on a solid and horizontal surface. We recommend the positioning on a concrete surface / base with the height of between 50 and 100 mm.
-
Page 14: Changing Of Door Opening Direction
Installation and boiler assembly 3.1 CHANGING OF DOOR OPENING DIRECTION Upper and lower boiler door are factory designed so that it can be changed opening direction to left or right side. Opening direction can be changed. It is neccesary to change positions of universally parts responsible for direction of door opening. - Page 15 Installation and boiler assembly The procces of converting factory delivered lower boiler door with right opening direction (default) to door with left opening direction. 1.Removing door from boiler and remove universally parts from door Unscrew two screws (5) and remove door from boiler. Strike out elastic pins and remove handle (1) and hinge (2) from boiler door.
- Page 16 Install. of the extension on the lower boiler door for the install. of pellet burners 3.2. INSTALL. OF THE EXTENSION FOR THE INSTALL. OF PELLET BURNER In order to install a pellet burner on the lower boiler door, it is necessary to install a set for installing a pellet burner on the lower boiler door.
- Page 17 Install. of the extension on the lower boiler door for the install. of pellet burners Install the air vent cover (4), the lower door insulation (6) and the lower insulation protection (7) and all fasten together with a nut M8 screw (M8X50). Install the microswitch L-profile (3) and fasten it with a screw (M8X15).
- Page 18 Placing fireclay plates on the firebox grate 3.3. PLACING FIRECLAY BOARDS ON THE FIREBOX GRATE Fireclay plates measuring 400x200*4 should be placed on top of the water-cooled grate to the end towards the back of the firebox as in picture 5. - Additional equipment for burning wood pellets Picture 5: Position of fireclay plates on top of the grate in the firebox.
- Page 19 Installation and boiler assembly Picture 6a. Installation of casing to boiler EKO-CK P Detail X (3.9x9.5) (4.2x16) (4.2x32) Fasten insulation support (8) with screws 4,2 x 16 into wholes at the upper side of the boiler body. Fix the lateral sides (2) and (3) on girders on the lateral sides of the boiler mount into rectangular opening of the casing lateral sides (b1) and (b2), hook them up on casing supports (8), and fix them with two screws on sheet metal 3.9 x 9,5 on the rear casing supports (8).
- Page 20 Installation and boiler assembly Picture 6b. Installation of casing to boiler EKO-CKB P (4.2x32) (3.9x9.5) Place the lateral cover (1) and the lateral cover(2) on the factory-prepared brackets located on the top of the boiler. Place the back cover (3) on the pipe at the back of the boiler. Back cover (3) closer to the left lateral and right lateral cover secure it with the six 4.2 x 32-thread screws in the lateral left and right cover Attach the front lower (4) cover hook the hooks to the prepared holes (E) on the lateral left (2) and...
-
Page 21: Connection To Chimney
Installation and boiler assembly 3.4. OPENING FOR FRESH AIR (FRESH AIR SUPPLY) Each boiler room must be equipped with an opening for supply of fresh air which is dimensioned in accordance with boiler output (minimum opening area according to the below shown equation). Such opening must be protected with a net or grate. - Page 22 Installation and boiler assembly Picture 7. Possible ways of connections of boilers EKO-CK (B) P + Cm Pelet-set to chimney Thermal insulation Opening for cleaning Thermal insulation 10mm Opening for cleaning min. 300 mm max. 600 mm Possible way of connection of boilers EKO-CK (B) P + Cm Pelet-set to chimney (recommendation) Picture 8.
- Page 23 Installation and boiler assembly 3.6. AN EXAMPLE OF SELECTION OF A CHIMNEY (diagram on picture 8) - BOILER HEAT OUTPUT - 30 kW - FUEL - WOOD PELLETS - REQUIRED USABLE CHIMNEY HEIGHT - H = 8 m - REQUIRED CHIMNEY LIGHT DIAMETER - 18 cm - Usable chimney height - chimney height from connection spot of smoke pipe to the chimney top.
- Page 24 Installation and boiler assembly 3.7.2 CPPL 40-50 1. Disassemble pellet burner into 4 part as shown in picture Lower boiler door Burner protection Fans with flange Pellet feeding (right version) Burner head cover and heater Photcell Gasket Gasket thinner Gasket thicker 2.
- Page 25 Installation and boiler assembly 3.7.3 CPPL-90 Disassemble the burner into 4 parts as shown figure below (point 3.7.4.). Place burner head (with fixed thicker gasket toward door and thinner gasket on the side away from door) onto prepared screws on the door, then place a feeding box and tighten the screws with enclosed nuts M8. Put a gasket onto the feeding box and put a feeding tube onto it (faced toward the pellet tank, either on the left or on the right side and tighten it firmly using enclosed screws M4x30.
- Page 26 Installation and boiler assembly 3.7.4 CPPL 90 The order of operations for installing a pellet burner at lower boiler door 1. Disassemble pellet burner into 4 parts as shown in Figure Burner protection Fans with Burner head Lower boiler Pellet feeding cover flange and heater door...
- Page 27 Installation and boiler assembly 3.8. INSTALLATION OF THE PELLET CONTROLLER - remove the perforated part of the upper boiler cover and through the hole place the safety thermostat sensor and boiler temperature sensor (regulation) in the boiler sleeve (on EKO-CK P + Cm Pelet-set on upper part of the boiler, on the EKO-CKB P + Cm Pelet-set from the front side of the boiler - run the sensors to the sleeve on the lateral side of the boiler).
- Page 28 Installation and boiler assembly Picture 10. - Microswitch installation Microswitch position when the lower boiler door opens on right side (factory) Microswitch position when the lower boiler door opens on left side Microswitch holder Microswitch position when the lower boiler door opens on right side (factory) Microswitch holder Microswitch position when the lower boiler door opens on left side At standard delivery (lower boiler door opens on right side) microswitch is installed on front lower...
- Page 29 Installation and boiler assembly 3.9. LABEL POSITION (authorized service technician) 1. Pellet feeder 2. Controller 4. Pellet tank screw 3. Burner back side 3.10. INSTALLATION OF THE PELLET ANK AND PELLET TRANSPORTER The description of the INSTALLATION of pellet tank and pellet transporter can be found in the "Technical instructions for mounting, use and maintenance of pellet and feeder screw ", which are enclosed in the package in addition to the CPSP or CPSP-800 pellet tank and the CPPT pellet transporter, CPPT- 50 or CPPT-90.
- Page 30 Boiler installation with the central heating installation 4.0. CONNECTING THE BOILER TO THE HEATING SYSTEM All work when installed needs to be performed according to the important national and European norms. The boiler EKO-CK (B) P + Cm Pelet-set is possible to install in closed and open central heating systems.
- Page 31 Boiler installation with the central heating installation 4.4. TYPE OF HEATING SYSTEMS - CLOSED AND OPEN HEATING SYSTEMS Basic scheme of EKO-CK (B) P + Cm Pelet-set boiler installation on closed heating system Scheme 1) Basic scheme of EKO-CK boiler installation (B) P + Cm Pelet-set on open heating system Scheme 2) above the highest heating...
- Page 32 Boiler installation with the central heating installation 4.4.1. THERMAL PROTECTION IN AN CLOSED HEATING SYSTEM According to European EN standards, boiler thermal protection must be installed in closed heating system. Boiler is factory prepared for installation of thermal protection - Picture a) and b). In case of any damage of boiler installed in the closed heating system due to its overheating, and boiler or system are not equipped with any thermal protection at all, or do not have properly installed thermal protection, guarantee will not be applied.
- Page 33 Boiler installation with the central heating installation Picture b) Installation of thermal protection of a boiler installed on a closed heating system EKO-CK P + Cm Pelet-set 90 Factory-installed pump thermostat Safety air vent group HEATING INSTALLATION From the water supply connected to the city water...
- Page 34 Boiler installation with the central heating installation 4.5. BOILER CONNECTION EKO - CKB P + CM PELET-SET (SINK DHW TANK IN THE BOILER) TO WATER SUPPLY INSTALLATION The connection of the stainless steel DHW tank in the boiler to the water supply installation must be carried out according to the valid technical standards by the authorized service person (Schemes a and b).
-
Page 35: Temperature Regulation
Temperature reg., Boiler conn. to the electrical installation, Safety equipment 5.0. TEMPERATURE REGULATION For temperature REGULATION, CPREG / CPREG-Touch digital boiler regulation is used. To adjust and use the CPREG / CPREG-Touch control, see Book 2/2 "Technical Instructions EKO-CK(B) P + Cm pelet-set_BOOK 2/2"... - Page 36 Safety equipment, Additional equipment Filling sensor / temperature gauge: Normal operation: a green LED is lit while the other flashes depending on the amount of pellet falling through the feeding tube. Feeding tube fiiled with pellets: all LED-s are lit for 10 seconds without flickering 8.0.
- Page 37 Commissioning 9.0. COMMISSIONING The boiler must not be operated in a flammable and explosive atmosphere. The product should not be used by children or persons with reduced mental or physical abilities, and persons with a lack of knowledge and experience unless supervised or trained by a person in charge of their safety. Use protective gloves is obligatory (pic.
- Page 38 Commissioning Picture 14. Boiler door opening method Left Right Upper boiler door Lower boiler door Open Close Handles of upper boiler door Handles of lower boiler door PROCESS OF OPENING BOILER DOOR: UPPER BOILER DOOR: 1. Pull the handle of the upper boiler door RGV in direction of the arrow "OPEN". 2.
- Page 39 Properties of wooden pellets, Boiler use 10.0. PROPERTIES OF WOODEN PELLETS Wooden pellets are used as fuel in boilers with built-in pellet burner CPPL. Wooden pellets are biofuel made of wooden wastes. Pellets can be packed in different packaging: in bags (15 kg or 1000 kg), or as bulk in large (underground) tanks ( 4 - 15 m3) or in basement spaces.
-
Page 40: Cleaning And Maintenance
Cleaning and maintenance 12.0. CLEANING AND MAINTENANCE OF THE BOILER AND ACCESSORIES FOR BURNING WITH WOOD PELLETS The ash that remained in the boiler after being fired with wooden pellets should be disposed of in metal containers with a lid. Use of protective gloves is obligatory. (Picture 12). Care should be taken to: - deposit in the boiler furnace and, if necessary, clean it;... - Page 41 Cleaning and maintenance Once a year (at least) it is necessary to in detail check / clean up the following components: - clean thoroughly burner, grate... - clean photocell - empty and clean pellet tank - remove and clean pellet screw feeder (Cleaning frequency of above items depends on pellet quality and it should be adjusted accordingly) - Check flexible connecting tube and place it so that flexible pellet feeding tube is inclined toward the burner so that pellets can fall freely into the burner,...
-
Page 42: Ec Declaration Of Conformity
EC Declaration of conformity Technical instructions EKO-CK(B) P + Cm Pelet set... - Page 43 Notes Technical instructions EKO-CK(B) P + Cm Pelet set...
- Page 44 READY Centrometal d.o.o. shall not be responsible for possible incorrect data caused by printing errors or errors during transcription and in any case, it reserves the right to modify its products deemed to be required and useful, without any prior notification.
Need help?
Do you have a question about the EKO-CK P 20 and is the answer not in the manual?
Questions and answers