Table of Contents
Advertisement
Available languages
Available languages
Quick Links
Istruzioni per installazione, uso e manutenzione
Montage und Bedienungsanleitung
Manuel d'entretien
Installation, use and maintenance instructions
Bruciatore di gasolio
I
Öl-Gebläsebrenner
D
Brûleur fioul domestique
F
Light oil burner
GB
Funzionamento monostadio
Einstufiger Betrieb
Fonctionnement à 1 allure
One stage operation
CODICE
CODE
3736251
MODELLO - MODELL
MODELE - MODEL
RG1RK
TIPO - TYP
TYPE
362 T1
2902325 (5)
Advertisement
Chapters
Table of Contents

Related Manuals for Riello Burners Gulliver RG1RK


Summary of Contents for Riello Burners Gulliver RG1RK
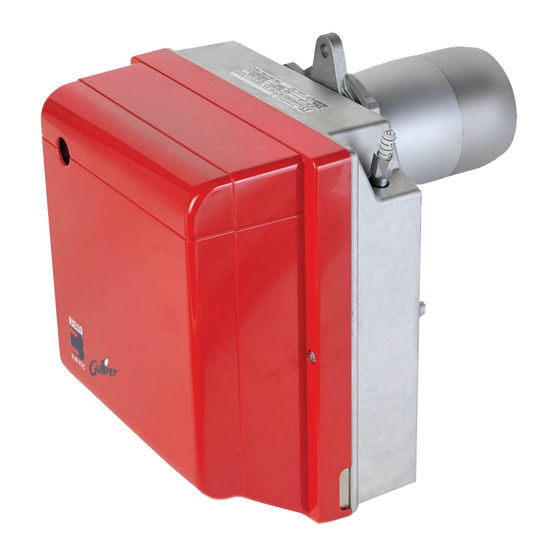
- Page 1 Istruzioni per installazione, uso e manutenzione Montage und Bedienungsanleitung Manuel d’entretien Installation, use and maintenance instructions Bruciatore di gasolio Öl-Gebläsebrenner Brûleur fioul domestique Light oil burner Funzionamento monostadio Einstufiger Betrieb Fonctionnement à 1 allure One stage operation CODICE MODELLO - MODELL TIPO - TYP CODE MODELE - MODEL...
-
Page 3: Table Of Contents
INDICE DESCRIZIONE DEL BRUCIATORE ..FUNZIONAMENTO ....1.1 Materiale a corredo ....4.1 Regolazione della combustione. -
Page 4: Dati Tecnici
DATI TECNICI 2.1 DATI TECNICI TIPO 362 T1 ÷ ÷ Portata – Potenza termica 5 kg/h – 60 kW ÷ Combustibile Gasolio, viscosità 4 6 mm /s a 20°C ± Alimentazione elettrica Monofase, 50Hz 230 V Motore 0,85 A assorbiti –... -
Page 5: Installazione
INSTALLAZIONE L’INSTALLAZIONE DEL BRUCIATORE DEVE ESSERE EFFETTUATA IN CONFORMITÀ ALLE LEGGI E NORMATIVE LOCALI. 3.1 FISSAGGIO ALLA CALDAIA Inserire sulla flangia (1) la vite e i due dadi, (vedi fig. 3). Allargare, se necessario, i fori dello schermo isolante (5). Fissare alla portina della caldaia (4) la flangia (1) mediante le viti (2) e (se necessario) i dadi (3) interponendo lo schermo isolante (5), (vedi fig. -
Page 6: Impianti Idraulici
3.3 IMPIANTI IDRAULICI ATTENZIONE: Fig. 5 La pompa è predisposta per funzionamento bitubo. Per il funzionamento monotubo è necessario svitare il tappo di ritorno (2), togliere la vite di by-pass (3) e quindi riavvitare il tappo (2), (vedi fig. 5). Accertarsi, prima di mettere in funzione il bruciatore, che il tubo di ritorno del combustibile non abbia occlu- sioni. -
Page 7: Collegamenti Elettrici
3.4 COLLEGAMENTI ELETTRICI 50Hz 230V ATTENZIONE NON SCAMBIARE IL NEUTRO CON LA FASE PE L NOTE: – Sezione dei conduttori: min. 1 mm . (Salvo Interruttore generale diverse indicazioni di norme e leggi locali). – I collegamenti elettrici eseguiti dall’installatore devono rispettare le norme vigenti nel paese. -
Page 8: Funzionamento
FUNZIONAMENTO 4.1 REGOLAZIONE DELLA COMBUSTIONE In conformità con la Direttiva Rendimento 92/42/CEE, l’applicazione del bruciatore alla caldaia, la regolazione e il collaudo, devono essere eseguiti nell’osservanza del manuale d’istruzione della caldaia stessa, compreso il controllo della concentrazione di CO e CO nei fumi, della loro temperatura e di quella media dell’acqua della caldaia. -
Page 9: Pressione Pompa
ATTENZIONE Fig. 11 Al rimontaggio del gruppo portaugello avvitare il dado (3) come mostrato in figura sotto. D5684 SERRARE SENZA PORTARE A BATTUTA 4.3 PRESSIONE POMPA Viene tarata in fabbrica a 12 bar. Per effettuare le variazioni agire sulla vite (4, fig. 5, pag. 4). 4.4 REGOLAZIONE TESTA (vedi fig. -
Page 10: Riscaldamento Del Combustibile
4.7 RISCALDAMENTO DEL COMBUSTIBILE Per garantire l’accensione ed il funzionamento regolari anche alle basse temperature, il bruciatore è dotato di un riscaldatore del gasolio nella testa di combustione. Il riscaldatore si inserisce alla chiusura dei termostati. Il consenso all’avviamento del bruciatore avviene mediante un termostato posto sul portaugello una volta raggiunta la temperatura ottimale per l’accensione. -
Page 11: Anomalie / Rimedi
ANOMALIE / RIMEDI Si elencano alcune cause e i possibili rimedi a una serie di anomalie che potrebbero verificarsi e portare ad un mancato o non regolare funzionamento del bruciatore. Un’anomalia, nel funzionamento nella maggior parte dei casi, porta alla accensione della segnalazione all’interno del pulsante di sblocco dell’apparecchiatura di comando e controllo (3, fig. -
Page 13: Beschreibung Des Brenners
INHALT BESCHREIBUNG DES BRENNERS ..1 BETRIEB ......1.1 Mitgeliefertes Zubehör ....1 4.1 Einstellung der Brennerleistung. -
Page 14: Technische Merkmale
TECHNISCHE MERKMALE 2.1 TECHNISCHE DATEN 362 T1 ÷ ÷ Durchsatz - Brennerleistung 5 kg/h – 60 kW ÷ Brennstoff Heizöl-EL, Viskosität 4 6 mm /s bei 20°C ± Stromversorgung Einphase, 50Hz 230 V Motor Stromaufnahme 0,85 A – 2750 U/min – 289 rad/s 4 µF Kondensator Zündtransformator... -
Page 15: Installation
INSTALLATION DIE INSTALLATION DES BRENNERS MUSS IN ÜBEREINSTIMMUNG MIT DEN ÖRTLICHEN GESETZEN UND VORSCHRIFTEN AUSGEFÜHRT WERDEN. 3.1 BRENNERMONTAGE Die Schraube und die beiden Muttern am Flansch (1) montieren (siehe Abb. 3). Falls erforderlich, die Bohrungen der Isolierdichtung (5) erweitern. Mit den Schrauben (2) und (falls erforderlich) den Muttern (3) den Flansch (1) an der Kesseltür (4) mit Isolierdichtung (5) montieren (siehe Abb 2). -
Page 16: Ölversorgungsanlage
3.3 ÖLVERSORGUNGSANLAGE WICHTIGER HINWEIS: Abb. 5 Die Pumpe ist werksseitig für den Zweirohr-Betrieb eingerichtet. Wird ein Pumpen-Einrohrbetrieb für not- wendig erachtet, so ist der Rücklauf-Schlauchlei- tungsstopfen (2) zu lösen und die By-Pass Schraube (3) zu entfernen. Danach ist der Rücklauf-Schlauchlei- tungsstopfen wieder einzuschrauben. -
Page 17: Elektrisches Verdrahtungsschema
3.4 ELEKTRISCHES VERDRAHTUNGSSCHEMA 50Hz 230V WICHTIGER HINWEIS PE L NULLEITER NICHT MIT DER PHASE VERWECHSELN ANMERKUNGEN: – Leiterdurchmesser: min. 1 mm . (Außer im Falle ander- Hauptschalter slautender Angaben durch Normen und örtliche Gesetze). – Die vom Installateur ausgeführten elektrischen Verbindun- gen müssen den lokalen Bestimmungen entsprechen Betriebsstundenzähler (230V - 0,1A max.) -
Page 18: Betrieb
BETRIEB 4.1 EINSTELLUNG DER BRENNERLEISTUNG In Konformität mit der Wirkungsgradrichtlinie 92/42/EWG müssen die Anbringung des Brenners am Heizkessel, die Einstellung und die Inbetriebnahme unter Beachtung der Betriebsanleitung des Heizkessels ausgeführt werden, einschließlich Kontrolle der Konzentration von CO und CO in den Abgasen, der Abgastemperatur und der mittleren Kesseltemperatur. -
Page 19: Pumpendruck
ACHTUNG Abb. 11 Bei der Wiedermontage des Düsenstockes die Mut- ter (3) anschrauben wie in Abbildung dargestellt. D5684 ANZIEHEN, OHNE BIS ZUM ANSCHLAG AUSZUFAHREN 4.3 PUMPENDRUCK Wird werksseitig auf 12 bar eingestellt. Veränderungen werden mit Hilfe der Schraube (4, Abb. 5, Seite 4) vorgenommen. 4.4 BRENNERKOPFEINSTELLUNG (Siehe Abb. -
Page 20: Elektrodeneinstellung
4.6 ELEKTRODENEINSTELLUNG (siehe Abb. 12) WICHTIGER HINWEIS DIE ABSTÄNDE MÜSSEN WICHTIGER HINWEIS EINGEHALTEN WERDEN – 0,5 mm Setzen den Stauscheibenhalter-System 2 ÷ 2,5 (1) gegen den Düsenstock (2) und befes- Abb. 12 tige ihn mit der Schraube (3). Für eventuelle Einstellungen des Elek- trodenpaares (4), die Schraube (5) lösen. -
Page 21: Wartung
WARTUNG Der Brenner muß in regelmäßigen Zeitabständen und in Übereinstimmung mit den örtlichen Gesetzen und Vorschriften vom Kundendienst gewartet werden. Die Wartung ist für den umweltfreundlichen Betrieb des Brenners unbedingt notwendig. Es wird dadurch sichergestellt, daß bestmögliche Energie-Verbrauchswerte erreicht werden, was mit einer Schadstoff- Reduzierung gleichzusetzten ist. -
Page 22: Störungen / Abhilfe
STÖRUNGEN / ABHILFE Nachfolgend finden Sie einige denkbare Ursachen und Abhilfemöglichkeiten für Störungen, die den Betrieb des Brenners beeinflussen oder einen nicht ordnungsgemäßen Betrieb des Brenners verursachen könnten. In den meisten Fällen führt eine Störung zum Aufleuchten der Kontrolleuchte in der Entstörtaste des Steuergeräts (3, Abb. - Page 23 SOMMAIRE DESCRIPTION DU BRULEUR ..FONCTIONNEMENT....1.1 Matériel fourni ....4.1 Réglage de la combustion .
-
Page 24: Donnees Techniques
DONNEES TECHNIQUES 2.1 DONNEES TECHNIQUES TYPE 362 T1 ÷ ÷ Débit - Puissance thermique 5 kg/h – 60 kW ÷ Combustible Fioul domestique, viscosité 4 6 mm /s à 20°C ± Alimentation électrique Monophasée, 50Hz 230 V Moteur 0,85 A absorbés – 2750 t / min – 289 rad/s 4 µF Condensateur Transformateur d’allumage... -
Page 25: Installation
INSTALLATION LE BRÛLEUR DOIT ÊTRE INSTALLÉ CONFORMÉMENT AUX LOIS ET AUX RÉGLEMENTATIONS LOCALES. 3.1 FIXATION A LA CHAUDIERE Insérer sur la bride (1) la vis et deux écrous, (voir fig. 3). Elargir, si nécessaire, les trous dans le joint isolant (5). Fixer sur la plaque de la chaudière (4) la bride (1) par l’intermédiaire des vis (2) et (si nécessaire) des écrous (3) en interposant le joint isolant (5), (voir fig. -
Page 26: Installation Hydraulique
3.3 INSTALLATION HYDRAULIQUE IMPORTANT: Fig. 5 La pompe est prévue pour un fonctionnement en bitube. Pour le fonctionnement en mono-tube, il faut dévisser le bouchon de retour (2), enlever la vis de by- pass (3) et ensuite revisser le bouchon (2), (voir fig. 5). Avant de mettre en fonction le brûleur il faut s’assurer que le tube de retour du combustible ne soit pas obstrué. -
Page 27: Raccordements Électriques
3.4 RACCORDEMENTS ELECTRIQUES 50Hz 230V ATTENTION NE PAS INVERSER LE NEUTRE AVEC LA PHASE PE L NOTES: – Section conducteurs: min. 1 mm . (Sauf des indications différentes prévues par les normes et les lois locales). Interrupteur général – Les branchements électriques exécutés par l’in- stallateur doivent respecter le règlement en vigueur dans le Pays. -
Page 28: Fonctionnement
FONCTIONNEMENT 4.1 REGLAGE DE LA COMBUSTION Conformément à la Directive rendement 92/42/CEE, suivre les indications du manuel de la chaudière pour monter le brûleur, effectuer le réglage et l’essai, contrôler la concentration de CO et CO , dans les fumées, leur température et celle moyenne de l’eau de la chaudière. -
Page 29: Pression Pompe
ATTENTION Fig. 11 Au remontage de la ligne porte gicleur visser l’écrou (3) comme indiqué en figure ci-dessous. D5684 SERRER, MAIS PAS JUSQU’A LA BUTEE 4.3 PRESSION POMPE Elle est réglée à 12 bar en usine. Pour modifier ce réglage, jouer sur la vis (4, fig. 5, page 4). 4.4 REGLAGE TETE DE COMBUSTION (voir fig. -
Page 30: Réchauffage Du Combustible
4.7 RECHAUFFAGE DU COMBUSTIBLE Pour garantir l’allumage et le fonctionnement réguliers, même à basse température, le brûleur est équipé d’un réchauffeur de fioul dans la tête de combustion. Le réchauffeur se branche à la fermeture des thermostats. Le démarrage du brûleur est conditionné par un thermostat placé sur la ligne porte gicleur. Celui-ci autorise le démarrage quand la température d’allumage optimale est atteinte. -
Page 31: Pannes / Remedes
PANNES / REMEDES La liste ci-dessous donne un certain nombre de causes d’anomalies et leurs remèdes. Problèmes qui se traduisent par un fonctionnement anormal du brûleur. Un défaut, dans la grande majorité des cas, se traduit par l'allumage du signal sur le bouton de réarme- ment manuel de la boîte de commande et de contrôle (3, fig. - Page 32 INDEX BURNER DESCRIPTION ... . WORKING ..... . . 1.1 Burner equipment ....4.1 Combustion adjustment.
- Page 33 TECHNICAL DATA 2.1 TECHNICAL DATA TYPE 362 T1 – – Output - Thermal power 5 kg/h 60 kW Fuel Light oil, viscosity 4 – 6 mm /s at 20 °C ± Electrical supply Single phase, 50Hz 230 V Motor Run current 0.85 A – 2750 rpm – 289 rad/s 4 µF Capacitor Ignition transformer...
- Page 34 INSTALLATION THE BURNER MUST BE INSTALLED IN CONFORMITY WITH LEGISLATION AND LOCAL STANDARDS. 3.1 BOILER FIXING Put on the flange (1) the screw and two nuts, (see fig. 3). Widen, if necessary, the insulating gasket holes (5). Fix the flange (1) to the boiler door (4) using screws (2) and (if necessary) the nuts (3) interposing the insulating gasket (5), (see fig.
- Page 35 3.3 HYDRAULIC SYSTEMS WARNING: Fig. 5 The pump is designed to allow working with two pipes. In order to obtain one pipe working it is necessary to unscrew the return plug (2), remove the by-pass screw (3) and then screw again the plug (2). (See fig. 5). Before starting the burner make sure that the return pipe-line is not clogged.
- Page 36 3.4 ELECTRICAL WIRING 50Hz 230V WARNING PE L DO NOT EXCHANGE NEUTRAL WITH PHASE NOTES: – Wires of min. 1 mm section. (Unless requested Main switch otherwise by local standards and legislation). – The electrical wiring carried out by the installer must be in compliance with the rules in force in the Country.
- Page 37 WORKING 4.1 COMBUSTION ADJUSTMENT In conformity with Efficiency Directive 92/42/EEC the application of the burner on the boiler, adjustment and testing must be carried out observing the instruction manual of the boiler, including verification of the CO and CO concentration in the flue gases, their temperatures and the average temperature of the water in the boiler. To suit the required appliance output, choose the proper nozzle and adjust the pump pressure, the setting of the combustion head, and the air damper opening in accordance with the following schedule.
- Page 38 ATTENTION Fig. 11 During the reassembly of the nozzle-holder assem- bly screw the nut (3) as shown in the figure below. D5684 TIGHTEN WITHOUT MOVING BACKWARDS TO THE END 4.3 PUMP PRESSURE The pump leaves the factory set at 12 bar. To change it act on pump pressure adjust screw (4, fig.
- Page 39 4.7 FUEL HEATING In order to assure regular ignition and working also at low temperature the burner has an oil pre-heater fitted in combustion head. The pre-heater starts when thermostats close. When the required temperature for ignition is reached the thermostat fitted on the nozzle holder starts the burner.
- Page 40 FAULTS / SOLUTIONS Here below you can find some causes and the possible solutions for some problems that could cause a fail- ure to start or a bad working of the burner. A fault usually makes the lock-out lamp light which is situated inside the reset button of the control box (3, fig.
Need help?
Do you have a question about the Gulliver RG1RK and is the answer not in the manual?
Questions and answers