
Related Manuals for LEGRAND C2G 29977


Summary of Contents for LEGRAND C2G 29977
- Page 1 Network Controller for HDMI® over IP (Model: 29977) Operation Manual rev.03/20 Manual_29977...
- Page 2 Network Controller for HDMI over IP Copyright Notice: Copyright © 2019 Legrand. Copyright © 2019 C2G. All rights reserved. No part of this publication may be reproduced, stored in a retrieval system, or transmitted in any form or by any means, electronic, mechanical, photocopying, recording or otherwise without prior written permission of the author.
-
Page 3: Table Of Contents
© 2019 C2G Network Controller for HDMI over IP Table of Contents 1. Overview .............................4 1.1. Description ..........................4 1.2. Features ............................ 5 2. Technical Specifications ......................6 3. Installation and Use ........................7 3.1. Part List ............................ 7 3.2. Product Overview ........................8 3.3. -
Page 4: Overview
© 2019 C2G Network Controller for HDMI over IP 1. Overview 1.1. Description The C2G Network Controller for HDMI over IP (model: 29977) is a Linux-based PC that allows users to control hub-installed C2G products. When installed on a local area network (LAN), the C2G Network Controller can scan the LAN for C2G products and allows the user to auto-discover, configure and control these products through an Ethernet Web interface. -
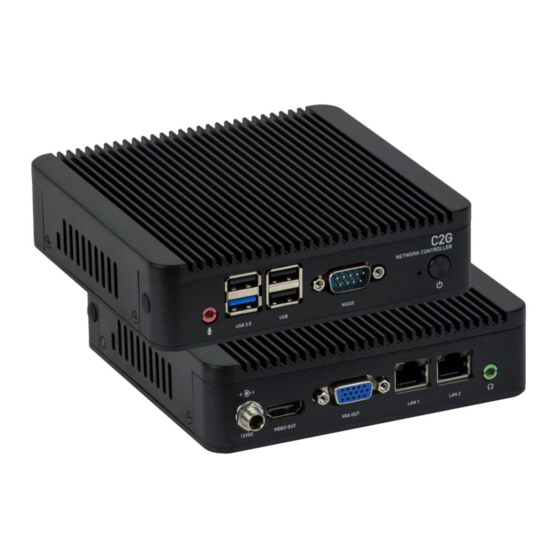
Page 5: Features
© 2019 C2G Network Controller for HDMI over IP 1.2. Features Front View) Rear View) Figure 2: C2G Network Controller Front Panel • Power LED • Power button • Audio in (3.5 mm) • Three (3) USB 2.0 ports • SS USB 3.0 port •... -
Page 6: Technical Specifications
© C2G 2019 Network Controller for HDMI over IP 2.Technical Specifications Specifications Intel Celeron J1800 Processor, @ 2.41GHz 4 cores Memory 2GB DDR3 Display Integrated Intel HD Graphics, 1x HDMI and 1x VGA Keyboard and Mouse USB keyboard and mouse (not required and not included) •... -
Page 7: Installation And Use
© C2G 2019 Network Controller for HDMI over IP 3. Installation and Use 3.1. Part List The C2G Network Controller comes with the following parts: • Base unit (1x) • External Power Adapter (1x) Figure 3: Base Unit Please verify that both parts are present before proceeding. Page 7... -
Page 8: Product Overview
© C2G 2019 Network Controller for HDMI over IP 3.2. Product Overview The external connections and connection indicators of the C2Gl Network Controller are detailed in Figure 4 and Figure 5. Please familiarize yourself with them before installing the unit. Figure 4: Rear Panel = DC Power = HDMI video out... -
Page 9: Installation Procedure
© C2G 2019 Network Controller for HDMI over IP 3.3. Installation Procedure Note that the examples below assume that the Ethernet Switch used does not support WiFi, and a Router with WiFi capability is required in order to communicate with smartphones and tablets for control purposes. - Page 10 © C2G 2019 Network Controller for HDMI over IP If the Ethernet Switch does not already reside in the example subnet of 192.168.2.x, then set the static IP of the Ethernet Switch to a free static IP address (for the sake of this example we will use an IP address of 192.168.2.1).
- Page 11 © C2G 2019 Network Controller for HDMI over IP http://192.168.168.50/mnc/ NOTE: mnc must be written in lower case. Figure 6: Internet Browser Entry 3. Press Enter on the keyboard. If the browser connects to the Network Controller, go to Step 7. 4.
- Page 12 © C2G 2019 Network Controller for HDMI over IP Figure 8: Computer IP Address 5. If the IPv4 Address (shown in the red box of Figure 8) does NOT begin with the numbers 192.168.168.x, then perform the following steps (refer to Figures 9 through 12): A.
- Page 13 © C2G 2019 Network Controller for HDMI over IP M. Click on OK. Step 5A Steps 5B-5C Figure 9 Page 13...
- Page 14 © C2G 2019 Network Controller for HDMI over IP Step 5D Step 5E Step 5F Figure 10 Page 14...
- Page 15 © C2G 2019 Network Controller for HDMI over IP Step 5G Steps 5H-5I Figure 11 Page 15...
- Page 16 © C2G 2019 Network Controller for HDMI over IP Steps 5J-5K-5L-5M Figure 12 The computer is now ready to communicate with the Network Controller. Refer to Figure 13. 6. Open up an Internet browser (Explorer, Chrome, Firefox, etc.) and type the following address in the address bar near the top of the screen: http://192.168.168.50/mnc/ NOTE: mnc must be written in lower case...
- Page 17 © C2G 2019 Network Controller for HDMI over IP Refer to Figure 14a. 7. The C2G Network Controller Web interface Login Screen will appear. Figure 14a: Login Screen 8. In the User Name field, type admin (for initial login). Use lower case. 9.
- Page 18 © C2G 2019 Network Controller for HDMI over IP Figure 15: Network Settings Screen 13. Next ensure that the above radio buttons are selected as shown. For LAN 1 as Static and LAN 2 as Dynamic (DHCP). 14. In the LAN 1 IP address field, type the first 3 entries of the IP address of the network subnet on which the Network Controller will be installed, which in our example is 192.168.2.x.
-
Page 19: Ethernet Web Interface - Device Management
© C2G 2019 Network Controller for HDMI over IP 17. Click on Save. The Network Controller will reboot (Figure 16). The Network Controller is now configured to work with your network router. Figure 16: Network Controller Reboot Screen Process 2: Physically installing the Network Controller to the network 1. - Page 20 © C2G 2019 Network Controller for HDMI over IP The C2G Network Controller Web interface Login Screen will appear ( Figure 17). Figure 17 Login Screen In the User Name field, type admin. Use lower case. In the Password field, type the password entered previously in step 11. Click Log in.
- Page 21 © C2G 2019 Network Controller for HDMI over IP Extender Models The C2G Network Controller is designed to work with the C2G Extender models (refer to Table 2). These Extender models are controlled using C2G’s Network Controller software, although the setup for each may differ slightly. Model Type Resolution...
-
Page 22: Extender Models 29975 And 29976
© C2G 2019 Extender Model 29975 and 29976 3.5. Extender Models 29975 and 29976 Products Screen Once the user has logged in, the Products screen will appear (Figure 18). Figure 18: Products Screen – Initial View In the SELECT A PRODUCT TO ADD: drop down box, select 4K HDMI Over IP (29975/29976) and then click on ADD DEVICE (Figure 19). - Page 23 © C2G 2019 Extender Model 29975 and 29976 A dialog box appears asking the user to provide a custom name for the selected product (Figure 20). The user then types a name in the Custom Name: field and clicks OK. Note that if the user decides to click CANCEL, the previous screen appears (Figure 18), without a product being added.
- Page 24 © C2G 2019 Extender Model 29975 and 29976 The user can change the ID of each row by modifying the ID field. The user can also delete the entire row completely by clicking the next to it. To configure a given product, the user clicks on Select, which brings up a multi- tabbed screen (Figure 22).
- Page 25 © C2G 2019 Extender Model 29975 and 29976 1. Products Screen - Set-up Tab The Set-up tab offers the user two options for the type of set-up allowed: Automatic or Manual. Automatic means that the software will scan the system for every dip- switch enabled device.
- Page 26 © C2G 2019 Extender Model 29975 and 29976 Figure 24: Products Screen – Set-up Tab Figure 25: Name Editing To save all name changes, click on Save. A green UPDATED tag will appear next to newly changed names (Figure 26). Page 26...
- Page 27 © C2G 2019 Extender Model 29975 and 29976 Figure 26: Saving Name Changes Remote sources may also be used with the 29976 decoder. Start by pressing on the “Add Remote Source” button in Figure 26. This will bring up a popup menu to fill-in relating to the remote source, as shown in Figure 27, and followed by Figure 28.
- Page 28 © C2G 2019 Extender Model 29975 and 29976 To view and modify component parameters, click on the Detail button next to the given AV over IP device. A dialog appears (Figure 29 for TX, and Figure 30 for RX). Figure 29: TX Device Detail Dialog Figure 30: RX Device Detail Dialog 29975 Encoder (TX) Parameters: Custom Name: Device name defined by user (info only)
- Page 29 © C2G 2019 Extender Model 29975 and 29976 29976 Decoder (RX) Parameters: Custom Name: Device name defined by user (info only) Model: Device model number (info only) Mac Address: Device MAC Address (info only) IP Address: Device IP Address (info only) FW Version: Installed firmware version (info only) Video Resolution: Video resolution at input (info only) CPU Usage: Device CPU usage in percentage (info only)
- Page 30 © C2G 2019 Extender Model 29975 and 29976 2. Products Screen - Matrix Tab The Matrix tab of the Products screen allows the user to connect any Display to any Source. The user also has the option of using Presets to save connection schemes (“Presets”), as well as to edit and delete existing presets (Figure 31).
- Page 31 © C2G 2019 Extender Model 29975 and 29976 Once the selection is made (the user can change any or all connections between displays and sources), the user clicks on Connect to finalize the change. A green SUCCESS tag will appear next to the new or changed connection (Figure 33). Figure 33: Change Successful To create a new preset, the user clicks the >...
- Page 32 © C2G 2019 Extender Model 29975 and 29976 To save this preset, the user clicks on Create. A green SUCCESS tag will appear next to the > Save current connections as new preset field and the newly created preset becomes the Current active Preset (Figure 35). Figure 35: Confirmation of New Preset To delete a preset, the user clicks the >...
- Page 33 © C2G 2019 Extender Model 29975 and 29976 Once selected, a dialog will appear asking the user to confirm the deletion request (Figure 37). Figure 37: Confirmation of Deleted Preset Click on OK. The preset will be deleted and a green SUCCESS tag will appear next to the >...
- Page 34 © C2G 2019 Extender Model 29975 and 29976 To save the current matrix configuration under an existing Preset name, click on > Save current connection in following preset drop-down box and selects a preset name (Figure 39). Figure 39: Change Current Active Preset Once selected, the Preset will be saved and a green SUCCESS tag will appear next to the >...
- Page 35 © C2G 2019 Extender Model 29975 and 29976 3. Products Screen – Multiview/Videowall Tab The Multiview/Videowall tab of the Products screen enables the user to define, configure and manage the connectivity of Multiview screens and/or Video Walls. Multiview enables the user to display multiple videos or images on a single display or on a Video Wall consisting of multiple displays.
- Page 36 © C2G 2019 Extender Model 29975 and 29976 The “Config” sub-section in Figure 41 allows the user to save, load, delete and clear configurations which have been created on the grid. • The pull-down tab allows the user to load any saved configuration. •...
- Page 37 © C2G 2019 Extender Model 29975 and 29976 (Figures 43). Increasing the size of the display to cover multiple grids allows for finer placement of source material within a given display, offering more flexibility when assigning sources in a Multiview arrangement. Multiview allows for virtual windowing across one or more displays.
- Page 38 © C2G 2019 Extender Model 29975 and 29976 Repeat the above steps for each display. When creating Video walls all the displays should be the same brand, size and model, and thus should have the same settings. Figure 44: Configuring displays Next add a source by clicking on the source and dragging it (via top left corner) on to the grid over one or more displays.
- Page 39 © C2G 2019 Extender Model 29975 and 29976 other source and make sure to un-check the “On Top” box and press “Save”. This is not configured automatically, and must be set manually. • The “Shift” buttons are used for fine shift adjustments for cases where a video is spread across more than one display and some alignment is required between displays.
- Page 40 © C2G 2019 Extender Model 29975 and 29976 Figure 46: Adding more sources It is important to note that the number of sources that can be displayed side-by-side simultaneously on one given display depends on the resolution of the sources. For example: •...
- Page 41 © C2G 2019 Extender Model 29975 and 29976 4. Products Screen - RS-232 Tab The RS-232 tab of the Products screen enables the user to send RS-232 commands from the Network Controller to a C2G 29975 encoder or 29976 decoder (Figure 47). Figure 47: RS-232 Tab When sending RS-232 commands through the Network Controller, the user first selects the device that the RS-232 commands will be sent to.
- Page 42 © C2G 2019 Extender Model 29975 and 29976 Once a device is selected, the Data to send in HEX field becomes enabled. Begin by setting the RS232 parameters as required and click on “Save”. Next enter the RS232 command in Hex in the Data to send in HEX field and click on “Send”. In the above example, 4K Media Player-1 was chosen as the selected device (but a decoder connected to sink equipment could have also been selected), meaning that a command sent to 4K Media Player-1 will travel from the Network Controller to the Ethernet...
- Page 43 © C2G 2019 Extender Model 29975 and 29976 5. Products Screen - IR Tab The IR tab of the Products screen enables the user to send IR commands from the 29977 Network Controller to a 29975 encoder or 29976 decoder IR port (Figure 49). Figure 49: IR Tab The 29975 and 29976 devices support a bi-directional IR port.
- Page 44 © C2G 2019 Extender Model 29975 and 29976 Figure 50: IR Tab – Selecting a Device Once a device is selected, the Data to send in HEX field becomes enabled. Begin by setting the IR Mode to “Emitter” and click on “Save”. Next enter the IR command in Hex in the Data to send in HEX field and click on “Send”.
- Page 45 © C2G 2019 Extender Model 29975 and 29976 6. Products Screen - Firmware Tab The Firmware tab of the Products screen enables the user to update the firmware for C2G encoders and decoders (Figure 51) Figure 51: Firmware Tab The user selects Source (TX), then chooses the firmware update file to upload to the given device.
- Page 46 © C2G 2019 Extender Model 29975 and 29976 Settings Screen The Settings screen contains two tabs: Network and Administration. The Network tab (Figure 52) is used to change the IP address of the C2G Network Controller, the network mask, as well as the router IP address. It also allows the user to enable or disable DHCP.
- Page 47 © C2G 2019 Extender Model 29975 and 29976 The mDNS Browser tab is used to find C2G devices on the local network using the mDNS Protocol, and lists their IP and MAC Addresses. See Figure 54. Figure 54: Settings Screen: mDNS Browser Tab Press the mNDS Discovery button to begin the discovery.
- Page 48 © C2G 2019 Extender Model 29975 and 29976 Software Update Screen The Software Update enables the user to update the C2G Network Controller software (Figure 56). This software is available on C2G’s website (www.cablestogo.com). Download the software to the local PC before performing the update.
-
Page 49: Troubleshooting
© C2G 2019 Network Controller for HDMI over IP Troubleshooting Table 3 lists common problems, as well as their possible causes and solutions. If the information below does not solve the problem, technical support contact information can be found at the end of this section. -
Page 50: Appendix - Ip Command Api
© C2G 2019 Network Controller for HDMI over IP Appendix – IP Command API The C2G API (Application Program Interface) Commands for the 29977 Network Controller for HDMI over IP are not covered in this document. They are covered in a separate document as follows: File: 29977 Network Controller IP Commands.PDF which is available on the 29977 unit webpage of the C2G website. -
Page 51: Product Warranty Policy
© C2G 2019 Network Controller for HDMI over IP 6. Product Warranty Policy Important Safety Information Do not plug the unit in any outlet that does not have enough current to allow the device to function. Refer to the specifications in this manual for power level of the unit. Liquid: If this unit or it’s corresponding power adapter has had liquid spilled on or in it, do not attempt to use the unit. - Page 52 © C2G 2019 Network Controller for HDMI over IP FCC Statement Note: This device complies with part 15 of the FCC Rules. Operation is subject to the following two conditions: This device may not cause harmful interference, and This device must accept any interference received, including interference that may cause undesired operation.
Need help?
Do you have a question about the C2G 29977 and is the answer not in the manual?
Questions and answers