
Related Manuals for Milwaukee MAX MW160


Summary of Contents for Milwaukee MAX MW160
- Page 1 INSTRUCTION MANUAL MW160 MAX pH / mV / ISE / Temperature Bench Meter SATISFACTION GUARANTEED...
- Page 2 This instruction manual will provide you the necessary information for correct use of the meters. All rights are reserved. Reproduction in whole or in part is prohibited without the written consent of the copyright owner, Milwaukee Instruments Inc., Rocky Mount, NC 27804 USA.
-
Page 3: Table Of Contents
TABLE OF CONTENTS 1. FUNCTIONAL DESCRIPTION ............................4 2. GENERAL DESCRIPTION .............................6 3. SPECIFICATIONS ................................7 4. OPERATIONAL GUIDE ..............................8 5. pH CALIBRATION ................................11 6. pH BUFFER TEMPERATURE DEPENDENCE ....................14 7. RELATIVE mV CALIBRATION ............................15 8. ISE CALIBRATION .................................16 9. GOOD LABORATORY PRACTICE (GLP) ......................19 10. -
Page 4: Functional Description
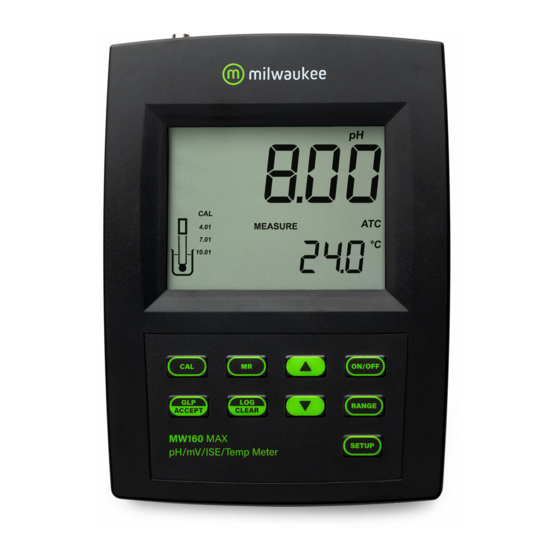
4 MW160 Bench Meter 1. FUNCTIONAL DESCRIPTION DISPLAY A. Primary display B. Measuring unit for primary display C. Calibration messages D. Memorized ph calibration buffers E. Calibration tags F. Mode indicators G. Require user confirmation H. Calibration messages I. Temperature compensation mode indicator J. - Page 5 FUNCTIONAL DESCRIPTION 5 FRONT PANEL 1. Liquid Crystal Display (LCD) 2. CAL key, to enter/exit calibration mode 3. MR key, to enter/exit memory recall 4. GLP/ACCEPT key, to display GLP data or to confirm value 5. LOG/CLR key, to store reading in memory or to clear calibration 6.
-
Page 6: General Description
6 MW160 Bench Meter 2. GENERAL DESCRIPTION Thank you for choosing Milwaukee Instruments. This instruction manual will provide you the necessary information for correct use of the meter. MW160 is a logging microprocessor-based pH, ORP, ISE and temperature bench meter. -
Page 7: Specifications 7
SPECIFICATIONS 7 3. SPECIFICATIONS -2.00 to 16.00 pH ±699.9 mV / ±2000 mV Range 0.001 to 19999 ppm (ISE) -20.0 to 120.0 °C (-4.0 to 248.0 °F) 0.01 pH 0.1 mV / 1 mV 0.001 (0.001 to 9.999) ppm Resolution 0.01 (10.00 to 99.99) ppm 0.1 (100.0 to 999.9) ppm 1 (1000 to 19999) ppm 0.1 °C (0.1 °F) -
Page 8: Operational Guide
8 MW160 Bench Meter 4. OPERATIONAL GUIDE INITIAL PREPARATION Plug the 12 VDC adapter to the power supply socket. To prepare the instrument for use, connect the pH electrode to the BNC connector and the temperature probe to the appropriate socket on the rear panel of the instrument. The temperature probe is used in conjunction with the pH electrode to utilize the instrument’s ATC capability, but it can also be used independently to take temperature measurements. - Page 9 OPERATIONAL GUIDE 9 If measurements are taken successively in different samples, it is recommended to rinse the electrode thoroughly with water and then with some of the sample to be tested. The pH reading is affected by temperature. In order to measure the pH accurately, the temperature effect must be compensated.
- Page 10 10 MW160 Bench Meter y The instrument displays the mV reading on the primary LCD or Rel mV reading if a Rel mV calibration has been performed and the temperature on the secondary LCD. Notes: When the reading is out of range, the closest full-scale value is displayed blinking. If using a pH electrode while in mV mode, the instrument will measure the mV generated by the pH electrode.
-
Page 11: Ph Calibration 11
pH CALIBRATION 11 5. pH CALIBRATION It is recommended to calibrate the instrument frequently, especially if high accuracy is required. The pH calibration is also necessary in the following cases: a. Whenever the pH electrode is replaced. b. At least once a week. c. - Page 12 12 MW160 Bench Meter y When the reading is stable and close to the selected buffer, the “READY” and “ACCEPT” tags will blink on the LCD. y Press the GLP/ACCEPT key to confirm calibration. y The calibrated value will be displayed on the primary LCD and the second expected buffer value on the secondary LCD, along with the tag of the buffer already calibrated.
- Page 13 pH CALIBRATION 13 y Press the GLP/ACCEPT key to confirm calibration. y The instrument stores the calibration values and returns to normal measurement mode. Notes: The instrument automatically skips the buffers already used for the previous calibration points to avoid erroneous procedure. If the value measured by the instrument is not close to the selected buffer, “WRONG BUFFER”...
-
Page 14: Ph Buffer Temperature Dependence
14 MW160 Bench Meter 6. pH BUFFER TEMPERATURE DEPENDENCE The temperature has an effect on pH. The calibration buffer solutions are affected by temperature changes to a lesser degree than normal solutions. During calibration the instrument will automatically calibrate to the pH value corresponding to the measured or set temperature. -
Page 15: Relative Mv Calibration 15
RELATIVE mV CALIBRATION 15 7. RELATIVE mV CALIBRATION y Press the CAL key when the instrument is in mV / Rel mV measurement mode. The “CALIBRATION” tag will appear on the LCD. y Relative mV value is displayed on the primary LCD and the absolute mV value on the secondary LCD. -
Page 16: Ise Calibration
16 MW160 Bench Meter 8. ISE CALIBRATION For greatest accuracy, it is recommended to calibrate the instrument frequently. Due to electrode conditioning time, the electrode must be kept immersed a few seconds to stabilize. PROCEDURE One or two-point calibration can be performed, with six memorized standards: 0.01, 0.1, 1, 10, 100 and 1000 ppm. - Page 17 ISE CALIBRATION 17 y When the reading is stable and close to the selected standard, the “READY” and “ACCEPT” tags will blink. y Press the GLP/ACCEPT key to confirm calibration. y The calibrated value will be displayed on the primary LCD and the second expected standard value on the secondary LCD.
- Page 18 18 MW160 Bench Meter The slope window is within ±20 mV and ±105 mV if ion charge is not specified (UndF option in SETUP menu), or between 50% and 120% of default slope for the corresponding ion charge. Default slope values (mV/decade): –...
-
Page 19: Good Laboratory Practice (Glp)
GOOD LABORATORY PRACTICE (GLP) 19 9. GOOD LABORATORY PRACTICE (GLP) GLP is a set of functions that allows storage and retrieval of calibration data and electrode status. All data regarding pH and ISE calibration is stored for the user to review when necessary. - Page 20 20 MW160 Bench Meter y The pH calibration slope value on the primary LCD and the offset on the secondary LCD. The pH calibration buffers in calibrating order. y The first pH calibration buffer: y The second pH calibration buffer: y The third pH calibration buffer: Notes: The “OLd”...
- Page 21 GOOD LABORATORY PRACTICE (GLP) 21 The “no BUFFER” message means that the instrument was calibrated in less than three points. The meter displays “OFF” if the function is disabled, or the number of days before the calibration alarm will be displayed (e.g. 5 days), or from the time calibration expired (e.g.
- Page 22 22 MW160 Bench Meter y The date (MM.DD. Y YYY) as in pH GLP mode. y The value slope on the primary LCD and the offset on the secondary LCD. y The first calibration standard. y The second calibration standard. y The instrument ID as in pH GLP mode.
- Page 23 GOOD LABORATORY PRACTICE (GLP) 23 Press the GLP/ACCEPT key at any moment and the instrument will return to measurement mode. If calibration has not been performed for the selected range, the instrument displays “no CAL” message blinking.
-
Page 24: Logging
24 MW160 Bench Meter 10. LOGGING Up to 50 readings can be stored into memory for each measurement range (pH, mV/Rel mv and ISE). LOGGING THE CURRENT DATA To store the current reading into memory press the LOG/CLR key while in measurement mode. - Page 25 LOGGING 25 If the log space is full, “FULL LOC” message will be displayed and no more data will be saved. If the LOG/CLR key is pressed while in measurement mode, a complete set of information is stored. VIEW LOGGED DATA Press the MR key to retrieve the information stored while in measurement mode.
- Page 26 26 MW160 Bench Meter Press the RANGE key and the instrument will display the next logged parameter: y The mV value on the primary LCD and the temperature on the secondary LCD. y The date: month and day on the primary LCD and the year on the secondary LCD, along with “DATE”...
- Page 27 LOGGING 27 y The “dEL” message on the primary LCD and the record number on the secondary LCD, along with “ACCEPT” tag blinking. Notes: If one of the arrow keys is pressed while “dEL” message is displayed, the next/previous record number will be selected. If the SETUP key is pressed, the secondary LCD will toggle between the record number and “ALL”...
-
Page 28: Setup
28 MW160 Bench Meter 11. SETUP Setup mode allows viewing and modifying the following parameters: y Calibration Alarm Time-Out (pH range only) y Buffer Display (pH range only) y Ion Charge (ISE range only) y Current Time (hh:mm) y Current Date (MM.DD. Y YYY) y Beep Status y Baud Rate (serial communication) y Instrument ID... - Page 29 SETUP 29 Press the GLP/ACCEPT key to accept the value or the CAL key to escape. Press the arrow keys to select the next/previous parameter. Press the SETUP key to exit SETUP menu at any time. The following table lists the SETUP parameters, their valid values range and the factory settings (default): Item Description...
-
Page 30: Mv Calibration (For Technical Personnel Only)
12. mV CALIBRATION (for technical personnel only) The MW160 is factory calibrated for mV. Milwaukee’s ORP electrodes are interchangeable and no mV calibration is needed when they are replaced. If the mV measurements are inaccurate, mV recalibration should be performed. -
Page 31: Temperature Calibration (For Technical Personnel Only) 31
If the temperature measurements are inaccurate, temperature recalibration should be performed. For an accurate recalibration, contact your dealer or the nearest Milwaukee Customer Service Center, or follow the instructions bellow. y Prepare a vessel containing ice and water and another one containing hot water (at 50 °C). -
Page 32: Pc Interface
Data can be exported to the most popular spreadsheet programs for further analysis. To connect the instrument to a PC through the RS232 port, use the Milwaukee Instruments Service MA9350 cable connector. To connect the instrument to a PC through the USB port, use a standard USB cable. - Page 33 PC INTERFACE 33 The instrument will answer for this command with: <STX> <answer> <ETX> where: <STX> is 02 ASCII code character (start of text) <ETX> is 03 ASCII code character (end of text) <answer>: <ACK> is sent for a recognized command <CAN>...
-
Page 34: Electrode Conditioning & Maintenance
34 MW160 Bench Meter 15. ELECTRODE CONDITIONING & MAINTENANCE PREPARATION PROCEDURE Remove the electrode protective cap. DO NOT BE ALARMED IF ANY SALT DEPOSITS ARE PRESENT. This is normal with electrodes and they will disappear when rinsed with water. During transport tiny bubbles of air may have formed inside the glass bulb. The electrode cannot function properly under these conditions. - Page 35 ELECTRODE CONDITIONING & MAINTENANCE 35 For refillable electrodes: Refill the electrode with fresh electrolyte (see the electrode’s specifications to select the correct refilling solution). Allow the electrode to stand upright for 1 hour. Follow the Storage Procedure above. CLEANING PROCEDURE y General: Soak in MA9016 General Cleaning Solution for approx.
-
Page 36: Troubleshooting
36 MW160 Bench Meter 16. TROUBLESHOOTING SYMPTOMS PROBLEM SOLUTION Soak the electrode tip in MA9016 for 30 minutes and Slow reponse/excessive drift. Dirty pH electrode. then follow the Cleaning Procedure. Clogged/dirty Junction. Low Clean the electrode. Refill Reading fluctuates up and electrolyte level (refillable with fresh electrolyte MA9012 down (noise). -
Page 37: Accessories
ACCESSORIES 37 17. ACCESSORIES MA9001 pH 1.68 Buffer Solution (230 mL bottle) MA9004 pH 4.01 Buffer Solution (230 mL bottle) MA9006 pH 6.86 Buffer Solution (230 mL bottle) MA9007 pH 7.01 Buffer Solution (230 mL bottle) MA9009 pH 9.18 Buffer Solution (230 mL bottle) MA9010 pH 10.01 Buffer Solution (230 mL bottle) MA9012... -
Page 38: Certification
Damage due to accidents, misuse, tampering or lack of prescribed maintenance is not covered by warranty. If service is required, contact your local Milwaukee Instruments Technical Service. If the repair is not covered by the warranty, you will be notified of the charges incurred. - Page 39 Milwaukee Instruments reserves the right to make improvements in design, construction and appearance of its products without advance notice.
- Page 40 THANK YOU FOR CHOOSING Sales and Technical Service Contacts: Milwaukee Electronics Kft. Alsó-kikötő sor 11C H-6726 Szeged - HUNGARY tel: +36 62 428 050 fax: +36 62 428 051 www.milwaukeeinst.com e-mail: sales@milwaukeeinst.com Milwaukee Instruments, Inc. 2950 Business Park Drive Rocky Mount, NC 27804 USA...
Need help?
Do you have a question about the MAX MW160 and is the answer not in the manual?
Questions and answers