Table of Contents
Advertisement
Quick Links
I N S T R U C T I O N F O R U S E
Item no.: Model
70030
VELA X-Ray Chair
70031
VELA 'Turn+' Thorax Chair
70032
VELA Mammography Chair
70033
VELA 'Basic+' Ophthalmology Chair
70034
VELA 'Move+' Ophthalmology Chair
70035
VELA 'Medium' Exercise Chair
70036
VELA 'Large' Exercise Chair
VELA Medical
The chair's design varies depending on the model
E N
Manual no. 106057
Advertisement
Table of Contents

Related Manuals for VELA Medical X-Ray Chair

Summary of Contents for VELA Medical X-Ray Chair
- Page 1 I N S T R U C T I O N F O R U S E VELA Medical Manual no. 106057 Item no.: Model 70030 VELA X-Ray Chair 70031 VELA ’Turn+’ Thorax Chair 70032 VELA Mammography Chair 70033 VELA 'Basic+' Ophthalmology Chair...
-
Page 2: Table Of Contents
TABLE OF CONTENTS 1.0. INTRODUCTION 1.1. WARNINGS 1.2. TROUBLESHOOTING 1.3. VELA TANGO WITH ELECTRIC HEIGHT ADJUSTMENT 1.3.1. Power input 1.3.2. Emission 1.3.3. Surge protection 1.4. LABELS USED ON THE CHAIR 1.5. SAFETY 1.5.1. Application 1.5.2. Transport 1.6. WARRANTY 1.7. UNPACKING THE CHAIR 1.8. -
Page 3: Introduction
If you have any questions, please contact VELA Medical’s distributor in your country. VELA Medical reserves the right to make changes to this manual. VELA Medical Gøteborgvej 8-12 DK-9200 Aalborg SV Denmark www.vela-medical.com... -
Page 4: Warnings
1.1. WARNINGS In case of an allergic reaction, stop using the chair and consult a doctor Only use original spare parts from VELA Medical Only use the supplied charger for charging the chair Do not make any changes to the accessories that come with the chair Only use the chair for the intended purpose Only adjust the seat angle while the user’s feet are on the floor... -
Page 5: Troubleshooting
There is too much load or uneven load on the chair. Try to adjust the height without sitting in the chair. If this does not work, the gas cartridge is defective and should be replaced. Contact your VELA Medical supplier The brake function does not work The brake is not activated. -
Page 6: Vela Tango With Electric Height Adjustment
Current: 0.5A Power: 12VA 1.3.2. EMISSION A VELA Medical chair with electrical functions has been tested and complies with current requirements regarding electromagnetic radiation (EMC require- ments). The chair is tested to the following specifications: :: Emission class CISPR 11, Group 1, Class B See more details at www.vela-medical.com... -
Page 7: Labels Used On The Chair
”VELA Tango” and conforms to all :: The chair is not built to stand on applicable EU rules. The chair is :: The wheel brake must always be manufactured by VELA Medical, Goeteborgvej 8-12, 9200 Aalborg activated when sitting down or SV, Denmark. -
Page 8: Transport
- 10°C. :: VELA Medical chair 1.6. WARRANTY :: Instructions for use VELA Medical grants a right of claim :: Charger (only for chairs with elec- under applicable law in the country trical functions) where the chair is acquired. The right of complaint applies only when using Note: see item 2.0.1 for correct... -
Page 9: Wheels
Note: Electrical and electronic 1.8.1. WHEELS We recommended you regularly equipment and accompanying check the wheels and remove any batteries contain materials, com- residual threads, etc. ponents and substances that can be harmful to human health and the environment if the waste is not 1.8.2. -
Page 10: Settings
2.0.2. HEIGHT ADJUSTMENT VIA HAND BOX (EL) The hand box is used via push buttons on the front. VELA Medical hand boxes can have one or more functions. The icons on the hand box show the button functions. Note: Insert plug in hand box to operate functions. Should only be used continuously for one minute, then a nine-minute break should follow. -
Page 11: Setting Angle Of Seat
2.0.4. SETTING ANGLE OF SEAT* Adjusted by pulling up the middle handle on the right-hand side. 2.0.5. SETTING ANGLE OF BACKREST Adjusted by pulling up the rear handle on the right-hand side. 2.0.6. ADJUSTING LUMBAR SUPPORT* The backrest can be adjusted to provide optimal lumbar BACK support by pulling up the handle on the right-hand side of the backrest. -
Page 12: Back Bolt
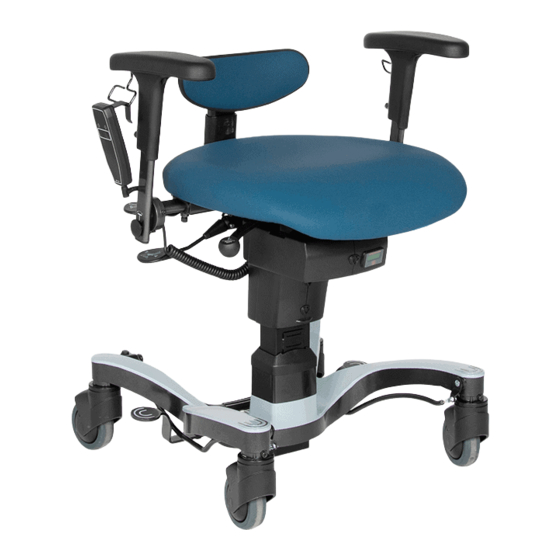
2.0.8. BACK BOLT* The backrest can be set to a specific angle by adjusting and attaching the bolt mounted on the back of the backrest. 2.0.9. ADJUSTING THE ARMREST HEIGHT Adjusted by loosening the screw on the armrest bar and adjusting the height of the armrest. -
Page 13: Rotation
2.0.12. ROTATION* The seat is rotated by pushing back on the front handle on the left-hand side. Rotation can be turned and locked in the following positions: 90° to the left, 0° (neutral), and 90° to the right. 2.0.13. 360 ° FOOT PEDAL FOR BRAKING The brake can be accessed from all sides of the chair and is activated by pressing down the brake pedal with your foot in the areas shown. -
Page 14: Strolling Bracket
2.0.16. STROLLING BRACKET* Strolling bracket for transporting a person in the chair. The strolling bracket is mounted to fittings under the seat using two finger screws. This is also where the depth is adjusted. The height is adjusted by pressing the two buttons on the side of the bracket while the handle is positioned at the desired height. -
Page 15: Battery Indicator (El)
2.0.20. BATTERY INDICATOR (EL) A battery indicator with a button is located on the front of the chair just below the seat. One press shows the remaining battery capacity in per cent (%). Two presses show the remaining battery voltage. 2.0.21. - Page 16 VELA Medical :: Gøteborgvej 8-12 :: 9200 Aalborg SV :: Denmark :: +45 96 34 76 00 :: mail@vela-medical.com vela-medical.com...
Need help?
Do you have a question about the X-Ray Chair and is the answer not in the manual?
Questions and answers