Advertisement
Quick Links
Gripper Kit (#28202) for Boe-Bot or ActivityBot Robots
The Gripper Kit
This kit allows your Parallax Boe-Bot (#28132 & #28832) or ActivityBot
(#32500) robot to pick up objects. Note: robots are sold separately. This kit
is not compatible with the Shield-Bot for Arduino (#130-35000 & #32335).
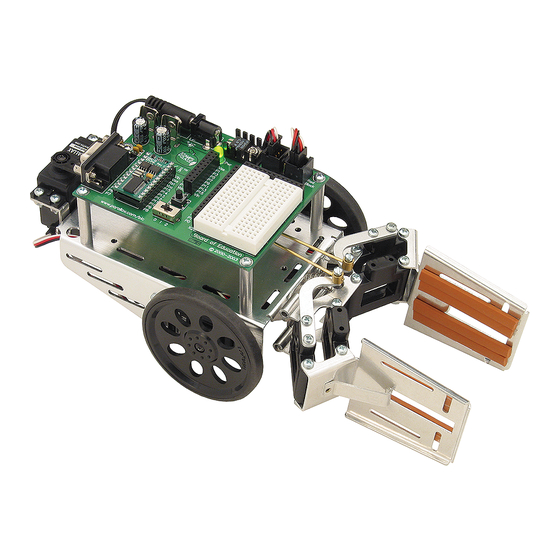
Before getting started, take an inventory of the parts in your kit. Use Fig #1
to identify each part to the parts list. Once you have inventoried your kit,
proceed to Step #1.
Parts List
Item Qty
Description
1
(1)
hinge mount
2
(1)
dowel pin
3
(2)
linkage plate
4
(4)
Gripper link
5
(8)
#4 x 1" spacer
6
(2)
Gripper plate
7
(8)
4-40 x 1.25" screw
8
(15)
4-40 hex nut
9
(1)
spring
10
(2)
control arm
11
(1)
Parallax Standard Servo
12
(1)
actuator rod
13
(2)
Brass E-Z Connector
14
(8)
foam tape
15
(9)
4-40 x 1/4" screw
16
(2)
servo bracket
17
(4)
4-40 x 3/8" screw
18
(2)
4-40 lock-nut (not shown)
19
(4)
#4 x 1.25" standoff
(not shown)
Recommended Tools
•
Pliers
•
Phillips #2 point screwdriver
•
Small flat-blade screwdriver
•
A sharp-tipped hobby knife,
such as an X-Acto
-OR-
A hand drill with 5/64" bit
Copyright © Parallax Inc.
Arrow.com.
Downloaded from
Web Site: www.parallax.com
Forums: forums.parallax.com
Sales: sales@parallax.com
Technical: support@parallax.com
WARNING!
DO NOT use electric
screwdrivers with this kit. Please
assemble using hand tools only
to avoid damaging your Gripper.
®
knife
Gripper Kit (#28202)
Office: (916) 624-8333
Fax: (916) 624-8003
Sales: (888) 512-1024
Tech Support: (888) 997-8267
Fig #1
v4.0 9/16/2014 Page 1 of 13
Advertisement

Related Manuals for Parallax 28202


Summary of Contents for Parallax 28202
- Page 1 Gripper Kit (#28202) for Boe-Bot or ActivityBot Robots The Gripper Kit This kit allows your Parallax Boe-Bot (#28132 & #28832) or ActivityBot (#32500) robot to pick up objects. Note: robots are sold separately. This kit is not compatible with the Shield-Bot for Arduino (#130-35000 & #32335).
- Page 2 Before continuing, double check your work to ensure 4-40 Hex Nut that the pieces are angled as in Fig #5. Fig #4 Fig #5 Copyright © Parallax Inc. Gripper Kit (#28202) v4.0 9/16/2014 Page 2 of 13 Arrow.com. Arrow.com. Downloaded from...
- Page 3 Double check your work, then proceed to Step #5. Gripper plate 4-40 x 1.25" pan head screw 4-40 hex nut foam tape Fig #8 Copyright © Parallax Inc. Gripper Kit (#28202) v4.0 9/16/2014 Page 3 of 13 Arrow.com. Arrow.com. Arrow.com.
- Page 4 Final assembly must match Fig #12. Double check your work, then proceed to Step #7. control arm 4-40 x ¼" pan head screw Fig #11 Fig #12 Copyright © Parallax Inc. Gripper Kit (#28202) v4.0 9/16/2014 Page 4 of 13 Arrow.com. Arrow.com. Arrow.com.
- Page 5 4-40 x ¼" screws and nuts as shown in Fig #14 and Fig #15. • Double check your work against Fig #16A/B. Fig #14 – Top View Fig #15 – Bottom View Copyright © Parallax Inc. Gripper Kit (#28202) v4.0 9/16/2014 Page 5 of 13 Arrow.com. Arrow.com. Arrow.com.
- Page 6 Place the top hinge tabs over the tabs on the hinge Boe-Bot or ActivityBot robot, assembled mount so the top of the Gripper stays on the hinge mount. Fig #17 Copyright © Parallax Inc. Gripper Kit (#28202) v4.0 9/16/2014 Page 6 of 13 Arrow.com. Arrow.com.
- Page 7 If dowel pin slips in very easily, use needle nose pliers to slightly crimp the center of the hinge plate. Item Description • Replace wheel. dowel pin Fig #18 Fig #19 Copyright © Parallax Inc. Gripper Kit (#28202) v4.0 9/16/2014 Page 7 of 13 Arrow.com. Arrow.com. Arrow.com. Arrow.com. Arrow.com. Arrow.com.
- Page 8 4-40 x 3/8" pan head screw 4-40 hex nut Note: Only one arm of the servo horn is shown for clarity. Parallax Standard Serv Fig #22 Fig #23 Copyright © Parallax Inc. Gripper Kit (#28202) v4.0 9/16/2014 Page 8 of 13 Arrow.com. Arrow.com. Arrow.com.
- Page 9 Using the needle nose pliers, bend actuator rod at Item Description mid-point. Then bend as shown in Fig #24. actuator rod Fig #24 Copyright © Parallax Inc. Gripper Kit (#28202) v4.0 9/16/2014 Page 9 of 13 Arrow.com. Arrow.com. Arrow.com. Arrow.com.
- Page 10 Item Description • Position the spring to fit over tabs as shown in Fig #26 below. spring Fig #26 Copyright © Parallax Inc. Gripper Kit (#28202) v4.0 9/16/2014 Page 10 of 13 Arrow.com. Arrow.com. Arrow.com. Arrow.com. Arrow.com. Arrow.com.
- Page 11 1.25” standoffs in this kit. • When finished, carefully compare your robot to Fig #28 to make sure everything is correct. Fig #27 Fig #28 Copyright © Parallax Inc. Gripper Kit (#28202) v4.0 9/16/2014 Page 11 of 13 Arrow.com. Arrow.com. Arrow.com.
- Page 12 E/Z holes in the sides of the brass E/Z connectors • Lock the actuator rods in place using the set-screws Set-screws for E/Z connector (see arrow in Fig #30). Fig #30 Copyright © Parallax Inc. Gripper Kit (#28202) v4.0 9/16/2014 Page 12 of 13 Arrow.com. Arrow.com. Arrow.com.
- Page 13 Gripper performance may vary with battery charge, servo performance, and actuator servo_angle(16, 1800); rod adjustment. Revision History: Version 4.0 adds support for ActivityBot robot. Copyright © Parallax Inc. Gripper Kit (#28202) v4.0 9/16/2014 Page 13 of 13 Arrow.com. Arrow.com.