Table of Contents
Advertisement
Quick Links
Stainless Steel Series Network Camera
2MP / 3MP / 4MP
Quick Installation Guide
EDN288MS / EDN368MS / EDN468MS
EZN288MS / EZN368MS / EZN468MS
Copyright © EverFocus Electronics Corp.
Release Date: December, 2017
All the images including product pictures or screen shots in this document are for example only. The
images may vary depending on the product and software version. Information contained in this
document is subject to change without notice.
Advertisement
Table of Contents

Subscribe to Our Youtube Channel
Related Manuals for EverFocus Stainless Steel Series


Summary of Contents for EverFocus Stainless Steel Series
- Page 1 Stainless Steel Series Network Camera 2MP / 3MP / 4MP Quick Installation Guide EDN288MS / EDN368MS / EDN468MS EZN288MS / EZN368MS / EZN468MS Copyright © EverFocus Electronics Corp. Release Date: December, 2017 All the images including product pictures or screen shots in this document are for example only. The images may vary depending on the product and software version.
-
Page 2: System Requirements
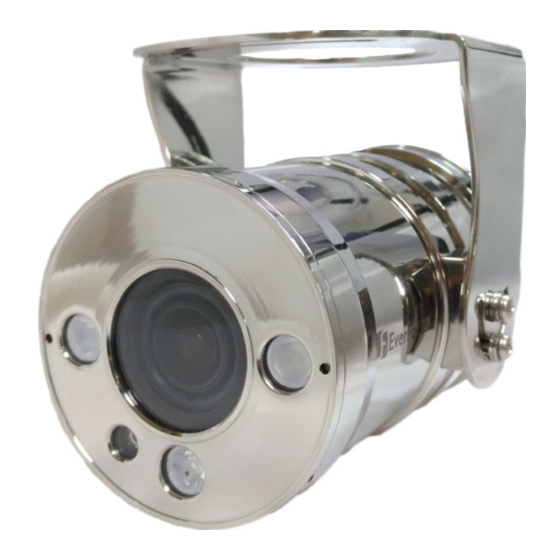
1. Introduction The marine-grade (AISI 316) stainless steel network cameras come with two types, Dome and Bullet, providing resolution up to 4-megapixel (2592 x 1520). The stainless steel series supports dual streams from H.265 and H.264 video compression formats. Stainless Steel Series Models... -
Page 3: Optional Accessory
Stainless Steel 2MP/3MP/4MP Network Cameras 1.3 Optional Accessory You can go to the product page on EverFocus’ website to check the related optional accessories. www.everfocus.com.tw 2. Physical Description EDN288MS / EDN368MS / EDN468MS EZN288MS / EZN368MS / EZN468MS No. Item Name... - Page 4 Note: This IP Camera supports micro SD/SDHC/SDXC card up to 128GB. You can go to the Download page on the product website to find the Storage Compatibility Table for viewing the tested SD cards. Please visit EverFocus’ Website www.everfocus.com.tw Reset Button: ...
- Page 5 Stainless Steel 2MP/3MP/4MP Network Cameras EDN288MS / EDN368MS / EDN468MS: To find the SD Card Slot and the Reset Button on the camera module, remove the camera cover using the supplied Hexagon Wrench. After inserting the SD card, be sure to place the supplied Desiccant Bag inside the module and then tightly screw back the camera cover.
-
Page 6: Installation
Stainless Steel 2MP/3MP/4MP Network Cameras 4. Installation Please refer to the steps below to mount the IP cameras. EDN288MS / EDN368MS / EDN468MS: 1. Before screwing the camera to the wall/ceiling, stick the Mounting Sticker on the wall/ceiling to mark the position for installation. Drill three screw holes on the wall/ceiling according to the Mounting Sticker. - Page 7 Stainless Steel 2MP/3MP/4MP Network Cameras 4. Connect a LAN/PoE cable to the camera. a. Remove the Screw Cap from the Cable Gland. Cable Gland Screw Cap b. Insert a RJ-45 network cable (without the RJ-45 connector on the one end) through the supplied Waterproof Ring, Cable Gland, Stopper and Screw Cap accordingly.
- Page 8 Stainless Steel 2MP/3MP/4MP Network Cameras 6. Connect a monitor to the Video Output on the IP camera to access camera live view while adjusting camera angles. To access camera live view, please refer to 5. Accessing the Camera. Video Output To adjust camera angles: Pan Adjustment: Simply turn left / right of the 3-Axis bracket by 75°...
- Page 9 Stainless Steel 2MP/3MP/4MP Network Cameras Tilt Adjustment: Loosen the two tilt screws on both side and adjust the angle up to 75° to the desired position, then tighten the tilt screws. Tilt Screw 0° ~ 75° 7. Place the supplied Desiccant Bag, tear down the Protection Film from the inside of the cover and then screw the camera cover back.
- Page 10 Stainless Steel 2MP/3MP/4MP Network Cameras EZN288MS / EZN368MS / EZN468MS: 1. Optionally screw the sunshield to the camera (please refer to Optional Accessory in this QIG). 2. Optionally insert a micro SD/SDHC/SDXC card into the card slot. Please refer to 3. SD Card Slot and Reset Button.
- Page 11 Stainless Steel 2MP/3MP/4MP Network Cameras 5. Connect a LAN/PoE cable to the camera. a. Remove the Screw Cap from the Cable Gland. Cable Gland Screw Cap b. Insert a RJ-45 network cable (without the RJ-45 connector on the one end) through the supplied Waterproof Ring, Cable Gland, Stopper and Screw Cap accordingly.
- Page 12 Stainless Steel 2MP/3MP/4MP Network Cameras 7. Access the camera live view while adjusting camera tilt angle. Loosen the screws to adjust the tilt angle. To access the camera live view, please refer to 5. Accessing the Camera. Cable Screws 0° ~ 210° Note: Before start operating the IP camera, please ensure the camera date and time are correct.
-
Page 13: Accessing The Camera
You can look up the IP address and access the Web interface of the IP camera using the IP Utility (IPU) program, which is included in the software CD. The IP Utility can also be downloaded from EverFocus’ Website: http://www.everfocus.com.tw/product/ip-utility/. Please connect the IP camera on the same LAN of your computer. - Page 14 Stainless Steel 2MP/3MP/4MP Network Cameras 4. If you log in for the first time, follow the on-screen instructions to update the latest Plugin version (ePlayer). After reloading the webpage, the login window pops up again. Type the user ID and password to log in again. By default, the user ID is user1 and the password is 11111111 5.
- Page 15 Stainless Steel 2MP/3MP/4MP Network Cameras 6. To optionally configure the Machine Name, IP Address, IP Type or Port Number using the IPU: a. Log in the device by checking the desired model and then click the Log in icon. The Log in dialog box appears.
- Page 16 To set up a static IP: By default, EverFocus’ IP cameras are set up with DHCP. To change the IP setting to static IP, select Static IP from IP Type drop-down list and set up the desired IP Address, for example, 192.168.31.67.
-
Page 17: Network Connections
Stainless Steel 2MP/3MP/4MP Network Cameras 6. Network Connections You can use one of the methods below to connect the camera to the network. Direct High-Speed Connection In a Direct High-Speed Connection, the camera connects directly to a modem without the need for a router. -
Page 18: One-To-One Connection (Directly From Pc To Ip Camera)
7. Upgrading Firmware You can upgrade the Firmware using the IP Utility software included in the software CD. The IP Utility can also be downloaded from EverFocus’ Website. Please connect the IP camera on the same LAN of your computer. - Page 19 Stainless Steel 2MP/3MP/4MP Network Cameras Type the Username and Password. Click the OK button, the Login status displays. Note: 1. The default user ID is user1 and the default password is 11111111 2. If you select more than one camera that has the same user ID / password, you will be able to log in several cameras at once.
- Page 20 TEL: +81 3 5625 8188 www.everfocus.com FAX: +81 3 5625 8189 sales@everfocus.com www.everfocus.co.jp info@everfocus.co.jp Ihr EverFocus Produkt wurde entwickelt Your EverFocus product is designed und hergestellt mit qualitativ and manufactured with high quality hochwertigen Materialien und materials and components which can Komponenten, die recycelt und wieder be recycled and reused.
Need help?
Do you have a question about the Stainless Steel Series and is the answer not in the manual?
Questions and answers