Advertisement
Table of Contents
Type of
Rack
Load
Round
1 or 2
Bar
bikes
Square
Bar
3 or more
Factory
bikes
Bar
DO NOT EXCEED RACK WEIGHT LIMITS!
IMPORTANT WARNING
IT IS CRITICAL THAT ALL YAKIMA RACKS AND ACCESSORIES BE PROPERLY AND SECURELY ATTACHED TO YOUR VEHICLE. IMPROPER
ATTACHMENT COULD RESULT IN AN AUTOMOBILE ACCIDENT, AND COULD CAUSE SERIOUS BODILY INJURY OR DEATH TO YOU OR
TO OTHERS. YOU ARE RESPONSIBLE FOR SECURING THE RACKS AND ACCESSORIES TO YOUR CAR, CHECKING THE ATTACHMENTS
PRIOR TO USE, AND PERIODICALLY INSPECTING THE PRODUCTS FOR ADJUSTMENT, WEAR, AND DAMAGE. THEREFORE, YOU MUST READ AND
UNDERSTAND ALL OF THE INSTRUCTIONS AND CAUTIONS SUPPLIED WITH YOUR YAKIMA PRODUCT PRIOR TO INSTALLATION OR USE. IF YOU
DO NOT UNDERSTAND ALL OF THE INSTRUCTIONS AND CAUTIONS, OR IF YOU HAVE NO MECHANICAL EXPERIENCE AND ARE NOT THOROUGHLY
FAMILIAR WITH THE INSTALLATION PROCEDURES, YOU SHOULD HAVE THE PRODUCT INSTALLED BY A PROFESSIONAL INSTALLER.
1033503E-1/21
Min. and
Max.
Crossbar
Limits
Spread*
16" spread =
16" - 42"
30 lbs. / bike
41cm - 107cm
41cm spread =
13.6kg / bike
18" spread =
18" - 42"
40 lbs. / bike
46cm - 107cm
46cm spread =
18.1kg / bike
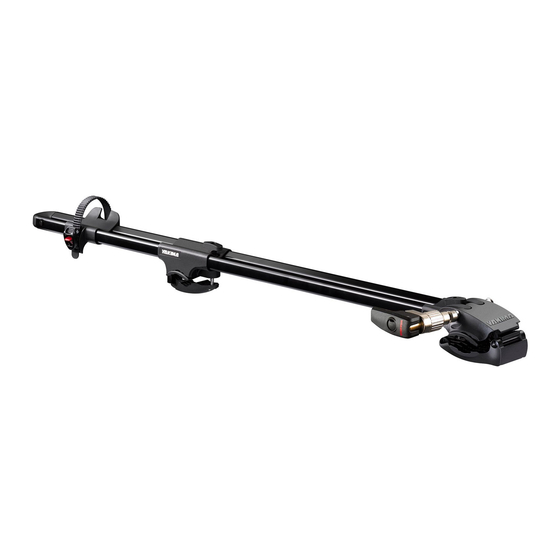
LOCKING SKEWER (1X)
END CAP (1X)
*CROSSBAR SPREAD
Your crossbar
spread is
the distance
between the
crossbars.
DESIGNED FOR FORKS
WITH SAFETY TABS.
OFF-ROAD DRIVING IS
NOT RECOMMENDED.
FORKLIFT (1X)
VINYL CAP (1X)
Forks with
Safety Tabs
Part #1033503 Rev.E
Advertisement
Table of Contents

Related Manuals for Yakima ForkLift


Summary of Contents for Yakima ForkLift
- Page 1 PRIOR TO USE, AND PERIODICALLY INSPECTING THE PRODUCTS FOR ADJUSTMENT, WEAR, AND DAMAGE. THEREFORE, YOU MUST READ AND UNDERSTAND ALL OF THE INSTRUCTIONS AND CAUTIONS SUPPLIED WITH YOUR YAKIMA PRODUCT PRIOR TO INSTALLATION OR USE. IF YOU DO NOT UNDERSTAND ALL OF THE INSTRUCTIONS AND CAUTIONS, OR IF YOU HAVE NO MECHANICAL EXPERIENCE AND ARE NOT THOROUGHLY FAMILIAR WITH THE INSTALLATION PROCEDURES, YOU SHOULD HAVE THE PRODUCT INSTALLED BY A PROFESSIONAL INSTALLER.
- Page 2 Open locking slider, loosen knob, open jaw. Loosen knob. Open slider. Open jaws. Attach ForkLift jaws to front crossbar. For low clearance crossbars: Hold ForkLift at an angle Use caution to avoid hardware damaging while positioning jaw around roof’s finish. A towel placed on the roof prior crossbar to avoid any contact to installation can help avoid scratches.
- Page 3 Secure rear clamp. Pass the t-bolt through the opening in bail. Rotate t-bolt to rest in slot in bail. Close rear clamp around crossbar. 90° Adjust clamp if necessary. If you don’t get a secure grip with your factory bars adjust your clamp. For factory bars choose the best Upper notch for round...
- Page 4 Continued from previous page... Flip orientation of rear clamp 180˚. Remove wheeltray and rear clamp. NOTE: You can flip the wheeltray or rear clamp independently as needed. For instance if you needed the buckle on the opposite side you Slide wheeltray and rear could flip the wheeltray as shown.
- Page 5 Attach skewer and quick release lever. Engage skewer by rotating red knob. Gently push and wiggle skewer through ForkLift head. Tighten red knob, but leave enough space for bike fork. Prevent damage Remove front wheel and load your bike.
-
Page 6: Before Driving Away
Install lock core. If you have purchased a lock, follow lock core instructions to install. Secure rear wheel. Move the ratchet tab up and down to tighten strap. Pull strap through wheel spokes. Do not let strap push against valve stem. Insert strap end into buckle. -
Page 7: Weight Limits
WEIGHT LIMITS Follow the YAKIMA Fit List or check online at Yakima.com for your rack’s weight limit. Do not exceed the weight limit of your vehicle’s rack. Not more than 165 lbs. (75 kg) unless otherwise noted. LOAD THIS PRODUCT...
Need help?
Do you have a question about the ForkLift and is the answer not in the manual?
Questions and answers