Table of Contents
Advertisement
Quick Links
Advertisement
Table of Contents

Related Manuals for Woodley InSight Mini Chem


Summary of Contents for Woodley InSight Mini Chem
- Page 1 User Manual...
- Page 2 InSight Mini Chem Meter Important Safety Instructions • Misuse of the InSight Mini Chem can cause electrocution, burns, fire and other hazards • Do not place the meter in or near to liquid. If the meter becomes wet, unplug it before touching it •...
-
Page 3: Table Of Contents
Table of Contents Section 1 Introduction ..........................4 Section 2 Getting Started ........................5 Section 3 Components ..........................7 Section 4 Initial Setup ........................... 12 Section 5 Meter Setup and Options ...................... 13 Section 6 Testing ........................... 14 Section 7 Memory/Communication...................... 18 Section 8 Control Strip Test ........................ -
Page 4: Section 1 Introduction
The InSight Mini Chem Meter applies the principle of photochemistry and is used with the InSight Mini Chem Test Strips. The whole blood, serum or plasma sample is added to the sample area of the test strip. In the process of rapid infiltration, blood cells are filtered out. -
Page 5: Section 2 Getting Started
Before testing, read the instructions carefully and learn about all the components of the InSight Mini Chem Meter. Depending on the packaging type, some of the components may need to be purchased separately. Please check the list of contents on the outer box for details of which components are included with your purchase. - Page 6 1. InSight Mini Chem Meter – Reads the test strips and displays the concentrations of Uric Acid (UA), Creatinine (CR) and Uric Acid (UR) 2. InSight Mini Chem Test Strips – Part of the system, these are inserted into the meter to measure the concentrations of UA, CR and UR 3.
-
Page 7: Section 3 Components
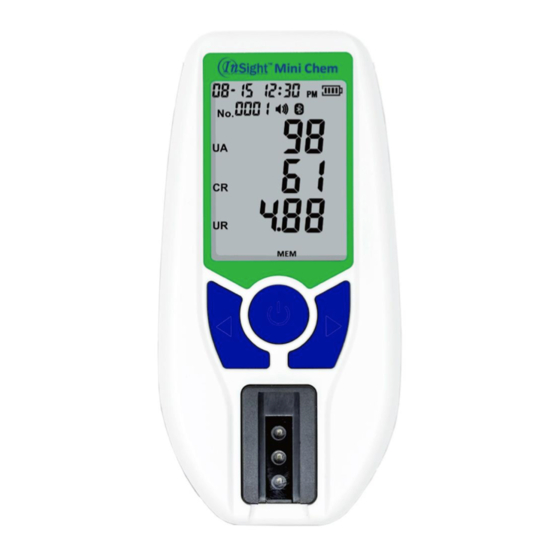
Section 3 Components The InSight Mini Chem Meter reads the test strips and displays the concentrations of Uric Acid (UA), Creatinine (CR) and Urea (UR). Use this diagram to become familiar with all the parts of the meter. USB Port (for charging the meter) - Page 8 Test Strips The InSight Mini Chem Test Strips work with the InSight Mini Chem Meter only, to measure the Uric Acid (UA), Creatinine (CR) and Urea (UR) concentration in whole blood, plasma and serum. The InSight Mini Chem Test Strips can detect Uric Acid (UA), Creatinine (CR) and Urea (UR).
- Page 9 Sample Application For best results, fill the Sample Application Area with the correct sample volume (35µl or use the supplied capillary pipette for correct volume). Incorrect results may occur if the sample is not applied correctly or if the Sample Application Area is not filled correctly. Before Testing After applying the sample, ensure that the Sample Application Area is completely covered.
- Page 10 • Refer to the InSight Mini Chem Test Strips Package Insert for more details Control Strip The InSight Mini Chem Control Strips work with the InSight Mini Chem Meter to ensure the optics are working correctly. After the control strip is inserted into the meter, the meter’s optics detect the colour intensity of the control strip.
- Page 11 Refer to Section 9 for more information. Note: The InSight Mini Chem Control Solution is intended for validating Renal Function testing while using the InSight Mini Chem Meter. Both levels of control solution must be tested and fall within the assigned values printed on the bottles.
-
Page 12: Section 4 Initial Setup
Section 4 Initial Setup Before testing, ensure the following procedures are followed. Turn on the Meter Press to turn the meter on. The meter will automatically turn off after 5 minutes of inactivity. Coding the Meter Each time a new box of test strips is opened, the new code chip included in the box must be inserted into the meter. -
Page 13: Section 5 Meter Setup And Options
Section 5 Meter Setup and Options With the meter turned on, press and hold for 2 seconds to enter the Settings mode. Press ◄ or ► to display several setup sub-modes. Press to enter the SET item. Year Setup As the year is displayed, press ◄ or ► to change it. Press to save. -
Page 14: Section 6 Testing
Section 6 Testing The following steps show how to use each component to measure the sample concentration. Sample Collection 1. Use fresh capillary blood from the paw or ear 2. Use heparinised or EDTA venous whole blood, plasma or serum Caution: Before testing, choose a clean, dry work surface. - Page 15 Note: Do not touch the test strip with the end of the capillary transfer tube or pipette. The capillary blood should be tested immediately after collection. Use of a capillary transfer tube or pipette is recommended for accurate results. Capillary blood samples can be obtained by using a lancing device and a lancet or a safety lancet.
- Page 16 Prior to testing, clean the testing site with an alcohol swab or by washing it with warm, soapy water. Dry the testing site thoroughly. Hold the lancing device against the paw/ear. Push to release button to prick the site. A click should be heard as the lancing device activates.
- Page 17 The blood drop symbol will flash when the meter is ready for the sample to be applied. Apply the sample to the centre of the Sample Application Area of the test strip. Once analysis has completed, remove the used test strip. The meter will return to the Initial Screen and is ready for another test strip to be inserted and to perform a new test.
-
Page 18: Section 7 Memory/Communication
Section 7 Memory/Communication Memory/Database to access the menu. Use ◄ and ► to Press to switch the meter on. Press and hold to enter. Use ◄ and ► to scroll through results. scroll across to MEM. Press Deleting Data To delete the data from the meter’s memory, press ◄ and ► at the same time to enable data deletion. -
Page 19: Section 8 Control Strip Test
Section 8 Control Strip Test to enter the menu, use ◄ or ► to scroll across to CTR. Press Press and hold to enter CTR Mode. After entering the CTR Mode, the meter will display OPt. Press and then insert a control strip into the Test Strip Holder. Follow the direction of the arrows indicated on the strip. -
Page 20: Section 9 Quality Control
Control Solution Testing Renal Function Control Solution testing is performed in a very similar manner to blood tests. The InSight Mini Chem Control Solution is used instead of blood. Note: Make sure the control solution and all the test materials reach operating temperatures of 10-35°C prior to testing. - Page 21 If the results fall within the specified control range, it indicates the InSight Mini Chem Meter is working correctly and the procedures are being performed correctly. If the results do not fall within the respective range(s), refer to Page 20 for further...
-
Page 22: Section 10 Maintenance
Section 10 Maintenance General Cleaning For best results, the meter should be cleaned after each day of testing. Meter Sensor Area and Test Strip Holder Wipe down the Test Strip Holder with a cotton swab. Do not scratch the transparent window covering the sensors. -
Page 23: Section 11 Precautions
Section 11 Precautions Follow the precautions listed below to ensure accurate results and correct operation of the meter: • The warranty provided by the meter may be void if used in a manner not defined in this instruction manual • Wear gloves to avoid contact with potentially hazardous biological specimens during testing •... -
Page 24: Section 12 Limitations
Section 12 Limitations The following substances do not interfere with test results: Substance Amount Substance Amount Acetaminophen 1324 µmol/L (20 mg/dL) Cholesterol 12.9 mmol/L (500 mg/dL) Ascorbic Acid 568 µmol/L (10 mg/L) Triglyceride 7.3 mmol/L (650 mg/dL) Conjugated Bilirubin 240 µmol/L (20 mg/dL) Uric Acid 0.6 mmol/L (10 mg/dL) Creatinine... -
Page 25: Section 13 Troubleshooting
Ensure no used test strips are left in the holder. Refer to the ‘Maintenance’ section. Restart the meter. Contact Woodley Equipment Company if the sensor area window is broken. Test strip was removed... -
Page 26: Section 14 Meter Performance
Section 14 Meter Performance Accuracy Item Range of Sample Bias 90 – 300 µmol/L (1.51 – 5.04 mg/dL) ≤±0.060 mmol/L (±1.01 mg/dL) 301 – 1200 µmol/L (5.05 – 20.17 mg/dL) ≤±20% 44 – 150 µmol/L (0.50 – 1.70 mg/dL) ≤±0.030 mmol/L (±0.34 mg/dL) 151 –... -
Page 27: Appendix 1 Meter Specifications
Appendix 1 Meter Specifications Feature Specifications Methodology Reflectance Photometer Test Time ≤5 mins Measurement Range UA: 90 – 1200 µmol/L (1.51 – 20.17 mg/dL) CR: 44 – 1320 µmol/L (0.50 – 14.93 mg/dL) UR: 0.90 – 40.00 mmol/L (5.41 – 240.24 mg/dL) Reference Range Canine UA: 0 –... -
Page 28: Appendix 2 Labelling And Information
Appendix 2 Labelling and Information Do not reuse Use by Keep dry Manufacturer Lot No. Biological risks Consult instructions for use Caution, the user must be consulted in all cases where this symbol is marked Symbol for the marking of electrical and electronic devices according to Directive 2012/19/EU. -
Page 29: Appendix 3 Warranty
Appendix 3 Warranty The InSight Mini Chem Meter is warrantied for a period of 12 months from date of invoice. Woodley Equipment Company Ltd. Old Station Park Buildings, St. John Street, Horwich, Bolton, BL6 7NY, UK Tel: +44 (0) 1204 669033 Email: sales@woodleyequipment.com... - Page 30 Old Station Park Buildings St. John Street Horwich Bolton BL6 7NY, UK Tel: +44 (0) 1204 669033 Email: sales@woodleyequipment.com Web: www.woodleyequipment.com...
Need help?
Do you have a question about the InSight Mini Chem and is the answer not in the manual?
Questions and answers