Table of Contents
Advertisement
Available languages
Available languages
Advertisement
Table of Contents

Subscribe to Our Youtube Channel
Related Manuals for Ducati PRO I EVO


Summary of Contents for Ducati PRO I EVO
- Page 1 Questo manuale d’istruzione è fornito da trovaprezzi.it. Scopri tutte le offerte per Ducati PRO-1 Evo cerca il tuo prodotto tra le migliori offerte di Monopattini Elettrici electric scooter User Manual English | Italiano | Español | Français | Deutsch | Polish...
- Page 2 Index English Italiano Español Français Deutsch Polish...
- Page 3 English electric scooter User manual Thank you for choosing this product. For information, technical support and assistance, contact your dealer or visit the website www.ducatiurbanemobility.it...
- Page 4 Contents Safety instructions Quick-start Package contents Product overview Control information / Control panel Assembly and configuration Folding and carrying Battery charging and activation Brake adjustment Range Storage and cleaning General warnings App configuration Learning to ride Battery (Warnings) Responsibilities Maintenance and daily care Data sheet Troubleshooting Error code table...
- Page 5 1. Safety instructions Please read the following instructions carefully before using the product. Save this manual for future reference or new users. • The company will not assume any liability deriving from misuse of the product or non-compliance either with road regulations or the instructions in this manual. •...
- Page 6 2. Quick-start • When you use it for the first time, charge the scooter to 100%. • Press the power button for a few seconds to start. • Check the battery indicator: if the battery is low, recharge it before use. The electric scooter is a device that requires periodic charging to work.
- Page 7 3. Package contents The handlebar must be fitted to the assembled electric scooter with the special screws. • Scooter • Accessories: - Allen key - 4 screws - Spare air chamber - Replacement stickers - Tyre inflation adapter • Battery charger...
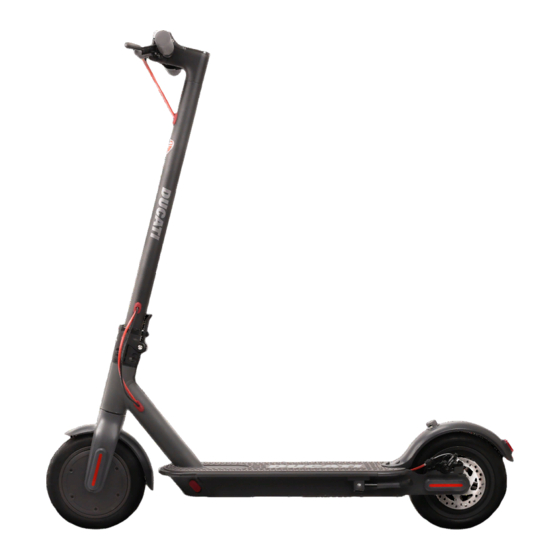
- Page 8 4. Product overview bell brake front light dashboard accelerator handlebar rod folding mechanism folding lock brake light footplate disc brake motor charging port stand...
- Page 9 5. Control information / Control panel 1. Speedometer: displays the current speed of the scooter. 2. Battery level: the battery level is indicated by 5 bars. 3. Headlights: Warning light. 4. Bluetooth: Bluetooth indicator. 5. SPORT mode - The display will show SPORT. (up to 25 km/h). 6.
- Page 10 • Power button/controls (A): Press and hold this button to turn the scooter on/off. • How to turn the lights on/off: press button (A) once to turn them on. When the lights are on, press button (B) again to turn them off. •...
- Page 11 6. Assembly and configuration Open the stand, raise the rod, place the Install the handlebar on the rod (see lever in the closed position. image) Insert the 4 screws manually without When you have finished, turn on tightening them, then use the your device to make sure everything hexagonal key provided to tighten them is working.
- Page 12 Loose handlebar rod If the handlebar rod is loose, you can tighten the screws on the folding system using the key supplied. 7. Folding and carrying Closing Opening Closing: Turn off the electric scooter, release the locking mechanism: press the red hook and pull the lever outwards (see image), pull the handlebar rod inwards and make sure it is effectively locked.
- Page 13 Carrying position Always carry the scooter by holding it with one or both hands by the handlebar rod. 8. Battery charging and activation 1. Open the rubber cap of the charging socket located on the left side of the footplate. 2.
- Page 14 There is a risk of falling when using the electric scooter. For your own safety, wear a helmet and knee pads to protect yourself against falls and injuries while learning to ride the electric scooter. Turn the electric scooter on and check the battery charge level. 9.
- Page 15 10. Range Maximum range depends on several variables: Terrain: range is greater when riding on a smooth surface than when riding on rough roads and slopes. User weight: the heavier the user, the shorter the range. Temperature: Riding the scooter in a very cold or hot environment affects the range.
- Page 16 12. General warnings • Check brakes, pressure (50 PSI), condition of wheels and accelerator before each use. If you notice unusual noises or any anomalies, do not use the product and contact the Technical Assistance Service at your dealer. • The scooter should not be modified in any way, this could alter its efficiency or damage its structure and cause problems.
- Page 17 • View the partial and total kilometres travelled • View the remaining battery level • Display cruising speed • Display speed modes • Display the temperature of the driving wheel Access the app store to download and install the Ducati Urban e-Mobility app...
- Page 18 1. Download the app on your smartphone; 2. Turn on the electric scooter and activate Bluetooth on the smartphone; 3. Start the app and log in*, connect your smartphone to the electric scooter via Bluetooth within 1-2 metres; *If this is your first time using this app, fill in the “e-mail” field to register and authenticate the verification code.
- Page 19 The app’s interface with the associated electric scooter appears as follows: Associated electric scooter Main interface Electric scooter battery percentage Speed in real time Distance travelled (ODO) Riding modes Usage time Distance travelled (TRIP) Record route Activate / Deactivate Settings application...
- Page 20 Associated electric scooter Settings interface User profile App language Name of the electric scooter Speed units ON/OFF Cruise Control ON/OFF Mode Zero Start ON/OFF Motor lock Information Support request User profile logout Information on “Cruise Control”: Activate the “Cruise Control” function in the app, keep the electric scooter at a constant speed (>...
- Page 21 14. Learning to ride Follow the safety instructions before riding the scooter. Use approved equipment such as helmets and knee pads. Do not use the electric scooter in the rain. The electric scooter cannot be used by more than one person at the same time. Children under the age of 14* and pregnant women should not use this electric scooter.
- Page 22 Minimum weight allowed on the electric scooter: 20 kg. Maximum weight allowed on the electric scooter: 100 kg. Do not ride the electric scooter if you have been drinking alcohol and/or taking medicines. Do not use your phone or listen to music while riding the electric scooter.
- Page 23 Do not use the electric scooter in dangerous areas, in the presence of flammable and/or explosive substances, liquids and/or dirt. This electric scooter is not designed to be ridden on roads and motorways. Consult the legislative decree in force in your municipality on where electric scooters are allowed to travel.
- Page 24 Always ride with both hands on the handlebar. Do not ride on the electric scooter with just one foot. Do not press the accelerator when walking with the electric scooter. Do not ride the electric scooter in puddles or on wet surfaces.
- Page 25 Pay attention to your head when passing under canopies, doors and the like. When riding at the highest permitted speed, do not turn the handlebar abruptly. Start braking sufficiently far away so that you can avoid obstacles, curves and areas that have uneven surfaces.
- Page 26 Do not hit obstacles with the wheels. Do not touch the motor immediately after riding, it could be extremely hot. Maintain a minimum safety distance of 5 m from other vehicles.
- Page 27 15. Battery (Warnings) Make sure the scooter, charger and charging port are dry. When the scooter is fully charged, the LED light on the charger changes from red (charging) to green (charging completed). Use only the original charger. Other chargers may damage the device and pose other potential risks.
- Page 28 What to avoid: Opening the battery or taking it apart, hitting, throwing or puncturing the battery or sticking objects on the battery. Touching any substances leaking from the battery, as it contains hazardous substances. Letting children or pets touch the battery. Over-charging, over-discharging or short-circuiting the battery.
- Page 29 17. Daily maintenance and care Cleaning and storage • If there are stains on the scooter body, wipe them off with a damp cloth. If stains persist, put toothpaste on them, brush with a toothbrush, then wipe with a damp cloth. If there are scratches on the plastic components, use sandpaper or other abrasive material to remove them.
- Page 30 Note: once fully charged it will have a life of 120-180 days. Damage caused by the battery being left uncharged for a long period is irreversible and is not covered by the limited warranty. Once the damage has occurred, the battery cannot be recharged (the battery must not be disassembled by unqualified personnel, as this could lead to electric shocks, short circuits or even major safety incidents).
- Page 31 18. Data sheet General information Frame Aluminium alloy Speed E: <= 6km/h | D:<= 20km/h | SPORT: <= 25km/h (max speed) Maximum incline 15% (subject to variations based on rider weight, road conditions and temperature) Brakes Electronic front and rear disc brakes Motor 350W Tyres...
- Page 32 19. Troubleshooting Tests to be carried out • After a fall, check that the accelerator lever works properly. To do this, accelerate and decelerate several times. • Check from time to time that the brakes are working properly. To do this, move the vehicle.
- Page 33 20. Error Codes Table Error Code Indications Motor malfunction Control unit signal error Accelerator lever malfunction Control unit MOS malfunction Phase/current error Average current malfunction Battery voltage error Brake lever malfunction By pressing the accelerator lever, up to the maximum travel, CAUTION the scooter will activate the Cruise Control function for a few seconds and will maintain the same speed even when the lever...
- Page 34 CAUTION Disposing of electrical or electronic devices at the end of their life (applicable in all European Union countries and in other European systems with separate collection systems) This symbol on the product or packaging indicates that the product should not be considered as normal household waste, but instead taken to an appropriate collection point for recycling electrical and electronic equipment (WEEE).
- Page 35 CAUTION Disposal of dead batteries (applicable in all countries of the European Union and in other European systems with separate collection system) This symbol on the product or packaging indicates that the battery pack should not be considered normal household waste. On some types of batteries, this symbol may be used in combination with a chemical symbol.
- Page 36 NOTE Read the manual and instructions below in full before using the product. Product name: Ducati PRO-I EVO Product type: Electric scooter Year of production: 2020 Note: • To recharge this electric scooter, use ONLY the supplied battery charger labelled XHK-916-42015 with the following output voltage: 42V –...
- Page 37 The undersigned: M.T. Distribution S.r.l. Address: Via Bargellino 10, 40012 Calderara di Reno (BO), Italy certifies that the design and manufacture of this product Product brand: Ducati Item model number: PRO-I EVO Type of product: Electric scooter complies with the following directives: 2006/42/EC Machinery Directive...
- Page 38 Italiano monopattino elettrico Manuale d’uso Grazie per aver scelto questo prodotto. Per informazioni, supporto tecnico ed assistenza rivolgersi al proprio rivenditore o visita il sito www.ducatiurbanemobility.it...
- Page 39 Indice Istruzioni di sicurezza Guida rapida Contenuto della confezione Panoramica del prodotto Informazioni dei comandi / Pannello di controllo Assemblaggio e configurazione Piegare e trasportare Ricarica e attivazione della batteria Regolazione dei freni Autonomia Conservazione e pulizia Avvertenze generali Configurazione app Imparare a guidare Batteria (Avvertenze) Responsabilità...
- Page 40 1. Istruzioni di sicurezza Leggere attentamente le seguenti istruzioni prima di utilizzare il prodotto. Salvare questo manuale per riferimenti futuri o nuovi utilizzatori. • L’azienda non si assumerà nessuna responsabilità derivata dal mal utilizzo del prodotto o inadempienze tanto relative alle norme stradali quanto alle istruzioni di questo manuale.
- Page 41 2. Guida rapida • Al primo utilizzo caricare il monopattino al 100%. • Premere il pulsante di accensione per qualche secondo per avviarlo. • Controllare l’indicatore della batteria, se la batteria è scarica, ricaricarla prima dell’uso, il monopattino elettrico è un apparecchio che richiede una ricarica periodica per funzionare.
- Page 42 3. Contenuto della confezione Monopattino assemblato, il manubrio sarà da installare con le apposite viti. • Monopattino • Accessori: - Chiave a brugola - n° 4 viti - Camera d’aria di scorta - Stickers di ricambio - Adattatore per gonfiaggio gomme •...
- Page 43 4. Panoramica del prodotto campanello freno luce frontale pannello di controllo acceleratore asta del manaubrio meccanismo di chiusura ripiegamento ripiegamento luce freno pedana freno a disco motore porta di ricarica cavalletto...
- Page 44 5. Informazioni dei comandi / Pannello di controllo 1. Tachimetro: visualizza la velocità attuale del monopattino. 2. Livello della batteria: il livello della batteria è indicato da 5 barre. 3. Fari: Spia del fanale. 4. Bluetooth: Spia del Bluetooth. 5. Modalità SPORT - Il display mostrerà SPORT. (fino a 25km/h). 6.
- Page 45 • Pulsante di accensione/comandi (A): mantenere premuto questo tasto per accendere/ spegnere il monopattino. • Come accendere/spegnere le luci: premere una volta il pulsante (A) per accenderlo. Mentre le luci sono accese, premere di nuovo il pulsante (A) per spegnerle. •...
- Page 46 6. Assemblaggio e configurazione Aprire il cavalletto, alzare l’asta, collocare Installare il manubrio sull’asta (vedi la leva in posizione di chiusura. immagine) Inserire le 4 viti manualmente senza Dopo aver terminato, accendere il serrarle, poi utilizzare la chiave dispositivo per assicurarsi che tutto esagonale fornita per serrarle e fissare il funzioni.
- Page 47 Asta del manubrio traballante Se l’asta del manubrio è traballante, è possibile serrare le viti sul sistema di piegatura utilizzando la chiave in dotazione. 7. Piegare e trasportare Chiusura Apertura Chiusura: Spegnere il monopattino elettrico, sbloccare il meccanismo di chiusura: premere il gancio rosso e tirare la leva verso l’esterno (vedi immagine), portare l’asta del manubrio verso l’interno e assicurarsi del effettivo bloccaggio.
- Page 48 Posizione di trasporto Trasportare sempre il monopattino tenendolo con una o entrambe le mani dall’asta del manubrio. 8. Ricarica e attivazione della batteria 1. Aprire il tappo in gomma della presa di ricarica situata nel lato sinistro della pedana. 2. Inserire il connettore del caricabatteria nella presa.
- Page 49 Durante l’utilizzo del monopattino elettrico c’è il rischio di cadute. Per la propria sicurezza, indossare casco e ginocchiere per proteggersi da eventuali cadute e lesioni mentre si impara a guidare il monopattino elettrico. Accendere il monopattino elettrico e controllare il livello di carica della batteria. 9.
- Page 50 10. Autonomia La massima autonomia dipende da diverse variabili: Terreno: la guida su pavimentazione liscia comporta un’autonomia maggiore rispetto alla guida su strade sconnesse e pendii. Peso dell’utente: più pesante è l’utente, più breve è l’autonomia. Temperatura: la guida del monopattino in un ambiente molto freddo o caldo influenza l’autonomia. Velocità...
- Page 51 12. Avvertenze generali • Controllare i freni, la pressione (50PSI), la condizione delle ruote e l’acceleratore prima ogni uso. Se si rilevano rumori insoliti o qualche anomalia, non utilizzare il prodotto e contattare il Servizio di Assistenza Tecnica presso il proprio rivenditore. •...
- Page 52 • Visualizzare i chilometri percorsi parziali e totali • Visualizzare il residuo della batteria • Visualizzare la velocità di crociera • Visualizzare le modalità di velocità • Visualizzare la temperatura della ruota motrice Accedere all’app store per scaricare e installare l’app Ducati Urban e-Mobility...
- Page 53 1. Scaricare l’app sullo smartphone. 2. Accendere il monopattino elettrico e attivare il Bluetooth sullo smartphone. 3. Avviare l’app e accedere*, connettere il proprio smartphone al monopattino elettrico tramite Bluetooth entro 1-2 metri di distanza. *Se è la prima volta che si utilizza questa app compilare il campo “e-mail” per registrarsi e autenticare il codice di verifica.
- Page 54 L’interfaccia dell’app con monopattino elettrico associato appare come di seguito: Monopattino elettrico associato L’interfaccia principale Percentuale della batteria del monopattino elettrico Velocità in tempo reale Distanza percorsa (ODO) Modalità di guida Tempo di utilizzo Distanza percorsa (TRIP) Mappa Registra percorso Impostazioni Attiva / Disattiva applicazione...
- Page 55 Interfaccia Impostazioni monopattino elettrico associato Profilo utente Lingua dell’app Nome del monopattino elettrico Unità della velocità ON/OFF Cruise Control ON/OFF Modalità Zero Start ON/OFF Blocco motore Informazioni Richiesta di assistenza Logout profilo utente Informazioni sul “Cruise Control”: Attivare la funzione “Cruise Control” nell’app, mantenere il monopattino elettrico ad una velocità...
- Page 56 14. Imparare a guidare Seguire le istruzioni di sicurezza prima di guidare il monopattino. Utilizzare elementi omologati come caschi e ginocchiere. Non usare il monopattino elettrico sotto la pioggia. Il monopattino elettrico non può essere utilizzato da più di una persona contemporaneamente.
- Page 57 Peso minimo permesso sul monopattino elettrico: 20 kg. Peso massimo permesso sul monopattino elettrico: 100 kg. Non guidare il monopattino elettrico in caso di assunzione di alcool e/o medicinali. Non utilizzare il telefono e non ascoltare musica durante la guida del monopattino elettrico.
- Page 58 Non utilizzare il monopattino elettrico in zone pericolose, in presenza di sostanze infiammabili e/o esplosive, liquidi e/o sporco. Questo monopattino elettrico non è stato progettato per essere guidato in strade e autostrade. Consultare il decreto legislativo in vigore presso il suo comune riguardo a dove è...
- Page 59 Circolare sempre con le due mani sul manubrio. Non guidare il monopattino elettrico con un solo piede. Non premere l’acceleratore quando si cammina con il monopattino elettrico. Non condurre il monopattino elettrico su pozzanghere e superfici bagnate.
- Page 60 Prestare attenzione con la testa in caso di passaggio sotto tettoie, porte e/o simili. In caso di circolazione alla velocità più alta consentita non girare il manubrio in maniera brusca. Cominciare a frenare ad una distanza sufficiente da evitare ostacoli, curve e zone che differiscono in quanto a pavimentazioni.
- Page 61 Non colpire ostacoli con le ruote. Non toccare il motore subito dopo aver guidato, potrebbe trovarsi ad una temperatura elevata. Mantenere una distanza di sicurezza minima di 5m dagli altri veicoli.
- Page 62 15. Batteria (Avvertenze) Accertarsi che il monopattino, il caricabatterie e la porta di ricarica siano asciutti. Quando il monopattino è completamente carico, la luce LED sul caricabatteria passa da rosso (in carica) a verde (carica completata). Utilizzare solo il caricabatterie originale. Altri caricabatterie danneggiano il dispositivo e comporta- no altri rischi potenziali.
- Page 63 Da non fare: Aprire o smontare la batteria o colpire, lanciare, forare o attaccare oggetti alla batteria. Toccare eventuali sostanze fuoriuscite dalla batteria, poiché contiene sostanze pericolose. Lasciare che bambini o animali tocchino la batteria. Sovraccaricare, sovrascaricare o mandare in cortocircuito la batteria. Immergere o esporre la batteria all’acqua o ad altre sostanze liquide.
- Page 64 17. Manutenzione e cura quotidiana Pulizia e conservazione • Se sono presenti macchie sul corpo del monopattino, pulirle con un panno umido. Se le macchie persistono, applicarvi sopra del dentifricio, spazzolarle con uno spazzolino, quindi pulire con un panno umido. Se sono presenti graffi sui componenti in plastica, utilizzare carta vetrata o altro materiale abrasivo per rimuoverli.
- Page 65 Nota: una volta completamente carico avrà un’autonomia di 120-180 giorni. Il danno provocato da un’assenza di carica prolungata è irreversibile e non è coperto dalla garanzia limitata. Una volta avvenuto il danno, la batteria non può essere ricaricata (è vietato lo smontaggio della batteria da parte di personale non qualificato, in quanto ciò...
- Page 66 18. Scheda tecnica Informazioni generiche Telaio Lega di alluminio Velocità E: <= 6km/h | D:<= 20km/h | SPORT: <= 25km/h (max velocità) Pendenza massima 15% (soggetto a variazioni in base al peso del conducente, alle condizioni della strada e alla temperatura) Freni Freno elettronico anteriore e a disco posteriore Motore...
- Page 67 19. Risoluzione dei problemi Prove da effettuare: • Dopo una caduta, verificare che la leva dell’acceleratore funzioni correttamente. Per far ciò, accelerare e decelerare varie volte. • Verificare ogni tanto che i freni funzionino correttamente. Per far ciò, muovere il veicolo spingendolo manualmente e frenare all’improvviso per assicurarsi che risponda ai comandi.
- Page 68 20. Tabella Codici Errori Codice Errore Indicazioni Malfunzionamento motore Errore segnale centralina Malfunzionamento leva acceleratore Malfunzionamento MOS della centralina Errore fase / corrente Malfunzionamento corrente media Errore voltaggio batteria Malfunzionamento leva freno Premendo la leva Acceleratore, fino alla massima escursione, ATTENZIONE per qualche secondo il monopattino attiverà...
- Page 69 ATTENZIONE Trattamento del dispositivo elettrico o elettronico a fine vita (applicabile in tutti i paesi dell’unione europea ed in altri sistemi europei con sistema di raccolta differenziata) Questo simbolo sul prodotto o sulla confezione indica che il prodotto non deve essere considerato come un normale rifiuto domestico, ma deve invece essere consegnato ad un punto di raccolta appropriato per il riciclo di apparecchi elettrici ed elettronici (RAEE).
- Page 70 ATTENZIONE Trattamento delle pile esauste (applicabile in tutti i paesi dell’unione europea ed in altri sistemi europei con sistema di raccolta differenziata) Questo simbolo sul prodotto o sulla confezione indica che la pila- batteria non deve essere considerato un normale rifiuto domestico. Su alcuni tipi di pile questo simbolo potrebbe essere utilizzato in combinazione con un simbolo chimico.
- Page 71 AVVERTENZE Leggere completamente il manuale e le istruzioni sottostanti prima di utilizzare il prodotto. Nome del prodotto: Ducati PRO-I EVO Tipo di prodotto: Monopattino elettrico Anno di produzione: 2020 Nota: • Per ricaricare questo monopattino elettrico utilizzare SOLO il caricabatterie in dotazione etichettato XHK-916-42015 con la seguente tensione di uscita: 42V –...
- Page 72 La sottoscritta: M.T. Distribution S.r.l. Indirizzo: Via Bargellino 10, 40012 Calderara di Reno (BO), Italia certifica che la progettazione e la produzione di questo prodotto Marca del prodotto Ducati N° modello articolo: PRO-I EVO Tipo di prodotto: Monopattino elettrico É conforme alle seguenti direttive:...
- Page 73 Español patinete eléctrico Manual de uso Gracias por elegir este producto. Para obtener información, soporte técnico y asistencia, diríjase a su distribuidor o visite el sitio web www.ducatiurbanemobility.it...
- Page 74 Índice Instrucciones de seguridad Guía de inicio rápido Contenido del embalaje Vista del producto Información de los controles/panel de control Montaje y configuración Plegar y transportar Carga y activación de la batería Ajuste de los frenos Autonomía Almacenamiento y limpieza Advertencias generales Configuración de la aplicación Aprender a conducir...
- Page 75 1. Instrucciones de seguridad Lea atentamente las siguientes instrucciones antes de utilizar el producto. Guarde este manual para futuras consultas o para nuevos usuarios. • La empresa no asumirá ninguna responsabilidad derivada del mal uso del producto o del incumplimiento tanto de la normativa vial como de las instrucciones de este manual. •...
- Page 76 2. Guía rápida • Antes del primer uso, cargue el patinete al 100 %. • Pulse el botón de encendido durante unos segundos para iniciarlo. • Compruebe el indicador de la batería, si la batería está descargada, recárguela antes de usar el patinete eléctrico, ya que se trata de un dispositivo que requiere una carga periódica para funcionar.
- Page 77 3. Contenido del embalaje Con el patinete montado, se deberá instalar el manillar con los tornillos correspondientes. • Patinete • Accesorios: - Llave Allen - 4 tornillos - Cámara de repuesto - Adhesivos de repuesto - Adaptador para el inflado de los neumáticos •...
- Page 78 4. Vista del producto timbre freno luz delantera panel de control acelerador barra del manillar cierre plegable mecanismo de plegado luz de freno plataforma freno de disco motor puerto de carga pie de apoyo...
- Page 79 5. Información de los controles/panel de control 1. Velocímetro: muestra la velocidad actual del patinete. 2. Nivel de la batería: el nivel de la batería se indica mediante 5 barras. 3. Faros: testigo del faro. 4. Bluetooth: indicador del Bluetooth. 5.
- Page 80 • Botón de encendido/controles (A): mantenga pulsado este botón para encender/apagar el patinete. • Cómo encender/apagar las luces: pulse una vez el botón (A) para encenderlas. Cuando las luces estén encendidas, pulse de nuevo el botón (A) para apagarlas. • Modo/velocidad: pulse dos veces el botón (A) para seleccionar el modo: - E: hasta 6 km/h - D: hasta 20 km/h - SPORT: hasta 25 km/h...
- Page 81 6. Montaje y configuración Abra el caballete, levante la barra y Coloque el manillar sobre la barra (ver coloque la palanca en la posición de imagen) cierre. Introduzca los 4 tornillos manualmente Cuando haya terminado, encienda el sin apretarlos, luego use la llave dispositivo para asegurarse de que hexagonal que se proporciona para todo funcione.
- Page 82 Barra del manillar inestable Si la barra del manillar es inestable, puede apretar los tornillos del sistema de plegado con la llave que se suministra. 7. Plegar y transportar Cierre Apertura Cierre: Apague el patinete eléctrico y desbloquee el mecanismo de cierre: presione el gancho rojo y tire de la palanca hacia fuera (ver imagen), lleve la barra del manillar hacia dentro y asegúrese de que quede bien bloqueada.
- Page 83 Posición de transporte Transporte siempre el patinete sujetándolo con una o ambas manos por la barra del manillar. 8. Carga y activación de la batería 1. Abra la tapa de goma de la toma de carga ubicada en el lado izquierdo de la plataforma.
- Page 84 Mientras se utiliza el patinete eléctrico existe el riesgo de sufrir una caída. Por su propia seguridad, lleve casco y rodilleras para protegerse de posibles caídas y lesiones mientras aprende a conducir el patinete eléctrico. Encienda el patinete eléctrico y compruebe el nivel de carga de la batería. 9.
- Page 85 10. Autonomía La autonomía máxima depende de diversas variables: Terreno: la conducción sobre un pavimento liso implica una mayor autonomía que si se conduce en calles irregulares y con pendientes. Peso del usuario: cuanto más pesado sea el usuario, menor será la autonomía. Temperatura: la conducción del patinete en un ambiente muy frío o cálido afecta a la autonomía.
- Page 86 12. Advertencias generales • Compruebe los frenos, la presión (50 PSI), el estado de las ruedas y el acelerador antes de cada uso. Si detecta ruidos inusuales o cualquier anomalía, no utilice el producto y póngase en contacto con el servicio de asistencia técnica de su distribuidor. •...
- Page 87 • Ver los kilómetros totales y parciales recorridos • Ver la batería restante • Mostrar la velocidad de crucero • Ver los modos de velocidad • Ver la temperatura de la rueda motriz Acceda a la «app store» para descargar e instalar la aplicación Ducati Urban e-Mobility...
- Page 88 1. Descargue la aplicación en su «smartphone». 2. Encienda el patinete eléctrico y active el Bluetooth del «smartphone». 3. Inicie la aplicación, acceda* y conecte su «smartphone» al patinete eléctrico a través de Bluetooth a una distancia máxima de 1-2 metros. *Si es la primera vez que usa esta aplicación, complete el campo del «correo electrónico»...
- Page 89 La interfaz de la aplicación con el patinete eléctrico emparejado se muestra del siguiente modo: Patinete eléctrico emparejado Interfaz principal Porcentaje de batería del patinete eléctrico Velocidad en tiempo real Distancia recorrida (ODO) Modo de conducción Tiempo de uso Distancia recorrida (TRIP) Mapa Registrar recorrido Configuración...
- Page 90 Interfaz de configuración del patinete eléctrico emparejado Perfil del usuario Idioma de la aplicación Nombre del patinete eléctrico Unidad de velocidad Control de crucero ON/OFF Modo ON/OFF Inicio desde cero Bloqueo del motor ON/OFF Información Solicitud de asistencia Cierre de sesión del perfil de usuario Información sobre el «Control de crucero»: Active la función de «Control de crucero»...
- Page 91 14. Aprender a conducir Siga las instrucciones de seguridad antes de conducir el patinete. Utilice elementos homologados, como cascos y rodilleras. No utilice el patinete eléctrico bajo la lluvia. El patinete eléctrico no puede ser utilizado por más de una persona al mismo tiempo. Los menores de 14 años* y las mujeres embarazadas no pueden utilizar este patinete eléctrico.
- Page 92 Peso mínimo permitido sobre el patinete eléctrico: 20 kg. Peso máximo permitido sobre el patinete eléctrico: 100 kg. No conduzca el patinete eléctrico en caso de tomar alcohol o medicamentos. No utilice el teléfono ni escuche música mientras conduce el patinete eléctrico. Preste atención a la conducción en presencia de baches, arena, charcos, hielo, nieve, escaleras, en lugares oscuros y de noche o...
- Page 93 No utilice el patinete eléctrico en zonas peligrosas, en presencia de sustancias, inflamables o explosivas, líquidos o suciedad. Este patinete eléctrico no está diseñado para circular por carreteras ni autopistas. Consulte la legislación vigente en su municipio acerca de dónde está permitida la circulación de patinetes eléctricos.
- Page 94 Conduzca siempre con ambas manos en el manillar. No conduzca el patinete eléctrico con un solo pie. No pulse el acelerador cuando camine con el patinete eléctrico. No conduzca el patinete eléctrico sobre charcos o superficies mojadas.
- Page 95 Tenga cuidado con la cabeza al pasar por debajo de marquesinas, puertas o similares. En caso de circular a la velocidad máxima permitida, no gire el manillar de manera brusca. Comience a frenar a una distancia suficiente para evitar obstáculos, curvas y zonas que tengan un pavimento irregular.
- Page 96 No golpee obstáculos con las ruedas. No toque el motor inmediatamente después de haber circulado, podría estar a una temperatura elevada. Mantenga una distancia de seguridad mínima de 5 m con respecto a otros vehículos.
- Page 97 15. Batería (advertencias) Asegúrese de que el patinete, el cargador de la batería y el puerto de carga estén secos. Cuando el patinete está completamente cargado, la luz led del cargador cambia de rojo (cargando) a verde (carga completada). Utilice solo el cargador de la batería original. Otros cargadores de baterías pueden dañar el dispositivo y suponer otros peligros potenciales.
- Page 98 No debe: Abrir o desmontar la batería o golpear, arrojar, perforar o pegar objetos a la misma. Tocar cualquier sustancia que salga de la batería, ya que contiene sustancias peligrosas. Dejar que los niños o las mascotas toquen la batería. Sobrecargar, descargar excesivamente o cortocircuitar la batería.
- Page 99 17. Mantenimiento y cuidado diario Limpieza y conservación • Si hay manchas en el cuerpo del patinete, se deben limpiar con un paño húmedo. Si las manchas persisten, aplique pasta de dientes sobre ellas, cepille con un cepillo de dientes y luego limpie con un paño húmedo. Si hay arañazos en los elementos de plástico, use papel de lija u otro material abrasivo para eliminarlos.
- Page 100 Nota: una vez que esté completamente cargado, el patinete tendrá una autonomía de 120 a 180 días. Los daños provocados por una descarga prolongada son irreversibles y no están cubiertos por la garantía limitada. Una vez producido el daño, la batería no se puede recargar (está...
- Page 101 18. Ficha técnica Información general Marco De aleación de aluminio Velocidad E: <= 6km/h | D:<= 20km/h | SPORT: <= 25km/h (máx. velocidad) Pendiente 15% (sujeto a variaciones según el peso del conductor, las condiciones de la vía y la temperatura) Frenos Frenos de disco electrónicos delanteros y traseros Motor...
- Page 102 19. Solución de problemas Pruebas que se deben realizar • Después de una caída, verifique que la palanca del acelerador funciona correctamente. Para ello, acelere y desacelere varias veces. • Verifique que los frenos funcionan correctamente. Para ello, mueva el vehículo em pujándolo manualmente y frene repentinamente para asegurarse de que responde a los controles.
- Page 103 20. Tabla de códigos de error Código de error Indicaciones Funcionamiento incorrecto del motor Error de señal de la centralita Funcionamiento incorrecto de la palanca del acelerador Funcionamiento incorrecto de la centralita MOS Error de fase/corriente Funcionamiento incorrecto de la corriente media Error de voltaje de la batería Funcionamiento incorrecto de la palanca de freno Al presionar la palanca del acelerador, hasta el tope de su...
- Page 104 ATENCIÓN Tratamiento del dispositivo eléctrico o electrónico al final de su vida útil (aplicable en todos los países de la Unión Europea y en otros países europeos con sistemas de recogida selectiva) Este símbolo en el producto o en el embalaje indica que no debe considerarse como un residuo doméstico normal, sino que debe entregarse en un punto de recogida adecuado para el reciclaje de equipos eléctricos y electrónicos (REEE).
- Page 105 ATENCIÓN Tratamiento de las pilas agotadas (aplicable en todos los países de la Unión Europea y en otros países europeos con sistemas de recogida selectiva) Este símbolo en el producto o en el embalaje indica que la batería no debe considerarse como un residuo doméstico normal. En algunos tipos de pilas, este símbolo se puede utilizar en combinación con un símbolo químico.
- Page 106 ADVERTENCIAS Lea en su totalidad el siguiente manual y las instrucciones antes de utilizar el producto. Nombre del producto: Ducati PRO-I EVO Tipo de producto: patinete eléctrico Año de fabricación: 2020 Nota: • Para recargar este patinete eléctrico, use ÚNICAMENTE el cargador de baterías que se suministra, con la etiqueta XHK-916-42015 y el siguiente voltaje de salida: 42 V - 1,5 A.
- Page 107 El abajo firmante: M.T. Distribution S.r.l. Dirección: Via Bargellino 10, 40012 Calderara di Reno (BO), Italia certifica que el diseño y la fabricación de este producto Marca del producto: Ducati N.° de modelo del artículo: PRO-I EVO Tipo de producto: Monopattino elettrico cumple con las siguientes directivas: Directiva de máquinas 2006/42/CE...
- Page 108 Français trottinette électrique Manuel de l’utilisateur Merci d’avoir choisi ce produit. Pour plus d’informations, un support technique et une assistance, contactez votre revendeur ou visitez le site internet www.ducatiurbanemobility.it...
- Page 109 Table des matières Consignes de sécurité Guide rapide Contenu de l’emballage Présentation du produit Informations sur les commandes/Panneau de commande Assemblage et configuration Plier et transporter Recharge et activation de la batterie Réglage des freins Autonomie Conservation et nettoyage Avertissements généraux Configuration de l’application Apprendre à...
- Page 110 1. Consignes de sécurité Veuillez lire attentivement les instructions suivantes avant d’utiliser le produit. Conservez ce manuel pour référence future ou pour de nouveaux utilisateurs. • La société n’assumera aucune responsabilité découlant d’une mauvaise utilisation du produit ou du non-respect du code de la route et des instructions du présent manuel. •...
- Page 111 2. Guide rapide • Lors de la première utilisation, chargez la trottinette à 100 %. • Appuyez sur le bouton d’alimentation pendant quelques secondes pour la démarrer. • Vérifiez l’indicateur de batterie. Si la batterie est faible, rechargez-la avant utilisation. La trottinette électrique est un appareil qui doit être rechargé...
- Page 112 3. Contenu de l’emballage La trottinette est livrée montée, mais le guidon doit être installé en utilisant les vis fournies. • Trottinette • Accessoires : - Clé Allen - n° 4 vis - Chambre à air de rechange - Autocollants de rechange - Adaptateur pour gonfler les pneus •...
- Page 113 4. Présentation du produit sonnette frein lumière avant panneau de commande accélérateur tige de guidon fermeture du mécanis- mécanisme de pliage me de pliage feu de freinage plate-forme frein à disque port de charge béquille moteur...
- Page 114 5. Informations sur les commandes/Panneau de commande 1. Compteur de vitesse: affiche la vitesse actuelle de la trottinette. 2. Niveau de la batterie: le niveau de la batterie est indiqué par 5 barres. 3. Phares: voyant du phare. 4. Bluetooth: voyant du Bluetooth. 5.
- Page 115 • Bouton d’alimentation/commandes (A) : maintenez ce bouton enfoncé pour allumer/ éteindre la trottinette. • Comment allumer/éteindre les lumières : appuyez une fois sur le bouton (A) pour les allumer. Avec les lumières allumées, appuyez à nouveau sur le bouton (A) pour les éteindre. •...
- Page 116 6. Assemblage et configuration Ouvrez la béquille, soulevez la tige, et Installez le guidon sur la tige (voir l’image). placez le levier en position fermée. Insérez les 4 vis manuellement sans les Après avoir terminé, allumez l’appareil serrer, puis utilisez la clé hexagonale pour vous assurer que tout fonctionne.
- Page 117 Tige de guidon bancale Si la tige de guidon vacille, vous pouvez serrer les vis du système de pliage à l’aide de la clé fournie. 7. Plier et transporter Fermeture Ouverture Fermeture : Éteignez la trottinette électrique, déverrouillez le mécanisme de pliage : appuyez sur le crochet rouge et tirez le levier vers l’extérieur (voir l’image), ramenez la tige du guidon vers l’intérieur et assurez-vous qu’elle est bien verrouillée.
- Page 118 Position de transport Portez toujours la trottinette en la tenant par le guidon avec une ou les deux mains. 8. Recharge et activation de la batterie 1. Ouvrez le capuchon en caoutchouc de la prise de charge située sur le côté gauche de la plate-forme.
- Page 119 Il existe un risque de chute lors de l’utilisation de la trottinette électrique. Lorsque vous apprenez à conduire la trottinette électrique et pour votre propre sécurité, portez un casque et des genouillères pour vous protéger des chutes et des blessures. Allumez la trottinette électrique et vérifiez le niveau de charge de la batterie.
- Page 120 10. Autonomie L’autonomie maximale dépend de plusieurs variables : Terrain : la conduite sur une chaussée lisse offre davantage d’autonomie que la conduite sur des routes accidentées ou en pente. Poids de l’utilisateur : plus l’utilisateur est lourd, plus l’autonomie diminue. Température : conduire la trottinette dans un environnement très froid ou chaud affecte son autonomie.
- Page 121 12. Avertissements généraux • Vérifiez les freins, la pression (50 PSI), l’état des roues et l’accélérateur avant chaque utilisation. Si vous remarquez des bruits inhabituels ou des anomalies, n’utilisez pas le produit et contactez le service d’assistance technique de votre revendeur. •...
- Page 122 • Afficher les kilomètres partiels et totaux parcourus • Afficher la batterie restante • Afficher la vitesse de croisière • Afficher les modes de vitesse • Afficher la température de la roue motrice Accéder à l’App Store pour télécharger et installer l’application Ducati Urban e-Mobility...
- Page 123 1. Téléchargez l’application sur votre smartphone ; 2. Allumez la trottinette électrique et activez le Bluetooth sur votre smartphone ; 3. Démarrez l’application et connectez-vous *, connectez votre smartphone à la trottinette électrique via Bluetooth à 1 ou 2 m de distance ; * Si c’est la première fois que vous utilisez cette application, veuillez remplir le champ «...
- Page 124 L’interface de l’application avec la trottinette électrique jumelée ressemble à ce qui suit : Trottinette électrique jumelée Interface principale Pourcentage de la batterie de la trottinette électrique Vitesse en temps réel Distance parcourue (ODO) Mode de conduite Temps d’utilisation Distance parcourue (TRIP) Carte Enregistrer l’itinéraire Paramètres...
- Page 125 Interface des paramètres de la trottinette électrique jumelée Profil utilisateur Langue de l’application Nom de la trottinette électrique Unité de vitesse ON/OFF Cruise Control ON/OFF Mode Zero Start ON/OFF Verrouillage du moteur Informations Demande d’assistance Déconnexion du profil utilisateur Informations sur « Cruise Control » : Activez la fonction «...
- Page 126 14. Apprendre à conduire Suivez les consignes de sécurité avant de conduire la trottinette. Utilisez des articles homologués tels que des casques et des genouillères. N’utilisez pas la trottinette électrique sous la pluie. La trottinette électrique ne peut pas être utilisée par plus d’une personne à...
- Page 127 Poids minimum autorisé sur la trottinette électrique : 20 kg. Poids maximum autorisé sur la trottinette électrique : 100 kg. Ne conduisez pas la trottinette électrique après avoir consommé de l’alcool et/ou pris des médicaments. N’utilisez pas le téléphone et n’écoutez pas de musique en conduisant la trottinette.
- Page 128 N’utilisez pas la trottinette électrique dans des zones dangereuses, en présence de substances inflammables et/ou explosives, de liquides et/ou de saletés. Cette trottinette électrique n’est pas conçue pour être conduite sur des routes et autoroutes. Consultez le décret législatif en vigueur dans votre commune concernant les lieux où...
- Page 129 Roulez toujours avec les deux mains sur le guidon. Ne conduisez pas la trottinette électrique avec un seul pied. N’appuyez pas sur l’accélérateur lorsque vous conduisez la trottinette électrique. Ne conduisez pas la trottinette électrique dans des flaques d’eau et sur des surfaces humides.
- Page 130 Faites attention à la tête lorsque vous passez sous des auvents, des portes et/ou autres. Lorsque vous conduisez à la vitesse maximale autorisée, ne tournez pas le guidon brusquement. Commencez à freiner suffisamment loin pour éviter les obstacles, les virages et les zones qui diffèrent de la chaussée.
- Page 131 Ne heurtez pas d’obstacles avec les roues. Ne touchez pas le moteur immédiatement après avoir conduit, il pourrait être chaud. Maintenez une distance de sécurité minimale de 5 m par rapport aux autres véhicules.
- Page 132 15. Batterie (Mises en garde) Assurez-vous que la trottinette, le chargeur et le port de charge sont secs. Lorsque la trottinette est complètement chargée, le voyant LED du chargeur passe du rouge (chargement) au vert (chargement terminé). Utilisez uniquement le chargeur d’origine. D’autres chargeurs endommageront votre appareil et présentent d’autres risques potentiels.
- Page 133 À ne pas faire: Ouvrir ou démonter la batterie ou frapper, jeter, percer ou coller des objets sur la batterie. Toucher toute substance s’échappant de la batterie, car elle contient des substances dangereuses. Laisser les enfants ou les animaux toucher la batterie. Surcharge, décharge excessive ou court-circuit de la batterie.
- Page 134 17. Entretien et soins quotidiens Nettoyage et conservation • S’il y a des taches sur le corps de la trottinette, essuyez-les avec un chiffon humide. Si les taches persistent, appliquez du dentifrice sur le dessus, brossez avec une brosse à dents, puis essuyez avec un chiffon humide.
- Page 135 Remarque: une fois complètement chargée, elle aura une autonomie de 120 à 180 jours. Les dommages causés par une absence prolongée de charge sont irréversibles et ne sont pas couverts par la garantie limitée. En cas de dommage avéré, la batterie ne peut pas être rechargée (le démontage de la batterie par un personnel non qualifié...
- Page 136 18. Fiche technique Informations générales Cadre En alliage d’aluminium Vitesse E: <= 6km/h | D:<= 20km/h | SPORT: <= 25km/h (vitesse max.) Pente maximale 15% (Sous réserve de variations en fonction du poids du conducteur, des condi- tions de la chaussée et de la température.) Freins Frein électronique avant et à...
- Page 137 19. Résolution des problèmes Essais à réaliser • Après une chute, vérifiez que le levier de l’accélérateur fonctionne correctement. Pour ce faire, accélérez et décélérez plusieurs fois. • Vérifiez régulièrement que les freins fonctionnent correctement. Pour ce faire, faites rouler le véhicule en le poussant manuellement et en freinant soudainement pour s’assurer qu’il réponde aux commandes.
- Page 138 20. Tableau des codes d’erreur Code d’erreur Indications Dysfonctionnement du moteur Erreur de signal de l’unité de commande Dysfonctionnement du levier d’accélérateur Dysfonctionnement de l’unité de commande MOS Erreur de phase/courant Dysfonctionnement courant moyen Erreur de tension de batterie Dysfonctionnement du levier de frein En appuyant sur le levier de l’accélérateur, jusqu’au maximum ATTENTION souhaité, la trottinette activera la fonction Cruise Control...
- Page 139 ATTENTION Traitement du dispositif électrique ou électronique en fin de vie (applicable dans tous les pays de l’Union européenne et dans d’autres systèmes européens avec système de collecte séparée des déchets) Ce symbole figurant sur le produit ou sur l’emballage indique que le produit ne doit pas être considéré...
- Page 140 ATTENTION Traitement des piles usagées (applicable dans tous les pays de l’Union européenne et dans d’autres systèmes européens avec système de collecte séparée des déchets) Ce symbole sur le produit ou sur l’emballage indique que la pile- batterie ne doit pas être considérée comme un déchet ménager normal.
- Page 141 AVERTISSEMENT Lisez l’intégralité du manuel et les instructions ci-dessous avant d’utiliser le produit. Nom du produit: Ducati PRO-I EVO Type de produit: trottinette électrique Année de production: 2020 Remarque: • Pour recharger cette trottinette électrique, utilisez UNIQUEMENT le chargeur de batterie fourni étiqueté...
- Page 142 La soussignée: M.T. Distribution S.r.l. Adresse: Via Bargellino 10, 40012 Calderara di Reno (BO), Italie certifie que la conception et la production de ce produit Marque du produit: Ducati N° de modèle de l’article: PRO-I EVO Type de produit: Trottinette électrique est conforme aux directives suivantes: 2006/42/CE Directive Machines 2014/30/UE Directive sur la compatibilité...
- Page 143 Deutsch elektroroller Benutzerhandbuch Vielen Dank, dass Sie sich für dieses Produkt entschieden haben. Informationen, technische Unterstützung und Hilfe erhalten Sie von Ihrem Händler oder auf der Webseite www.ducatiurbanemobility.it...
- Page 144 Inhalt Sicherheitshinweise Kurzanleitung Inhalt der Verpackung Produktübersicht Bedienungsinformationen/Display Montage und Konfiguration Zusammenklappen und Transportieren Laden und Aktivieren des Akkus Einstellen der Bremsen Reichweite Lagerung und Reinigung Allgemeine Hinweise Konfiguration der App Fahren lernen Akku (Warnhinweise) Verantwortlichkeiten Wartung und tägliche Pflege Technisches Datenblatt Fehlerbehebung Fehlercode-Tabelle...
- Page 145 1. Sicherheitshinweise Bitte lesen Sie die folgenden Anweisungen vor der Verwendung des Produktes sorgfältig durch. Bewahren Sie dieses Handbuch für späteres Nachschlagen oder für neue Benutzer auf. • Das Unternehmen übernimmt weder Haftung für unsachgemäße Anwendung des Produkts noch für die Nichtbeachtung von Verkehrsvorschriften oder von Anweisungen in diesem Handbuch.
- Page 146 2. Kurzanleitung • Laden Sie den Roller vor dem ersten Gebrauch zu 100 % auf. • Drücken Sie den Startknopf einige Sekunden lang, um ihn zu starten. • Überprüfen Sie die Akkuanzeige. Wenn der Akku leer ist, laden Sie ihn vor dem Gebrauch auf.
- Page 147 3. Inhalt der Verpackung Nach der Montage des Rollers, muss die Lenkstange mit den entsprechenden Schrauben angeschraubt werden. • Roller • Zubehörteile: - Inbusschlüssel - 4 Schrauben - Ersatzschlauch - Ersatzaufkleber - Adapter zum Aufpumpen von Reifen • Batterieladegerät...
- Page 148 4. Présentation du produit klingel bremse frontlicht display gaspedal lenkerstange klappmechanismus klappverschluss bremslicht trittbrett scheibenbremse ladeanschluss ständer motor...
- Page 149 5. Bedienungsinformationen/Display 1. Tachometer: Zeigt die aktuelle Geschwindigkeit des Rollers an. 2. Batteriestand: Der Batteriestand wird durch 5 Balken angezeigt. 3. Scheinwerfer: Kontrollleuchte des Scheinwerfers. 4. Bluetooth: Bluetooth-Anzeige. 5. SPORT-Modus - Auf dem Display wird SPORT angezeigt (bis zu 25 km/h). 6.
- Page 150 • Startknopf/Befehle (A): Halten Sie den Startknopf zum Ein-/Ausschalten des Rollers gedrückt. • Licht Ein-/Ausschalten: Drücken Sie einmal die Taste (A), um das Licht einzuschalten. Drücken Sie bei eingeschaltetem Licht die Taste (B) erneut, um es auszuschalten. • Modus/Geschwindigkeit: Drücken Sie zweimal die Taste (A), um den Modus auszuwählen: - E: bis zu 6 km/h - D: bis zu 20 km/h...
- Page 151 6. Montage und Konfiguration Öffnen Sie den Ständer, heben Sie die Bringen Sie den Lenker an der Stange Stange an und bringen Sie den Hebel in an (siehe Bild) die geschlossene Position. Setzen Sie die 4 Schrauben manuell Schalten Sie das Gerät nach der ein, ohne sie festzuziehen, schrauben Montage ein, um sicherzustellen, dass Sie sie danach mit dem mitgelieferten...
- Page 152 Wackelige Lenkerstange Wenn die Lenkerstange wackelt, können Sie die Schrauben am Klappsystem mit dem mitgelieferten Schraubenschlüssel festziehen. 7. Zusammenklappen und Transportieren Schliessen Öffnen Verschluss: Schalten Sie den Elektroroller aus, entriegeln Sie den Verriegelungsmechanismus: Drücken Sie den roten Haken und ziehen Sie den Hebel nach außen (siehe Bild), biegen Sie die Lenkerstange nach innen und stellen Sie sicher, dass sie fest blockiert ist.
- Page 153 Transportposition Halten Sie den Roller immer mit einer Hand oder beiden Händen an der Lenkerachse fest, wenn sie ihn transportieren. 8. Laden und Aktivieren des Akkus 1. Öffnen Sie die Gummikappe der Ladebuchse auf der linken Seite des Trittbretts. 2. Stecken Sie den Ladestecker in die Steckdose.
- Page 154 Beim Fahren des Elektrorollers besteht die Gefahr, zu stürzen. Tragen Sie zu Ihrer eigenen Sicherheit einen Helm und Knieschützer, um sich vor Stürzen und Verletzungen zu schützen, während Sie das Fahren mit dem Elektroroller erlernen. Schalten Sie den Elektroroller ein und überprüfen Sie den Ladezustand des Akkus. 9.
- Page 155 10. Reichweite Die maximale Reichweite hängt von mehreren Variablen ab: Gelände: Fahren auf glatten Straßen bedeutet mehr Reichweite als Fahren auf unebenen Straßen und Hängen. Benutzergewicht: Je schwerer der Benutzer, desto kürzer die Reichweite. Temperatur: Das Fahren des Rollers in einer sehr kalten oder heißen Umgebung beeinträchtigt die Reichweite.
- Page 156 12. Allgemeine Hinweise • Überprüfen Sie vor jedem Gebrauch die Bremsen, den Druck (50 PSI), den Zustand der Reifen und des Gashebels. Wenn Sie ungewöhnliche Geräusche oder Anomalien bemerken, verwenden Sie das Produkt nicht und wenden Sie sich an den technischen Kundendienst Ihres Händlers.
- Page 157 • Die zurückgelegten Teil- und Gesamtkilometer ansehen • Den verbleibenden Akku ansehen • Die Reisegeschwindigkeit ansehen • Die Geschwindigkeitsmodi anzeigen • Die Temperatur des Antriebsrads anzeigen Greifen Sie auf den App Store zu, um die Ducati Urban e-Mobility App herunterzuladen und zu installieren...
- Page 158 1. Laden Sie die App auf das Smartphone herunter. 2. Schalten Sie den Elektroroller ein und aktivieren Sie Bluetooth auf dem Smartphone. 3. Starten Sie die App und melden Sie sich an *; verbinden Sie Ihr Smartphone in einer Entfernung von 1 - 2 Metern über Bluetooth mit dem Elektroroller. * Wenn Sie diese App zum ersten Mal verwenden, füllen Sie das Feld„E-Mail”...
- Page 159 Die App-Oberfläche mit gekoppeltem Elektroroller sieht wie folgt aus: Elektroroller Hauptbildschirm Akkustand des Elektrorol- lers in Prozent Geschwindigkeit in Echtzeit Zurückgelegte Strecke (ODO) Fahrmodus Nutzungszeit Zurückgelegte Strecke (TRIP) Landkarte Route aufzeichnen Einstellungen Anwendung aktivieren/ deaktivieren...
- Page 160 Zugehörige Benutzeroberfläche für die Einstellungen für Elektroroller Benutzerprofil Sprache der app Name des Elektrorollers Geschwindigkeitseinheit EIN/AUS Tempomat EIN-/AUS-Modus Null Start EIN/AUS Motorsperre Informationen Support-Anfrage Abmelden des Benutzer- profils Informationen zu „Tempomat”: Aktivieren Sie die Funktion „Tempomat“ in der App, halten Sie den Elektroroller auf einer konstanten Geschwindigkeit (>...
- Page 161 14. Fahren lernen Befolgen Sie die Sicherheitshinweise, bevor Sie mit dem Roller fahren. Verwenden Sie zugelassene Sicherheitsausrüstungen wie Helme und Knieschützer. Verwenden Sie den Elektroroller nicht bei Regen. Der Elektroroller kann nicht von mehr als einer Person gleichzeitig gefahren werden. Kinder unter 14 Jahren * und schwangere Frauen können diesen Elektroroller nicht benutzen.
- Page 162 Mindestbelastung des Elektrorollers: 20 kg. Maximal zulässiges Gewicht des Elektrorollers: 100 kg. Fahren Sie den Elektroroller nicht unter Einfluss von Alkohol und/oder Medikamenten. Telefonieren Sie nicht und hören Sie keine Musik, während Sie mit dem Elektroroller fahren. Seien Sie vorsichtig beim Fahren auf unebenen Straßen, Sand, Pfützen, Eis, Schnee, Treppen, an dunklen Orten und bei Nacht oder Nässe.
- Page 163 Führen Sie den Elektroroller nicht in Gefahrenbereichen, in Gegenwart von brennbaren und/oder explosiven Substanzen, Flüssigkeiten und/oder Schmutz. Dieser Elektroroller ist nicht für das Fahren auf Straßen und Autobahnen ausgelegt. Informieren Sie sich bei Ihrer Gemeinde über die aktuell geltende Gesetzesverordnung und darüber, wo das Fahren mit E-Rollern erlaubt ist.
- Page 164 Legen Sie beim Fahren stets beide Hände auf die Lenkstange. Fahren Sie den E-Roller nicht mit nur einem Fuß. Drücken Sie nicht auf das Gaspedal, wenn Sie den Elektroroller schieben. Fahren Sie nicht mit dem Elektroroller in Pfützen und auf nassen Oberflächen.
- Page 165 Achten Sie auf Ihren Kopf, wenn Sie Vordächer, Türen und/oder dergleichen unterqueren. Drehen Sie den Lenker nicht abrupt, wenn Sie mit der höchstzulässigen Geschwindigkeit fahren. Beginnen Sie den Bremsvorgang mit ausreichendem Abstand, um Hindernissen, Kurven und Bereichen mit unterschiedlichem Belag auszuweichen. Denken Sie daran, das Gaspedal vor dem Bremsen loszulassen.
- Page 166 Fahren Sie nicht mit den Rädern gegen Hindernisse. Berühren Sie den Motor nicht sofort nach dem Fahren, da er heiß werden kann. Halten Sie einen Sicherheitsabstand von mindestens 5 m zu anderen Fahrzeugen ein.
- Page 167 15. Akku (Warnhinweise) Stellen Sie sicher, dass der Roller, das Ladegerät und der Ladeanschluss trocken sind. Wenn der Roller vollständig aufgeladen ist, wechselt das LED am Ladegerät von Rot (Aufladen) auf Grün (Aufladen abgeschlossen). Verwenden Sie nur das Originalladegerät. Andere Ladegeräte beschädigen Ihr Gerät und bringen potenzielle Risiken mit sich.
- Page 168 Was Sie nicht tun sollten: Den Akku öffnen oder darauf schlagen, ihn werfen, hineinstechen oder Gegenstände am Akku anbringen. Berühren Sie keine Substanzen, die aus dem Akku austreten, da dieser gefährliche Stoffe enthält. Erlauben Sie Kindern oder Haustieren nicht, den Akku zu berühren. Überladen, Überentladen oder Kurzschließen Sie nicht den Akku.
- Page 169 17. Tägliche Wartung und Pflege Reinigung und Aufbewahrung • Wenn der Elektroroller verschmutzt ist, reinigen Sie ihn mit einem feuchten Tuch. Wenn die Flecken bestehen bleiben, tragen Sie Zahnpasta auf, bürsten Sie sie mit einer Zahnbürste und wischen Sie sie mit einem feuchten Tuch ab. Wenn die Kunststoffteile Kratzer aufweisen, entfernen Sie sie mit Schleifpapier oder einem anderen Schleifmittel.
- Page 170 Hinweis: Sobald der Akku vollständig aufgeladen ist, hat er eine Autonomie von 120 bis 180 Tagen. Schäden, die durch längeres Fehlen der Ladevorgänge verursacht werden, sind irreversibel und fallen nicht unter die beschränkte Garantie. Sobald der Schaden aufgetreten ist, kann der Akku nicht mehr aufgeladen werden (der Ausbau des Akkus durch nicht qualifiziertes Personal ist verboten, da dies zu Stromschlägen, Kurzschlüssen oder sogar sicherheitsrelevanten Unfällen führen kann).
- Page 171 18. Technisches Datenblatt Allgemeine Informationen Rahmen Aluminiumlegierung Geschwindigkeit E: <= 6km/h | D:<= 20km/h | SPORT: <= 25km/h (Höchstgeschwindigkeit) Maximales 15% (vorbehaltlich Abweichungen je nach Fahrergewicht, Straßenzustand und Temperatur) Bremsen Elektronische Scheibenbremsen vorne und hinten Motor 350W Reifen 8,5 Zoll Vorder- und Hinterreifen mit Schlauch Niederspannungsschutz 31V +/- 0.5V Strombegrenzung...
- Page 172 19. Fehlerbehebung Durchzuführende Tests • Überprüfen Sie nach einem Sturz, ob der Gashebel ordnungsgemäß funktioniert. Beschleunigen und bremsen Sie dazu mehrmals. • Überprüfen Sie von Zeit zu Zeit, ob die Bremsen ordnungsgemäß funktionieren. Bewegen Sie dazu das Fahrzeug. Schieben Sie es von Hand und bremsen Sie plötzlich, um sicherzustellen, dass es auf die Steuerungen reagiert.
- Page 173 20. Fehlercode-Tabelle Fehlercode Hinweise Motorstörung Signalfehler des Steuergeräts Fehlfunktion des Gashebels MOS-Fehlfunktion des Steuergeräts Phasen-/Stromfehler Störung Durchschnittsstrom Batteriespannungsfehler Fehlfunktion des Bremshebels Durch Drücken des Gashebels bis zur maximalen Auslenkung WARNUNG aktiviert der Roller die Funktion Tempomat für einige Sekunden und behält die gleiche Geschwindigkeit bei, auch wenn der Hebel losgelassen wird.
- Page 174 WARNUNG Entsorgung von elektrischen oder elektronischen Altgeräten (gilt in allen Ländern der Europäischen Union und anderen europäischen Ländern mit Abfalltrennungssystemen) Dieses Symbol auf dem Produkt oder auf der Verpackung weist darauf hin, dass das Produkt nicht als normaler Haushaltsabfall entsorgt werden darf, sondern an einer geeigneten Sammelstelle für das Recycling von Elektro- und Elektronikgeräten (WEEE) abgegeben werden muss.
- Page 175 WARNUNG Behandlung von Altbatterien (anwendbar in allen Ländern der Europäischen Union und anderen europäischen Systemen mit getrennten Abfallsammelsystemen) Dieses Symbol auf dem Produkt oder der Verpackung weist darauf hin, dass die Batterie bzw. der Akku nicht als normaler Haushaltsmüll betrachtet werden dürfen. Auf einigen Batterietypen wird dieses Symbol zusammen mit einem chemischen Symbol angezeigt.
- Page 176 WARNHINWEISE Lesen Sie das Handbuch und die Anweisungen vollständig durch, bevor Sie das Produkt verwenden. Produktname: Ducati PRO-I EVO Produkttyp: Elektroroller Produktionsjahr: 2020 Hinweis: • Verwenden Sie zum Aufladen dieses Elektrorollers NUR das mitgelieferte Ladegerät mit der Bezeichnung XHK-916-42015 mit der folgenden Ausgangsspannung: 42 V - 1,5 A.
- Page 177 Das unterzeichnende Unternehmen MT Distribution Srl Adresse: Via Bargellino 10, 40012 Calderara di Reno (BO), Italien bescheinigt dass der Entwurf und die Fertigung dieses Produkts Produktmarke: Ducati Modellnr. des Artikels: PRO-I EVO Produkttyp: Elektroroller Er entspricht den folgenden Richtlinien: 2006/42/EG 2014/30/EU Richtlinie zur elektromagnetischen Verträglichkeit 2014/35/EU...
- Page 178 Polish hulajnoga elektryczna Instrukcja obsługi Dziękujemy za wybranie tego produktu. Aby uzyskać informacje, wsparcie techniczne i pomoc, skontaktuj się ze sprze- dawcą lub odwiedź stronę internetową www.ducatiurbanemobility.it...
- Page 179 Spis treści Instrukcje dotyczące bezpieczeństwa Szybkie wprowadzenie Zawartość opakowania Opis produktu Informacje o elementach sterujących / Panel sterowania Montaż i konfiguracja Składanie i przenoszenie Ładowanie i aktywacja akumulatora Regulacja hamulców Zasięg Przechowywanie i czyszczenie Ostrzeżenia ogólne Konfiguracja aplikacji Nauka jazdy na hulajnodze Akumulator (ostrzeżenia) Odpowiedzialność...
- Page 180 1. Instrukcje dotyczące bezpieczeństwa Przed rozpoczęciem korzystania z produktu uważnie przeczytaj ęponiższe instrukcje. Zachowaj tę instrukcję do wykorzystania w przyszłości lub dla nowych użytkowników. • Firma nie ponosi żadnej odpowiedzialności związanej z konsekwencjami niewłaściwego użytkowania produktu lub z nieprzestrzegania przepisów drogowych, jak i instrukcji zawartych w niniejszym podręczniku.
- Page 181 2. Szybkie wprowadzenie • Przy pierwszym użyciu naładuj akumulator hulajnogi do 100% jego pojemności. • Aby uruchomić hulajnogę, naciśnij przycisk zasilania na kilka sekund. • Sprawdź wskaźnik naładowania akumulatora: jeśli akumulator jest rozładowany, naładuj go przed jazdą. Hulajnoga elektryczna to urządzenie, które wymaga okresowego ładowania.
- Page 182 3. Zawartość opakowania Po złożeniu hulajnogi kierownicę należy zamocować za pomocą odpowiednich śrub. • Hulajnoga • Akcesoria: - Klucz imbusowy - 4 śruby - Zapasowa dętka - Naklejki zamienne - Adapter do pompowania opon • Ładowarka...
- Page 183 4. Opis produktu dzwonek hamulec światło przednie panel sterowania manetka przyśpieszenia drążek kierownicy mechanizm składania zaczep blokady skład- ania światła hamowania podest hamulec tarczowy gniazdo ładowania nóżka boczna silnik...
- Page 184 5. Informacje o elementach sterujących / Panel sterowania 1. Prędkościomierz: wyświetla aktualną prędkość jazdy. 2. Poziom naładowania akumulatora: poziom naładowania akumulatora jest wskazywany przez 5 pasków. 3. Światła: lampka kontrolna reflektora 4. Bluetooth: lampka kontrolna łączności Bluetooth. 5. Tryb SPORT – na wyświetlaczu pojawi się napis SPORT (prędkość do 25 km/h). 6.
- Page 185 • Przycisk zasilania / elementy sterujące (A): naciśnij i przytrzymaj ten przycisk, aby włączyć / wyłączyć hulajnogę. • Jak włączyć / wyłączyć światła: naciśnij raz przycisk (A), aby włączyć. Gdy światła są włączone, naciśnij ponownie przycisk (B), aby je wyłączyć. •...
- Page 186 6. Montaż i konfiguracja Otwórz nóżkę boczną, podnieś drążek Ustaw kierownicę na drążku (patrz kierownicy, ustaw dźwignię w pozycji zdjęcie) zamkniętej. Włóż ręcznie 4 śruby, nie dokręcając Po zakończeniu włącz urządzenie, aby upewnić się, że wszystko działa. Aby ich, a następnie użyj dostarczonego klucza imbusowego, aby je dokręcić...
- Page 187 Chwiejny drążek kierownicy Jeśli drążek kierownicy chwieje się, można dokręcić śruby systemu składania za pomocą dostarczonego klucza. 7. Składanie i przenoszenie Składanie Rozkładanie Składanie: Wyłącz hulajnogę elektryczną, zwolnij mechanizm blokujący: naciśnij czerwony hak i pociągnij dźwignię do zewnątrz (patrz ilustracja), przesuń drążek kierownicy do wewnątrz i upewnij się, że jest skutecznie zablokowany.
- Page 188 Pozycja podczas przenoszenia Zawsze przenoś hulajnogę, trzymając ją jedną lub obiema rękami za drążek kierownicy. 8. Ładowanie i aktywacja akumulatora 1. Otwórz gumową zaślepkę gniazda ładowania znajdującego się po lewej stronie podestu. 2. Podłącz wtyczkę ładowarki do gniazda. 3. Gdy akumulator będzie w pełni naładowany, wyciągnij wtyczkę...
- Page 189 Podczas korzystania z hulajnogi elektrycznej istnieje ryzyko upadku. Dla własnego bezpieczeństwa zakładaj kask i nakolanniki, aby chronić się przed upadkami i urazami podczas nauki jazdy na hulajnodze elektrycznej. Włącz hulajnogę elektryczną i sprawdź poziom naładowania akumulatora. 9. Regulacja hamulców Regulacja hamulca Jeśli hamulec jest zbyt naprężony, użyj dostarczonego klucza imbusowego i obróć...
- Page 190 10. Zasięg Maksymalny zasięg zależy od kilku zmiennych. Są to: Nawierzchnia: jazda po gładkiej nawierzchni pozwala pokonać większą odległość w porównaniu do jazdy po nierównych drogach i pochyłościach. Waga użytkownika: im większa jest masa ciała użytkownika, tym krótsza będzie przejechana odległość...
- Page 191 12. Ostrzeżenia ogólne • Przed każdym użyciem sprawdź hamulce, ciśnienie (50PSI) i stan kół, oraz manetkę przyspieszenia. Jeśli usłyszysz nietypowe dźwięki lub zauważysz jakiekolwiek anomalie, zaprzestań używania produktu i skontaktuj się z działem pomocy technicznej sprzedawcy. • Zabrania się dokonywania jakichkolwiek zmian w hulajnodze, które mogłyby wpłynąć na jej sprawność...
- Page 192 • Ustawienie koloru światła pozycyjnego LED (RGB) • Wyświetlenie częściowej i całkowitej liczby przejechanych kilometrów • Wyświetlenie stanu naładowania akumulatora • Wyświetlenie prędkości jazdy • Wyświetlenie trybu prędkości • Wyświetlenie temperatury koła napędowego Przejdź do sklepu z aplikacjami, aby pobrać i zainstalować aplikację Ducati Urban e-Mobility...
- Page 193 1. Pobierz aplikację na smartfona; 2. Włącz hulajnogę elektryczną i aktywuj opcję Bluetooth na smartfonie; 3. Uruchom aplikację i zaloguj się*, podłącz smartfon z hulajnogą elektryczną przez Bluetooth z odległości 1-2 metrów; *Jeśli używasz tej aplikacji po raz pierwszy, wypełnij pole „e-mail”, aby zarejestrować i uwierzytelnić...
- Page 194 Poniżej został przedstawiony interfejs aplikacji sparowanej z hulajnogą elektryczną: Hulajnoga elektryczna sparowana Interfejs główny Procent naładowania aku- mulatora hulajnogi elektrycznej Prędkość jazdy w czasie rzeczywistym Przebyta odległość (ODO) Tryb jazdy Czas użytkowania Przebyta odległość (TRIP) Mapa Rejestruj trasę Ustawienia Włącz / wyłącz aplikację...
- Page 195 Interfejs ustawień sparowanej hulajnogi elektrycznej Profil użytkownika Język aplikacji Nazwa hulajnogi elektrycznej Jednostka prędkości Tempomatu ON / OFF Tryb ON / OFF Zero Start Blokada silnika ON / OFF Informacje Wsparcie techniczne Wylogowanie z profilu użytkownika Informacje dotyczące „Tempomatu”: Włącz funkcję „Tempomat” w aplikacji, utrzymuj hulajnogę na stałej prędkości jazdy (> 8 km/h) i przytrzymaj wciśniętą...
- Page 196 14. Nauka jazdy na hulajnodze Przed jazdą na hulajnodze postępuj zgodnie z instrukcjami bezpieczeństwa. Używaj zatwierdzonych akcesoriów, takich jak kaski i nakolanniki. Nie używaj hulajnogi elektrycznej w deszczu. Z hulajnogi elektrycznej nie może korzystać jednocześnie więcej niż jedna osoba. Dzieci w wieku poniżej 14 lat* i kobiety w ciąży nie mogą...
- Page 197 Minimalna dozwolona masa ciała użytkownika tej hulajnogi elektrycznej wynosi: 20 kg. Maksymalna dozwolona masa ciała użytkownika tej hulajnogi elektrycznej wynosi: 100 kg. Nie jeźdź na hulajnodze elektrycznej po wypiciu alkoholu i/lub po zażyciu lekarstw. Nie używaj telefonu ani nie słuchaj muzyki podczas jazdy na hulajnodze elektrycznej.
- Page 198 Nie używaj hulajnogi elektrycznej w niebezpiecznych obszarach, w obecności łatwopalnych i/lub wybuchowych substancji, cieczy i/lub zanieczyszczeń. Ta hulajnoga elektryczna nie jest przeznaczona do jazdy po szosach i autostradach. Zapoznaj się z dekretem ustawodawczym obowiązującym w miejscu Twojego zamieszkania, aby dowiedzieć się, gdzie można jeździć...
- Page 199 Zawsze jedź, trzymając obie ręce na kierownicy. Nigdy nie jedź na hulajnodze, trzymając tylko jedną stopę na podeście. Gdy prowadzisz hulajnogę elektryczną obok siebie, nie naciskaj manetki przyspieszenia. Nie jedź na hulajnodze elektrycznej po kałużach i mokrych nawierzchniach.
- Page 200 Uważaj na głowę podczas przejeżdżania pod zadaszeniami, bramami itp. Podczas jazdy z najwyższą dozwoloną prędkością nie kręć gwałtownie kierownicą. Zacznij hamować wystarczająco wcześniej, aby bezpiecznie pokonać przeszkody, zakręty i obszary o zróżnicowanej nawierzchni. Pamiętaj, aby zwolnić manetkę przyspieszenia przed rozpoczęciem hamowania.
- Page 201 Nie uderzaj kółkami w przeszkody. Nie dotykaj silnika bezpośrednio po zakończeniu jazdy, może on być mocno rozgrzany. Zachowaj minimalną odległość bezpieczeństwa równą 5 m od innych pojazdów.
- Page 202 15. Akumulator (ostrzeżenia) Upewnij się, że hulajnoga, ładowarka i gniazdo ładowania są suche. Gdy akumulator hulajnogi jest w pełni naładowany, dioda LED na ładowarce zmienia kolor z czerwonego (ładowanie) na zielony (ładowanie zakończone). Używaj tylko oryginalnej ładowarki. Nieoryginalne ładowarki mogą spowodować uszkodzenie urządzenia i przyczynić...
- Page 203 Nie wolno: Otwierać ani demontować akumulatora, narażać na uderzenia, rzucać nim, przebijać ani przyklejać do niego żadnych przedmiotów; dotykać wycieków z akumulatora, ponieważ zawierają one niebezpieczne dla zdrowia ludzi związki chemiczne; pozwalać, aby dzieci lub zwierzęta dotykały akumulatora; nadmiernie ładować, nadmierne rozładowywać lub dopuszczać do zwarcia w akumulatorze; zanurzać...
- Page 204 17. Codzienna konserwacja i pielęgnacja Czyszczenie i przechowywanie • Jeśli na korpusie hulajnogi widoczne są plamy, zetrzyj je wilgotną szmatką. Jeśli plamy się utrzymują, nałóż na nie pastę do zębów, następnie szczoteczką do zębów usuń plamy, po czym wytrzyj oczyszczony obszar wilgotną szmatką. Jeśli na plastikowych elementach pozostają...
- Page 205 Uwaga: po pełnym naładowaniu akumulatora hulajnoga będzie zdolna do jazdy przez 120- 180 dni. Uszkodzenia spowodowane wydłużonym okresem braku ładowania są nieodwracalne i nie są objęte ograniczoną gwarancją. Uszkodzonego akumulatora nie można ponownie ładować (zabrania się zlecania demontażu akumulatora niewykwalifikowanym osobom, ponieważ...
- Page 206 18. Dane techniczne Informacje ogólne Obudowa Stop aluminium Prędkość E: <= 6km/h | D:<= 20km/h | SPORT: <= 25km/h (prędkość maksymalna) Maksymalne 15% (może ulec zmianie w zależności od wagi kierowcy, warunków drogowych i temperatury) Hamulce Hamulec elektroniczny przedni i tylny hamulec tarczowy Silnik 350W Opony...
- Page 207 19. Rozwiązywanie problemów Testy do wykonania • Po ewentualnym upadku sprawdź, czy manetka przyspieszenia działa prawidłowo. W tym celu kilkakrotnie przyspiesz i zwolnij. • Od czasu do czasu sprawdzaj, czy hamulce działają prawidłowo. Aby to zrobić, przesuwaj hulajnogę do przodu, trzymając ją za kierownicę, i nagle zahamuj, żeby upewnić...
- Page 208 20. Tabela kodów błędów Kod b Wskazania Usterka silnika Błąd sygnału jednostki sterującej Awaria manetki przyspieszenia Usterka układu półprzewodnikowego jednostki sterującej Błąd fazy/prądu Usterka układu stabilizacji prądu Błąd napięcia akumulatora Nieprawidłowe działanie dźwigni hamulca Naciśnięcie manetki przyspieszenia aż do maksymalnego UWAGA wychylenia spowoduje, że hulajnoga włączy funkcję...
- Page 209 UWAGA Postępowanie z urządzeniem elektrycznym lub elektronicznym po zakończeniu jego eksploatacji (dotyczy wszystkich krajów Unii Europejskiej i innych europejskich systemów zbiórki selektywnej) Ten symbol na produkcie lub opakowaniu oznacza, że produkt nie powinien być traktowany jako zwykły odpad z gospodarstwa domowego, ale powinien zostać...
- Page 210 UWAGA Postępowanie z wyczerpanymi bateriami (dotyczy wszystkich krajów Unii Europejskiej i innych europejskich systemów zbiórki selektywnej) Ten symbol na produkcie lub opakowaniu oznacza, że baterii/ akumulatora nie wolno usuwać wraz z odpadami z gospodarstwa domowego. Na niektórych rodzajach akumulatorów ten symbol może być...
- Page 211 OSTRZEŻENIA Przed rozpoczęciem korzystania z produktu dokładnie zapoznaj się z treścią instrukcji obsługi. Nazwa produktu: Ducati PRO-I EVO Rodzaj produktu: Hulajnoga elektryczna Rok produkcji: 2020 Uwaga: • Aby naładować tę hulajnogę elektryczną, należy stosować WYŁĄCZNIE dostarczoną ładowarkę oznaczoną XHK-916-42015 o następującym napięciu wyjściowym: 42 V - 1,5 A.
- Page 212 Niżej podpisana spółka: MT Distribution S.r.l. Adres: Via Bargellino 10, 40012 Calderara di Reno (BO), Włochy Poświadcza że projekt i realizacja niniejszego produktu Marka produktu: Ducati Nr modelu produktu: PRO-I EVO Rodzaj produktu: Hulajnoga elektryczna Produkt jest zgodny z następującymi dyrektywami: Dyrektywa maszynowa 2006/42/WE Dyrektywa 2014/30/UE w sprawie kompatybilności elektromagnetycznej 2014/35/UE...
- Page 213 Scarica l’app Ducati Urban e-Mobility per usare al meglio questo prodotto Download the app Ducati Urban e-Mobility for a better use of the product Imported and distributed by M.T. Distribution Srl Calderara di Reno, Bologna www.mtdistribution.it Errors and omissions excepted...
Need help?
Do you have a question about the PRO I EVO and is the answer not in the manual?
Questions and answers