Table of Contents
Advertisement
Quick Links
Advertisement
Table of Contents
Troubleshooting

Related Manuals for EchoNous EchoNous Bladder


Summary of Contents for EchoNous EchoNous Bladder
- Page 1 User Manual P003948-007, Rev. A March 2021 www.EchoNous.com...
- Page 2 INTENTIONALLY LEFT BLANK...
-
Page 3: Table Of Contents
Setting up the system 24 Basic device control 24 System controls 25 System status icons 25 System notification icons 26 Menu 26 Settings 26 Network printer setup (optional) 27 Bluetooth printer setup (optional) 28 EchoNous Bladder & Vein User Guide... - Page 4 Other Functions 51 CHAPTER 4 Annotations 51 Text annotations 52 Voice annotations 52 Exam notes 53 Entering patient details 53 Printing 54 Export 55 Scan review 55 Deleting exams and patients 56 Data security 57 EchoNous Bladder & Vein User Guide...
- Page 5 Power supplies (chargers) 74 Internal battery 74 Measurement accuracy 75 Degree of protection against ingress of water 76 Safety 79 CHAPTER 8 Ergonomics 79 External materials 79 Disposal 79 Electrical safety 80 Electromagnetic compatibility (EMC) 81 EchoNous Bladder & Vein User Guide...
- Page 6 Advanced device and IT setup 87 CHAPTER 9 Administrator setup 87 Software updates restrictions 87 User management 87 Multiple device setup 89 Imaging restrictions 89 Data recording restrictions 90 Storage access restrictions 90 References 91 CHAPTER 10 Glossary 92 EchoNous Bladder & Vein User Guide...
-
Page 7: Important Information
CHAPTER 1 About the user guide This user guide is a reference tool for users of the EchoNous™ System; it does not constitute medical advice nor provide clinical training, instruction in exam protocols, or information on how to interpret scans. -
Page 8: Symbols In This User Guide
The System generates and transmits ultrasound energy in the form of pulses in the 2 to 6 MHz range for the EchoNous Bladder probes and in the 6 to 14 MHz range for the EchoNous Vein probe into a patient, detects the reflected pulses, and processes the information to generate ultrasound images and measure anatomical structures. -
Page 9: Intended Uses
FIGURE 1. Intended uses The EchoNous System is for noninvasive imaging of the human body and is intended for the following applications: Abdominal, Musculoskeletal, Pediatric, Small Organ, and Peripheral vessel. Users must have ultrasound training for abdominal, musculoskeletal, pediatric, small organ, and peripheral vessel imaging. -
Page 10: System And Transducer Applications
Musculoskeletal (conventional) Musculoskeletal (superficial) Intravascular Other (specify) Cardiac Cardiac adult Cardiac pediatric Intravascular (cardiac) Trans-esophageal (cardiac) Intra-cardiac Other (specify) Peripheral Peripheral vessel Other (specify) vessel * Small organ use is prostate EchoNous Bladder & Vein User Guide... - Page 11 Trans-esophageal (non-cardiac) Musculoskeletal (conventional) Musculoskeletal (superficial) Intravascular Other (specify) Cardiac Cardiac adult Cardiac pediatric Intravascular (cardiac) Trans-esophageal (cardiac) Intra-cardiac Other (specify) Peripheral Peripheral vessel Other (specify) vessel * Small organ use is prostate EchoNous Bladder & Vein User Guide...
- Page 12 Adult cephalic Trans-rectal Trans-vaginal Trans-urethral Trans-esophageal (non-cardiac) Musculoskeletal (conventional) Musculoskeletal (superficial) Intravascular Other (specify) Cardiac Cardiac adult Cardiac pediatric Intravascular (cardiac) Trans-esophageal (cardiac) Intra-cardiac Other (specify) Peripheral Peripheral vessel vessel Other (specify) EchoNous Bladder & Vein User Guide...
-
Page 13: Training
The EchoNous System is intended to be used by clinicians with appropriate professional qualifications and clinical training. All users should read the generic ALARA education program supplied with your EchoNous System (see enclosed ISBN 1-93004 7-71-1, Medical Ultrasound Safety) or the Health Canada “Guidelines for the Safe Use of Diagnostic Ultrasound”... -
Page 14: System Features
The camera for barcode scanning is on the rear of the display. Classifications • The System is internally battery powered during scanning. • The EchoNous Type C Power Supply P005179 classification for Protection against electric shock: Class II equipment. EchoNous Bladder & Vein User Guide... -
Page 15: Patient Environment
EchoNous fluid ingress or if the device exhibits any unusual behavior, do not use, and contact customer support or your EchoNous distributor immediately. If required, also follow the cleaning and disinfection instructions (see Cleaning). Cautions, warnings, and contraindications To ensure the device is not damaged and user and patient safety is maintained, please read and follow the cautions and warnings below. -
Page 16: Warnings
• Do not submerge the display or the power supply (charger) as electric shock could result. The EchoNous Vein and EchoNous Bladder probes may be immersed 12mm (1/2 inch) from the cable strain relief for high level disinfection. The remainder of the probe is IPX4 which allows water splashing onto the probe. - Page 17 • The ultrasound probes are connected to the EchoNous System display running EchoNous System software to configure a medical System. The display has been certified by EchoNous as part of a medical System to EN IEC 60601-1: Edition 3.1. •...
-
Page 18: Cautions
EchoNous distributor for further information • When using the optional mobile stand, the EchoNous System can be susceptible to ESD and may require manual intervention. If ESD results in an error, unplug the probe and plug back in to restore operation. -
Page 19: Contraindications
Failure to observe proper static control procedures may result in damage to the System. Any faults should be reported to EchoNous customer support or your EchoNous distributor for repair. Contraindications • The System is designed for transcutaneous scanning only. Do not attempt intra-cavity imaging; in particular, trans-esophageal, trans-vaginal and trans-rectal scans are contraindicated. -
Page 20: Labeling
ANSI/ AAMI ES 60601-1 (2005) + AMD (2012)/CAN/CSA-C22.2 No. 6060-1 (2008) + (2014). E509516 Tested to comply with FCC None standards EchoNous Bladder & Vein User Guide... - Page 21 Ref. No. D.2-2 and is visible in normal use IEC 60601-1 (used in accordance with IEC Medical electrical 60601-1, Cl. 16.9.2.1) equipment - Part 1: General requirements for basic safety and essential performance EchoNous Bladder & Vein User Guide...
- Page 22 Code) Part or model number Catalog number Ref. No. 5.1.6 ISO 15223-1 Medical devices - Symbols to be used with medical device labels, labeling and information to be supplied - Part 1: General requirements EchoNous Bladder & Vein User Guide...
- Page 23 XX is generic placeholder for Ref. No. 5.3.8 specified percentages ISO 15223-1 Medical devices - Symbols to be used with medical device labels, labeling and information to be supplied - Part 1: General requirements EchoNous Bladder & Vein User Guide...
- Page 24 Alternating current Ref. No. D.1-1 IEC 60601-1 Medical electrical equipment - Part 1: General requirements for basic safety and essential performance Scan button None (cross-references scanning control button on probe to instructions in User Manual) EchoNous Bladder & Vein User Guide...
-
Page 25: Contact Information
Contact information United States EchoNous Inc. 8310 154th Avenue NE Building B, Suite 200 Redmond, WA 98052 Technical Support (toll free) (844) 854 0800 Sales (toll free) 1 (844) 854 0800 support@EchoNous.com Email Websitewww.EchoNous.com EchoNous Bladder & Vein User Guide... -
Page 26: European Economic Area
North Sydney, NSW, 2060 Australia Tel: +61 2 9959 2400 Trademarks and document copyright EchoNous, the EchoNous logo, EchoNous Bladder, EchoNous Vein, and EchoNous AI Station are registered and unregistered trademarks of EchoNous, Inc. Unauthorized use is strictly prohibited. ® ®... - Page 27 Trademarks and document copyright © EchoNous, Inc., 2020 EchoNous Bladder & Vein User Guide...
- Page 28 Important Information INTENTIONALLY LEFT BLANK EchoNous Bladder & Vein User Guide...
-
Page 29: Getting Started
CHAPTER 2 Unpacking the boxes Your EchoNous System is shipped in multiple boxes. Be careful not to insert anything sharp through the top of the boxes when opening. Check that you have received all of the ordered components: • An EchoNous System display (with preinstalled EchoNous System software), associated power supply, and setup guide. -
Page 30: Setting Up The System
To set up the system with an optional EchoNous AI Station, refer to System for mobile use, follow the instructions below: Press and hold the Power button for two seconds to turn the EchoNous Display on. The application setup wizard will run. Set up the following: Language. -
Page 31: System Controls
System status icons are shown at the top right of the screen: Tablet battery status Wi-Fi status Bluetooth status (used for wireless printing and barcode scanning) Location services – The device GPS is active and transmitting. Ethernet status EchoNous Bladder & Vein User Guide... -
Page 32: System Notification Icons
— Exam Patient Details – check to force users to enter patient information before starting a scan. — Send Anonymized Data to EchoNous – check to send anonymized images to EchoNous to enable future product improvements. Check with your institution’s data policies or legal department before enabling this option. -
Page 33: Network Printer Setup (Optional)
— Hide home screen Vascular Access button – check to remove the disabled Vascular Access button from the home screen. If the EchoNous Vein probe was enabled during initial setup, this setting will have no effect. • Bladder Volume – tap to see bladder volume preferences —... -
Page 34: Bluetooth Printer Setup (Optional)
Slide the on-screen button to the right to turn Bluetooth on. Select Mobile Printer to pair it with the system (see Figure 9). Tap Home to return to the Home Screen. Menu, and select Settings. EchoNous Bladder & Vein User Guide... -
Page 35: Barcode Scanner Setup (Optional)
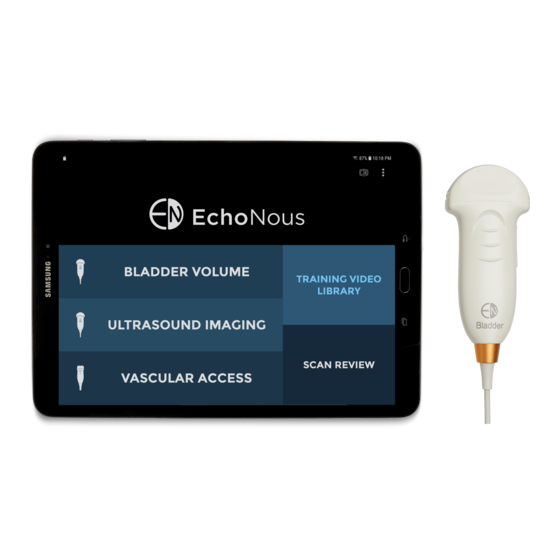
Select the bar code scanner to pair it with the system. Tap Home to return to the Home Screen. Imaging screens Ultrasound imaging screens Tap Ultrasound Imaging on the Home Screen to start an ultrasound exam. EchoNous Bladder & Vein User Guide... - Page 36 • Image Date and Time – displays the date and time of the image. • Gain and Depth Controls – adjust the gain (brightness) or the depth for the system. • Orientation Mark – corresponds to the orientation marker on the probe. Probe orientation marker EchoNous Bladder & Vein User Guide...
-
Page 37: Bladder Volume Screens
Instructional Instructions video Done (end exam) Start scan/stop scan Bladder outline Measured volume Pubic bone Image text indicator annotation Ultrasound Image date and image time Image Scan again thumbnails Bladder scan screens FIGURE 9. EchoNous Bladder & Vein User Guide... -
Page 38: Vascular Access Screens
• Image Thumbnails – will be displayed for multiple images in an exam. Tap a thumbnail to view an image. Vascular access screens Tap Vascular Access on the Home screen to start a Vascular Access exam. EchoNous Bladder & Vein User Guide... - Page 39 • Exam Icons – are displayed depending on the context of the exam. Icons include help, print, measure, movie, delete, toggling the center line, toggling the needle guidance lines, and a menu to access other functions, such as annotations and notes. Tap to activate the function associated with the icon. EchoNous Bladder & Vein User Guide...
-
Page 40: Recommended Ultrasound Transmission Gel
• Image Thumbnails – will be displayed for multiple images in an exam. Tap a thumbnail to view an image. Recommended ultrasound transmission gel EchoNous recommends the use of Aquasonic 100 Ultrasound Transmission Gel manufactured by Parker Laboratories, INC. Fairfield, New Jersey 07004. -
Page 41: Scanning
(FIGURE 15. Home screen), with up to five tiles: Home screen FIGURE 15. • Tap Bladder Volume to perform a bladder volume examination. This option is only available when connected to a bladder probe. EchoNous Bladder & Vein User Guide... -
Page 42: Bladder Scanning
If necessary, palpate the patient’s pubic bone, and place a generous volume of gel just above (about 1 inch or 2.5 cm) the pubic bone FIGURE 16. Place transducer and start). (see FIGURE 16. Place transducer and start EchoNous Bladder & Vein User Guide... - Page 43 Transducer positioning FIGURE 18. — When the bladder has been found, an orange outline will appear around the bladder. The pubic bone (FIGURE 19. Acquire data). indicator will appear as a green curved line EchoNous Bladder & Vein User Guide...
- Page 44 • During acquisition, the display will show the fan position. When the three dimensional data acquisition is complete, the System automatically completes the scan and displays the measured volume FIGURE 20. Measured volume). (see Measured volume FIGURE 20. A movie of the complete bladder acquisition is displayed. EchoNous Bladder & Vein User Guide...
-
Page 45: Bladder Measurement Correction
System. • A chime sounds when the System expects you to change direction of the fan and when the fanning has been completed. • A beep sounds at the completion of a successful scan. EchoNous Bladder & Vein User Guide... -
Page 46: Tips For Obtaining Bladder Volume
Greater than symbol FIGURE 23. Anchor the pivot point to ensure that the probe does not slide in any direction while fanning. EchoNous Bladder & Vein User Guide... - Page 47 • Make sure that the orientation marker remains pointing toward the patient’s head. If 0 ml reading: • When obtaining a measurement of 0 ml, tap the <?> icon to display a message indicating possible reasons for an empty result. EchoNous Bladder & Vein User Guide...
-
Page 48: Phantom Mode
The System provides a special patient type for scanning ultrasound phantoms. To select the phantom patient and select Enable Phantom Mode. type, tap Abdominal Ultrasound imaging Tap Ultrasound Imaging on the Home screen (see FIGURE 15. Home screen) to initiate an ultrasound scan. EchoNous Bladder & Vein User Guide... -
Page 49: Ultrasound Presets
The convention is for the probe orientation marker to be on the patient's right for transverse scans, and toward the head for sagittal or coronal scans. Tap the Scan icon to start (unfreeze) and stop (freeze) ultrasound scans. EchoNous Bladder & Vein User Guide... -
Page 50: Ultrasound Measurement
Ultrasound measurement Tap the Measurement icon to insert calipers, arrows, or volume measurements on images. — Calipers measure a straight line distance between two points FIGURE 29. Distance measurement). (see Distance measurement FIGURE 29. EchoNous Bladder & Vein User Guide... - Page 51 — You can insert four measurements per image. Tap the image outside the shape to end editing that shape. Tap a shape to reselect it for editing. — The units of measurement are cm for distance and cc for volume. EchoNous Bladder & Vein User Guide...
-
Page 52: Ultrasound Imaging Movies
— Tap anywhere on the image to hide the movie controls. Vascular access Tap Vascular Access on the Home screen (see FIGURE 15. Home screen) to initiate a Vascular Access scan. EchoNous Bladder & Vein User Guide... -
Page 53: Vascular Access Scanning
The probe center marker corresponds to the blue circles on the display. Tapping the symbol shows and hides the needle guidance lines. Use a two-finger pinch to zoom in or out of images. EchoNous Bladder & Vein User Guide... -
Page 54: Enabling Depths Of 4 And 5 Cm
FIGURE 34. Distance Measurement Enabling depths of 4 and 5 CM On EchoNous Vein, there are three ways of enabling depths of 4 and 5 CM, if desired. To enable the setting for all scans: From the home screen, tap the icon in the upper right corner. -
Page 55: Vascular Access Movies
— Tap the movie icon on the image to show the movie controls. — Scroll through image frames by dragging the progress marker — Tap to pause and play the movie clip. EchoNous Bladder & Vein User Guide... -
Page 56: Common Functions
After each use and between each patient, you must clean and properly disinfect the probe and transducer following the steps in this user guide (see Probe cleaning and disinfection). Turning the system off Hold down the Power button of the EchoNous System display to turn the System off. EchoNous Bladder & Vein User Guide... -
Page 57: Other Functions
Other Functions CHAPTER 4 Annotations Annotations can be added to individual images. Tap the icon to display the Exam menu. Select Annotation from the drop-down list box (FIGURE 37. Annotating). Annotating FIGURE 37. EchoNous Bladder & Vein User Guide... -
Page 58: Text Annotations
Images with linked voice recordings will display a Voice Annotation icon in the bottom left corner of the image. Tap this icon to launch the Voice Annotation window and play the existing voice annotation. — Tap the Delete icon to delete the recording. EchoNous Bladder & Vein User Guide... -
Page 59: Exam Notes
Patient details are required if data is saved. Patients may already be stored in the System, or they may need to be entered. Search for Barcode entry patient New Patient tab Existing Patient Patient list Entering patient details FIGURE 40. EchoNous Bladder & Vein User Guide... -
Page 60: Printing
FIGURE 41. Network printing uses the Mopria service (see www.mopria.org), which enables printing to thousands of network printer types. The EchoNous System display needs to be connected via WiFi to the same network as the printer. To print: Tap the Printer icon. -
Page 61: Export
Tap EXPORT ALL to export all scans or EXPORT SELECTION to export only selected scans. The images, videos, and PDF reports are saved to the display’s internal storage in a subfolder of “EchoNous Export.” The subfolder is named using the patient name, date, and time of the exam (PatientName - YYYYMMDD_HHMMSS). -
Page 62: Deleting Exams And Patients
Tap Scan Review on the Home screen. Tap and hold the exam or patient. The exam or patient will be checked, and check boxes appear next to other FIGURE 44. Deleting Patients). patients and exams (see Deleting Patients FIGURE 44. EchoNous Bladder & Vein User Guide... -
Page 63: Data Security
Tap Screen lock type Select PIN or Password Enter the PIN or password. Tap Continue Confirm the pin or password. Tap OK Select your notification content preference. Tap Home to return to Home Screen. EchoNous Bladder & Vein User Guide... - Page 64 Other Functions INTENTIONALLY LEFT BLANK EchoNous Bladder & Vein User Guide...
-
Page 65: Maintenance And Troubleshooting
Avoid unnecessary bending or winding of the connecting cable. If the System is dropped or suffers a heavy knock: • Inspect the device. If you discover major damage do not use the device; report the fault to your EchoNous distributor for repair. -
Page 66: Battery Maintenance
Battery maintenance You cannot remove the EchoNous System display battery. Take precautions if the device is not used for long periods of time. Before storing, fully charge the device. Turn the device off when placing in storage, and store at ambient or cooler temperature. -
Page 67: Cleaning
For cleaning requirements of the display refer to its user manual. EchoNous Vein and EchoNous Bladder probes The following cleaning instructions must be followed for the EchoNous Vein and EchoNous Bladder probes. The probes must be cleaned after each use. Cleaning the probes is an essential step before effective disinfection. - Page 68 Observe the required wet contact time. Monitor the probe for wet appearance. Reapply with a new wipe if no longer wet. Examine the probe for damage, such as cracks, splitting, or sharp edges. If damage is evident, discontinue using the probe, and contact your EchoNous representative. EchoNous Refer to website for additional disinfection options.
-
Page 69: Troubleshooting
Scan technique impacts the quality of the ultrasound image during a bladder measurement and, therefore, impacts the accuracy of the measurement. Light downward pressure Firm downward pressure Bladder off center Bladder centered Scan Technique FIGURE 45. EchoNous Bladder & Vein User Guide... -
Page 70: Echonous Customer Support
• Pivot and do not slip or slide the tip of the probe. EchoNous customer support EchoNous If problems persist or recur, contact Customer Support or your EchoNous distributor. Contact information). For other countries, refer to EchoNous website (see EchoNous Bladder & Vein User Guide... -
Page 71: Connectivity And Accessories
Connectivity and Accessories CHAPTER 6 Accessories The following accessories are supported by the EchoNous System: • Wireless printer • Wireless barcode scanner • EchoNous Power Supply (P003198) • EchoNous Stand Power Supply (P004016) • EchoNous Type C Power Supply (P005179) •... -
Page 72: System Connectivity
EN IEC 60601-1 Edition 3.1. • Do not connect the EchoNous System display to external computers or peripherals using the USB port unless the System is outside the patient area. Failure to comply with these guidelines may result in electric shock. -
Page 73: Power Supplies (Chargers)
The EchoNous power supplies are dedicated units to be used exclusively only with the EchoNous System. • Do not open or modify the EchoNous Power Supply P003198 or any other supplied power supplies - Risk of electric shock • Only connect to an AC supply rated at 100-240V and 50-60Hz. - Page 74 • The ultrasound probes are connected to an Android display running EchoNous software to configure a medical system. The display has been certified by EchoNous as part of a medical electrical system to EN IEC 60601-1 Edition 3.1. • Do not connect the EchoNous System display to external computers or peripherals using the USB port unless the System is outside the patient area.
- Page 75 • When adjusting the height of the display unit on the EchoNous AI Station, it is important to safely manage the DC power cord to avoid damage to the cord and risk of electric shock.
-
Page 76: Echonous Ai Station Power Management
EchoNous AI Station power management Charging The EchoNous AI Stations can be fully charged using the AI Station stand power cord. To charge the system, first ensure that the tablet display is turned on, then connect the power cord to an AC source. -
Page 77: Echonous Ai Station Troubleshooting
Cleaning EchoNous recommends the use of a soft cloth, lightly dampened with warm water or a mild soap solution for cleaning the AI Station. Wipe surfaces with the moist cloth, and towel dry with a soft clean cloth. Disinfection Where bodily fluid or other contamination is expected, the EchoNous stands can be disinfected using the spray and wipe method with a variety of disinfection products. - Page 78 Connectivity and Accessories INTENTIONALLY LEFT BLANK EchoNous Bladder & Vein User Guide...
-
Page 79: Specifications
~50g (1.76 oz) (3.94 inches) (1.54 inches) (0.827 inches) Cable dimensions TABLE 2. Component Length EchoNous Vein USB micro to USB C 813mm (32 inches) Connecting cable, tablet display 1800mm (70.9 inches) Display dimensions TABLE 3. Component Height Width... -
Page 80: Environmental Operating And Storage Conditions
Specifications Environmental operating and storage conditions The EchoNous System is intended to be used and stored in normal ambient conditions inside a medical facility. Operating, charging, transport, and storage condition ranges TABLE 4. Operating Transport and Storage Temperature (°C) 5 (41°F) – 40°C (104°F) -20 (-4°F) –... -
Page 81: Measurement Accuracy
Full Scale ±5% or ± 0.1cm B-mode Lateral (vein) Full Scale ±5% or ± 0.1cm B-mode 0-999ml ±10% or ± 10ml Volume When used as per instructions scanning a bladder in a tissue equivalent phantom. EchoNous Bladder & Vein User Guide... -
Page 82: Degree Of Protection Against Ingress Of Water
Specifications Degree of protection against ingress of water The EchoNous Bladder probe and cable assembly is IPX4. The probe is IPX7 from the probe face to the level of FIGURE 47. Water protection for EchoNous Bladder probe. cable strain relief. See IPX7 from the probe face to this line. - Page 83 Degree of protection against ingress of water The EchoNous Vein probe and cable assembly is IPX4. The probe is IPX7 from the probe face to the level of cable strain relief.vSee FIGURE 48. Water protection for EchoNous Vein probe. IPX7 from the probe face to this line.
- Page 84 Specifications INTENTIONALLY LEFT BLANK EchoNous Bladder & Vein User Guide...
-
Page 85: Safety
The AI Station HUB contains a lithium metal battery and should be disposed of in an environmentally responsible manner in compliance with federal and local regulations. Where the device has been exposed to biologically hazardous material, EchoNous recommends that you dispose of the device using biohazard containers and in compliance with federal and local regulations. EchoNous recommends the System is taken to a waste center which specializes in the disposal of biohazard waste. -
Page 86: Electrical Safety
Avoid any unnecessary strain on the mains power supply cord. • When adjusting the height of the display unit on the EchoNous AI Station mobile stand, it is important to safely manage the DC power cord to avoid damage to the cord and risk of electric shock. -
Page 87: Electromagnetic Compatibility (Emc)
If the System is found to cause or respond to interference, try re-orienting the System or the affected device, or increasing the separation distance between the devices. Contact EchoNous customer support or your EchoNous distributor for further information. The System contains sensitive components and circuits. Failure to... - Page 88 ) for 5 sec Power frequency 3 A/m 3 A/m Power frequency magnetic fields (50/60 Hz) magnetic should be at levels characteristic of a field typical location in a typical commercial or hospital environment. IEC 61000-4-8 EchoNous Bladder & Vein User Guide...
- Page 89 AC mains voltage prior to application of the test level At 80MHz and 800 MHz, the higher frequency range applies These guidelines may not apply in all situations. Electromagnetic propagation is affected by absorption and reflection from structures, objects and people. EchoNous Bladder & Vein User Guide...
- Page 90 NOTE 1: At 80 MHz and 800 MHz, the separation distance for the higher frequency range applies. NOTE 2: These guidelines may not apply in all situations. Electromagnetic propagation is affected by absorption and reflection from structures, objects and people. EchoNous Bladder & Vein User Guide...
-
Page 91: Power Supplies (Chargers)
Power supplies (chargers) Power supplies (chargers) The external EchoNous power supplies (chargers) comply with the requirements of EN IEC 60601-1 Edition 3.1. Do not open or modify the EchoNous Power Supply (P005179), the EchoNous AI Station power supply (P005332), or any other supplied... - Page 92 ±10.6% ±5.3% ±10.4% Probe (THI) Uncertainties Derated spatial peak, temporal average intensity (milliwatts/cm SPTA.3 TI Thermal index MI Mechanical index Derated spatial-peak pulse-average intensity (watts/cm PA.3 Uncertainties are the cumulative effect of measurement uncertainties. EchoNous Bladder & Vein User Guide...
-
Page 93: Advanced Device And It Setup
• Allow USB Software Updates – check to allow installation of software updates via USB. User management From the Home Screen, tap and select Settings. Select Administration then select Manage Users. Tap the icon in the top right of the screen. EchoNous Bladder & Vein User Guide... - Page 94 Enter a Username, Family (Last) name, Given (First) name, and if required set the password (see 1. Add User). Add User FIGURE 1. Tap Save to finish. FIGURE 2. User Login). You will need to enter a username and password to save patient data (see FIGURE 2. User Login EchoNous Bladder & Vein User Guide...
-
Page 95: Multiple Device Setup
Settings. Select Administration then select Settings Management. Select Import EchoNous System Settings. Select the XML file to import. Imaging restrictions To set up a password for accessing Ultrasound Imaging and Vascular Access functionality: EchoNous Bladder & Vein User Guide... -
Page 96: Data Recording Restrictions
Select Do not allow recording to restrict recording all bladder volume data. Storage access restrictions To restrict access to exported images via USB: From the Home Screen, tap and select Settings. Select Administration then select Restrict access to exported images via USB under Storage Access. EchoNous Bladder & Vein User Guide... -
Page 97: References
• IEC 60950-1:2005, Information Technology Equipment. Safety-Part 1: General Requirements. • EN ISO 10993-1: 2009, Biological Evaluation of medical devices. Part 1: Evaluation and testing within a risk management process. • ISBN 1-93004 7-71-1, Medical Ultrasound Safety. EchoNous Bladder & Vein User Guide... -
Page 98: Glossary
Exams are identified by patient name and/or by date and time of scan. Multiple socket outlet. Patient A single person, with unique details such as name, gender, date of birth and EMR Id (electronic medical record). EchoNous Bladder & Vein User Guide... - Page 99 Customer Support depths of 4 and 5 CMs dimensions Display specifications disposal distance.............see Measurement exams external materials Image Annotations voice Intended uses IPX Rating labeling latex EchoNous Bladder & Vein User Guide...
- Page 100 ............See maintenance setup shutdown solvents sterile sheaths support touch screen navigating trademarks training turn off turn on ultrasound risks User Manual conventions version EchoNous Bladder & Vein User Guide...
- Page 101 User Manual ...........See User Manual warnings Zooming EchoNous Bladder & Vein User Guide...
Need help?
Do you have a question about the EchoNous Bladder and is the answer not in the manual?
Questions and answers
Can this ultrasound perform gastric scans to measure volume in the stomach/antrum?
I keep getting a error code 211. what does this mean?