Apogee duet User Manual
Apogee duet audio interface: users guide
Hide thumbs
Also See for duet:
- User manual (69 pages) ,
- Quick start manual (43 pages) ,
- Supplementary manual (1 page)
Table of Contents
Advertisement
Quick Links
Advertisement
Table of Contents

Subscribe to Our Youtube Channel
Related Manuals for Apogee duet


Summary of Contents for Apogee duet
- Page 1 User’s Guide v1.3 - September 2007...
-
Page 2: Table Of Contents
Over Hold Maestro Control – Advanced: Out Muting Maestro Mixer Maestro Control – Advanced: MIDI Controllers Maestro Preferences – Duet Preferences Launch Maestro automatically when connecting Duet Enable Duet pop-ups Reset Connecting Your Duet: Instrument and Mic Instrument and Instrument... -
Page 3: Package Contents
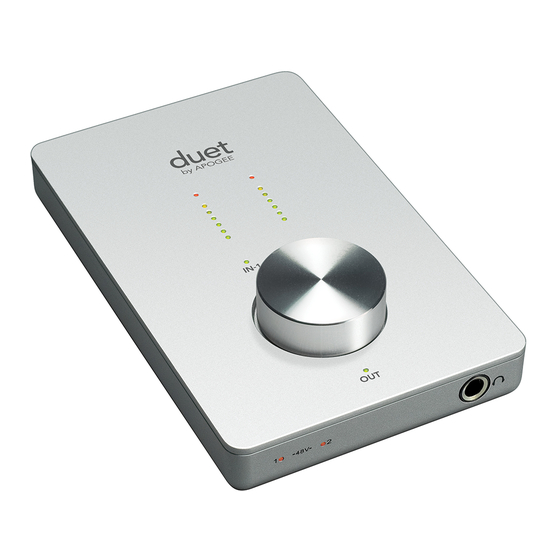
Duet User’s Guide FireWire Port Using the included FireWire cable, connect your Mac here – Duet is powered from the FireWire connection. Input and Output Level These LEDs display selected with the encoder. The Encoder Knob desired level. -
Page 4: Quick Start Guide
Connect FireWire cable After restarting your Mac, connect Duet’s FireWire port to a FireWire 400 port on your Mac using the provided cable. As Duet is powered through the FireWire connection, the OUT LED should light immediately. Quick Start Guide Quick Start Guide Duet –... -
Page 5: Using Duet With Garageband
Choose Track > New Basic Track... Double click the new track’s header to view the Track Info pane; in this pane, set Input Source to Mono 1 (Duet); set Monitor to On. To open GarageBand’s Apogee Duet control panel, click on the Edit button next to the Input Source pop-up menu. -
Page 6: Operation
OS X Audio MIDI Setup (found in the Applications/Utilities folder) provides control of Duet’s sample rate and output level, as well as settings for assigning software I/O to Duet’s hardware I/O. To control Duet’s output level and muting from AMS or from the Mac keyboard, set Default Output to Duet. -
Page 7: Maestro
Identify Unit Clicking on this button verifies that communication is established between Maestro software and Duet hardware by lighting all top panel LEDs. Click the button again to return Duet’s LEDs to their normal function. Input This pop-up menu is used to select the input connector and level: XLR Line +4dBu –... -
Page 8: Maestro Control - Advanced
Duet – User’s Guide Maestro Maestro Control – Advanced OUT Muting – See page 14 for details Mic/Instrument gain mode – This pop-up menu sets the input gain mode: Max. Gain range – The full range of gain is available, with a relay switch occurring after the first 10 dB of gain. -
Page 9: Maestro Control - Advanced: Out Muting
Maestro Maestro Mixer The Maestro Mixer provides the ability to blend Duet’s hardware inputs with playback from an audio application, and route the resulting mix to Duet’s hardware outputs. This provides to the recording performer a signal consisting of 1) playback from the audio application 2) the performer’s input signal without the delay that would be incurred if routed through the... -
Page 10: Maestro Control - Advanced: Midi Controllers
To select a MIDI controller using the top panel encoder, press the encoder until the Duet pop-up displays selection of the desired MIDI controller (see p. 16 for more about Duet pop-ups). Note that when MIDI controllers are selected, neither the IN-1, IN-2, nor OUT LEDs are lit. -
Page 11: Maestro Preferences - Duet Preferences
Mixer settings won’t be preserved after the Mac has been shut down or restarted. Enable Duet pop-ups When this box is checked, Encoder pop-ups appear on the Mac which display various Duet settings, including input and output levels, Input, Group and muting. To illustrate, a few... -
Page 12: Connecting Your Duet
Duet – User’s Guide Connecting Your Duet: Instrument and Monitors and Headphones Connect monitors to the 1/4” outputs with the icons labeled OUT-L and OUT-R on the breakout cable. Connecting Your Duet Connecting Your Duet: Instrument and Mic Connect headphones to the 1/4”... -
Page 13: Instrument And Instrument
Duet – User’s Guide Connecting Your Duet: Instrument and Instrument Connect an instrument to the 1/4” input with the icon labeled IN-1on the breakout cable. Connecting Your Duet Connecting Your Duet: Mic and Mic Connect an instrument to the 1/4”... -
Page 14: Troubleshooting
Out L-R, then the From Mac fader must be raised to send audio software application outputs to Duet’s outputs. I don’t want Maestro to open automatically each time I connect Duet. What should I set? Open Maestro > Preferences and un-check the Launch Maestro automatically when connecting Duet checkbox. -
Page 15: Notifications
Apogee. In the event your Duet needs to be upgraded or repaired, it is necessary to contact Apogee prior to shipping, and a Return Materials Authorization (RMA) number will be assigned. This number will serve as a reference for you and helps facilitate and expedite the return process. -
Page 16: Declarations Of Conformity
EN61000-3-2, EN61000-3-3, EN61000-4-2, EN61000-4-3, EN61000-4-4, EN61000-4-5, EN61000- 4-6, EN61000-4-8, EN61000-4-11 Declaration of Conformity – Japan Apogee Electronics Corporation hereby declares that the Duet, to which this declaration relates, is in material conformity with the VCCI Class B standard. Declaration of Conformity – Australia Apogee Electronics Corporation hereby declares that the Duet is in material conformity with AN/NZS standard requirements. - Page 17 Duet User’s Guide v1.3 - September 2007 www.apogeedigital.com...
Need help?
Do you have a question about the duet and is the answer not in the manual?
Questions and answers