Apogee ONE User Manual
Hide thumbs
Also See for Apogee ONE:
- User manual ,
- Owner's manual (42 pages) ,
- Quick start manual (32 pages)
Table of Contents
Advertisement
Quick Links
Advertisement
Table of Contents

Related Manuals for Apogee Apogee ONE


Summary of Contents for Apogee Apogee ONE
- Page 1 Apogee ONE User’s Guide V1, May, 2013...
-
Page 2: Table Of Contents
Table of Contents - Apogee ONE User’s Guide Contents Overview! ......................Introduction! Package contents! ONE panel tour! Getting Started! ....................Connecting to your Mac! Connecting to your iPad ! Adjusting Input & Output Levels! Maestro Software ! ..................Input ! -
Page 3: Overview
The first studio-quality audio interface and microphone for iPad, iPhone and Mac The Apogee ONE is the first studio quality microphone and USB audio interface for iPad, iPhone and Mac. ONE is designed for easily creating professional and amazing sounding recordings on your iPod touch, iPhone, iPad or Mac. -
Page 4: Package Contents
Overview - Apogee ONE User’s Guide Package contents The following items are included in the ONE box: • ONE • Breakout cable with: • 1 XLR Mic input • 1 1/4” Instrument input • Microphone stand clip • USB cable •... -
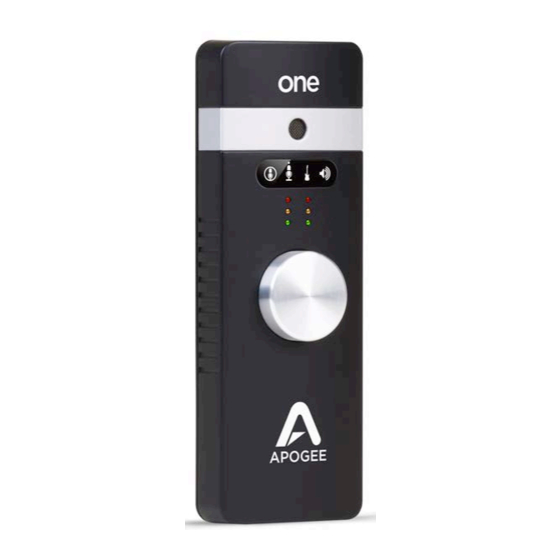
Page 5: One Panel Tour
Overview - Apogee ONE User’s Guide ONE panel tour Built-in Microphone 1/8” Stereo Headphone/Speaker Output ONE’s built-in microphone capsule is located at the top ONE’s 1/8” stereo output may be connected to of the front panel. When using the built-in microphone, headphones or powered speakers. - Page 6 Overview - Apogee ONE User’s Guide DC Power When connecting to a Mac, ONE is easily powered by any available USB port; there’s no need to connect the included DC power supply. When connected to iPad, iPod Touch, or iPhone, there are two options for DC power: 1.
-
Page 7: Getting Started
5. Download the latest ONE for iPad and Mac software installer. 6. Once you have downloaded the package, double-click the Apogee icon to run the firmware updater. 7. After the firmware update has completed, double-click the open-box icon to run the software installer. - Page 8 When using an XLR microphone or 1/4” instrument, connect to ONE’s breakout cable. Open Apogee Maestro software (found in your Mac’s Applications folder), and select the Input tab. Select the Analog Level setting that corresponds to the microphone source you’d like to record.
-
Page 9: Connecting To Your Ipad
The App Store will open and navigate automatically to the Apogee Maestro app. 4. Once you've signed in to the App Store, click INSTALL to download Apogee Maestro. Note: it's possible to record through the built-in microphone and play back audio without installing Maestro. -
Page 10: Connect To Headphones Or Speakers
When using an XLR microphone or 1/4” instrument, connect to ONE’s breakout cable. Open Apogee Maestro app, choose ONE from the main menu and select the Input tab. Select the Analog Level setting that corresponds to the input source you’d like to record. -
Page 11: Adjusting Input & Output Levels
Getting Started - Apogee ONE User’s Guide Adjusting Input & Output Levels Input level To change ONE’s input level (i.e the preamp gain of microphones and instruments): 1. Push the Controller Knob until the built-in 2. Turn the Controller Knob until the microphone, external microphone or instrument desired recording level is obtained. -
Page 12: Maestro Software
Maestro Software Apogee Maestro is the first audio interface control application made for Mac and iOS. Featuring a single window design, and multiple tab interface for quick access to all device and system settings, Maestro makes software control of ONE, Duet, Quartet and Symphony I/O* easy. -
Page 13: Input
Maestro - Apogee ONE User’s Guide Input Input Tab on Mac 1. Device Icon & ID Button (Mac only) - A device 3. Input Gain - The gain of each input is controlled icon and ID button is placed adjacent to each with these software knobs. - Page 14 Maestro - Apogee ONE User’s Guide Input Tab on iOS 1. Analog Level - Use this pop-up menu to select 3. Analog Input Meter - This meter displays the the source for Input 1 - the built-in mic (Int Mic), level of the analog input after A/D conversion.
-
Page 15: Output
Maestro - Apogee ONE User’s Guide Output Output Tab on Mac 1. Device Icon & ID Button (Mac only) - see the 4. Output Level - This knob controls the speaker Input tab description. output level. 2. Analog Output Meter - This meter displays the 5. - Page 16 Maestro - Apogee ONE User’s Guide Output Tab on iOS 1. Analog Output Meter - This meter displays the 3. Output Level - This knob controls the speaker level of the analog output before D/A conversion, output level. Touch the “-” or “+” buttons to in the range -48 to 0 dBFS.
-
Page 17: Mixer
Maestro - Apogee ONE User’s Guide Mixer Mixer Tab on Mac 1. Device Icon & ID Button (Mac only) - see the 6. Solo - This button mutes all other channels whose Input tab description. Solo buttons are not engaged. - Page 18 Maestro - Apogee ONE User’s Guide Mixer Tab on iOS 1. Pan - This rotary knob pans the input signal 5. Solo - This button mutes all other channels whose between the left and right sides of the Maestro Solo buttons are not engaged.
-
Page 19: Device Settings
Maestro - Apogee ONE User’s Guide Device Settings Device Settings Tab on Mac 1. Device Icon & ID Button - see the Input tab 2. Peripheral Prefix - Use this pop-up menu to description. assign a letter prefix (A-Z) to each peripheral device displayed in the Devices Sidebar. - Page 20 Maestro - Apogee ONE User’s Guide Device Settings Tab on iOS 1. Peak Hold - This pop-up menu sets the time that 2. Over Hold - This pop-up menu sets the time that peak indications are held on software and front over indications are held on software and front panel meters.
-
Page 21: System Setup - Tool Bar (Mac Only)
Maestro - Apogee ONE User’s Guide System Setup - Tool Bar (Mac only) System Setup 1. Device Icon & ID Button - see the Input 3. Peak Hold - This pop-up menu sets the time that tab description. peak indications are held on software and front panel meters. -
Page 22: Menu Bar Menus (Mac Only)
Quit Apogee Maestro 2 - Choose this menu item to quit Maestro. Rescan - Choose this menu item to re-initialize the link between Maestro software and Apogee hardware connected to the Mac in the case where the hardware is correctly connected and powered on but not detected in Maestro. - Page 23 Zoom - Choose this menu item to maximize the size of the Maestro window. Open any of the currently active tabs by typing Command + number. Help - Choose this menu item to open Maestro Help for any Apogee hardware devices connected to your Mac.
-
Page 24: Ios Main Menu
1. Apogee Device - Select device in use to access Maestro tab windows. 2. Register Product - Register product into Apogee’s database for quality support. 3. Knowledge Base - Support portal with answers to frequently asked questions about Apogee products. -
Page 25: Operation
Operation - Apogee ONE User’s Guide Operation In this section you’ll find answers to questions that might arise while you’re recording with ONE on your Mac or iPad. Using ONE’s built-in mic ONE includes an built-in mic for those instances when you want to record quickly and easily - to preserve an inspiration, capture an ambience or record a conversation. -
Page 26: How Do I Set A Recording Level
Operation - Apogee ONE User’s Guide How do I set a recording level? Once your microphone or instrument is connected, your audio software is configured and you’ve created a new recording track, just how do you set the input gain for a proper recording level in your audio software? There’s no simple answer, but with a few guidelines and a bit of experience, you’ll find the perfect recording level for any situation. -
Page 27: How Do I Set The Input Control Of My Powered Speakers
Operation - Apogee ONE User’s Guide How do I set the input control of my powered speakers? Most powered speakers offer an input volume control, often labelled as input sensitivity. Rather than describe an overly complicated method for setting this control, the easiest way to determine the right setting is to note where you generally set ONE’s output level. -
Page 28: Maestro Low Latency Mixing
Operation - Apogee ONE User’s Guide Maestro Low Latency Mixing While recording, if you notice a delay between the moment you play or sing a note and when you hear it in your headphones you are experiencing latency. With Maestro’s low latency mixer, you can set up a signal path to hear yourself with minimal latency. - Page 29 Operation - Apogee ONE User’s Guide Maestro Low Latency mixing (continued) Figure A To illustrate the effect of latency, Figure A depicts the typical signal path of a vocal overdub session. A vocalist sings into a microphone, which is routed to an analog to digital converter, then to the audio software application for recording. In the software application, the vocalist’s live signal is mixed with the playback of previously recorded tracks, routed to a...
-
Page 30: Software Setup
Operation - Apogee ONE User’s Guide Software Setup Mac OS: Using ONE with Logic 1. In the Logic Pro menu bar, choose Preferences > Audio. In the Preferences window, click the Devices tab, then click the Core Audio tab. 2. In the Core Audio pane, set Output Device and Input Device to ONE. - Page 31 Operation - Apogee ONE User’s Guide Mac OS: Using ONE with Logic (continued) 6. To record a single microphone or instrument: set Number to 1; click the Audio radio button; set Format to Mono; set Input to Input 1; set Output to Output 1-2;...
- Page 32 Operation - Apogee ONE User’s Guide Mac OS: Using ONE with Avid Pro Tools (9 or greater) 1. In Pro Tools menu bar, choose Setup > Playback Engine. 2. Set Playback Engine to ONE. 3. Set the H/W Buffer Size to 64.
- Page 33 Operation - Apogee ONE User’s Guide Mac OS: Using ONE with Ableton Live 1. Choose Live > Preferences. Click on the Audio tab. 2. Select CoreAudio in the Driver Type menu. 3. Select ONE in both the Audio Input Device and Audio Output Device menus.
- Page 34 Operation - Apogee ONE User’s Guide Mac OS: Using ONE with GarageBand 1. Double-click on the GarageBand icon to open the application. 2. Highlight New Project, then select Acoustic Instrument to create an audio recording track with no effects. 3. In the GarageBand menu bar, choose GarageBand >...
- Page 35 Operation - Apogee ONE User’s Guide Mac OS: Using ONE with Cubase/Nuendo 1. In the Cubase menu bar, choose Devices > Device Setup. 2. In the Devices Column, click VST Audio System. 3. Select ONE in the ASIO Driver pop-up menu.
- Page 36 Operation - Apogee ONE User’s Guide Mac OS: Using ONE with Cubase/Nuendo (continued) 11. Choose Devices > VST Connections. 12. Click the Inputs tab. 13. Click Add Bus. 14. In the Add Input Bus window, set Configuration to Stereo and click Add Bus.
-
Page 37: Using One With Ios Apps
If ONE does appear, try re-launching the app. Note: You will not hear your input until you enable software monitoring from a recording application or engage the low latency mixer in Apogee's Maestro control panel (see page 28 for more info). -
Page 38: Additional Support
Additional Support - Apogee ONE User’s Guide Additional Support For more information: • Apogee KnowledgeBase and FAQs • Apogee Product Registration • How to contact Apogee Technical Support Visit: http://www.apogeedigital.com/support/... -
Page 39: Specifications
Specifications - Apogee ONE User’s Guide Specifications Features Computer Connectivity USB 2.0 High Speed Roundtrip Latency Performance 32 buffer @ 96kHz = 4.4 ms 64 buffer @ 44.1kHz = 7.0 ms Power USB Bus Power, DC Power Supply or Battery Power Bit Resolution/Sample Rate 24-bit/44.1-96kHz... -
Page 40: Warranty & Notifications
12 months. The term of this warranty begins on the date of sale to the purchaser (proof of purchase in the form of a receipt may be required). Units returned for warranty repair to Apogee or an authorized Apogee warranty repair facility will be repaired or replaced at the manufacturer’s option, free of charge. - Page 41 Your warranty will be voided if you tamper with the internal components. If you have any questions with regard to the above, please contact Apogee. In the event your Apogee product needs to be upgraded or repaired, it is necessary to contact Apogee prior to shipping, and a Return Merchandise Authorization (RMA) number will be assigned. Warnings...
- Page 42 Cet appareil numérique de la classe B respecte toutes les exigences du Règlement sur le matérial brouilleur du Canada. Declaration of Conformity – CE Apogee Electronics Corporation hereby declares that the product, the ONE, to which this declaration relates, is in material conformity with the following standards or other normative documents: • EN50081-1/EN55022; 1995 •...
- Page 43 Apogee Electronics Corp. Santa Monica, CA www.apogeedigital.com Rev 1.0.0...
Need help?
Do you have a question about the Apogee ONE and is the answer not in the manual?
Questions and answers