Apogee duet User Manual
Hide thumbs
Also See for duet:
- User manual (69 pages) ,
- Quick start manual (43 pages) ,
- Supplementary manual (1 page)
Table of Contents
Advertisement
Quick Links
Advertisement
Table of Contents

Related Manuals for Apogee duet


Summary of Contents for Apogee duet
- Page 1 User’s Guide September 2011...
-
Page 3: Table Of Contents
Powered Monitors Connecting to a Home Stereo Troubleshooting Core Audio Applications Guide 43-45 Using Duet with Apple Soundtrack Pro Using Duet with Mainstage Using Duet with Final Cut Pro Using Duet with Ableton Live Using Duet with MOTU Digital Performer Using Duet with Steinberg Nuendo Features &... -
Page 4: Package Contents
Duet – User’s Guide Package Contents The following items should be included in your Duet package: • Duet • 1 meter FireWire cable • Duet’s breakout cable Duet 1 meter FireWire cable Duet’s breakout cable... -
Page 5: Introducing Duet
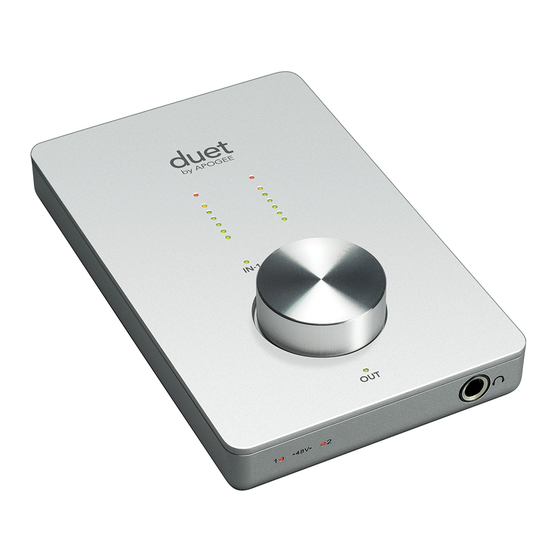
FireWire Port I/O Breakout Cable Using the included FireWire Using the included cable, connect your Mac breakout cable, here – Duet is powered from connect microphones, the FireWire connection. instruments, and line outputs here. Input and Output Level These LEDs display the level of the input or output selected with the encoder. -
Page 6: Quick Start Guide
FireWire port to a FireWire 400 port on your Mac using the provided cable. If you Mac has Firewire 800 ports only, connect Duet using a FW400 to FW800 cable. Note that, in this case, the FW800 port runs at the FW400 speed. -
Page 7: Select Duet In System Preferences
Sound I/O After connecting Duet to your Mac, the dialog box shown at the left will appear. Click Yes to choose Duet for Mac sound output and input. This selection may also be made in the System Preferences > Sound > Output pane. -
Page 8: Using Duet With Garageband
Choose Track > New Basic Track... Double click the new track’s header to view the Track Info pane; in this pane, set Input Source to Mono 1 (Duet); set Monitor to On. To open GarageBand’s Apogee Duet control panel, click on the Edit button next to the Input Source menu. -
Page 9: Using Duet With Logic Pro
Under the Logic Pro menu, choose Preferences > Audio. Click on the Device tab, then on the Core Audio tab. In the Core Audio pane, select Duet in the Device menu. Select 128 in the I/O Buffer Size menu. Choose Audio > I/O Labels under the Options menu. -
Page 10: Operation
Duet – User’s Guide Operation Duet’s settings may be easily changed using either its top panel encoder or the variety of software control panels described on page 10. Though several options are possible, you can choose the hardware and software controls that best suit your individual needs. For example, Logic Pro users may choose to adjust levels with Duet’s top panel encoder and... -
Page 11: Control Panel Options
Duet – User’s Guide Operation Apogee Apogee Duet Apogee Control Duet pane Audio System Hardware Maestro Panel in Garage- MIDI Setup Prefs Encoder (in Logic) Band Input gain Input Control - Selection, 48v, Group, Phase Output Control - Attenuation, Mute... -
Page 12: Os X System Preferences
The OS X System Preferences Sound window provides settings to choose Duet for Mac sound input and output . If you didn’t choose Duet for Mac sound I/O in step 3 of the Quickstart guide, you may do so in this window. -
Page 13: Operation
Duet – User’s Guide Apogee Maestro Apogee Control Panel OS X Audio MIDI Setup OS x System Preferences Operation... -
Page 14: Maestro
Identify Unit Clicking on this button verifies that communication is established between Maestro software and Duet hardware by lighting all top panel LEDs. Click the button again to return Duet’s LEDs to their normal function. Input... - Page 15 Level The nominal or average level of the line outputs is set with this menu: Line out – Set Level to Line out when connecting Duet’s OUT-L or OUT-R connectors to powered speakers, a hi-fi system or a mixing console.
-
Page 16: Maestro Control - Advanced
Duet – User’s Guide Maestro Maestro Control – Advanced OUT Muting – These check boxes determine which outputs actually mute when the Mute function is engaged. Here are a few example settings: When boxes are checked as shown at left, it’s possible... - Page 17 Duet – User’s Guide Maestro Maestro...
-
Page 18: Maestro Control - Advanced: Midi Controllers
Duet pop-up displays selection of the desired MIDI controller (see p. 16 for more about Duet pop-ups). Note that when MIDI controllers are selected, none of the top panel (IN-1, IN-2 ,OUT) LEDs are lit. - Page 19 Duet – User’s Guide Maestro Maestro...
-
Page 20: Maestro Control - Low Latency Mixing
Duet – User’s Guide Maestro Low Latency mixing Before describing the functions of Maestro’s Mixer pane, a bit of background information concerning latency and computer-based digital recording setups will help you better understand these functions. When recording with most computer-based digital audio applications, the delay between the input and output of the recording system often disturbs the timing of the musicians performing. - Page 21 Duet – User’s Guide Maestro Low Latency mixing - continued By routing the hardware input directly to the hardware output and mixing in playback as shown in Figure B, it’s possible to provide the vocalist a headphone monitoring signal with a much shorter delay.
-
Page 22: Maestro Mixer
Maestro Maestro Mixer The Maestro mixer provides the ability to blend Duet’s hardware inputs with playback from an audio application, and route the resulting mix to Duet’s hardware outputs. Using the Maestro mixer, it’s possible to create a monitor mix where latency isn’t a problem. - Page 23 The Maestro mixer serves to provide a low latency monitoring mix while recording. Therefore if you’re using Duet to listen to iTunes or audio from another program, there’s no need to use the mixer. Set To Hardware to None to disable the mixer.
-
Page 24: Maestro Preferences - Duet Preferences
Mixer settings won’t be preserved after the Mac has been shut down or restarted. Enable Duet pop-ups When this box is checked, Encoder pop-ups appear on the Mac which display various Duet settings, including input and output levels, Input, Group and muting. To illustrate, a few... - Page 25 Duet – User’s Guide Maestro OUT Level set to –12 dB Mute engaged OUT muting set as below Mute engaged, OUT muting set as below Encoder set to modify MIDI Controller 1 Maestro...
-
Page 26: Maestro Menu By Menu
- This selection defines the key command to engage all Mutes or Solos when clicking on the Mute or Solo buttons. Additional Preferences Launch Maestro automatically when connecting a device - When this box is checked, Maestro is launched automatically when Duet is detected. Maestro... -
Page 27: Maestro Menu By Menu
Choosing this menu item opens the Routing/Mixer window. Tools > Reset Symphony Clocking In certain instances Apogee interfaces can’t be detected until the clock setting of the first interface has been reset. Choosing Reset Symphony Clocking allows the reset of clock source on the first interface to Internal or External. -
Page 28: Devices Sidebar, Device Icon & Id Button
Maestro 2 Devices Sidebar Any Maestro-compatible Apogee interfaces connected to the host computer are displayed in the Devices sidebar, regardless of whether the connection is made via Symphony PCI card, USB or FireWire. Hardware settings are displayed by first selecting one or more interfaces in the Devices sidebar and then clicking on a tab. -
Page 29: Input Tab Window
4. Group On/Off - Use this to group the gain setting of both inputs so that the multi- function knob on Duet or one software gain knob controls both input gains simultaneously. If a gain offset is present between inputs when Group is set to On, this offset is preserved. -
Page 30: Output Tab Window
Duet – User’s Guide Maestro 2 Output Tab Window 1. Analog Output Meter - This meter displays the level of the analog output before D/A conversion, in the range -48 to 0 dBFS. 2. Speaker Out Selection - This menu selects the software output that is sent to the speaker and headphone outputs. -
Page 31: Device Settings Tab Window
Duet – User’s Guide Maestro 2 Device Settings Tab Window 1. Peripheral Prefix - Use this drop down menu to assign a letter prefix (A-Z) to each peripheral device displayed in the Devices Sidebar. The letter prefix is included in all graphic representations of the peripheral as well as I/O labels in Maestro and Core Audio compatible applications. -
Page 32: Mixer Tab Window
Duet – User’s Guide Maestro 2 Mixer Tab Window Use the Mixer Tab Window to adjust the Mix of input and output signals as well as configure Low Latency Mixing. 1. Pan - This rotary knob pans the input signal between he left and right sides of the Maestro mixer’s stereo output. -
Page 33: System Setup Window, Menu Bar Menus
Mac is started. Check Display Pop-ups to show top panel encoder adjustments. Hide Apogee Maestro 2 - Choose this menu item to hide the Maestro application. Hide Others - Choose this menu item to hide all other open applications. -
Page 34: Menu Bar Menus
Close - Choose this menu item to close the Preferences panel when opened. Rescan - Choose this menu item to re-initialize the link between Maestro software and Apogee hardware connected to the Mac, in the case where the hardware is correctly connected and powered on but not detected in Maestro. -
Page 35: Low Latency Mixing
Duet – User’s Guide Maestro 2 Low Latency Mixing While recording, if you notice a delay between the moment you play or sing a note and when you hear it in your headphones you are experiencing latency. Maestro’s low latency mixer may help and can be configured by clicking the Mixer tab in Maestro. -
Page 36: Maestro Mixer Settings
Duet – User’s Guide Maestro 2 Maestro Mixer Settings Initially, set the Input, Software Return, and Mixer Master faders to 0 dB. On the Output tab of Maestro, set the speaker, headphone, or both outputs to Mixer. Maestro... -
Page 37: Maestro 2
Duet – User’s Guide Maestro 2 Maestro Mixer Settings After making the input selection and setting gain, the signal should be displayed on both the Input and Mixer Master meters. If the Input’s Over LED lights, reduce the input gain in the Maestro Control window. -
Page 38: Connecting Your Duet
Duet – User’s Guide Connecting Your Duet: Monitors and Headphones Connect monitors to the 1/4” outputs with the icons labeled OUT-L and OUT-R on the breakout cable. your monitor inputs or stereo inputs are the RCA type, please use the adapters included to make the connection. -
Page 39: Instrument And Mic
Duet – User’s Guide Connecting Your Duet: Instrument and Mic Connect an instrument to the 1/4” Connect a microphone to the input with the icon labeled XLR input with the icon labeled IN-1 on the breakout cable. IN-2 on the breakout cable.. -
Page 40: Instrument And Instrument
Duet – User’s Guide Connecting Your Duet: Instrument and Instrument Connect an instrument to the 1/4” Connect an instrument to the 1/4” input with the icon labeled input with the icon labeled IN-1on the breakout cable. IN-2 on the breakout cable. -
Page 41: Mic And Mic
Duet – User’s Guide Connecting Your Duet: Mic and Mic Connect a microphone to the XLR Connect a microphone to the XLR input with the icon labeled IN-1 input with the icon labeled IN-2 on the breakout cable. on the breakout cable. -
Page 42: Powered Monitors
Connecting Your Duet Powered Monitors Duet is also the best way to listen to audio from your Mac, be it from your iTunes library, an Internet radio station or CD/DVD playback. To connect Duet's line outputs directly to powered speakers, you'll need 2 cables with 1/4"... -
Page 43: Connecting To A Home Stereo
Duet’s OUT-L and OUT-R jacks and use a commonly available RCA to RCA cable to connect to the AUX or CD input of your receiver. When connecting to a home audio system, set Duet’s output to 0 dB (i.e full volume) and use the receiver’s volume control to set playback level. -
Page 44: Troubleshooting
Out L-R, then the From Mac fader must be raised to send audio software application outputs to Duet’s outputs. I want Maestro to open automatically each time I connect Duet. What should I set? Open Maestro > Preferences and check the Launch Maestro automatically when connecting a device checkbox. -
Page 45: Core Audio Applications Guide
Using Duet with Apple Soundtrack Pro Choose Soundtrack Pro > Preferences. Click on the Recording tab. Select Duet in both the Input and Monitor menus. Close the Preferences window after making settings. Using Duet with Apple MainStage Choose MainStage > Preferences... -
Page 46: Using Duet With Final Cut Pro
Choose Live > Preferences Click on the Audio tab. Select CoreAudio in the Driver Type menu. Select Duet in both the Audio Input Device and Audio Output Device menus. Set Buffer Size to 128. Close the Preferences window after making settings. -
Page 47: Using Duet With Motu Digital Performer
Choose Devices > Device Setup In the Devices window, click on VST Audio System. Select Duet in the ASIO menu. Once Duet is recognized by Nuendo, select Duet in the Devices window. Click on Control Panel. In the ASIO Settings pop-up, set Buffer Size to 128 and click OK. -
Page 48: Features & Specifications
• Integration and control with Apple’s GarageBand, Logic Pro, Logic Express and Final Cut Studio (Soundtrack Pro) • Compatible with any Core Audio-compliant audio application • Apogee’s Maestro software for advanced control and low latency mixing System Requirements Computer: Mac G4 1GHz or faster, PPC or Intel CPU Memory: 1 GB RAM minimum, 2 GB recommended OS X : 10.4.11 or greater must be installed, 10.5.3 or greater highly recommended. -
Page 49: Notifications
Copyright Notice The Apogee Duet is a computer-based device, and as such contains and uses software in ROMs. This software, and all related documentation, including this User’s Guide contain proprietary information which is protected by copyright laws. -
Page 50: Registration And Warranty Information
Apogee. In the event your Duet needs to be upgraded or repaired, it is necessary to contact Apogee prior to shipping, and a Return Materials Authorization (RMA) number will be assigned. This number will serve as a reference for you and helps facilitate and expedite the return process. -
Page 51: Declarations Of Conformity
EN61000-3-2, EN61000-3-3, EN61000-4-2, EN61000-4-3, EN61000-4-4, EN61000-4-5, EN61000-4- 6, EN61000-4-8, EN61000-4-11 Declaration of Conformity – Japan Apogee Electronics Corporation hereby declares that the Duet, to which this declaration relates, is in material conformity with the VCCI Class B standard. Declaration of Conformity – Australia/New Zealand Apogee Electronics Corporation hereby declares that the Duet is in material conformity with AN/NZS standard requirements. - Page 52 Duet User’s Guide May 2011 www.apogeedigital.com...
Need help?
Do you have a question about the duet and is the answer not in the manual?
Questions and answers