glass 1989 MYSPA 195 E Installation, Operation & Maintenance Manual
Hide thumbs
Also See for MYSPA 195 E:
- Manual (15 pages) ,
- Installation, operation & maintenance manual (68 pages)
Table of Contents
Advertisement
Available languages
Available languages
Advertisement
Table of Contents

Related Manuals for glass 1989 MYSPA 195 E


Summary of Contents for glass 1989 MYSPA 195 E
- Page 1 MySpa PORTABLE Manuale d’installazione, uso & manutenzione Installation, operation & maintenance manual Installations-, Bedienungs- & Wartungsanleitung Manual de instalación, uso & mantenimiento Notice d’installation, utilisation & maintenance...
-
Page 3: Table Of Contents
ITALIANO INDICE Scheda tecnica Pag. 5 Premesse Pag. 6 Impianti Pag. 12 Schema connessioni Pag. 13 Pag. 14 Pag. 15 ENGLISH DEUTSCH INHALTSVERZEICHNIS CONTENTS Techniche Daten Seite 5 Technical Information Page 5 Vorwort Seite 26 Introduction Page 16 Seite 32 Installations Page 22 Anschlussplan... - Page 4 ATTENZIONE: PREDISPOSIZIONI PER L’INSTALLAZIONE. Vedi scheda tecnica del prodotto, www.glass1989.it ATTENTION: INSTALLATION PREPARATIONS. See the technical sheet of the product, www.glass1989.it ACHTUNG: EINBAUVORBEREITUNGEN. Siehe technisches Datenblatt des Produktes unter www.glass1989.it ATENCIÓN: PREPARACIONES PARA LA INSTALACIÓN. ATTENTION:...
-
Page 5: Scheda Tecnica Pag
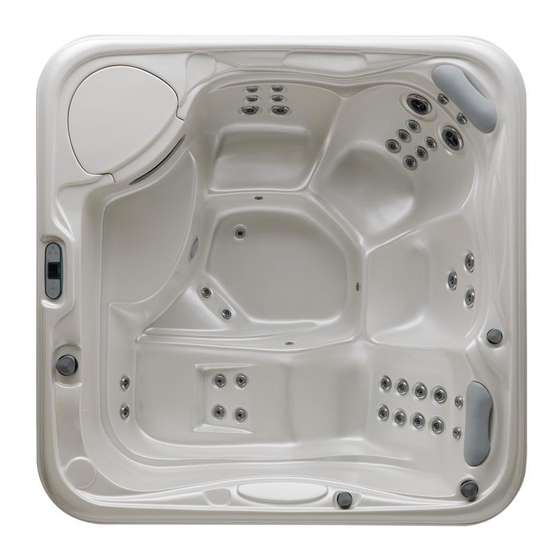
MYSPA 195 E MYSPA 216/165 1860 2160 1700 1680 MYSPA 215 MYSPA 228 2150 2280 1720 1390... -
Page 6: Premesse Pag
ITALIANO PREMESSA Il seguente manuale è destinato agli installatori, descrive sistemi e metodi da adottare per eseguire una corretta installazione del INSTALLATORE IDRAULICO. prodotto. normali, di intervenire sugli organi meccanici per effettuare tutte le La Spa è da intendersi esclusivamente per uso domestico e regolazioni, interventi di manutenzione e riparazioni necessarie. - Page 7 Leggere attentamente il manuale in ogni sua parte prima AVVERTENZA di utilizzare il prodotto. La GLASS 1989 srl raccomanda di installare le Spa direttamente sul suolo. Se la Spa viene interrata o se Il manuale è concepito per differenti modelli e versioni, pertanto, vengono utilizzate delle pedane cosicché...
- Page 8 AVVERTENZA. Nel caso in cui la spa venga installata in un ATTENZIONE: regolare i piedini centrali della MySpa in modo luogo chiuso, si raccomanda di mantenere l’ambiente ben che appoggino correttamente sulla pavimentazione. ventilato. Per evitare formazioni di condensa all’interno del vano della minima di 314cm INSTALLAZIONE DELLA COPERTURA o danni ai polmoni, soprattutto nelle persone immunodepresse...
- Page 9 COLLEGAMENTO EQUIPOTENZIALE. essere collegata ad un interruttore salvavita (non fornito da L’apparecchiatura va collegata all’impianto equipotenziale del Glass 1989 srl con la Spa). Glass 1989 srl raccomanda di collegare il salvavita a monte del cavo elettrico della Spa. Il nel prodotto.
- Page 10 IMPORTANTE: Il produttore sconsiglia di riempire la spa Nota per un funzionamento sicuro: regolate per prima perché potrebbe cosa l’alcalinità totale, altrimenti non potrete regolare danneggiare i componenti. correttamente il pH e le operazioni di disinfezione non potranno essere eseguite correttamente. La spa sarà pronta si deve dare corrente all’impianto.
- Page 11 temperature fredde, seguite le fasi delineate nel capitolo rimessa in funzione. “Svuotare la Spa, quindi completare i passaggi seguenti: ad evitare danni dovuti al congelamento della spa se, surriscaldamento. Dopo un normale periodo di arresto, la naturalmente, vengono seguiti alla lettera. NOTA: ASSICURATEVI CHE LA SPA SIA DISCONNESA Collegamenti elettrici inadatti –...
-
Page 12: Impianti Pag
IMPIANTI MySpa 195_E MySpa 216/165 - MySpa 215 - MySpa 228... -
Page 13: Schema Connessioni Pag
SCHEMA CONNESSIONI CONNESSIONE “C.V.” MySpa 195_E 230 V GROUND GROUND N (neutral) NEUTRAL GFCI BREAKER (16 A) LINE_1 L (line) MySpa 216/165 230 V 400V 3FN L1 (line) LINE_1 N (neutral) NEUTRAL GFCI BREAKER (16A) N (neutral) NEUTRAL GFCI BREAKER (16 A) LINE_1 L (line) L 2 (line) -
Page 14: Pag
INSTALLAZIONE FILTRO A SABBIA (OPTIONAL) SCHEMA CONNESSIONI Collegare l’alimentazione elettrica ai corrispondenti morsetti presenti nella scatola elettronica. NOTA: MySpa 195_E MySpa 195_E C. Cavo alimentazione pompa MySpa 195_E... -
Page 15: Pag
INSTALLAZIONE SCAMBIATORE DI CALORE (OPTIONAL) 1,5 MM 1,5 MM... -
Page 16: Introduction
ENGLISH INTRODUCTION of the product. HYDRAULIC INSTALLER. The Spa is designed exclusively for domestic indoor use. The Spa satisfy all directives and is not dangerous to the end- user if the installation, use, and maintenance are according to that electrical and mechanical parts are maintained in perfect ELECTRICAL INSTALLER. - Page 17 WARNING. herein are not complied with. Leveling Preparation section of this manual.) existing standards of the installed country. electrical components, in a place where water will drain away from it. Allowing water into the equipment compartment can personnel. damage the electronics, or may result in tripping your house’s Do not remove the sticker from the product! care and maintenance.
- Page 18 pH, and other water care requirements. schedule, and in accordance with this owner’s manual. spa water system. SPA LEVELING PREPARATION (MySpa 195_E) Concrete sloped at 1.3 cm per 3 m is preferred so that rain water and water spillover will run off and not puddle underneath the spa. to note that soft surfaces, even when stepping stones are used to settle, thus resulting in an unleveled spa.
- Page 19 found in the product. SPA START-UP AVOIDING THE RISK OF ELECTROCUTION Risk of electrocution preliminary checks on the system and make any adjustments. CAUTIONS limit thermostat may result. exceed all national and local electrical codes. to the spa automatically activates critical components WARNING: within the spa, such as controls, heater, circulation pump and other systems.
- Page 20 compartment with the jet pump on for at least ten minutes. Do not use the spa the FIRST TIME it is STARTED UP after super chlorination, given the high concentration of step is important, as out-of balance TA will affect your ability disinfectants in the water at this time.
- Page 21 unions loose. NOTE: DO NOT LEAVE ANY WATER IN YOUR SPA. WARNING: When not in use, the spa must be covered with a vinyl spa cover. Damage caused by either sun exposure or freezing is not covered under warranty. Opening Instructions: and pannel.
-
Page 22: Installations
INSTALLATIONS MySpa 195_E MySpa 216/165 - MySpa 215 - MySpa 228 1. Pump - 2. Suction - 6. O... -
Page 23: Wiring Diagram
WIRING DIAGRAM “C.V.” CONNECTION MySpa 195_E 230 V GROUND GROUND N (neutral) NEUTRAL GFCI BREAKER (16 A) LINE_1 L (line) MySpa 216/165 230 V 400V 3FN L1 (line) LINE_1 N (neutral) NEUTRAL GFCI BREAKER (16A) N (neutral) NEUTRAL GFCI BREAKER (16 A) LINE_1 L (line) L 2 (line) - Page 24 SAND FILTER INSTALLATION (OPTIONAL) WIRING DIAGRAM NOTE: MySpa 195_E MySpa 195_E MySpa 195_E...
-
Page 25: Heat Exchangers Installation
HEAT EXCHANGERS INSTALLATION (OPTIONAL) 1,5 MM 1,5 MM... -
Page 26: Vorwort
DEUTSCH VORWORT Die vorliegende Anleitung ist für den Installateur gedacht. Sie INSTALLATEUR. Teilen auszuführen. Gefahren für den Benutzer auf, falls sie nach den vom ELEKTROINSTALLATEUR. und mechanischen Teile voll leistungstüchtig gehalten werden. Aus diesem Grund sind die in der vorliegenden Anleitung 2006/95/EWG hergestellt. - Page 27 einer ultraniedrigen Spannung unter 12V gespeist werden, unzugänglich sein für Personen, die sich in der Wanne Originalersatzteile verwenden. vorhergesehenen Annahmestellen. ACHTUNG. Alle angegebenen Maße sind in mm. EINBAUVORBEREITUNGEN aufgeführten Installations- und Wartungs-Vorschriften nicht eingehalten werden. WICHTIG: Aufgrund des großen Fassungsvermögens und Gewichts der Wanne (siehe technische Eigenschaften des notwendig.
- Page 28 Bedeutung, um ein Ansammeln von Wasser um den Whirlpool herum Whirlpool führt. HINWEIS: Wenn der Whirlpool auf Gras oder Erde platziert wird, gelangen. Ihre Anlage sowie die und diese Schäden sind von der Garantie ausgenommen. geschaffen werden müssen. Bei den Whirlpools sind an den Düsenpumpen Lüftungsschlitze 1.3 cm WARNUNG: Halten Sie den Bereich um den Whirlpool herum sorgen.
- Page 29 Ort aufgestellt werden muss, sind diese Installationsvoraussetzungen FALSCH: ANLEITUNG ZUR VERLEGUNG ELEKTRISCHER LEITUNGEN Maschinenraum entfernt ist. weniger als 1,5 m um den Whirlpool auf. Düsenpumpenmotors und damit zu Motorschäden führen SCHUTZ VOR STROMSCHLÄGEN Stromschlagrisiko Schutzschalter) angeschlossen werden. Glass 1989 srl ERDUNGSKABEL anzuschließen.
- Page 30 Der Wasserstand im 3 und 5 ppm, fahren Sie mit dem nächsten Schritt fort. Sollte WICHTIG: Glass 1989 srl rät davon ab, enthärtetes Wasser des Whirlpools beschädigen könnte. Düsenpumpe laufen, damit das Wasser im Whirlpool weitere Tür zum Maschinenaggregat verriegelt wurde, muss die Stromversorgung des Whirlpools eingeschaltet werden.
- Page 31 4. Close the spa cover and fasten the cover tie downs. If your area recieves a lot of snow or ice, it is recommended to cover the spa cover with two pieces of plywood forming a pitched roof or tarp over the spa cover and one over the plywood. WARNING: When not in use, the spa must be covered with an insulating spa cover.
- Page 32 ANLAGENBEREICH MySpa 195_E MySpa 216/165 - MySpa 215 - MySpa 228...
-
Page 33: Anschlussplan
ANSCHLUSSPLAN ANSCHLUSS “C.V.” MySpa 195_E 230 V GROUND GROUND N (neutral) NEUTRAL GFCI BREAKER (16 A) LINE_1 L (line) MySpa 216/165 230 V 400V 3FN L1 (line) LINE_1 N (neutral) NEUTRAL GFCI BREAKER (16A) N (neutral) NEUTRAL GFCI BREAKER (16 A) LINE_1 L (line) L 2 (line) - Page 34 SANDFILTER INSTALLATION (OPTIONAL) SCHALTPLAN anschließen. HINWEIS: MySpa 195_E MySpa 195_E MySpa 195_E...
-
Page 35: Plattenwärmetauscher Installation
PLATTENWÄRMETAUSCHER INSTALLATION (OPTIONAL) 1,5 MM 1,5 MM... -
Page 36: Introducción Pág
ESPAÑOL INTRODUCCIÓN los sistemas y métodos que hay que adoptar para efectuar TÉCNICO SANITARISTA. correctamente la instalación del producto. e interno. en la instalacion eléctrica. La Spa responde a las directivas y no es peligrosa para el operador siempre que se instale, use y mantenga según las ELECTRICISTA. - Page 37 centro de servicio de asistencia más cercano y utilice sólo PREPARACIÓN PARA repuestos originales. LA INSTALACIÓN IMPORTANTE: Debido a la alta capacidad y al considerable peso de la bañera (véanse las características técnicas ATENCIÓN. instalaciones y de la estructura. casos: PREPARACIÓN DEL EMPLAZAMIENTO del presente manual.
- Page 38 ATENCIÓN: no instale el spa sobre un piso con calefacción. ADVERTENCIA: Asegúrese de mantener bien ventilada el área alrededor de su spa cuando lo instale en interiores o Para evitar formaciones de condensación dentro del hueco de un área mínima de 314cm La falta de una ventilación adecuada podría causar una acumulación anormal de químicos del spa o de fragmentos ATENCION: Regule los pies de apoyo centrales de la MySpa...
- Page 39 comprobación del GFCI. electrocución, incendios o lesiones personales. ¡Lea y siga al pie de la letra las instrucciones y los requisitos necesarios para los componentes eléctricos tenga un desagüe adecuado. PELIGRO: RIESGO DE DESCARGA ELÉCTRICA está permanentemente conectada al conector equipotencial colocado en el spa.
- Page 40 agua del spa de forma periódica. Cuando la temperatura del agua supere los 32ºC, actúe tal y como se indica a uniones de cada lado de la bomba estén manualmente continuación. bien apretadas. El nivel de agua de su spa debe situarse aproximadamente 4 cm spa durante un total de 15 minutos.
- Page 41 cubiertos por la garantía. Istruzioni di Apertura: de los chorros a alta velocidad durante al menos 15 minutos. ACONDICIONAMIENTO DEL SPA PARA EL INVIERNO las puertas, vuelva a instalar el tapón de desagüe y apriete UBICACIÓN DEL TAPÓN DE DE- SAGÜE DE LA BOMBA UNIÓN DE DESCARGA...
-
Page 42: Plantas Pág
PLANTAS MySpa 195_E MySpa 216/165 - MySpa 215 - MySpa 228 5. Succión - 6. Generador de ozono opcional... -
Page 43: Esquema De Conexiones Pág
ESQUEMA DE CONEXIONES CONEXION “C.V.” MySpa 195_E 230 V GROUND GROUND N (neutral) NEUTRAL GFCI BREAKER (16 A) LINE_1 L (line) MySpa 216/165 230 V 400V 3FN L1 (line) LINE_1 N (neutral) NEUTRAL GFCI BREAKER (16A) N (neutral) NEUTRAL GFCI BREAKER (16 A) LINE_1 L (line) L 2 (line) -
Page 44: Pág
INSTALACIÓN FILTRO ARENA (OPCIONAL) ESQUEMA DE CONEXIÓN electrónica. NOTA: MySpa 195_E MySpa 195_E MySpa 195_E... -
Page 45: Pág
INSTALACIÓN INTERCAMBIADOR DE CALOR (OPCIONAL) 1,5 MM 1,5 MM... -
Page 46: Français
FRANÇAIS PRÉFACE Les présentes instructions s‘adressent aux installateurs et REMARQUES. place correcte du produit. important doit être respecté. Le Spa est uniquement conçu pour un usage domestique et interne. INSTALLATEUR PLOMBIER. La Spa de ce fait aucun danger pour l‘utilisateur, si soit été installée, des conditions normales et d’intervenir sur les éléments mécaniques pour les réglage, l’entretiens et les réparations. - Page 47 N’EST PAS couvert par votre garantie! AVERTISSEMENT modèles et versions, de sorte que le produit livré peut GLASS 1989 srl recommande d’installer le spa au-dessus du niveau du sol. Abaisser la partie supérieure du spa au niveau répercussion sur les opérations de montage qui restent identiques dans tous les cas.
- Page 48 une forte élèvation. L’eau peut pénétrer dans les structures ATTENTION: ne pas installer une SPA sur un plancher chauffé. AVERTISSEMENT: Si vous installez votre spa à l’intérieur reposent correctement sur le sol. soit bien aéré. de 314cm chimiques du spa risquent d’atteindre une concentration INSTALLATION DU COUVERCLE DU SPA lésions pulmonaires chez certaines personnes souffrant d’un système immunitaire compromis ou d’une infection respiratoire.
- Page 49 DANGER: RISQUE D’ÉLECTROCUTION et d’autres accidents. Veuillez lire et suivre attentivement toutes inférieure de 1.5 mt., seulment si chaque élément métallique présent dans cet espace sont permanentement reliés avec ou téléviseur ne sera installé dans un rayon de 1,5 m du spa.
- Page 50 désinfectant à base de biguanide de polyhexaméthylène (Biguanide, PHMB.). unions situés sur les côtés de la pompe sont serrés à la force du poignet. avec de l’eau. à environ 4 cm au-dessus du jet le plus haut du spa. IMPORTANT: Le producteur déconseille l’utilisation (dichlorure de sodium) pour 950 litres d’eau (pendant que la pendant 15 minutes et de faire circuler l’eau du spa.
- Page 51 REMISAGE HIVERNAL DU SPA SERVICE EMPLACEMENT DU BOUCHON DE VIDANGE DE LA POMPE conçue pour la protéger en cas de surchauffe. Si la pompe RACCORD s’arrête d’elle-même dans un ancien modèle de spa, cela peut D’ÉCOULEMENT de la pompe. Si la pompe s’arrête d’elle-même dans un nouveau RACCORD facteurs suivants: D’ASPIRATION...
-
Page 52: Bloc Technique
BLOC TECHNIQUE MySpa 195_E MySpa 216/165 - MySpa 215 - MySpa 228... -
Page 53: Schema Raccordements
SCHEMA RACCORDEMENTS RACCORDEMENT “C.V.” MySpa 195_E 230 V GROUND GROUND N (neutral) NEUTRAL GFCI BREAKER (16 A) LINE_1 L (line) MySpa 216/165 230 V 400V 3FN L1 (line) LINE_1 N (neutral) NEUTRAL GFCI BREAKER (16A) N (neutral) NEUTRAL GFCI BREAKER (16 A) LINE_1 L (line) L 2 (line) - Page 54 INSTALLATION FILTRE À SABLE (OPTIONAL) DIAGRAMME DE CÂBLAGE électronique. REMARQUE: MySpa 195_E MySpa 195_E MySpa 195_E A. Tuyau de raccordement refoulement B. Tuyau de raccordement refoulement...
-
Page 55: Installation Échangeur De Chaleur
INSTALLATION ÉCHANGEUR DE CHALEUR (OPTIONAL) 1,5 MM 1,5 MM... - Page 56 230V. MySpa 195_E 2500 W MySpa 216/165 3500 W MySpa 215 4500 W MySpa 228 4500 W 2004/108/EEC. EN 55014-1 EN 55014-2...
- Page 58 1.3 cm C.V.
- Page 60 1 – 3 –...
- Page 61 Istruzioni di Apertura:...
- Page 62 MySpa 195_E MySpa 216/165 - MySpa 215 - MySpa 228...
- Page 63 MySpa 195_E 230 V GROUND GROUND N (neutral) NEUTRAL GFCI BREAKER (16 A) LINE_1 L (line) MySpa 216/165 230 V 400V 3FN L1 (line) LINE_1 N (neutral) NEUTRAL GFCI BREAKER (16A) N (neutral) NEUTRAL GFCI BREAKER (16 A) LINE_1 L (line) L 2 (line) LINE_2 GROUND...
- Page 64 MySpa 195_E MySpa 195_E MySpa 195_E...
- Page 65 1,5 MM 1,5 MM...
- Page 68 1989 Srl LASS Via Baite,12/E (z.i.) 31O46 O (TV) ITALY DERZO . +39 0422.7146 r.a www.glass1989.it...
Need help?
Do you have a question about the MYSPA 195 E and is the answer not in the manual?
Questions and answers