Table of Contents
Advertisement
Quick Links
Advertisement
Table of Contents

Related Manuals for Tradinco TRAQC-8

Summary of Contents for Tradinco TRAQC-8
- Page 1 User Manual TRAQC-8 TRAQC-8 Portable Calibrator User Manual...
-
Page 2: Table Of Contents
3.2.7 Switch Test Setup ............... 22 3.2.8 V Input..................22 3.2.9 Hart Resistor ................22 3.2.10 mA/V Scaling ................22 3.2.11 Set mA/V Scaling ............... 23 Electrical Output A Setup (optional) ..........24 page : 2 TRAQC-8 04/2017 EN Rev.4... - Page 3 Set recal Date ................30 3.9.4 Erase data memory..............30 3.9.5 Show Product Data ..............31 3.10 Calibration of TRAQC-8..............32 3.10.1 Adjust instrument inputs............. 32 3.10.1.1 Current input ............... 33 3.10.1.2 Current in + Loop supply (optional) ........33 3.10.1.3...
- Page 4 User Manual TRAQC-8 7.5.1 Standard Supply includes ............41 7.5.2 Optional Supply ................41 page : 4 TRAQC-8 04/2017 EN Rev.4...
-
Page 5: General
Implementation of modifications to the product that are not supplied or implemented by TRADINCO INSTRUMENTS. TRADINCO INSTRUMENTS and its vendors will not be liable for any indirect, special, incidental or consequential damages irrespective of whether TRADINCO INSTRUMENTS or the vendor has advance notice of the possibility of such damages. -
Page 6: Traqc-8 Description
With the TRAQC-8 it is possible to measure test pressures generated by the built-in gas bottles as well with test pressures which are generated by an external pressure source. The aluminum case of the TRAQC-8 is provided with a lid which has a handle for carrying the calibrator. -
Page 7: Ce Electrical Safety Directive 2014/35/Eu
User Manual TRAQC-8 1.2.3 CE Electrical Safety Directive 2014/35/EU The electrical part of the TRAQC-8 (pressure calibrator of the Tradinco Traqc-7 series) meets the regulations as mentioned standards EN 61010-1 : 2010 • The unit is CE marked accordingly Symbols Used Warning for conditions or practices that could result in personal injury, loss of life and/or in damage to the product or other property. -
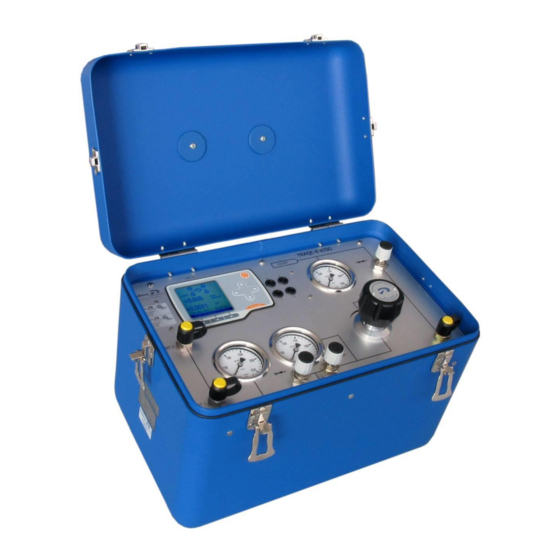
Page 8: Calibrator Interface
1.5 Calibrator Interface Bottle shut off valve Pressure Supply valve control valve (PCV) Test connections Relief (vent) valve Refill connection On / Off key Electrical connections Navigation keys Function keys (F1, F2, F3) page : 8 TRAQC-8 04/2017 EN Rev.4... -
Page 9: Navigation
‘ENTER’ (under F1) results in going one level further. The menus consist of multiple options to choose from. The option in the black bar is the one selected. By using the navigation keys another option in the menu is selected. page : 9 TRAQC-8 04/2017 EN Rev.4... -
Page 10: Electrical Connections
The “Electric Connections Layout” in the display references the physical layout of these 4 banana socket. (Example see figure). The letters A,B,C and D are for identification purposes and will be of reference, in this manual only page : 10 TRAQC-8 04/2017 EN Rev.4... -
Page 11: Operating Instructions
Control the power supply indication before plug in. 2.2 Operating Instructions The TRAQC-8 is a pressure calibrator with a maximum of 200 bar and is design for a so-called "dead end" system. The calibrator includes a high pressure reducer which has to be fed by an external pressure source of maximal 200 bar or by the internal gas bottles. -
Page 12: Measurement Of External Test Pressures
Disconnect the test hoses and put them in the carrying case in the lid of the 8185. • Place the cover of the TRAQC-8 back on and close the four locks. 2.5 Storage End the utilization of the TRAQC-8 as follows: •... -
Page 13: Power Supply
The unit is equipped with an internal not removable Li-Ion battery. The charging of the batteries is fully automated. The TRAQC-8 is charged when its connected to the mains power supply charging will start as soon as the instrument is connected to the mains supply. -
Page 14: Power On/Off
TRAQC-8 2.7 Power On/Off The TRAQC-8 is switched on and off by pressing the on/off key. The TRAQC-8 will go through a short startup self-check routine. During that routine the display shows the current firmware. After completing the startup procedures the device switches into the measuring mode and displays the measured value(s), and the measuring unit(s) from last time. -
Page 15: Zeroing
(-port) of the TRAQC-8 • Connect one side of a pressure hose to the pressure coupling (-port) of the TRAQC-8 and leave the other side of the hose unconnected. With these procedures the pressure in the system of the TRAQC-8 can get equal with the atmospheric pressure. -
Page 16: Pressure Range
2.11.3 Selecting Pressure sensor Auto ranging The TRAQC-8 can also be equipped with two pressure ranges and one pressure connection for measuring test pressure. The TRAQC-8 is configured to automatically switch the measuring range. When the test pressure exceeds 101% of the low measuring range the TRAQC-8 will automatically switch from the low pressure range to the high pressure range. -
Page 17: Instrument Status
By entering the ‘Pressure range’ menu, and selecting the ‘Px auto ranging’ line with the ‘ARROW’ keys and press the ‘ENTER’ key (F1). 2.12 Instrument Status By pressing the ‘LEFT’-or “RIGHT’ ‘ARROW’ key in “measuring mode” the instruments status is shown. page : 17 TRAQC-8 04/2017 EN Rev.4... -
Page 18: User Configuration
Now use the ‘ARROW’ keys to change the number of cycles to the desired one, press ‘ENTER’ key (F1) to confirm. The number of cycles default is 6. The cycles can be set from 3 to page : 18 TRAQC-8 04/2017 EN Rev.4... -
Page 19: Resolution Setup
The density of seawater for the region where the pressure indicator is used can be set here. When a test pressure is set, the TRAQC-8 can calculate the pressure into meters under water. The density of the seawater will differ in different parts of the world and the value has to be adjusted for correcting for the pressure under water. -
Page 20: Absolute Mode
‘UP’ and ‘DOWN’ arrow keys the menu scrolls to show the additional items. The options are explained in the next paragraphs. 3.2.1 mA Input To switch the current input on or off select “current input on/off” with the ‘ARROW’ keys and press page : 20 TRAQC-8 04/2017 EN Rev.4... -
Page 21: Ma + Xmtr Supply (Optional)
(optional) With this option it is possible to measure temperatures using several types of RTD’s. After selecting this function you must select the RTD type, 2- 3- or 4 wire connection mode and page : 21 TRAQC-8 04/2017 EN Rev.4... -
Page 22: Switch Test
‘UNLOCK’ key (F3) as shown in the display. The TRAQC-8 uses the status of the switch when the switch function is enabled as the reference status, after this the TRAQC-8 responds to changes in the status. -
Page 23: Set Ma/V Scaling
With this function the user can set the conversion factors for the mA or V scaling. The display of the scaled mA (or V) can be in a pressure unit or a percentage (%) but also in percentage error of the unit under test. page : 23 TRAQC-8 04/2017 EN Rev.4... -
Page 24: Electrical Output A Setup (Optional)
V xmtr mode On/Off In “mA source” the TRAQC-8 will supply electrical power and control the mA output. (effectively a controlled current source). In mA simulator an external electrical power supply is required, and the TRAQC-8 will only control the mA output. -
Page 25: Xmtr Mode Settings (Parameter Mode Settings)
Values in excess of the standard range of 0 - 24 mA will be refused: when ENTERED the instrument will refuse and display: “Invalid entry”. The display will wait for a valid entry before proceeding to next entry. page : 25 TRAQC-8 04/2017 EN Rev.4... -
Page 26: Voltage Output
Press ‘ENTER’ key (F1) to confirm. Select “off”: the function has been disabled. 3.4 Electrical input B setup (optional) This option is under development 3.5 Electrical output B setup (optional) This option is under development page : 26 TRAQC-8 04/2017 EN Rev.4... -
Page 27: Instrument Configuration
User Manual TRAQC-8 3.6 Instrument Configuration The TRAQC-8 can be configured by selecting the instrument configuration label in the main menu. Backlight setup; use the ‘ARROW’ keys to change the contrast. Select language; the language can be set to English, Dutch, French and German by using the ‘ARROW’... - Page 28 Factory defaults; sets the device back in the factory defaults.* Restoring the TRAQC-8 will change the settings made by user back into the factory defaults. These defaults are: • measuring range is 1 • only the basic unit of the instrument is selectable •...
-
Page 29: Using The Memory Mode
‘ARROW’ keys and press ‘ENTER’ (F1) key. 3.8.1 List by tag number When instruments’ data is stored in the TRAQC-8 memory, select the instrument to be calibrated in the ‘list by tagnr.’ option. The menu shows the different instruments in a list. Use the ‘ARROW’... -
Page 30: Advanced Options
User Manual TRAQC-8 3.9 Advanced Options To change the advanced options of the TRAQC-8 select the menu “advanced options” in the “main menu” and press ‘ENTER’ key (F1) to continue. Use the ‘ARROW’ keys to set the password’s numbers and press ‘ENTER’ key (F1) to continue. The password is ‘2098’. -
Page 31: Show Product Data
To view the product details select “show instrument data” menu in the “advanced options” menu and press ‘ENTER’ key (F1). The information shown is the following: • The serial number • Firmware version • Recalibration date • Pump details • Accuracy %FS page : 31 TRAQC-8 04/2017 EN Rev.4... -
Page 32: Calibration Of Traqc-8
TRAQC-8 3.10 Calibration of TRAQC-8 The TRAQC-8 is calibrated by Tradinco Instruments B.V. to achieve the stated accuracy. The calibration report is supplied with the instrument. The user cannot change these factory adjustments. However, it is possible to make adjustments within the predetermined accuracy limits and calibrate the TRAQC-8. -
Page 33: Current Input
After entering all milliamp. input data, the TRAQC-8 will confirm at the last ‘ENTER’ key (F1) with a long beep, and automatically revert to the “adjust instrument inputs” menu. -
Page 34: Adjust Vbat A/D
TRAQC-8 requests “Input Actual value” When the two pressures applied are to close in range of one another, the TRAQC-8 will not accept the data and requests if another attempt should be done. -
Page 35: Adjust Instruments Outputs (Optional)
“Adjust instrument outputs”: The instrument will revert to its basic calibration. All adjustments as described in the following chapters are “two point” adjustments: one at minimum value, and one at maximum value. Based on these two points, TRAQC-8 will extrapolate all intermediate data. 3.10.2.1... -
Page 36: Voltage Output
3.10.2.3 Voltage output In order to calibrate the Voltage signal, connect the ‘PLUS’ and ‘MINUS’ 4mm banana sockets of the TRAQC-8 to a multi meter with higher specifications than the TRAQC-8. • Correct the output signal by using the ‘ARROW’ keys. -
Page 37: Data Transfer
For this communication the TRAQC-8 makes use of a RS232 interface. 5.2 Connections The TRAQC-8 can be equipped with a 9-pin RS232 (female) connector which is mounted in the pressure indicator. The pin assignment of the TRAQC-9 (9 pin) is as follows: Txd transmit data (from calibrator to host);... -
Page 38: Maintenance Instructions
• When ready tighten the lock nut again. A spare part kit with new needle and seats is available at Tradinco Instruments 6.2 Pressure gauges Check that the pressure gauges are firmly fixed to the instruments front panel. Make sure that the sight glasses of the pressure gauges are not cracked or broken and that the dial is in the correct position, not corroded and clearly readable. -
Page 39: Battery Maintenance
If the before mentioned inspections are not carried out in a proper way, by a proper institute, very serious accidents may occur to personal and equipment in the proximity of the instrument/bottles. ‘Tradinco Instrumenten-Apparaten B.V.’ cannot be held liable for any of such incidents. -
Page 40: Product Specifications
: 0 – 11 V, 0.02% R+ 0.01 FS, 0 – 24 mA, 0.025% R+ 0.01 FS. 7.4 Data storage Large internal memory 2MB suitable for storage of 32 calibration procedures and calibration results. Suitable for up- and downloading in combination with AutoCal ® page : 40 TRAQC-8 04/2017 EN Rev.4... -
Page 41: Options & Accessories
• mA with 24 VDC for externally powered transmitters • Loop calibration function (0-24 mA sourcing) • UltraClean according to Certificate TIA-UC-1 • Barometric reference sensor, 850 to 1150 mbara (accuracy ±0.02% FS) page : 41 TRAQC-8 04/2017 EN Rev.4... - Page 42 User Manual TRAQC-8 Tradinco Instrumenten-Apparaten b.v. Radonstraat 250 2718 TB Zoetermeer The Netherlands +31 79 2033133 www.tradinco.com info@tradinco.com page : 42 TRAQC-8 04/2017 EN Rev.4...
Need help?
Do you have a question about the TRAQC-8 and is the answer not in the manual?
Questions and answers