Table of Contents
Advertisement
Advertisement
Table of Contents

Related Manuals for SwitchDoc Labs WeatherRack2


Summary of Contents for SwitchDoc Labs WeatherRack2
- Page 1 WeatherRack2 Installation April 2021 Version 1.3 Page Version 1.3 October 2020...
-
Page 2: Table Of Contents
Testing the WeatherSense Sensors ........................25 Disclaimer ................................25 Introduction Thank you for your purchase of the SwitchDoc Labs FT-020T WeatherRack2. The following user guide provides step by step instructions for installation, operation and troubleshooting. Page Version 1.3 October 2020... -
Page 3: Warnings
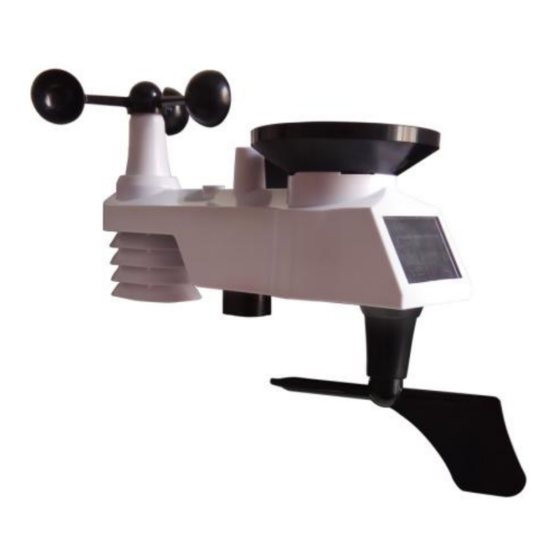
The FT-020T weather station consists a sensor array with Integrated Outdoor Transmitter and mounting hardware. It also includes an F016TH Indoor Temperature and Humidity Sensor. Parts List The FT-020T WeatherRack2 and the F016TH T/H sensor consists of the following parts. Item Image... - Page 4 Item Image Foot Mounting (with pole insert) Dimensions: 84x 152 x 216mm Mounting Bracket Back Plate (pole mount) Dimensions: 76 x 102 x 38mm Mounting Pole Dimensions: 76 x 76 x 25mm Pole mounting nuts (M3) / bolts Ø3) Pole mounting nuts (M5) / bolts ( Ø5) Page Version 1.3 October 2020...
-
Page 5: Recommended Tools
Item Image Tapping screws Figure 1 Recommended Tools Precision screwdriver (for small Phillips screws) Compass or GPS (for wind direction calibration) Adjustable Wrench Hammer and nail for hanging remote F016TH thermo-hygrometer transmitter. Sensor Assembly Set Up The following illustration shows FT-020T Sensor Array Figure 2 3.3.1 Insert batteries into the transmitter. - Page 6 Figure 3 Remove the battery door on the back of the sensor by removing the set screw, as shown in Figure 4. Figure 4 Inserting 3xAA batteries in the battery compartment, as shown in Figure 5. Page Version 1.3 October 2020...
- Page 7 Figure 5 Close the battery door. Make sure the gasket (around the battery compartment) is properly seated in its trace prior to closing the door. Tighten the set screw. Note: Do not install the batteries backwards. You can permanently damage the sensors. The solar panel does not charge the batteries, so rechargeable batteries are not needed or recommended.
- Page 8 Figure 6 3.3.2Insert batteries into the FT016TH thermo-hygrometer transmitter. Remove the battery door on the back of the sensor by removing the set screw, as shown in Figure 7. Your device may be more square than the illustration shown. Figure 7 BEFORE inserting the batteries, locate the dip switches on the inside cover of the lid of the transmitter."...
- Page 9 60 seconds thereafter. Each time it flashes, the sensor is transmitting data. The unit will always transmit the data in °F but the SwitchDoc Labs software always reports in metric units (°C). Verify the correct channel number (CH) and temperature units of measure (°F vs. °C) are on the display, as shown in Figure 9.
-
Page 10: Weather Station Installation
Figure 9 (1) temperature (2) temperature units (°F vs. °C) (3) channel number (4) relative humidity Close the battery door. Make sure the gasket (around the battery compartment) is properly seated in its trace prior to closing the door. Tighten the set screw. Weather Station Installation Pre Installation Checkout Before installing your weather station in the permanent location, we recommend operating the weather station for one week in a temporary location with easy access. -
Page 11: Best Practices For Wireless Communication
Best Practices for Wireless Communication Wireless communication is susceptible to interference, distance, walls and metal barriers. We recommend the following best practices for trouble free wireless communication. 1. Electro-Magnetic Interference (EMI). Keep the sensors several feet away from computer monitors and TVs. -
Page 12: Northern Hemisphere (Nor)
Prior to installation, you will need to calibrate the wind direction. Northern Hemisphere (NOR). The cardinal directions (N, S, E, W) molded on the body of the outdoor sensor are indicators for the Northern Hemisphere only. There is a “S” indicator on the wind vane that indicates South, as shown in Figure 13. Align this “S” marker in the direction of South. -
Page 13: Southern Hemisphere (Sou)
Southern Hemisphere (SOU). For Southern Hemisphere installations, ignore these (N, S, E, W) and face the solar panel to the North (and in a sunny position) when it comes to installing the Integrated outdoor transmitter. Step 1: Install the Integrated outdoor transmitter and face the solar panel North. In the Southern Hemisphere, there will a permanent wind direction error#180º). - Page 14 Figure 15 Page Version 1.3 October 2020...
-
Page 15: Low Battery Icon
F016TH Indoor Thermo-hygrometer Transmitter installation. If you are mounting it outside, it is recommended you mount the F016TH Thermo-hygrometer sensor outside in a shaded area. A north facing wall is preferred because it is in the shade most of the day. Direct sunlight and radiant heat sources will result in inaccurate temperature readings. -
Page 16: Wireless Specifications
10m/s ~50 m/s: ±10% (whichever is greater) WeatherRack2 Raw Data Description and Example Results from the Pi and Arduino Here is an example of results coming in from the WeatherRack2 from the PythonTest Software: pi@SwitchDocLabs:~/SDL_Pi_WeatherRack2 $ sudo python3 readWeatherSensors.py Starting Wireless Read {"time"... - Page 17 Data Descriptions: time: Time of Message Reception • model: SwitchDoc Labs FT020T AIO • device: Serial Number of the sensor - changed on powerup but can be used to discriminate from other • similar sensors in the area batterylow: 0 if battery good, 1 if battery is getting low •...
-
Page 18: F016Th Sensor Data Description
From the Arduino Driver: F016TH Sensor Data Description Here is an example of results coming in from the F016TH (F007TH) from the PythonTest Software: pi@SwitchDocLabs:~/SDL_Pi_WeatherRack2 $ sudo python3 readWeatherSensors.py Starting Wireless Read Page Version 1.3 October 2020... -
Page 19: Power Consumption
"device" : 233, "modelnumber" : 5, "channel" : 3, "battery" : "OK", "temperature_F" : 72.100, "humidity" : 45, "mic" : "CRC"} This is the raw data: {"time" : "2020-07-09 10:54:16", "model" : "SwitchDoc Labs F007TH Thermo-Hygrometer", "device" : 233, "modelnumber" : 5, "channel" : 3, "battery" : "OK", "temperature_F"... -
Page 20: Troubleshooting Guide
Figure 52 Replace the FT-020T Sensor Array and F016TH thermo-hygrometer transmitter batteries once every 1-2 years Troubleshooting Guide. Problem: F016TH Temperature sensor reads too high in the daytime. Solution: Make sure the F016TH thermo-hygrometer is mounted in a shaded area if outdoors . The preferred location is a north facing wall because it is in the shade most of the day. -
Page 21: Testing The Weathersense Sensors
Proceed to the WeatherRack2 Testing Manual. Disclaimer SwitchDoc Labs, LLC takes no responsibility for any physical injuries and possession loss caused by those reasons which are not related to product quality, such as operating without following the operating manual and cautions, natural disasters, or force majeure.
Need help?
Do you have a question about the WeatherRack2 and is the answer not in the manual?
Questions and answers