Cochlear Nucleus 7 Getting Started
Hide thumbs
Also See for Nucleus 7:
- User manual (92 pages) ,
- Quick manual (17 pages) ,
- User manual supplement (8 pages)
Table of Contents
Advertisement
Advertisement
Table of Contents

Subscribe to Our Youtube Channel
Related Manuals for Cochlear Nucleus 7


Summary of Contents for Cochlear Nucleus 7
- Page 1 Hear Your Way Getting started...
- Page 3 100 countries. 3. Read this booklet to learn about your device, At Cochlear, we are dedicated to bringing the gift of including how to use the Nucleus Smart App sound to people all over the world and we aim to give our recipients the best lifelong hearing experience.
- Page 5 Refer to the diagram on page registration process for you - check to see if you still 10 to locate where this is on the Nucleus 7 Sound need to complete the process yourself. Processor. If you’re unsure where to find any of the...
- Page 7 Introducing Cochlear Family, a unique community designed to make your life easier, fuller, and more connected. As a member of Cochlear Family, you can be amongst the first to hear about exciting new products, services, promotions and events. You’ll also have access to support videos, including device basics such as pairing your sound processor...
-
Page 9: Table Of Contents
Maintenance and accessories Nucleus 7 Sound Processor ........10 Replacing your microphone protectors ....32 CR310 Remote Control ..........11 Storing and caring for your Nucleus 7 Sound Processor ............34 Assemble and turn on ..........12 Wearing options ............36 Changing disposable batteries ......... 14 Using Aqua+ ..............38... -
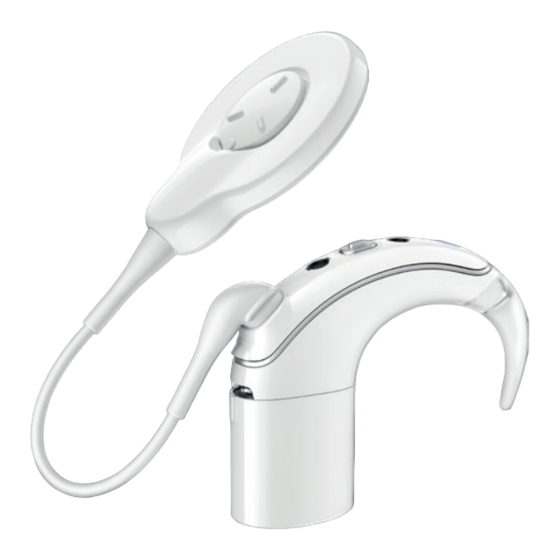
Page 10: Nucleus 7 Sound Processor
Nucleus 7 Sound Processor Cochlear magnet Slimline coil (includes cable) ™ Microphone cover Tamper-resistant lock Battery module Microphones Indicator light Control button Processing unit Earhook Serial number... -
Page 11: Cr310 Remote Control
CR310 Remote Control Front Back Display Program Telecoil button Next program button Previous program button Volume or sensitivity On/Off switch Volume or sensitivity up button Volume or sensitivity down button Serial number Coil guide for pairing Battery cover Pin for attaching lanyard... -
Page 12: Assemble And Turn On
Once aligned, twist the Coil to your Cochlear module hold the battery rechargeable battery battery module to attach it Nucleus 7 Sound Processing module at a slight angle to module, align the raised to the processing unit. Unit, insert the coil cable the sound processor socket. - Page 13 5 sec 2 min Once assembled, your To turn your sound To turn on again, connect Your clinician can set up sound processor will turn processor off, disconnect the battery, or if the battery your sound processor to on automatically. A green the battery, or press and is already connected, short- turn off automatically when...
-
Page 14: Changing Disposable Batteries
Pull the unlocked battery module consists of the (PR44) zinc air batteries batteries, first press and cover away from the Cochlear Battery Cover and designed for cochlear hold the control button for battery holder. Remove the Cochlear Battery Holder. It implant use. - Page 15 Remove the new batteries Insert the batteries into Replace the battery cover Your processor will from the packet, and the battery holder with the by sliding it up towards the automatically turn on. let them stand for a few flat side (positive terminal) processing unit.
-
Page 16: Using Rechargeable Batteries
The Nucleus 7 Sound Processor comes with our Y charger, so you can charge up to two batteries at once. We also Using rechargeable batteries offer the additional USB charger to make charging on the go even easier. Y Battery Charger... - Page 17 Battery Charger The USB Battery Charger Fit the rechargeable battery Plug the charger into a The LED flashes green while charges one rechargeable module to the charger power outlet or USB port. charging. battery module at a time. at a slight angle. Twist to If you use a power outlet, The LED changes to steady To use, remove the covers...
-
Page 18: Pairing With A Compatible Apple Device
‘Devices’ section. If bilateral or bimodal, you will turn on both devices. For more information about pairing your Nucleus 7 Sound Processor, see www.nucleussmartapp.com/pair * Please refer to the back page for detailed device compatibility information. - Page 19 ‘Pair’ for each side to begin ‘Pair’. LED will again flash blue. pairing window. pairing both your Nucleus 7 Sound Processors with your When pairing starts, you Your processor will be listed To do so, turn each sound compatible Apple device.
-
Page 20: Using The Nucleus Smart App To Adjust Volume Settings
With the Nucleus Smart App, you can control and monitor Using the Nucleus Smart App your Nucleus 7 Sound Processor without the need for an to adjust volume settings additional remote control. To get started, download If enabled by your clinician, Tap ‘Volume’... - Page 21 The Nucleus Smart App also When paired with Tap ‘plus’ or ‘minus’ to treble and master volume allows you to separately the Nucleus 7 Sound change the settings. If you limits while you can hear adjust the volume of Processor, audio sources will hear too much background sounds or speech.
-
Page 22: Pairing With The Cr310 Remote Control
Pairing with the CR310 Quickly and easily adjust your Nucleus 7 Sound Processor from the handheld CR310 Remote Control. Remote Control The Cochlear CR310 Before you can use your To pair your processor with Turn back on your processor Remote Control allows... - Page 23 Place the coil on the back of The remote control will The remote control then If you have two processors, your remote control. show pairing in progress. shows successful pairing repeat steps 3-7 for your of your left (L) or right (R) second processor.
-
Page 24: Pairing With The Wireless Mini Microphone
Microphone 2/2+ with your pairing button on the back 2/2+ is red. When fully first time, make sure it has Nucleus 7 Sound Processor, of the Mini Microphone charged, it is green with red been charged for at least remove and turn off your 2/2+ using the tip of a pen flashes every two seconds. - Page 25 Stream audio to your briefly flash a blue indicator Microphone 2/2+, have the Microphone 2+, place it on Nucleus 7 Sound Processor light to tell you pairing has person you want to listen a table to listen to multiple from a Mini Microphone been successful.
-
Page 26: Pairing With The Wireless Phone Clip
To pair your Phone Clip Remove the Phone Clip’s top of the Phone Clip is red. Clip for the first time, make with your Nucleus 7 Sound silver cap and use the tip When fully charged, it is sure it has been charged for... - Page 27 Your sound processor will To pair your Phone Clip to On your compatible To stream audio, simply briefly flash a blue indicator your mobile phone, make iPhone , open ‘Settings’ turn on your Phone Clip. ® light to tell you it has sure that your phone’s then Bluetooth, search for When audio starts playing...
-
Page 28: Pairing With The Wireless Tv Streamer
To pair your TV Streamer with your Then, press the pairing button on the the wall using the power cord. Then, Nucleus 7 Sound Processor, remove and back of your TV Streamer once, twice or connect your TV Streamer to the audio turn off your sound processor. - Page 29 The TV Streamer’s activity indicator will Your sound processor will briefly flash Stream audio by using the sound flash orange to indicate it is in pairing a blue indicator light to tell you pairing processor button, the CR310 Remote mode for the next 20 seconds. During has been successful.
-
Page 30: Streaming Audio From True Wireless Devices
Whether you use your processor, the CR310 Remote Streaming audio from Control or the Nucleus Smart App, with the Nucleus 7 True Wireless devices Sound Processor controlling your streamed audio has never been easier. 2 sec 2 sec Once paired with your... - Page 31 Your processor will start When the Nucleus 7 Tap ‘Off’ to stop streaming streaming from your Mini Sound Processor is paired audio and return to the Microphone or TV Streamer with a compatible Apple previous program. and the accessory icon will device, you can also control appear on the screen.
-
Page 32: Replacing Your Microphone Protectors
You should replace your Cochlear Microphone protectors are built into the To remove the old microphone cover, Nucleus 7 Sound Processor’s Nucleus 7 Microphone Cover, which is hold the coil cable grip and firmly pull it microphone protectors every three completely replaced. - Page 33 Do not twist Use a fingernail to lift the microphone Fit the replacement microphone cover Without twisting, push your coil cable cover from the bottom edge, then lift up onto the sound processor and press into the sound processor until it clicks. to remove.
-
Page 34: Storing And Caring For Your Nucleus 7 Sound Processor
It’s important to take care of your Nucleus 7 Sound Storing and caring for your Processor to keep it working properly and optimize Nucleus 7 Sound Processor your hearing performance. 2 mth 8 hr To keep your Cochlear Nucleus 7 Sound... - Page 35 Check microphone protectors for signs When storing more than one For long term storage, remove of dirt or grime and replace if needed. rechargeable battery, be sure the disposable batteries from the battery connectors do not touch as this could module.
-
Page 36: Wearing Options
For added peace of mind, a range of retention Wearing options accessories are available to help you wear your Nucleus 7 Sound Processor securely and safely. The Cochlear Tamper For extra peace of mind, When playing sports or Children may also... - Page 37 Clip the retention option prevention option is the retention options to the to the earhook end first Cochlear Safety Cord. This Nucleus 7 Sound Processor, followed by the metal hook clips to clothing, meaning first remove the earhook at the battery end. Then, that wearers are less and battery module.
-
Page 38: Using Aqua
* Nucleus 7 with Aqua+ is water resistant to level IP68 of the International Standard IEC60529. This water protection rating means that the sound processor with the Aqua+ can be continuously submerged under water to a depth of 3 meters (9 feet and 9 inches) for up to 2 hours. - Page 39 Once connected. the coil connector and pull thoroughly dry, store the plug straight out. Then, Aqua+, the blue Aqua+ coil open Aqua+ and remove and any accessories in the your sound processor. Nucleus 7 Activity Kit’s waterproof case.
- Page 40 For a list of verified devices visit http://www.nucleussmartapp.com/android. The Nucleus 7 Sound Processor is compatible with iPhone X, iPhone 8 Plus, iPhone 8, iPhone 7 Plus, iPhone 7, iPhone 6s Plus, iPhone 6s, iPhone 6 Plus, iPhone 6, iPhone SE, iPhone 5s, iPhone 5c, iPhone 5, iPad Pro (12.9-inch), iPad Pro (9.7-inch), iPad Air 2, iPad Air, iPad mini 4, iPad mini 3, iPad mini 2, iPad mini, iPad (4th generation) and iPod touch (6th generation) using iOS 10.0 or later.
Need help?
Do you have a question about the Nucleus 7 and is the answer not in the manual?
Questions and answers