Table of Contents
Advertisement
Quick Links
Installation, Operation
and Maintenance Manual
4-Stage Reverse Osmosis Systems
Model RO-PURE
WARNING
!
Read this Manual BEFORE using this equipment.
Failure to read and follow all safety and use information
can result in death, serious personal injury, property
damage, or damage to the equipment.
Keep this Manual for future reference.
WARNING
!
Do not use with water that is microbiologically unsafe or of
unknown quality without adequate disinfection before or after
the system.
WARNING
!
Discard small parts remaining after the installation.
NOTICE
If you are unsure about installing this product, consult a
professional plumber or call a WATTS representative.
Failure to follow instructions and install correctly may result in
leaks, property damage and/or product not performing correctly,
and voids warranty.
Handle all system parts and components carefully. Do not drop,
drag, or turn components upside down.
Be sure floor under the system is clean, level and strong enough
to support the unit, and that the Module is mounted to a surface
strong enough to support its weight.
System tested and certified by WQA against
NSF/ANSI Standard 58 for the reduction of the
claims specified on the performance data sheet
and to NSF/ANSI 372 for lead free compliance.
IOM-Premier-RO-PURE.indd 1
RO-PURE
Table of Contents
Introduction. . . . . . . . . . . . . . . . . . . . . . . . . . . . . . . . . . . . . . . . . . . . 2
Before Installation
Operational Parameters . . . . . . . . . . . . . . . . . . . . . . . . . . . . . . . . . . . 2
Contents of Under Counter Filter . . . . . . . . . . . . . . . . . . . . . . . . . . . . 2
System Diagram . . . . . . . . . . . . . . . . . . . . . . . . . . . . . . . . . . . . . . 2-3
Tools Recommended For Installation . . . . . . . . . . . . . . . . . . . . . . . . 4
Using Quick-Connect Fittings . . . . . . . . . . . . . . . . . . . . . . . . . . . . . . 4
Installation
Step 1. Adapt-A-Valve™ Installation . . . . . . . . . . . . . . . . . . . . . . . . . 4
Step 2. Drill a Hole for the Faucet in a Sink . . . . . . . . . . . . . . . . . . . . 5
Step 3. Watts Top Mount Faucet Installation . . . . . . . . . . . . . . . . . . . 5
Step 4. Blue Tube from Faucet to RO Module . . . . . . . . . . . . . . . . . . 6
Step 5. Red Tube from Faucet to RO Module . . . . . . . . . . . . . . . . . . 6
Step 6. Reverse Osmosis Module Mounting . . . . . . . . . . . . . . . . . . . 6
Step 7. Drain Saddle Installation . . . . . . . . . . . . . . . . . . . . . . . . . . 6-7
Step 8. Green Tube Connection . . . . . . . . . . . . . . . . . . . . . . . . . . . ..7
Step 9. Tank Ball Valve Installation . . . . . . . . . . . . . . . . . . . . . . . . . . ..7
Step 10. Blue Tube Connection to Tank .. . . . . . . . . . . . . . . . . . . . . ..7
Step 11. Ice maker Connection . . . . . . . . . . . . . . . . . . . . . . . . . . . . 7
Operation
Startup . . . . . . . . . . . . . . . . . . . . . . . . . . . . . . . . . . . . . . . . . . . . . . . 7
Maintenance
Maintenance . . . . . . . . . . . . . . . . . . . . . . . . . . . . . . . . . . . . . . . . . .8-9
Membrane Replacement . . . . . . . . . . . . . . . . . . . . . . . . . . . . . . . . . . 8
Annual Sanitization . . . . . . . . . . . . . . . . . . . . . . . . . . . . . . . . . . . . . . 9
Check Air Pressure in the Tank . . . . . . . . . . . . . . . . . . . . . . . . . . . . . 9
Procedure for Extended Non-Use (More than 2 months) . . . . . . . . . . 9
Technical & Warranty Information
Troubleshooting . . . . . . . . . . . . . . . . . . . . . . . . . . . . . . . . . . . . . . . . 10
Performance Data Sheet . . . . . . . . . . . . . . . . . . . . . . . . . . . . . . 11-12
Arsenic Facts. . . . . . . . . . . . . . . . . . . . . . . . . . . . . . . . . . . . . . . . . . 13
Service Record . . . . . . . . . . . . . . . . . . . . . . . . . . . . . . . . . . . . . . . . 14
Limited Warranty . . . . . . . . . . . . . . . . . . . . . . . . . . . . . . . . . . . . . . . 15
IOM-Premier-RO-Pure
Pages
®
7/10/20 2:32 PM
Advertisement
Table of Contents

Subscribe to Our Youtube Channel
Related Manuals for Watts Premier RO-PURE


Summary of Contents for Watts Premier RO-PURE
-
Page 1: Table Of Contents
Step 2. Drill a Hole for the Faucet in a Sink ....5 Step 3. Watts Top Mount Faucet Installation ....5 If you are unsure about installing this product, consult a Step 4. -
Page 2: Introduction
If on-product labels or this Manual are misplaced, damaged or il- 40 psi Operating Pressure 85 psi (6.0 kg/cm2) legible, or if you require additional copies, please contact Watts for (2.8 kg/cm2) these items at no charge. pH Parameters If you are ever uncertain about a particular task or the proper method Iron 0.2 ppm... -
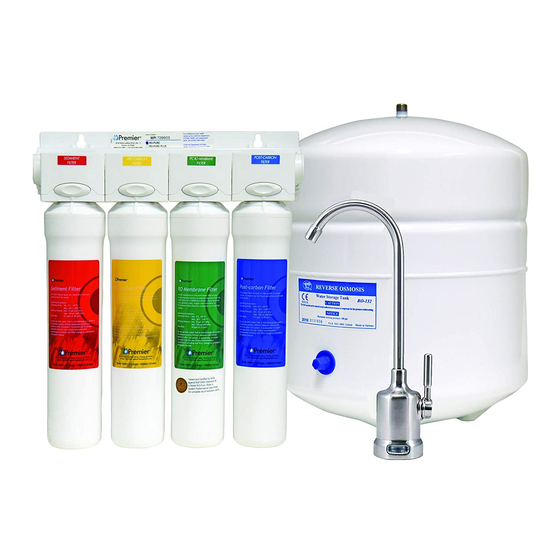
Page 3: System Diagram
Plumbing Diagram and Parts List System Diagram PART # DESCRIPTION WP610051 Filter Head & ASOV WP610141 Automatic Shut Off Valve WP119007 3 Gall Metal Tank (White) WP560080 Adapt-A-Valve WP116094 Chrome Air-Gap Top Mount Monitored Faucet w/Tubing Brushed Nickel Air-Gap Top Mount Monitored Faucet WP116093 w/Tubing WP134018... -
Page 4: Tools Recommended For Installation
Tools Recommended for Installation Adapt-A-Valve™ Installation • 1¼" Diamond Tipped Hole Saw bit for faucet opening (Counter Tops/Porcelain STEP 1 & Stainless Sinks) • Phillips bit for electric drill NOTICE • 1¼ " Adjustable Wrench Water supply line to the system must be from the cold water •... -
Page 5: Step 2. Drill A Hole For The Faucet In A Sink
Drilling a hole in a sink or countertop for faucet installation is faucet. entirely out of the control of Watts. Watts accepts no responsi- bility for damage resulting from installing faucet in any surface Step 3-6 – The RED tubing has one BENT end and one STRAIGHT including marble countertop or a porcelain sink. -
Page 6: Step 4. Blue Tube From Faucet To Ro Module
The drain connection can instead be made at the dishwasher inlet port of the garbage disposal using a Garbage Disposal Drain Line Adapter which is available for purchase from Watts Premier (PN# WP164020). Step A – Gather the pieces of the drain... -
Page 7: Step 8. Green Tube Connection
Step E – Measure the ⁄ " black tube from faucet to the drain Startup saddle on the drain pipe and make a straight cut to the correct length. Step F – Connect the black tube to the open quick connect fi tting NOTICE on the drain saddle by pushing the tube all the way to the If your RO system is connected to a refrigerator / ice maker,... -
Page 8: Maintenance
Step C – Make sure to remove the cap off of the new replacement Maintenance filter. To install a filter cartridge: Remove the seal cap and insert the cartridge into the valve head until you hear an WARNING audible “click” (the button does not need to be pressed to install new filters). -
Page 9: Annual Sanitization
Check Air Pressure in the Tank Annual Sanitization NOTICE NOTICE Do not change your post-carbon fi lter until the sanitization Check air pressure only when tank is has been completed. empty of water! The pre-fi lters and membrane can be changed before the Check air pressure in the storage tank sanitization when you notice a decrease in available... -
Page 10: Troubleshooting
1. Low/Slow production Low water pressure Assure a minimum of 40psi incoming water pressure. Watts sells a booster pump if home water pressure is low. Make sure water supply is turned on and Adapt-A-Valve™ is all the way open. Crimps in tubing Check tubing and straighten or replace as necessary. -
Page 11: Performance Data Sheet
Performance Data Sheet Watts Premier • 8716 W Ludlow Drive, Suite 1 • Peoria, AZ 85381 • Phone: 800-752-5582 Model: RO-PURE General Use Conditions Recommended Replacement Parts and Change Intervals 1. System to be used with municipal or well water sources treated and tested on regular basis to insure bacteriological safe quality. - Page 12 Performance Data Sheet -Cont'd Performance Claims This system has been tested according to NSF/ANSI 58 for reduction of the substances listed below, and to NSF/ANSI 372 for lead free compliance. The concentration of the indicated substances in water entering forms of arsenic. This system is to be used on water supplies the system was reduced to a concentration less than or equal containing a detectable free chlorine residual at the system inlet to the permissible limit for water leaving the system as specified...
-
Page 13: Arsenic Facts
Arsenic Facts Arsenic (As) is a naturally occurring contaminant found in many ground waters. Arsenic in water has no color, taste or odor. It must be measured by an arsenic test kit or lab test. Public water utilities must have their water tested for arsenic. You can obtain the results from your water utility contained within your consumer confidence report. -
Page 14: Service Record
Service Record DATE OF PURCHASE MODEL NUMBER SERIAL NUMBER DATE OF INSTALL INSTALLED BY INSTALLED BY DATE SEDIMENT PRE-CARBON POST CARBON RO MEMBRANE (6 MONTHS) (6 MONTHS) (1 YEAR) (2-5 YEARS) Notes: IOM-Premier-RO-PURE.indd 14 7/10/20 2:32 PM... -
Page 15: Limited Warranty
In the event of such defects within the warranty period, return the unit (less tank) after obtaining a return authorization (see below) and Watts will repair or, at Watts’ option, replace the unit at no charge. - Page 16 IOM-Premier-RO-PURE.indd 16 7/10/20 2:32 PM...
Need help?
Do you have a question about the Premier RO-PURE and is the answer not in the manual?
Questions and answers