Avisaro 4.0 Series Quick Manual
Hide thumbs
Also See for 4.0 Series:
- Technical user's manual (57 pages) ,
- User manual (46 pages) ,
- Quick start manual (16 pages)

Subscribe to Our Youtube Channel
Related Manuals for Avisaro 4.0 Series


Summary of Contents for Avisaro 4.0 Series
- Page 1 Jump to: Table of Content Avisaro 4.0 Product Series Quick Guide RS232 Data Logger ‘4.0 Sky’ ( “M41014” / “C41014” ) RS232 Data Logger Version / Date: 2021/05/12 Page: 1 2021/05/12...
-
Page 2: Table Of Contents
Signal levels ........................... 7 5.1.3 D-Sub Connector ........................7 Configuration: ‘PC Companion Software’ ..................... 9 How to configure Avisaro “Series 4.0” products ................9 Detailed documentation ....................... 9 Detailed documentation ....................... 9 Software Installation ........................9 Driver installation ........................10 Initial Set-Up .......................... -
Page 3: This Document
Jump to: Table of Content HIS DOCUMENT 2.1 L OCATION Check for the latest document version the following link: German site: https://www.avisaro.de/de/40-Datenlogger-Sky-1xRS232-DSUB.html English site: https://www.avisaro.com/en/40-Data-Logger-Sky-1xRS232-DSub.html 2.2 O THER DOCUMENTS “Technical User Manual 4.0” contains all of this and more information. -
Page 4: Enclosure And User Controls
NCLOSURE AND ONTROLS 3.1 S TART AND STOP OPERATION The Avisaro 4.0 starts with operation right after power on if an USB stick is inserted. Also, after re- inserting a USB stick, the operation starts automatically. 3.2 LED B LINK ODES There is one multicolor LED to signal states of the Avisaro device. -
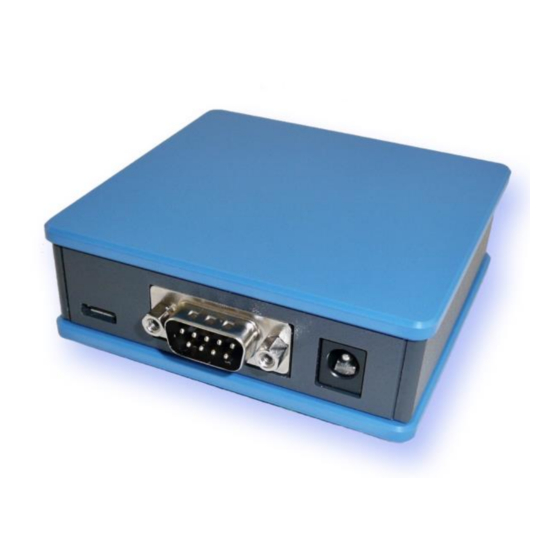
Page 5: Enclosure "4.0 Sky" With D-Sub Connector
Jump to: Table of Content 3.4 E “4.0 S ” NCLOSURE WITH UB CONNECTOR Front with slot for USB stick. Matches are shown Reverse side shows D-Sub connector for data and just for size reference: barrel connector for power: Optional, a DIN rail fitting is available: Page: 5 2021/05/12... -
Page 6: Usb Storage Stick
Jump to: Table of Content 4 USB S TORAGE TICK 4.1 F ORMAT AND Regular USB 2.0/3.0 memory sticks can be used: Size: From 4 to 256 GByte File system: Formatted as FAT or FAT32 (preferred) Typically, the USB stick is not included in the scope of delivery. 4.2 C HOOSING THE RIGHT TYPE Make sure to verify whether or not your application needs industrial grade USB storage - this is typically... -
Page 7: Interface Description And Pin Layout
Jump to: Table of Content NTERFACE DESCRIPTION AND AYOUT 5.1 RS232 I NTERFACE This is an industry standard RS232 connection. 5.1.1 Default RS232 settings Those are the default settings: Baudrate 9600 No of bits Parity bits none Stop bits Flow control none 5.1.2 Signal levels... - Page 8 Supply voltage does not carry an output voltage – thus if the device is powered via barrel connector, Pin 9 does not show the input voltage (internal diode). This is for security reason. If needed, Avisaro can modify the device such that this pin can be used to power other devices.
-
Page 9: Configuration: 'Pc Companion Software
Jump to: Table of Content : ‘PC C ’ ONFIGURATION OMPANION OFTWARE 6.1 H “S 4.0” OW TO CONFIGURE VISARO ERIES PRODUCTS 1) Connect via USB 2) ... 3) ... 4) ... 6.2 D ETAILED DOCUMENTATION If this document is a “Quick Guide” 6.3 D ETAILED DOCUMENTATION This document shows only those parts of the full “PC Companion”... -
Page 10: Driver Installation
6.5 D RIVER INSTALLATION If you connect the Avisaro Device to the PC using a Micro USB cable, a virtual COM port driver is installed. If this driver does not install automatically, you can download and install this manually: http://www.avisaro.de/de/40-PC-Treiber.html (German site) http://www.avisaro.com/en/40-ENG-PC-Driver.html... -
Page 11: Using The Pc Companion Tool
SING THE OMPANION Click on “Write Config” to transmit changes in the PC tool to the Avisaro device. Click on “Read Config” to display the currently stored values (if you navigate between options, the latest settings are read of course automatically).
Need help?
Do you have a question about the 4.0 Series and is the answer not in the manual?
Questions and answers