Welch Allyn Braun ThermoScan PRO 6000 Manual
Hide thumbs
Also See for Braun ThermoScan PRO 6000:
- Directions for use manual (21 pages) ,
- Directions for use manual (38 pages) ,
- Quick reference manual (2 pages)
Advertisement
Quick Links
Advertisement

Subscribe to Our Youtube Channel
Related Manuals for Welch Allyn Braun ThermoScan PRO 6000


Summary of Contents for Welch Allyn Braun ThermoScan PRO 6000
- Page 1 Braun ThermoScan ® PRO 6000 Thermometer Cindy Kuiper Global Marketing Manager...
- Page 2 PRO 6000 Key Marketing Contacts • Melissa Davis, Marketing Product Information Specialist • Chris Daly, US&C Thermometry Sr. Specialist • Kristin Daly, Global Marketing Sr. Specialist, Thermometry • Cindy Kuiper, Global Product Marketing Mgr., Thermometry • Jamie Wood, US&C Marketing Mgr.
- Page 3 Braun PRO 6000 Offering • New Product that addresses some of the top customer complaints of PRO4000 – Improved accuracy (low reading) – Probe cover detection – Ability to wipe device with new, harsher cleaning solutions • Protects $35M probe cover business –...
- Page 4 PRO 6000 Launch Schedule PerfecTemp Enabled • US&C Sept 2015 Without PerfecTemp (CE pending for this new feature expected Q4) • EMEI Jul 2015 • Latin America – Venezuela Q4 2015 – Rest of LA Q2 2016 • Australia Sept 2015 •...
- Page 5 Braun PRO 6000 Features...
- Page 6 Braun PRO 6000 Key Features • PerfecTemp™ Technology (US&C only Sept 2015) – Corrects for shallow placement of probe in ear – Collects data from 8 different sources – achieved a 35% reduction in low readings off by 0.5F or more from the reference temperature compared to Braun algorithm reading •...
- Page 7 Two Choices of Protective Cradles • Small 1-box cradle is the most portable and holds 20 PC • Large 2-box cradle has the most capacity by holding 40 PC and the unit can be wall mounted for security • Both cradles are compatible with the Charging Station •...
- Page 8 New Security Options • Large Cradle Mounting Option – Large 2-box cradle can be temporarily or permanently screwed to a wall surface for typical situations – Mounting screws included • Optional Security Tether – 1.8m (6ft) and 2.7m (9ft) security tethers screw to the cradle and thermometer (Allen wrench and screws included in kit) –...
- Page 9 Superior Recharging System • Redesigned Recharging Battery – Up to 700 measurements from a full charge – 350,000 total measurements per battery – Fully recharges in approximately 3-4 hours from empty (device and on CSM) – 3 year rechargeable battery part warranty –...
- Page 10 PRO 4000 vs. PRO 6000 Additional Differences List Price $217 $250/$255 (small/large cradle)
- Page 11 Braun PRO 6000 Integration with LAVS • Connex Spot Monitor – Integrated PRO 6000 thermometer docks directly into the CSM, no external cradle or USB cord is required – Note: PRO 6000 can not be added to a SureTemp Plus equipped model, customers must choose one type •...
- Page 12 Part Numbers & Pricing – US&C Part Number Product Description Dealer Net Dealer Margin List Price Braun PRO 6000 with Small Cradle (holds 06000-200N $175.00 $250.00 1-PC box) Braun PRO 6000 with Large Cradle (holds 06000-300N $178.50 $255.00 2-PC boxes), wall mountable Charge Station (includes recharging battery 06000-100 $104.30...
- Page 13 Braun PRO 6000 vs. Consumer ThermoScan 5 Feature/Funtion PRO 6000 ThremoScan 5 IRT 6520 ExacTemp Technology Pre-Heated Tip and Sensor Pulse Timer and C/F Button Not Available PerfecTemp Technology Not Available PRO 6000 Tested Cycle Count Life 100K Recharging Option Charging Station Not Available PC Box Carrier in Cradle...
- Page 14 Warranty – 3 Years...
- Page 15 PRO 6000 Service &Calibration • Calibration check is recommended 1 year – Same process as Braun PRO4000 – Works with 9600 Calibration Tester – Calibration certificate shipped with every device • Evaluation Units Available in US – E-06000-200N, E-06000-300N – Same process as Braun PRO4000 •...
- Page 16 PRO 6000 Service &Calibration • Pro4000 will be no longer for sale in US&C effective 10/31/15 – Units will be available for 5 years for service & warranty purposes – Units will be available to support LAVs until upgraded to PRO6000 –...
- Page 17 Selling & Support Materials • Product Brochure – SM4117 • Product Spec Sheet – SM4122 • Dedicated WA Site Product Webpage – Launching 9/7/15 • Quick Reference Card – Included with product on DFU CD • 18 Language Cleaning Sticker Sheet Included w/device •...
- Page 18 Approved Cleaning Solution Table in DFU Contacts Use a damp cloth or cleaning wipe with cleaning solution from the Approved Cleaning Solutions Table. To clean the body, ensure that the wipe is moist, not saturated. Wipe with display facing up. Wipe clean and dry 5 min.
- Page 19 Braun PRO 4000 and 6000 Probe Covers • New Braun PRO 6000 compatible probe covers launching with device PRO 4000 PC PRO 6000 PC – New product numbers and GTIN created Flat Flange .051” Raised Flange for PRO 6000 covers •...
- Page 20 HANDS ON DEVICE OPERATION...
- Page 21 Setting Up the Thermometer • Install the AA batteries (1,000 measurements from new set) • If needed, change the C/F default setting with switch in the battery compartment using a pen or pointed object...
- Page 22 Setting Up the Thermometer • Install the new probe cover box into the cradle • Attach the optional tether (1.8m/6ft or 2.7m/9ft) using included tool...
- Page 23 TIME TO TAKE A TEMPERATURE!
-
Page 24: Taking A Temperature
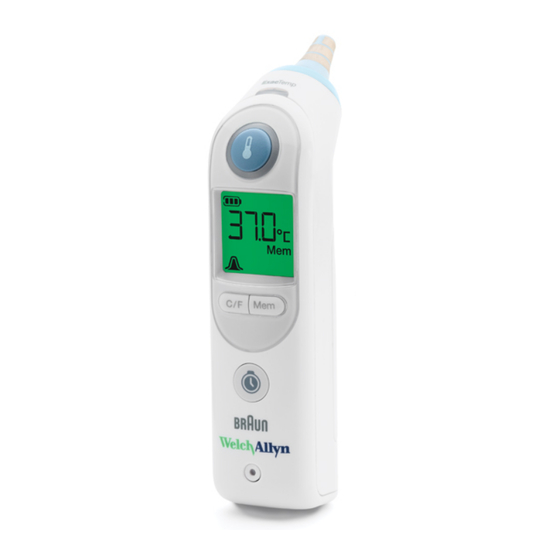
Taking a Temperature 1. Remove thermometer from cradle by gripping at the base and pivoting up – turns on automatically 2. Attach new probe cover by pushing probe tip straight into box, then pulling thermometer out 3. Wait for ready indication – ring around measure button turns green, thermometer will beep once, and 3 dashed lines on display indicate ready... - Page 25 Taking a Temperature 4. Place probe snugly in ear canal and direct/aim toward opposite temple – keep thermometer probe steady in the ear canal during measurement 5. Press and release measure button - unit will beep once, running dashes will appear on the display then the green ExacTemp light will flash 6.
- Page 26 Taking a Temperature 7. Remove used probe cover by pressing the PC ejection button and discard into receptacle 8. To take another measurement, place a new, clean probe cover on the thermometer. If no action is taken the thermometer will enter SLEEP after 10 seconds or upon returning to the cradle or host device.
-
Page 27: Using Control Buttons
Using Control Buttons • Press the MEMORY button to display last complete temperature. Memory can also be accessed from the sleep mode and will display for 5 seconds • Switch to alternative temperature scale by pushing the C/F button while a reading is being displayed – press C/F button again to revert back (also reverts back when unit goes to sleep) •... -
Page 28: Setting Up The Charging Station
Setting Up The Charging Station 1. Insert rechargeable battery pack into battery compartment with battery label facing outward. 2. Connect the USB cable to the back of the charging station (1a) and feed the cable through the retaining clip. 3. Select the appropriate interchangeable plug for country and region and connect to wall adapter. - Page 29 Charging The Thermometer 1. Place the thermometer into the thermometer cradle. Place the thermometer in cradle into the charging station. 2. The thermometer will produce an audible beep and the charging indicator on the charging station will illuminate amber. The battery charge status will be displayed on the thermometer LCD.
- Page 30 CLEANING THE DEVICE AND ACCESSORIES...
-
Page 31: Cleaning The Probe Tip
Cleaning the Probe Tip • Gently wipe surface of probe lens window with cotton swab or cloth slightly moistened with isopropyl or ethyl alcohol only. Use gentle pressure. • With probe facing down, wipe the probe with a damp cloth or cleaning wipe moistened with isopropyl or ethyl alcohol. - Page 32 Cleaning the Device Contacts Body, Cradle, and Charging Stations CAUTION─Do not use bleach solutions of any kind when cleaning metal electrical contacts. They will damage the device. 1. Slightly dampen a cotton swab with 70% isopropyl alcohol. 2. Remove the thermometer from the dock and clean the metal electrical contacts on the thermometer.
-
Page 33: Cleaning The Body And Accessories
Cleaning the Body and Accessories • For additional protection, place a new probe cover on the thermometer probe to protect this area when cleaning the body of the thermometer. • Use a damp cloth or cleaning wipe with cleaning solution from the Approved Cleaning Solutions Table. - Page 34 PRO6000 Global Part Numbers...
- Page 35 PRO6000 Global Part Numbers...
Need help?
Do you have a question about the Braun ThermoScan PRO 6000 and is the answer not in the manual?
Questions and answers