Welch Allyn Braun ThermoScan PRO 6000 Directions For Use Manual
Ear thermometer
Hide thumbs
Also See for Braun ThermoScan PRO 6000:
- Directions for use manual (21 pages) ,
- Manual (35 pages) ,
- Quick reference manual (2 pages)
Table of Contents
Advertisement
Advertisement
Table of Contents

Related Manuals for Welch Allyn Braun ThermoScan PRO 6000


Summary of Contents for Welch Allyn Braun ThermoScan PRO 6000
- Page 1 Ear thermometer Directions for use PRO 6000...
- Page 2 Skaneateles Falls, NY 13153 Welch Allyn Limited Navan business Park Dublin road, Navan, County Meath Republic of Ireland C15 AW22 For information about any Welch Allyn product, contact: Welch Allyn Technical Support: www.welchallyn.com/support Use only visit locations: Hillrom www.welchallyn.com/about/company/locations.htm probe covers...
- Page 3 1. Braun Thermoscan PRO 6000 Ear thermometer ® C / F C / F Mem 18 a...
-
Page 4: Package Components
Cradle Probe covers (1 or 2 probe cover boxes, depending on model) CD containing Directions for use, Quick reference guide, Welch Allyn Service Tool software (available via internet link) and Service Tool installation guide (available via internet link). 2 (AA) Duracell alkaline batteries ®... -
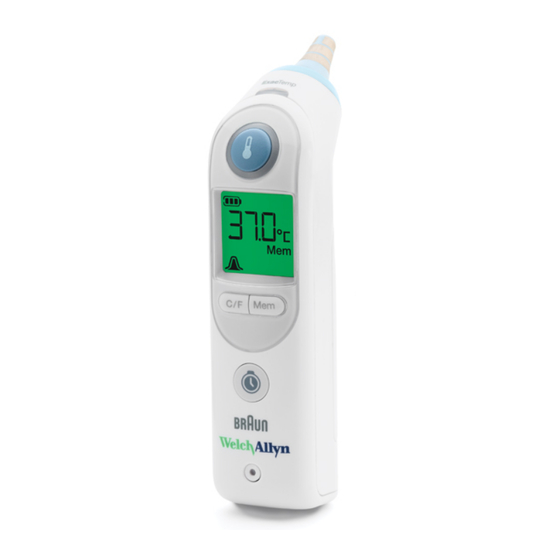
Page 5: Screen Elements
4. Screen elements Battery Full battery—indicates battery is between 100 % and 70 % of usable battery capacity Partial battery—indicates battery is between 70 % and 30 % of usable battery capacity Low battery—indicates battery ... - Page 6 Security unlock icon and countdown time (Requires charging station or compatible Welch Allyn Vital Signs device, sold separately.) If the security function is enabled, it requires the thermometer be returned to the charging station within a pre-selected time interval. Countdown time indicates the amount of time remaining until the thermometer will be locked if not returned to the charging station.
- Page 7 5.3 PerfecTemp™ Sensor System Speed and ease of access are two key advantages of ear thermometry. Concerns regarding accuracy and reliability have hindered adoption of this technology. In clinical studies, the precision of ear temperature measurement has been shown to be influenced by ear canal anatomy and variability in user technique.
-
Page 8: Body Temperature
5.6 Body temperature Normal body temperature is a range. The following table shows that this normal range also varies by site. Therefore, measurements from different sites, even if taken at the same time, should not be directly compared. Normal ranges by site Axillary 1, 2 95.6–99.4 °F... -
Page 9: Warnings And Precautions
6. Contraindications None 6.1 What affects accuracy Always use a new disposable probe cover for each measurement to maintain accuracy and hygiene. The right ear measurement may differ from the measurement taken in the left ear. Therefore, always take the temperature in the same ear. The ear must be free from obstructions or excess earwax build-up to take an accurate reading. -
Page 10: Battery Installation
WARNING The probe lens window must be kept clean, dry and undamaged at all times to ensure accurate measurements. To protect the probe lens window, always keep the thermometer in the storage cradle while transporting or when not in use. WARNING This thermometer is not intended for pre-term babies or small-for- gestational age babies. - Page 11 The large cradle (2 box storage) can be mounted as an easily removable wall hanger or a permanent wall mount. All mounting must be done into a wall stud. To mount the cradle the following items are needed: • 2 #8 wood or sheet metal, pan head screws, 3.2 cm (1.25") long •...
- Page 12 8.3 Tether installation A kit to tether the thermometer to the cradle is available separately. Installation instructions are provided with the tethering kit. Contact Welch Allyn for details.
- Page 13 9. Using the Braun Thermoscan PRO 6000 Ear thermometer ® Temperature measurement Remove thermometer from cradle by gripping thermometer at base and pivoting up. Thermometer will turn on automatically. Probe cover icon will flash on display indicating a new probe cover is needed. ...
-
Page 14: Temperature Measurement
Press and release measure button. The thermometer will beep once, running dashes will appear on the display then the green ExacTemp light will flash, indicating consistent probe position. Note: Always press the measure button before taking a measurement. Temperature measurement. - Page 15 Remove used probe cover by pressing Probe Cover Ejector button To achieve accurate measurements, use a new, clean probe cover for each measurement. To take another measurement, place a new, clean probe cover on the thermometer. If no action is taken the thermometer will enter sleep mode after 10 seconds or upon return to the thermometer cradle or host device.
-
Page 16: Manual Timer
10.3 Manual timer The Braun Thermoscan PRO 6000 Ear thermometer includes a 60 second timer that features ® an audible notification and visual indicator at 0, 15, 30, 45, and 60 seconds. The timer turns off automatically 5 seconds after 60 seconds is completed. The timer can be stopped at any time by pressing the Timer button or applying a probe cover. -
Page 17: Advanced Functions
The Welch Allyn Service tool software is required to modify the thermometer’s configuration. A charging station and rechargeable batteries or compatible Welch Allyn Device is required to connect to the PC running the Welch Allyn Service Tool. (See 11.3 Advanced function settings and 11.4 Service tools) -
Page 18: Advanced Function Settings
11.3 Advanced function settings The Welch Allyn Service tool software is required to modify the thermometer’s configuration. A charging station and rechargeable batteries or compatible Welch Allyn Device is required to connect to the PC running the Welch Allyn Service Tool. - Page 19 Click the Braun Thermoscan PRO 6000 ® Ear thermometer from the Device list (Device list) to highlight, then click the select button. The device tab opens. Click the Configure tab to the right of the device information tab. ...
- Page 20 The charging station serves as a convenient storage base which can also be wall mounted. Contact Welch Allyn for details. Welch Allyn Technical Support: www.welchallyn.com/support visit locations:...
- Page 21 12. Errors and notifications Error message Situation Solution No probe cover is attached Attach new, clean probe cover. (animates ON). Used probe cover is attached Discard probe cover that is (animates OFF). on and attach new, clean probe cover if taking another temperature measurement.
- Page 22 U is “Unadjusted Operating See 11.3 Advanced function Mode” . Mode used for raw settings and adjust settings via temperature measurement. Service Tool or contact local Requires service tool access Welch Allyn Service Center or to enable. representative.
-
Page 23: Maintenance And Service
WARNING Do not damage probe lens window. Avoid touching probe lens window except when cleaning. If probe lens window is damaged return to Welch Allyn for service. CAUTION Do not modify, change or adjust probe lens window. These changes will affect calibration and accuracy of the thermometer. -
Page 24: Cleaning The Contacts
Gently wipe surface of probe lens window with cotton swab or cloth slightly moistened with isopropyl or ethyl alcohol only. Note: Use gentle pressure when cleaning the sensor to prevent damaging the unit by accidently changing the position of the sensor. ... - Page 25 Remove the thermometer from the dock and clean the metal electrical contacts on the thermometer. Place the thermometer aside for 1 minute, allowing the contacts to air dry. 1 MINUTE Note: If any cleaning agent, other than isopropyl or ethyl alcohol, comes into contact with the probe, probe lens window or contacts immediately wipe dry.
-
Page 26: Approved Cleaning Solutions
Additional cleaning agents may be periodically evaluated for compatibility. If your cleaning agent is not listed, contact Welch Allyn to determine if additional cleaning agents are approved for use. As needed, clean the thermometer body and cradle following the below directions. - Page 27 Use a damp cloth or cleaning wipe with cleaning solution from the Approved Cleaning Solutions Table. To clean the body, ensure that the wipe is moist, not saturated. Wipe the body with the display facing up. Remove probe cover box carrier from the cradle by rotating the probe cover box carrier forward.
- Page 28 14.3 Cleaning the tether (sold separately) To clean the tether, ensure that the wipe is moist, not saturated. Wipe the tether with a damp cloth or cleaning wipe with cleaning solution from the Approved Cleaning Solutions Table. 14.4 Installing new probe cover box Keep out of reach of children.
-
Page 29: Storage Environment
14.5 Removing and installing probe cover box carrier Remove thermometer from cradle by gripping thermometer at base and pivoting up. Remove probe cover box carrier from the cradle by rotating the probe cover box carrier forward. Place probe cover box carrier back in cradle by lining up the brackets and pushing down. -
Page 30: Calibration Testing
Insert new batteries when the battery symbol begins to flash on the display (See 12. Errors and notifications). Open battery door by sliding spring latch to the right using your finger or a pointed object such as a pen. While holding the latch in the open position, grasp the battery door and remove it. -
Page 31: Specifications
15. Specifications Displayed temperature range: 20–42.2 °C (68–108 °F) Operating ambient temperature range: 10–40 °C (50–104 °F) Display resolution 0.1 °C or 0.1 °F Accuracy for displayed temperature ± 0.2 °C ± (0.4 °F) (35.0 °C–42 °C) (95 °F–107.6 °F) range: ±... -
Page 32: Standards And Compliance
This infrared thermometer meets requirements established in ASTM Standard E 1965– 98 (for the thermometer system [thermometer with probe cover]). Full responsibility for the conformance of the product to the standard is assumed by Welch Allyn, Inc. 4341 State Street Road, Skaneateles Falls, NY, USA 13153. -
Page 33: Symbol Definitions
Consult directions for use (DFU). A copy of the DFU is available on this website. A printed copy of the DFU can be ordered from Welch Allyn for delivery within 7 calendar days. 50°C 122°F Storage temperature –20°C... -
Page 34: Warranty
PRO 6000 Ear thermometer ® Welch Allyn (an affiliate of Hill-Rom®) warrants the product to be free of defects in material and workmanship and to perform in accordance with manufacturer’s specifications for the period of three years from the date of purchase from Welch Allyn or its authorized distributors or agents. - Page 36 Guidance and manufacturer’s declaration – RF wireless communication equipment immunity...
- Page 37 Guidance and manufacturer’s declaration – RF wireless communication equipment immunity...
Need help?
Do you have a question about the Braun ThermoScan PRO 6000 and is the answer not in the manual?
Questions and answers