
Related Manuals for Bante Instruments Bante520


Summary of Contents for Bante Instruments Bante520
- Page 1 Bante520 Portable Conductivity Meter Instruction Manual BANTE INSTRUMENTS CO., LTD...
- Page 2 Bante520 Portable Conductivity Meter Introduction Thank you for selecting the Bante520 portable conductivity meter. This manual provides a step-by-step guide to help you operate the meter, please carefully read the following instructions before use. Unpacking Before unpacking, ensure that the current work environment meets following conditions.
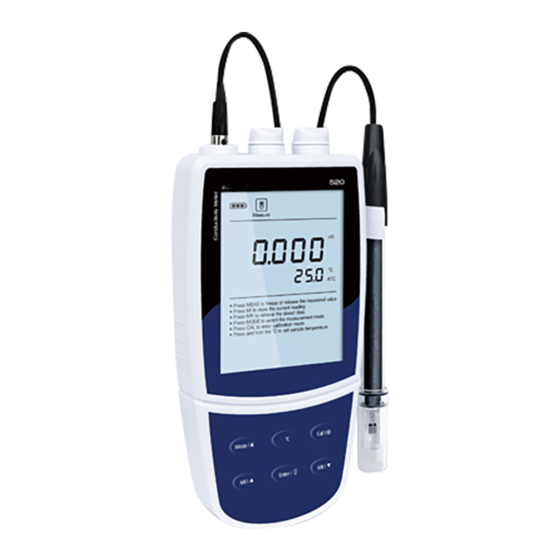
- Page 3 Bante520 Portable Conductivity Meter Display The Bante520 portable conductivity meter is equipped with an easy-read LCD display that used to show the measured values and mode icons. The following table describes the function of each icon. INDEX: Measurement mode icon: Low battery alarm: Indicates the meter is in the measurement mode.
- Page 4 Bante520 Portable Conductivity Meter Keypad FUNCTION • Switches the meter ON/OFF. • Locks the measured value, press the key again to resume measuring. • Exits the calibration or setting and returns to measurement. • Sets the temperature. • Starts calibration.
-
Page 5: Installing The Batteries
Bante520 Portable Conductivity Meter Installing the Batteries • Remove the battery cover from backside of the meter. • Insert three AA batteries into the battery compartment, note polarity. • Replace the battery cover into its original position. Installation is completed. -
Page 6: Switching The Meter On And Off
To enable the Auto-Power Off feature, please refer to chapter SETUP MENU. Setup Menu The Bante520 portable conductivity meter contains an integrated setup menu that is used to customize the displayed option to meet measurement requirements. The following table describes the functions of the menu items. - Page 7 Bante520 Portable Conductivity Meter Setting the default option Press and hold the key for 3 seconds to enter the setup menu. Press the or key to select the menu item (e.g., CAL/P-02). Press the key, the meter shows an option.
-
Page 8: Automatic Temperature Compensation
Bante520 Portable Conductivity Meter Temperature Compensation For better accuracy, we recommend the use of either a sensor with a built-in or a separate temperature probe for the calibration or measurements. Automatic Temperature Compensation Connect the temperature probe to the meter (Refer to page 4 “Connecting the Sensors”). The ATC icon immediately appears on the display, the meter is now switched to the automatic temperature compensation mode. -
Page 9: Calibrating The Meter
Selecting the Conductivity Electrode The Bante520 portable conductivity meter is capable of using the 3 types of conductivity electrodes. Prior to the calibration and measurement, you need to select the different sensors as per your sample concentration. The table below shows available electrode and its effective measuring ranges. -
Page 10: Multi-Point Calibration
Bante520 Portable Conductivity Meter Place the electrode (and temperature probe) into the conductivity standard solution, the meter automatically shows current calibration standard (e.g., 1413µ S/cm). Press the key, the meter begins the calibration, the Calibration icon will continuously Enter flashing. - Page 11 Bante520 Portable Conductivity Meter Viewing the calibration report Press the key in the measurement mode and the or key until the display shows ELE/P-2. Press the key. The meter shows the calibration point 1 (e.g., 10.00µ S/cm). Enter Press the ...
-
Page 12: Temperature Calibration
Bante520 Portable Conductivity Meter Temperature Calibration During the measurement process, if the temperature reading displayed differs from that of an accurate thermometer, the meter needs to be calibrated. Connect the temperature probe to the meter and place into a solution with a known accurate temperature. -
Page 13: Storing And Recalling Data
Bante520 Portable Conductivity Meter Storing and Recalling Data The Bante520 portable conductivity meter is capable of storing and recalling up to 100 data sets. Storing readings into memory During the measurement process, press the key to store the reading into the memory, the Memory icon appears on the display. -
Page 14: Electrode Care And Maintenance
Bante520 Portable Conductivity Meter Electrode Care and Maintenance • DO NOT touch the measurement area of electrode and always make sure that is clean. • If there is a build-up of solids inside the measurement area, these should be removed very carefully with a cotton bud soaked in solvent, taking care not to touch the metal parts of the inner cell. - Page 15 Bante520 Portable Conductivity Meter Connector 6-pin Display Power Requirements 3 × 1.5V “AA” batteries Dimensions 170 (L) × 85 (W) × 30 (H)mm Weight 300g Addendum 1: Preparation of Conductivity Standard Solutions Place AR potassium chloride reagent in a 50ml beaker and dry in an oven for 3 to 5 hours at 105° C, then cool to room temperature in desiccator.
-
Page 16: Warranty
Hazardous Substance Statement Bante Instruments is committed to the reduction and eventual elimination of all hazardous substances in both the manufacturing process and finished products we supply. We have an active manufacturing and procurement program to minimize and eliminate the use of harmful heavy metals such as cadmium, lead, mercury and the like.
Need help?
Do you have a question about the Bante520 and is the answer not in the manual?
Questions and answers