Table of Contents
Advertisement
Available languages
Available languages
DIGITAL PIANO
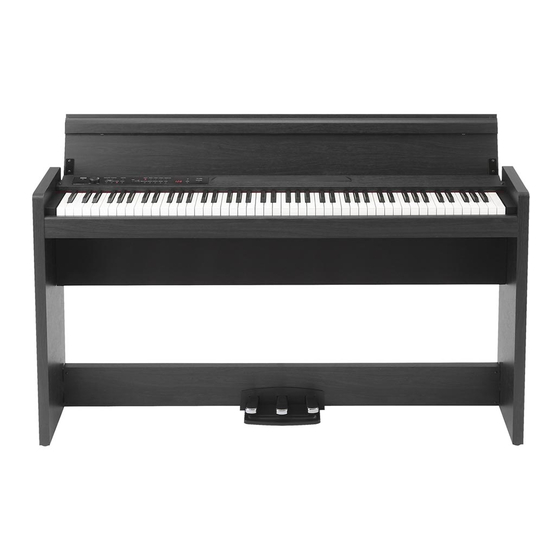
Thank you for purchasing the Korg LP-380 digital piano.
Merci d'avoir choisi la piano numérique LP-380 de Korg.
Vielen Dank, dass Sie sich für einen LP-380 digtal-
Klavier von Korg entschieden haben.
Gracias por su compra del Korg LP-380 Piano digital.
このたびは、 コルグ デジタル ・ ピアノLP-380をお買い上げいただきまして、
まことにありがとうございます。
Owner's Manual
Manuel d'utilisation
Bedienungsanleitung
Manual del usuario
取扱説明書
EFGSJ 5
Advertisement
Chapters
Table of Contents

Related Manuals for Korg LP-380


Summary of Contents for Korg LP-380
- Page 1 DIGITAL PIANO Owner’s Manual Thank you for purchasing the Korg LP-380 digital piano. Manuel d’utilisation Merci d’avoir choisi la piano numérique LP-380 de Korg. Bedienungsanleitung Vielen Dank, dass Sie sich für einen LP-380 digtal- Klavier von Korg entschieden haben. Manual del usuario Gracias por su compra del Korg LP-380 Piano digital.
- Page 2 If something does slip into the equipment, unplug the AC adapter from the wall outlet. Then IMPORTANT NOTICE TO CONSUMERS contact your nearest Korg dealer or the store where This product has been manufactured according to strict the equipment was purchased.
-
Page 3: Table Of Contents
By connecting the LP-380 to your computer with a USB ca- Check following assembly ----------------------- 18 ble, you can use the LP-380 as a MIDI keyboard for playing external sound sources, or use the computer to control the MIDI Implementation Chart ---------------- 87 LP-380, using it as a 16-part multitimbral sound generator (USB-MIDI). -
Page 4: Parts And Their Functions
16. USB port: this button and the PIANO SONG button enters the Connect the USB port on the LP-380 to your computer Sound demo song mode. with a USB cable to exchange MIDI and audio data. 6. FUNCTION button: 17. -
Page 5: Preparation And Demo Performances
Preparation and demo performances Before you begin playing About the included stand Fig. 1 The LP-380 is used with the included stand. Cord hook Make sure that you read the “Assembling the stand” section that can be found on page 17 before proceeding. - Page 6 Using the USB port Connect the USB port on the LP-380 to your computer with Using the music stand a USB cable to exchange MIDI and audio data. The key cover serves as a convenient music stand. (Fig. 2) Using USB-MIDI see “MIDI”...
-
Page 7: Listening To Demo Performances
Listening to demo performances Listening to a piano song The LP-380 contains a total of 30 demo performances (10 1. Press the PIANO SONG button. demo songs using 10 high-quality sounds and 20 familiar The PIANO SONG and PIANO1 buttons will light up, piano songs using the piano sounds). -
Page 8: Playing The
(10 sounds x 3 banks). Sound button Bank Sound name PIANO1 Classic Piano Grand Piano Each time the LP-380 is turned on, the sound in bank 1 is selected for all sound buttons. Jazz Piano PIANO2 Live Piano Honky-Tonk Playing two sounds at the same time Elec.Grand... -
Page 9: Performing With Another Person (Partner Mode)
For details, refer to “Partner mode settings” on page 12. The setting appears in the display with 3 producing a deep reverb effect and 1 producing a light reverb effect. Using pedals Soft pedal If a different sound is selected or if the LP-380 is turned Damper pedal off, the on/off setting for this effect as well as this effect’s The LP-380 has three pedals; damper, setting return to their factory defaults (default settings). sostenuto, and soft. -
Page 10: The Metronome
The metronome Selecting a bell for the accent The LP-380 is equipped with a metronome, which can be 1. Hold down the METRONOME button until the Met- changed to a bell sound, which is convenient for practicing. ronome settings mode is entered. -
Page 11: Other Functions
Fine tuning fingering, or use the same familiar fingering to play at a In order to adapt the LP-380 pitch to that of another instru- different pitch. This is called the Transpose function. ment, you can adjust the pitch in steps of 0.5 Hz over a range You can shift within a range of 11 semitones so that when of A4 = 427.5–452.5 Hz. - Page 12 Selecting a temperament The right side of the keyboard, from E4 to C8, produces sounds in a range two octaves lower (E2–C6). You can select from nine temperaments, including the ♭ The left side of the keyboard, from A0 to E 4, produces equal temperament, pure temperaments (major and mi- ♭...
- Page 13 In the Layer mode, the octave for each sound can be speci- function, turn off (oFF) this function. The default setting is fied. The setting range is ±1 octave for each sound, and –01, this function turned on. If this setting is changed, the new 00 and 01 appear in the display. The default setting is 00. setting is saved and remains selected, even if the LP-380 is turned off. 1. Enter the Function mode, and then press the HARP- SI/CLAV button. 1. Enter the Function mode, and then press the OR- The HARPSI/CLAV sound button lights up, and the GAN1 button.
-
Page 14: Midi
LP-380 and computer are con- When the LP-380 is turned on, transmission channel 1 (C01) nected with a USB cable. Connecting the LP-380 to a com- is automatically selected. puter that runs a music application will bring you even •... - Page 15 If an incompatible program change number is re- If the LP-380 is not to be used as a multi-timbral sound ceived, the LP-380 sound is not changed. module, disable this function (oFF).
-
Page 16: Appendix
• Make sure that the USB cable is connected correctly. Sperkers 10 cm x 2 Please make sure that the LP-380 is set to the same Power supply DC 19 V, 3.42 A MIDI channel as your MIDI application, and that the AC adapter (included) LP-380 is receiving MIDI data. -
Page 17: Assembling The Stand
Push rivet x 1 pc. Cord holder x 1 pc. Caution during assembly 3. Fasten the LP-380 and the speaker box to the right and left In order to assemble the stand safely, please observe the follow- side panels using eight screws (M6). -
Page 18: Check Following Assembly
“Connecting the Power” on page 5. Joints between the side panels and the attached anti-tipping brackets should be even (with no level difference left). 15. Place the LP-380 where you intend to use it. Make sure to place it in a safe location where the floor is flat and stable. When setting the digital piano in place, make sure that the stand does not rest on the AC adapter cable or pedal cable. - Page 19 (trombones, par ex.). Si cela se produit, débranchez l’alimentation de la prise de courant et contactez votre revendeur korg le plus proche ou la surface où vous avez acheté l’instrument. * Tous les noms de produits et de sociétés sont des marques commerciales ou déposées de leur...
-
Page 20: Introduction
Tableau d’implémentation MIDI---------- 87 vous pouvez utiliser le LP-380 comme un clavier MIDI pour jouer des sources de son externes, ou piloter le LP-380 avec un ordinateur en l’utilisant comme un générateur de son mul- titimbre à 16 parties (USB-MIDI). Vous pouvez aussi utiliser votre ordinateur pour enregistrer le son de votre jeu sur le LP- 380 sous forme de données audio, ou restituer le son de l’ordi-... -
Page 21: Parties Et Leurs Fonctions
Cette sortie principale permet de relier l‘instrument via le mode MIDI et régler les paramètres MIDI. Le bouton une fiche minijack stéréo à l‘entrée d‘un amplificateur s’allume quand le mode de fonctions du LP-380 est actif ou d‘enceintes actives, ou encore à la prise AUX IN et clignote quand l’instrument passe en mode MIDI. -
Page 22: Préparatifs Et Écoute Des Morceaux De Démonstration
Préparatifs et écoute des morceaux de démonstration Avant de commencer à jouer À propos du stand fourni Le LP-380 doit être utilisé avec le pied fourni. Illustration 1 Veillez à lire la section “Montage du pied” à la page 34 avant d’effectuer le montage. - Page 23 élevée, un hi-fi stéréo ou une paire Quand un casque est branché, le son des haut-parleurs du de retours de scène à votre LP-380. Si vous utilisez un hi- LP-380 est coupé. fi stéréo, branchez les bornes LINE OUT de l’appareil aux Utilisez un casque pour jouer en soirée ou éviter de déran- bornes d’entrée AUX ou LINE de votre LP-380 (ne jamais...
-
Page 24: Écoute Des Morceaux De Démonstration
Écoute des morceaux de démonstration Écoute d’un morceau de piano Le LP-380 propose 30 morceaux de démonstration (10 mor- 1. Appuyez sur le bouton PIANO SONG. ceaux illustrant 10 timbres de haute qualité et 20 morceaux Les boutons PIANO SONG et PIANO1 s’allument et le de piano bien connus utilisant les timbres de piano de numéro du morceau de piano (001) apparaît sur l’affi-... -
Page 25: Utilisation Du Lp-380 Pour La Lecture
Utilisation du LP-380 pour la lecture Jouer un timbre (mode Single) En outre, la banque sélectionnée pour un bouton de timbres reste en vigueur, même si un autre bouton de Sélectionner l’un des trente timbres à disposition (10 x 3 timbres est enfoncé. -
Page 26: Jouer À Deux (Mode Partner)
Le réglage de brillance est appliqué à tous les timbres et deux octaves vers le bas (Mi2 à Do6). ♭ reste en vigueur jusqu’à la mise hors tension du LP-380. À Le côté gauche du clavier (de La0 à Mi 4) est transposé... -
Page 27: Le Métronome
Le métronome Modification de l’accent Le LP-380 est doté d’un métronome qui vous permet d’acti- 1. Maintenez enfoncé le bouton METRONOME jusqu’à ver un son de clochette quand vous vous entraînez. ce que le mode de réglage du métronome soit actif. 2. Appuyez sur le bouton E.PIANO1 pour afficher le Lancer/arrêter le métronome... -
Page 28: Fonctionnalités Supplémentaires
Accordage fin Dans ce cas, vous pouvez transposer (décaler, modifier Pour adapter la hauteur de votre LP-380 à celle d’un autre la hauteur) de manière à faciliter le jeu ou jouer avec une instrument, vous pouvez la régler par pas de 0.5 Hz, dans hauteur différente. C’est la fonction “Transpose”. - Page 29 2. Chaque pression du bouton UP ou DOWN à côté de l’écran active (on) et coupe (oFF) alternativement le mode Partner. Sélectionner un tempérament Vous pouvez choisir parmi neuf tempéraments, compre- nant la gamme tempérée, les tempéraments purs (majeur Quand le mode Partner est activé, le timbre PIANO1 est et mineur), les tempéraments classiques (Kirnberger et utilisé...
- Page 30 “oFF”. Cette fonction est active par défaut. Le réglage de cette fonction est sauvegardé et conservé même Régler l’octave des timbres superposés après la mise hors tension du LP-380. En mode Layer, vous pouvez définir l’octave pour chaque 1. Activez le mode de fonctions puis appuyez sur le timbre.
-
Page 31: Midi
MIDI 1 à 16 (C01 ~ C16). ordinateur ou de piloter le générateur de son du LP-380 À la mise sous tension du LP-380, son canal 1 (C01) est depuis l’ordinateur quand le LP-380 et l’ordinateur sont re- automatiquement choisi pour la transmission. - Page 32 Quand vous sélectionnez un timbre avec les boutons de peut être piloté et ses sons peuvent être joués depuis l’ap- timbres et le bouton BANK du LP-380, le numéro de change- plication MIDI tournant sur votre ordinateur. ment de programme correspondant est transmis via MIDI.
-
Page 33: Appendice
Pédale résonance*, soutien, douce* Les notes sont coupées (*prenant en charge la fonction mi-pédale) • Le LP-380 est conçu pour donner la priorité aux notes jouées le plus récemment. Voir “Au sujet de la polypho- Connexions nie maximum.” Prise LINE OUT , Port USB (Type-B), Prise Casque × 2, Prise PEDAL, Prise SPEAKER... -
Page 34: Montage Du Pied
Il vous faut un tournevis cruciforme (+). Placez le cellophane de protection fourni avec le LP-380 à plat (M6) sur le sol et posez le LP-380 sur le cellophane en orientant sa face Panneau latéral (gauche) arrière vers le sol. -
Page 35: À Vérifier Après Le Montage
Veillez à ce qu’après le montage, les cales soient au même niveau de Voyez “Connexion au secteur” à la page 22. chaque côté de l’instrument. 15. Placez le LP-380 à l’endroit où vous avez l’intention de l’utiliser. Placez-le dans un endroit sûr où le sol est plat et solide. Quand vous installez le piano numérique, vérifiez que le pied n’est pas posé... - Page 36 Beschädigung des Geräts, Feuer oder ein elek-trischer Schlag die Folge sein. Beachten Sie, daß keinerlei Fremdkörper in das Ge- rät gelangen. Sollte ein Fremdkörper in das Gerät gelangt sein, so trennen Sie es sofort vom Netz. Wen- den Sie sich dann an Ihren KORG-Fachhändler. * Alle Produkt- und Firmennamen sind Warenzei- chen oder eingetragene Warenzeichen der betref- fenden Eigentümer.
-
Page 37: Einführung
LP-380 zu steuern und als 16-teiligen multitimbralen Klangerzeuger verwenden (USB-MIDI). Sie können auch das, was Sie auf dem LP-380 spielen, auf Ihrem Computer aufnehmen und als Audio-Datei speichern, oder Klänge von Ihrem Computer über die Lautsprecher des LP-... -
Page 38: Teile Und Funktionen
Taste zum Einstellen der Transposition. Während der 16. USB-Port: Transposition leuchtet die Taste auf. Durch gleichzeiti- Verbinden Sie den USB-Port des LP-380 mittels eines ges Drücken dieser Taste und der PIANO SONG-Taste USB-Kabels mit Ihrem Computer, um MIDI- und Audi- gelangen Sie in den Demosongmodus. -
Page 39: Vorbereitung Sowie Demos Und Soundbeispiele
Vorbereitung sowie Demos und Soundbeispiele Bevor Sie mit dem Spielen beginnen Hinweise zum beigefügten Ständer Das LP-380 wird mit einem Ständer geliefert. Lesen Sie dazu bitte den Abschnitt „Montage des Ständers“ auf Seite 51, bevor sie fortfah- ren. Abbildung 1 Anschließen ans Netz Kabelhaken Verbinden Sie das beiliegende Netzteil mit dem Netzkabel. Verbinden Sie die Netzteil- buchse mit der DC19V-Buchse der Anschlussfelds auf der Rückseite. Verbinden Sie das Netzkabel mit einer Steckdose. - Page 40 USB-AUDIO verwenden (bei der Wiedergabe von Au- diodaten von Ihrem Computer über die Lautsprecher des LP-380) 1. Regeln Sie die Lautstärke am LP-380 sowie an Ih- rem Computer komplett herunter. 2. Schließen Sie Ihren Computer mit einem USB- Kabel an den USB-Port an der Anschlussbox (Rückseite) an.
-
Page 41: Demo-Vorführungen Abspielen
Demo-Vorführungen abspielen Piano-Songs anhören 1. Drücken Sie die PIANO SONG-Taste. Das LP-380 hat insgesamt 30 Demos und Soundbeispiele Die PIANO SONG-Taste und die PIANO1-Taste leuch- (10 Demosongs mit 10 ausdrucksstarken Sounds und 20 ten auf, und im Display erscheint die Nummer des Pia- bekannte Pianosongs zur Vorstellung der Pianosounds). -
Page 42: Spielen Des Lp-380
Sie können einen der dreißig im Instrument enthaltenen Klänge auswählen (10 x 3 Sounds Banken). Taster Bank Klang PIANO1 Klassisches Piano Bei jedem Einschalten des LP-380 wird für alle Sound- Tasten Bank 1 ausgewählt. Flügel Jazz Piano PIANO2 Live Piano Mit zwei Klängen gleichzeitig spielen Honky-Tonk (Layer-Modus) Elektr. -
Page 43: Spielen Zu Zweit (Partnermodus)
Einstellungen“ auf Seite 46. Die jeweilige Einstellung wird im Display angezeigt: 3 pro- duziert einen starken, 1 einen leichten Halleffekt. Softpedal Falls ein anderer Sound ausgewählt oder das LP-380 aus- Haltepedal Verwendung der Pedale geschaltet wird, werden die vorgenommenen Änderungen Das LP-380 bietet drei Pedale: Dämp-... -
Page 44: Das Metronom
Das Metronom 4. Drücken Sie die METRONOME-Taste, um den Met- ronom-Einstellungsmodus zu verlassen. Das LP-380 ist mit einem Metronom ausgestattet, das für ein angenehmeres Üben zu einem Glockenton umgeschal- Ändern der Betonung tet werden kann. 1. Halten Sie die METRONOME-Taste gedrückt, bis das Instrument in den Metronom-Einstellungsmodus Metronom ein-/ausschalten wechselt. -
Page 45: Weitere Funktionen
In diesen Fällen können Sie transponieren Feinstimmung (Tonhöhe verändern), um die Fingerläufe zu vereinfachen Um die Stimmung des LP-380 der eines anderen Instru- oder mit denselben Fingerläufen in einer anderen Tonhöhe ments anzupassen, können Sie die Stimmung in Intervallen zu spielen. - Page 46 Bei aktiviertem Partnermodus ist der PIANO1-Klang so- wohl der rechten als auch der linken Tastaturhälfte zuge- wiesen, und die PIANO1-Taste leuchtet auf. Gleichzeitig erscheint unten rechts im Display ein Punkt (Partnermodus-Anzeige). Stimmung auswählen Die rechte Hälfte der Tastatur von E4 bis C8 ist nun zwei Sie haben die Auswahl unter neun Stimmungen, darun- Oktaven tiefer gestimmt (E2–C6).
- Page 47 Funktion deaktivieren (oFF). Werksseitig ist diese Funkti- on aktiviert. Falls Sie diese Einstellung ändern, wird die neue Einstellung gespeichert und bleibt auch nach dem Ausschalten des LP-380 gültig. 1. Rufen Sie den Funktionsmodus auf und drücken Sie Falls der Single-Modus eingestellt ist, erscheint im die ORGAN1-Taste.
-
Page 48: Midi
Im Layer-Modus bestimmen Sie durch Auswahl des Sen- dekanals den Kanal für Layer 1. Als Sendekanal für Layer Wen n das LP-380 erst ma ls a n I h ren Wi ndows- 2 wird automatisch der nächste Kanal eingestellt. Haben Computer angeschlossen wird, wird automatisch der Sie beispielsweise MIDI-Kanal 7 für den Sound von Layer... - Page 49 Filters (Senden/Empfangen) dem LP-380 zu ändern. Auf diese Weise können Sie Dämpferpedalsignale und andere Daten vom LP-380 übertragen, um eine auf Ihrem Dies ändert nichts an dem Sound, den Sie beim Spie- Computer laufende MIDI-Anwendung zu steuern, oder len der Tastatur des LP-380 hören.
-
Page 50: Anhang
Die Tonlage oder der Ton des Klavies klingt in man- CHORUS, BANK, Sound × 10, UP, DOWN, chen Tonalregionen falsch METRONOME • Die Piano-Sounds des LP-380 replizieren den Sound eines echten Klaviers so treu wie möglich. Das bedeutet, dass Ausgangleistung 22 W × 2 in manchen Regionen der Tastatur das Gefühl entstehen kan, dass die Obertöne stärker erscheinen oder Ton oder... -
Page 51: Montage Des Ständers
(M6) Seitenplatte (links) Sie benötigen einen Kreuzschlitzschraubenzieher (+). Legen Sie die Schutzhülle, mit der das LP-380 umhüllt war auf den Boden und legen Sie das LP-380 mit der Rückseite auf die Seitenplatte (rechts) Hülle. Legen Sie außerdem Lappen, Tücher, Zeitungen o. Ä. unter den Achten Sie darauf, sich nicht die Finger zu klemmen. -
Page 52: Überprüfung Nach Montage
Netz“ auf Seite 39. Achten Sie darauf, dass die Unterseite der Seitenplatten und der montierten Stützböckchen auf gleicher Höhe liegen. 15. Stellen Sie das LP-380 an den gewünschten Ort. Wählen Sie einen ebenen und stabilen Aufstellungsort. Achten Sie beim Aufstellen des Instruments darauf, dass weder das Netzteilkabel noch das Pedalkabel gequetscht werden. - Page 53 Precauciones Ubicación Nota respecto a residuos y deshechos (solo UE) El uso de la unidad en las siguientes ubicaciones Cuando aparezca el símbolo del cubo de basura tacha- puede dar como resultado un mal funcionamiento: do sobre un producto, su manual del usuario, la bate- ría, o el embalaje de cualquiera de éstos, significa que •...
-
Page 54: Introducción
380 utilizándolo como generador de sonido multitímbrico de 16 partes (USB-MIDI). También puede grabar en el ordenador, como datos de audio, el sonido de lo que toque en el LP-380, o reproducir sonido del ordenador a través de los altavoces del... -
Page 55: Partes Y Sus Funciones
LP-380 entre en el modo de Función, y par- la toma de entrada AUX de otro equipo. padeará cuando entre en el modo de función MIDI. -
Page 56: Preparativos E Interpretaciones De Demostración
Preparativos e interpretaciones de demostración Antes de comenzar a tocar Acerca del pedestal incluido Fig. 1 El LP-380 se utiliza con el pedestal incluido. Antes de seguir, lea la sección “Ensamblaje del pedestal” que se encuentra en la página 68. Gancho para cable Conexión de la alimentación... - Page 57 Utilización de auriculares Utilización de la toma LINE OUT Utilice auriculares estéreo con miniclavija estéreo de 1/8”. Utilice la toma LINE OUT, si desea conectar su LP-380 a Como en la parte inferior izquierda del teclado LP-380 hay un mezclador, a un equipo estéreo de alta fidelidad, o a un dos tomas para auriculares, dos personas podrán disfrutar par de monitores activos.
-
Page 58: Escucha De
Escucha de interpretaciones de demostración Escucha de una canción de piano 1. Pulse el botón PIANO SONG. El LP-380 contiene un total de 30 interpretaciones de de- Los botones PIANO SONG and PIANO1 se iluminarán, mostración (10 canciones de demostración utilizando 10 el número para la canción de piano (001) aparecerá... -
Page 59: Toque Del Lp-380
(10 sonidos x 3 bancos). Botón de sonido Banco Sonido PIANO1 Piano clásico Cada vez que encienda el LP-380, el sonido del banco 1 Piano de cola se seleccionará para todos los botones de sonido. Piano de jazz... -
Page 60: Interpretación Con
Puede utilizar los pedales para hacer efecto de reverberación ligero. su juego más expresivo y realista. Si se selecciona un sonido diferente, o si se apaga el LP-380, Pedal tonal Pedal celeste (izquierdo) el ajuste de activación/desactivación para este efecto así... -
Page 61: Metrónomo
Selección de una campana para el acento Si se selecciona un sonido diferente, o si se apaga el LP-380, 1. Mantenga pulsado el botón para entrar en el modo de el ajuste de activación/desactivación para este efecto así... -
Page 62: Otras Funciones
Los ajustes se aplican a todos los sonidos. Transposición En algunos casos, una canción puede estar escrita en una Cuando apague el LP-380, todas las funciones, excepto clave difícil (por ejemplo, muchas claves de negras), o pue- la función de apagado automático, volverán a los ajus- de que se desee desplazar la tonalidad para que coincida tes predeterminados. - Page 63 3. Especifique el ajuste con el botón UP o DOWN situa- 2. Cada vez que pulse el botón UP o DOWN situado al do al lado del visualizador. lado del visualizador el modo se activará (on) o des- Para volver a 440 Hz, pulse simultáneamente los boto- activará...
- Page 64 Para volver al ajuste predeterminado, pulse simultá- necerá seleccionad, incluso aunque se apague el LP-380. neamente los botones UP y DOWN. 1. Entre en el modo de Función, y después pulse el bo- tón ORGAN1.
-
Page 65: Midi
KORG Local On/Off USB-MIDI en www.korg.com e instalarlo como se in- Con el ajuste Local On, al tocar con el teclado del LP-380 se dica en la documentación incluida. producirán los sonidos de la interpretación y también se Incluso aunque no vaya a utilizar el LP-380 con varias transmitirán datos MIDI. Con el ajuste Local Off, al tocar... - Page 66 Esto le permite transmitir señales del pedal de resonancia Esto no cambiará el sonido que escuche al tocar el te- y otros datos del LP-380 a una aplicación MIDI que esté clado del LP-380. ejecutándose en el ordenador, o controlar el LP-380 mien- Para los números de cambio de programa y sus sonidos...
-
Page 67: Apéndice
La tonalidad o el tono del piano suenan mal en algu- Conexiones nas zonas del teclado Jack LINE OUT, Puerto USB (conector B), Jack de auri- • Los sonidos de piano del LP-380 reproducen el sonido culares ×2, Jack PEDAL, Jack SPEAKER de un piano real lo más fielmente posible. Esto significa que en algunas regiones del teclado, usted puede sentir Controles que los armónicos parecen más fuertes, o que la tonali-... -
Page 68: Ensamblaje Del Pedestal
Precaución durante el ensamblaje x 1 pieza Para ensamblar con seguridad el pedestal, tenga en cuenta los puntos 3. Fije el LP-380 y la caja de altavoz a los paneles laterales iz- siguientes. quierdo y derecho utilizando ocho tornillos (M6). -
Page 69: Comprobación Después Del Ensamblaje
12. Conecte el cable de pedales y el cable de altavoz a los conectores Empuje de la parte posterior de la caja de conectores del LP-380. Parte Cuando conecte el cable de pedales y el cable de altavoz, tenga en... - Page 70 安全上のご注意 ご使用になる前に必ずお読みください ・ 振動の多い場所で使用や保管はしない。 ここに記載した注意事項は、 製品を安全に正しくご使用いただき、 ・ ホコリの多い場所で使用や保管はしない。 あなたや他の方々への危害や損害を未然に防ぐためのものです。 ・ 風呂場、 シャワー室で使用や保管はしない。 注意事項は誤った取り扱いで生じる危害や損害の大きさ、 または ・ 雨天時の野外のように、 湿気の多い場所や水滴のかかる場所で、 切迫の程度によって、 内容を 「警告」 、 「注意」 の2つに分けています。 使用や保管はしない。 これらは、 あなたや他の方々の安全や機器の保全に関わる重要な ・ 本製品の上に、 花瓶のような液体が入ったものを置かない。 内容ですので、 よく理解した上で必ずお守りください。 ・ 本製品に液体をこぼさない。 火災・ 感電・ 人身障害の危険を防止するには ・ 濡れた手で本製品を使用しない。 注意 図記号の例 記号は、 注意 (危険、 警告を含む) を示しています。記 この注意事項を無視した取り扱いをすると、 号の中には、 具体的な注意内容が描かれています。左の 傷害を負う可能性または物理的損害が発生する可能性があります。...
-
Page 71: はじめに
目次 はじめに はじめに - ------------------------------------ 71 おもな特長 おもな特長 ------------------------------------- 71 30種類の高品位サウンド 各部の名称とその機能 -------------------- 72 ステレオ・コンサート・グランド・ピアノを含む、 表現力豊 かな高品質の音色を、 30種類内蔵しています。また、 同時 準備と自動演奏 - ---------------------------- 73 に2つの音を重ねて演奏できるレイヤー・モードや、鍵盤 演奏する前の準備 ----------------------------- 73 を左右で分けて同じ音域を、 2人で演奏できるパートナー・ モードも搭載しています。 自動演奏を聴く -------------------------------- 75 エフェクト 弾いてみましょう -------------------------- 76 音色の明るさを調整できるブリリアンス、 コンサート ・ ホー ルの自然な雰囲気をシミュレーションすることができるリ 音色を選ぶ (シングル・モード) - ------------- 76 バーブや、... -
Page 72: 各部の名称とその機能
各部の名称とその機能 コントロール ・ パネル コネクター ・ ボックス (後面) 18 19 20 コネクター ・ ボックス 1. ヘッドホン ( ) 端子 (コネクター・ボックス前面) : 12. 音色ボタン: ステレオ・ミニ・プラグのヘッドホンを2つ接続するこ 30 ( 10×3バンク) 音色から選択します。同時に2つの 音色で演奏 (レイヤー・モード) することもできます。 とができます。ヘッドホンのプラグを差し込むと、 ス ピーカーからは音が出なくなります。 13. ディスプレイ: ファンクション・モード時やメトロノームなどの設定 2. 電源ボタン: 押すたびに電源が入る、 切るを繰り返します。 を表示します。... -
Page 73: 準備と自動演奏
準備と自動演奏 演奏する前の準備 図1 コード ・ フック 付属のスタンドについて 本機は付属のスタンドに取り付けて使用します。 ACアダプターの取り付けや演奏をする前に、必ず 85ページの 「スタンドの組み立 コード ・ フックにコ て」 にしたがって設置してください。 ードを引っかける ときに、 この部分 DCプラグ 付属のACアダプターの接続 を必要以上に曲げ ACアダプターにACアダプター用電源コードを取付け、 DCプラグをコネクター・ ないように注意し てください。 ボックス (後面) のDC19V端子に接続します。 ACアダプターのコードを必ずコード・フックに引っかけてください (図1) 。コー ACアダプター ドをフックから外すときは、 無理に引っ張らないでください。プラグ破損の原因 になります。 ACアダプター用 ACアダプターは必ず付属のものをお使いください。他のACアダプターを使用 電源コード AC100V へ した場合、... - Page 74 USB-MIDIを使う 譜面立てを使うときは 82ページの 「MIDI」 を参照してください。 キー・カバーが譜面を置く譜面立てになります (図4) 。 USB-AUDIOを使う (コンピューターでオーディオを 再生し、 本機のスピーカーで音を鳴らす場合) 図4 1. 本機とコンピューターの音量を最小にします。 2. USBケーブルを使って、 後面のコネクター・ボック スのUSB端子にコンピューターを接続します。 本機がコンピューターに接続されると、 コンピューター は本機をUSBオーディオ・デバイスとして認識します。 3. コンピューターの再生デバイスにLP-380を選択し 譜面を開いたまま置くときに、 キー・カバーに強い力 ます。 を加えないでください。 4. コンピューターでオーディオを再生し、 ボリューム を少し上げます。本機のボリュームを上げるとス 電源を入れる ピーカーから音が鳴ります。 電源ボタンを押して、 本体の電源を入れます (図5) 。 5. 再生音に合わせて鍵盤を弾きながら、 コンピューター 図5 のボリュームを上げ、 音量バランスを調節します。 小さく...
-
Page 75: 自動演奏を聴く
14 014 ジムノペディ第 1 番 E. サティ CLAV 第 8 番 J.S. バッハ 15 015 別れの曲 Op.10-3 F. ショパン VIBES/ KORG 16 016 Old Feather Blues KORG オリジナル GUITAR Jazz in Spain オリジナル 17 017 亜麻色の髪の乙女 C. ドビュッシー d07 ORGAN1 Improvisation M.Geisel 18 018 エンターティナー S. ジョプリン... -
Page 76: 弾いてみましょう
弾いてみましょう 音色を選ぶ (シングル・モード) たとえば、 エレクトリック・グランド・ピアノの音色を 選ぶには、音色ボタンのPIANO2を押してボタンを点 本機は高品位な音色を30 (10×3バンク) 種類の中から選ぶ 灯させます。そのあとBANKボタンを2回押してバンク ことができます。 3 (エレクトリック・グランド・ピアノ) を選びBANKボ 音色ボタン バンク 音色名 # タンの右下のLEDを点灯させます。 なお、 それぞれの音色ボタンで選んだバンクは、 他の音 PIANO1 クラシック ・ ピアノ 色に切り替えても記憶されます。 グランド ・ ピアノ ジャズ ・ ピアノ PIANO2 ライブ ・ ピアノ 電源を入れるたびに、 各音色ボタンにはバンク1の音色 ホンキートンク ・ ピアノ が選択されます。... -
Page 77: 2人で演奏する (パートナー・モード
2人で演奏する (パートナー・モード) レイヤー・モードでは、 ダンパー・ペダルの効果をどち らかの音色だけにすることもできます ( 81ページの 鍵盤を左側と右側で分けて、 2人の演奏者が同様の音域で 「レイヤー・ペダルの設定」 参照) 。 演奏をすることができます。これをパートナー・モードと よびます。 パートナー・モード (→p.80) では、左右で独立して ダンパーをかけることもできます。 1. FUNCTIONボタンを押します。 FUNCTIONボタンとPIANO1ボタンが点灯します。 2. E.PIANO1ボタンを押します。 エフェクト 音色ボタンのE.PIANO1ボタンが点灯し、 ディスプレ イにoFFと表示されます。 ブリリアンス 音色の明るさを変えるエフェクトです。 BRILLIANCEボ タ ン を 押 し な が ら、デ ィ ス プ レ イ 横 の UP/DOWNボタンを押すことで設定を変更します。... -
Page 78: メトロノーム
メトロノーム アクセント音の選択 1. METRONOMEボタンを長押しして、 メトロノーム設 練習に便利なベル音や音量などをかえることができるメト 定モードに入ります。 ロノームを内蔵しています。 音色ボタンのPIANO1が点灯し、ディスプレイに拍子 メトロノームのオン、 オフ ( 04) が表示されます。このときMETRONOMEボタン METRONOMEボ タ ン を 押 す と、ボ が点滅に変わります。 タンが点灯しメトロノームがスター 2. E.PIANO1ボタンを押すと、 ディスプレイにアクセン トします。 ト音設定が表示されます。 メトロノームを止めるときは、 もう一度METRONOMEボ タンを押してボタンを消灯します。 3. ディスプレイ横のUP/DOWNボタンで値を設定します。 設定は3種類でoFF (アクセント音なし.) 、 on1 (強拍が テンポの設定 強調音) 、 on2 (強拍がベル音) で、 初期設定はoFFです。 メトロノームのテンポは、... -
Page 79: その他の機能
その他の機能 鍵盤タッチ・コントロールの設定 鍵盤を弾く強さによる音の強弱の変化の度合いを設定し ます。 「軽め」 では軽く押しても大きめの音が出て、 「重め」 では強めに押さないと大きな音が出ません。 設定を変えるときは、 TOUCHボタンを押しながら、 ディ スプレイの横のUP/DOWNボタンを押して設定します。 C7 F7 鍵盤 キーの高さ F ♯ 6 ~ B6 6 ~ 1半音下げる 標準 (トランスポーズなし) C ♯ 7 ~ F7 1 ~ 5半音上げる 表示 タッチ・コントロールの設定 軽め、 弱く弾いても強音が出せるタッチ ファンクション・モード 標準、 普通のピアノ・タッチ 重め、... - Page 80 音律を選ぶ パートナー・モードをオンにすると、 鍵盤の右側も左側も PIANO1音色になり、 PIANO1ボタンが点灯します。 平均律の他に、 純正律 (長調、 短調) 、 古典音律 (キルンベル ガー、 ヴェルクマイスター) 、 中東やインドの民族音楽で使 このとき、 ディスプレイ内右下のドットが表示さ れます (パートナー・モード表示) 。 われている音律など、 9つの音律から選択します。 右側の鍵盤はE4 ~C8で2オクターブ低い音域 ( E2 ~C6) ♭ 表示 音律 の音色が出ます。左側の鍵盤はA0 ~ E 4で2オクターブ高 ♭ 平均律 (初期設定) :一般的に広く使われている音 い音域 (A2 ~ E 6)...
- Page 81 レイヤー音量バランスの設定 レイヤー・ペダルの設定 レイヤー・モード (またはパートナー・モード) のときの音 レイヤー・モードのときの音色ごとのダンパー設定を行い 色の音量バランスの調整を行います。調整範囲は1-9...9 ます。 -9...9-1で、 レイヤー 1 (左側の鍵盤) が左の値、 レイヤー 設定はレイヤー 1の音色のみ ( o--) 、 レイヤー 2の音色の 2 (右側の鍵盤) が右の値になります。 み (--o) 、 両方の音色 (o-o) の3種類です 初期設定は9-9です。 初期設定はo-oです。 1. ファンクション・モードに入り、 E.PIANO2ボタンを押 1. ファンクション・モードに入り、 VIBES/GUITARボタ します。 ンを押します。 音色ボタンのE.PIANO2ボタンが点灯し、...
-
Page 82: Midi
WindowsOSの内蔵標準USB-MIDIドライバーは、同 ヤー 2の送信チャンネルは、 自動的に連続したチャンネル 時に複数のアプリケーションから本機を使用すること が割り当てられます。たとえば、 レイヤー 1の音色にMIDI ができません。複数のアプリケーションで本機を同時 チャンネル7を割り当てたときは、 レイヤー 2の音色は自動 に使用する場合は、 KORG USB-MIDIドライバーを 的にMIDIチャンネル8が選ばれます。レイヤー 1の音色に インストールする必要があります。コルグ・ウェブサ MIDIチャンネル16を割り当てたときは、 レイヤー 2の音色 イト ( www.korg.com) よりKORG USB-MIDIドライ はチャンネル1が選ばれます。 バーをダウンロードし、 付属のドキュメントに従って ローカル・オン/オフ インストールしてください。 ローカル・オンでは、 本機の鍵盤を弾くと演奏の音が鳴り、 複数のアプリケーションから利用しない場合でも、 よ 同時にMIDIデータを送信します。ローカル・オフでは、 本 り動作の安定が見込めるKORG USB-MIDIドライバー 機を弾いても演奏の音は鳴らず、 データだけを送信します。 のインストールをお薦めします。... - Page 83 プログラム・チェンジ送受信フィルターのオン、 オフ コントロール・チェンジ送受信フィルターのオン、 オフ 本機からMIDIプログラム・チェンジ・ナンバーを送信し、 本機のダンパー・ペダルなどの情報を接続したコンピュー 接続したコンピューター上のMIDIアプリケーションのプロ ター上のMIDIアプリケーションに送信してコントロールし グラムを切り替えることができます。また、 接続したコン たり、 コンピューター上のMIDIアプリケーションからこれ ピューター上のMIDIアプリケーションからMIDIプログラ らの情報を受信して本機をコントロールします。 ム・チェンジ・ナンバーを受信し、 本機のプログラムを切り コントロール・チェンジの情報を送受信するときはオフ 替えることができます。 ( oFF:初期設定) に、 送受信しないときはオン ( on) に設定 します。 本機を鍵盤で弾いたときの音色は切り替わりません。 ○ MIDIファンクション・モードに入り、 E.PIANO2ボタ プログラム・チェンジ・ナンバーと音色の対応については、 ンを押します。 下表の 「音色、 プログラム・チェンジ・ナンバー対応表」 を参 E.PIANO2ボタンが点灯し、 ディスプレイに設定 (oFF) 照してください。 が表示されます。...
-
Page 84: 故障かな?とお思いになる前に
付録 故障かな?とお思いになる前に 仕様 ご使用中に問題が起こった場合は次の事項を確認してくだ 鍵盤 RH3 (リアル・ウェイテッド・ハンマー・アクショ さい。それでも本製品が正しく動作しない場合は、 コルグ ン3) 鍵盤:88鍵 (A0 ~ C8) お客様相談窓口へお問い合わせください。 タッチ・コントロール 電源が入らない。 ライト (軽め) 、 ノーマル (標準) 、 ヘビー(重め) ・ AC アダプターが本機とコンセントに正しく接続されて いることを確認してください。 ピッチ トランスポーズ、 ファイン・チューニング 音律 9種類 音が出ない。 ・ スタンドのスピーカー ・ボックスのスピーカー ・コードが 音源... -
Page 85: スタンドの組み立て
スタンドの組み立て 警告 ネジ (M4) ×8本 キャ ップ×6個 ネジ (M6) ×6本 ● スタンドの組み立ては必ず 2 人以上で行ってください。 組み立て時の注意 コード ・ ホルダー×1本 プッシュ ・ リベッ ト×1本 正しく安全に組み立てるためには、 以下の項目に注意して作業を 行ってください。 3. 左右の側板に、 ネジ (M6) 6本で本体とスピーカー・ボックスを ・ 部品の種類や向きを間違わないように注意して、 手順通りに組 固定します。 み立ててください。 スピーカー・コードが左側になるようにスピーカー・ボックス を置きます。このときスピーカー(布が貼ってある面) は手前 その他の注意 になります。... -
Page 86: 組み立て後のチェック
5. ペダル板にペダル・ユニットをはめ込み、 ペダル板裏側の切り 11. 左右の側板のネジ頭に、 キャップをかぶせます。 欠きの上の穴にプッシュ・リベットを押し込み固定します。 押し込んだ後にペダル板を持ち上げ、 ペダルが落ちないことを 確認してください。プッシュ・リベットはペダル・ユニットの 脱落を防止するためのものです。そのため、 ペダル板に完全に キャ ップ 固定することはできません。 ペダル板 ・ 表面 12. 本体のコネクター・ボックス後面にある接続端子に、 ペダル・ 裏面 コード、 スピーカー・コードを接続します。 押す ペダル・コード、 スピーカー・コードを接続するときは、 コネ 表面 クターの向きに注意してください。 ペダル ・ コード、 スピーカー ・ コードを外すときは、 コネクター のロック爪を押しながら行ってください。 ペダル板 ・ 裏面 プッシュ... -
Page 87: Midi Implementation Chart
Though GM Mode On is recognized, not all GM sounds are supported. O: Yes Mode 1: Omni On, Poly Mode 2: Omni On, Mono Mode 3: Omni Off, Poly Mode 4: Omni Off, Mono X: No Consult your local Korg distributor for more information on MIDI IMPLEMENTATION. - Page 88 修理または商品のお取り扱いについてのご質問、 ご相談は、 お客様 1. 保証書に販売年月日等の記入がない場合は無効となります。記入 相談窓口へお問い合わせください。 できないときは、 お買い上げ年月日を証明できる領収書等と一緒 に保管してください。 WARNING! 2. 保証書は再発行致しませんので、 紛失しないように大切に保管し この英文は日本国内で購入された外国人のお客様のための注意事項です てください。 This Product is only suitable for sale in Japan. Properly qualified service is not available for this product if purchased elsewhere. 保証書 コルグ LP-380 Any unauthorised modification or removal of original serial 本保証書は、 保証規定により無償修理をお約束するものです。 number will disqualify this product from warranty protection. お買い上げ日 年 月 日 販売店名 お客様相談窓口 一部の電話ではご利用になれません。固定電話または携帯電話か らおかけください。 受付時間 月曜~金曜 10:00 ~ 17:00 (祝日、 窓口休業日を除く)...
Need help?
Do you have a question about the LP-380 and is the answer not in the manual?
Questions and answers