American Dynamics ADTT16 Operator's Manual
American dynamics adtt16 multiplexers: operators manual
Hide thumbs
Also See for ADTT16:
- User quick manual (2 pages) ,
- Installation instructions manual (6 pages)
Table of Contents
Advertisement
Advertisement
Table of Contents

Related Manuals for American Dynamics ADTT16


Summary of Contents for American Dynamics ADTT16
- Page 2 AD T ® OUCH RACKER System Operator’s Manual...
- Page 3 EQUIPMENT MODIFICATION CAUTION Equipment changes or modifications not expressly approved by Sensormatic Electronics Corporation, the party responsible for FCC compliance, could void the user's authority to operate the equipment and could create a hazardous condition. This equipment has been tested and complies with the limits for a Class A digital device, according to Part 15 of the FCC Rules.
-
Page 4: Table Of Contents
Table of Contents BEFORE YOU BEGIN...VII How To Use This Manual...viii Text Conventions ... ix Related Documents ... ix Support Services... x CHAPTER 1: ABOUT AD TOUCH TRACKER 16 ...1-1 Understanding Your AD T AD T 16 Features ...1-2 OUCH RACKER AD T 16 Equipment ...1-4... - Page 5 CHAPTER 2: MONITOR DISPLAY FORMATS...2-1 Choosing the External Unit for the T Displaying Video with Quad Splitters ...2-4 Displaying Video with Multiplexers...2-5 CHAPTER 3: CONTROLLING CAMERAS AND THEIR OUTPUTS...3-1 How the System Resolves Conflicts in Camera Control...3-2 Selecting a Camera ...3-2 Stepping Through the Cameras...3-3...
- Page 6 Special Utilities...5-11 APPENDIX A: PROGRAMMING WORKSHEETS... A-1 List of Quick Views... A-3 List of Patterns ... A-6 List of Inputs and Outputs ... A-9 Setup Sequence Worksheet ... A-12 Setup Alarms Worksheet ... A-15 APPENDIX B: SOFTWARE LICENSE AGREEMENT... B-1 Table of Contents...
-
Page 7: Before You Begin
Before You Begin The AD T information about the AD T application. It explains the procedures that you will perform when using the system. It is designed to be a continuing source of information and reference as you use your AD T In This Chapter How To Use This Manual Text Conventions... -
Page 8: How To Use This Manual
How To Use This Manual This manual is organized as follows: Chapter 1: About Your AD T OUCH different modes of operation, provides a brief overview of the T RACKER system. Chapter 2: Monitor Display Formats, describes the different formats in which you can display video on the monitor, depending on whether you are connected to a quad splitter or a multiplexer. -
Page 9: Related Documents
monospace Note Related Documents Other sources provide supplemental information about the AD T 16; these sources serve to enhance your understanding of the RACKER system and its applications. The User's Quick Guide (document number 8000-1011-02) provides quick reference information about some of the procedures that are described in detail in this manual. -
Page 10: Support Services
Contact your sales representative if you need additional copies of the AD Touch Tracker 16 Operator's Manual or any other support documentation. The document number for this manual is 8000-1009-02; use this number when ordering the manual. Support Services A variety of support services are available to help you get the most from your AD T OUCH If you have a question about system operation, and you cannot find the... -
Page 11: Chapter 1: About Ad Touch Tracker 16
C H A P T E R About AD T OUCH In This Chapter Understanding Your AD T AD T OUCH AD T OUCH An Overview of the T Modes of Operation RACKER OUCH RACKER 16 Features RACKER 16 Equipment RACKER OUCH RACKER... -
Page 12: Ad Touch Tracker 16 Features
Understanding Your AD T This manual describes those features that are available to you as an AD OUCH RACKER features. It is up to you, however, to assimilate these features and apply them in your specific environment. Every site and situation has different concerns, capabilities, and vulnerabilities. - Page 13 The capability to display video from up to 16 cameras on one monitor simultaneously in a 2x2 format, 3x3 format, or 4x4 format by using a multiplexer The capability to single-handedly control a camera's panning and tilting movements, as well as its zoom, focus, and iris commands An “Apple Peel”...
-
Page 14: Ad Touch Tracker 16 Equipment
AD T OUCH RACKER Every AD T Some equipment is required, while other equipment is optional. The following figure shows some components typically installed for an AD OUCH RACKER broad overview of the different types of equipment and how the components connect to one another. - Page 15 Programmable and Non-Programmable Domes SensorNet Quad Splitter or Multiplexer RS 232 Main Monitor Call Monitor Main OUCH RACKER SensorNet Call OUCH RACKER About AD T OUCH RACKER...
- Page 16 The system's cameras enable you to monitor activity throughout a facility from a single location. You can see video from up to 16 cameras. The AD T OUCH non-programmable domes, PTZ cameras, and fixed cameras. The T OUCH manually control their movement, as well as adjust their zoom, focus, and iris.
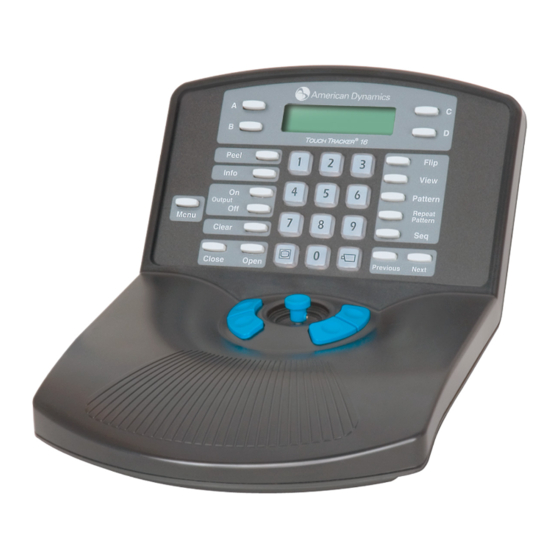
- Page 17 An Overview of the T The T OUCH you with easy access to a variety of video control features—from basic camera control to advanced automated functions. Zoom The Tracker Ball provides variable speed control of a camera's pan and tilt. The zoom and focus buttons enable you to control a camera's zoom and focus.
-
Page 18: Modes Of Operation
The keypad contains buttons that call up video from individual cameras and control the pre-programmed movement of those cameras. It also contains the buttons for camera iris control, dome output control, and monitor display formats. It also allows you to clear dome alarms from the T keypad. -
Page 19: Menu/Programming Mode
Display the ID code for the currently selected dome. (Refer to “Displaying a Dome's ID Code,” in Chapter 5.) In the camera control mode, the currently selected camera number appears on the LCD. If there is a Quick View or a Pattern running, this is also indicated. - Page 20 Press this button to select the top line of the LCD (in this example “Calibration”). Tip: You may also use the A or B buttons on the Touch Tracker to select menu items on the LCD. Use A to select the top item on the LCD; use B to select the bottom item on the LCD.
-
Page 21: Sequencing Mode
In the menu/programming mode, you can perform the following activities: Program the Quick Views for each programmable dome. (Refer to “Defining Quick Views,” in Chapter 4.) Program the Patterns for each programmable dome. (Refer to “Defining Patterns,” in Chapter 4.) Assign the Quick Views, Patterns, and fixed shots to be included in the Sequence. -
Page 22: Alarm Mode
monitor. The sequencing mode provides you with an unattended surveillance of your facility; it runs continuously until you stop it manually. When the T OUCH camera number whose video appears on the monitor. It also displays the event number (1 through 16) of the Sequence is currently displaying. In addition, the LCD displays how many seconds the current event will remain on the screen until it is replaced by the next event. -
Page 23: Chapter 2: Monitor Display Formats
In This Chapter Choosing the External Unit for the T Displaying Video with Quad Splitters Displaying Video with Multiplexers Choosing the External Unit for the T You must assign the correct type of external unit for your T It may be a quad splitter, a multiplexer, or a PC. If there is no external unit, this must be indicated as well. - Page 24 I M P O R T A N T Although the T configurations via this menu, it will only recognize the unit to which it is actually connected. Make sure you select the configuration that applies to your setup. If your system is connected to a 16-camera multiplexer, do not select a 9-camera multiplexer.
- Page 25 Device = Mux 9 Device = Mux 16 Device = PC Device = None The Point of Sale Exception Monitoring (POS/EM) interface is a proprietary Note protocol not supported by the AD Touch Tracker 16. 4. Use the Next button to scroll through the list of available choices. 5.
-
Page 26: Displaying Video With Quad Splitters
Displaying Video with Quad Splitters Quad splitters give you the ability to see video from up to eight cameras. The video can be viewed from each camera individually (refer to Chapter 3), or it can be displayed in quad mode. When cameras are displayed in the quad mode, you will be able to see video from four cameras at once on... -
Page 27: Displaying Video With Multiplexers
Displaying Video with Multiplexers Multiplexers allow you to see video from up to 16 cameras at one time. You can either call up these cameras individually (refer to Chapter 3), or you can display the cameras in one of the multiplexed modes. Duplex multiplexers allow you to record up to 16 cameras at one time and display the cameras in a multiplexed mode simultaneously. - Page 28 16 cameras on the monitor. This format is available with 16- camera multiplexers. Press the Display button on the Main T available display formats. Each time you press Display, the monitor changes from 2x2, 3x3, 4x4, or full-screen format.
-
Page 29: Chapter 3: Controlling Cameras And Their Outputs
C H A P T E R Controlling Cameras and Their Outputs In This Chapter How the System Resolves Conflicts in Camera Control Selecting a Camera Stepping Through the Cameras Controlling a Camera's Pan and Tilt Controlling Zoom and Focus Controlling the Iris “Flipping”... -
Page 30: How The System Resolves Conflicts In Camera Control
How the System Resolves Conflicts in Camera Control If your system configuration includes two T OUCH RACKER when the system is in the camera control mode. Whichever camera the Main operator has selected will be “locked” and the Call operator will not be able to control it. -
Page 31: Stepping Through The Cameras
If you select a camera via the Main T the Main monitor. If you select a camera via the Call T video appears on the Call monitor. Stepping Through the Cameras The Previous and Next buttons enable you to manually step through all of the cameras, one at a time. -
Page 32: Controlling Zoom And Focus
Controlling Zoom and Focus Once you have selected a camera, you can control the zoom and focus settings of that camera. When the T OUCH left side of the Tracker Ball and the Focus button is on the right side of the Tracker Ball. -
Page 33: Flipping" The Speeddome
even darker or lighter. There are buttons on the keypad that enable you to control the camera's iris, which is the device that regulates the brightness or darkness of the picture. To make the picture brighter, press the Iris Open button. To make the picture darker, press the Iris Close button. -
Page 34: Displaying Quick Views
The following procedure describes how to initiate the Apple Peel pattern. 1. Use the number buttons to enter the number of the SpeedDome for which you want to initiate the Apple Peel pattern (for example, camera 2). Then press the Camera button. 2. - Page 35 The View button on the keypad allows you to call up the Quick Views that you have defined for your cameras. Depending on the type of dome, either 4 or 96 Quick Views may be defined. If a list has been compiled for your facility, you can refer to the List of Quick Views in Appendix A to determine which Quick Views are available for which domes.
-
Page 36: Running Patterns
Running Patterns I M P O R T A N T The SpeedDome LT supports a feature called “Auto Pan” that allows you to program a smooth side-to-side camera movement for an area. When programmed, this feature is accessed using Pattern 1 for the dome. Please refer to the section in Chapter 4 titled “SpeedDome LT Auto Pan Programming,”... - Page 37 2. Use the number buttons to enter the number of the Pattern you want to run. Then press the Pattern button (if you want the Pattern to run one time and then stop), or press the Repeat Pattern button (if you want the Pattern to repeat indefinitely until you stop it).
-
Page 38: Running The Sequence
Running the Sequence Tip: The Sequence is started from the Main T The Sequence is a collection of Quick Views and Patterns that have been defined for your system's cameras. In the Sequence you can also include fixed shots from any camera. The Sequence can include up to 16 of these Quick Views, Patterns, and fixed shots;... -
Page 39: Controlling Dome Outputs
As the Sequence is running, the LCD indicates which camera's video is displayed, which event in the Sequence is currently active, and how many seconds remain in that event's duration time. The Sequence will repeat itself indefinitely until you press either the Seq button or the Clear button on the Main T Controlling Dome Outputs The programmable domes at your facility can have outputs connected to... -
Page 40: Clearing System Alarms
output off). The List of Inputs and Outputs provides the on and off states for each output. Depending on whether you turned the output on or off in the previous step, the LCD displays one of the following messages: If you entered an invalid output number (any number greater than 4 or an output that does not exist) the T Clearing System Alarms Tip: Alarms can be cleared from the Main T... - Page 41 There can be up to four alarms active at one time. If more than four alarms are active at one time, and none of them have been cleared, the oldest alarm gets “pushed out” of the queue. The following illustration is an example of what the LCD looks like when alarms are active.
- Page 42 The T stops beeping once all active alarms have been OUCH RACKER cleared. If the T was running the Sequence before the alarm OUCH RACKER came in, it will restart the Sequence from the beginning. If you were in the middle of programming when the alarm came in, you will have to resume programming from the beginning.
-
Page 43: Chapter 4: Defining Automatic System Functions
C H A P T E R Defining Automatic System Functions In This Chapter Defining a Quick View Defining a Pattern Understanding Sequence Programming Defining the Sequence Setting Up System Alarms SpeedDome LT Auto Pan Programming... -
Page 44: Defining A Quick View
Defining a Quick View I M P O R T A N T The SpeedDome Ultra III and newer domes support up to 96 views. Older programmable domes support up to 4 views. The T when you attempt to program a view numbered higher than 4 on domes older than the SpeedDome Ultra III. - Page 45 The T OUCH menu appears: 4. Use the Tracker Ball to scroll through the menu selections until Setup View is displayed on the LCD. 5. Press the appropriate button, zoom or focus, to select Setup View. The following prompt appears on the LCD: If you press a number that has already been assigned to a Quick View for Note this camera, the new Quick View will overwrite the existing Quick View.
-
Page 46: Defining A Pattern
In the List of Quick Views (found in Appendix A of this manual), make a record of the Quick View you just defined, including a brief description of what the Quick View is “looking at.” Tip: A short cut method for defining Quick Views is available. Press Menu, View, the Quick View number, and Zoom or Focus to create a Quick View of the current scene. - Page 47 Tip: You must use the Main T The SpeedDome LT does not support Pattern programming. Refer to the section in this chapter titled “SpeedDome LT Auto Pan Programming” for information about setting the Auto Pan feature. The following procedure describes how to define a Pattern. 1.
- Page 48 4. Use the Tracker Ball to scroll through the menu selections until Record Pattern is displayed. 5. Press the appropriate button—zoom or focus—to select Record Pattern. The following prompt appears on the LCD: Note If you press a number that has already been assigned to a Pattern for this camera, the new Pattern will overwrite the existing Pattern.
-
Page 49: Understanding Sequence Programming
seconds long. The number of commands remaining for this camera appears on the LCD as you program the Pattern. 9. When you complete programming the Pattern, press the Next button. The following message appears on the LCD: The T OUCH In the List of Patterns (in Appendix A of this manual), make a record of the Pattern you just defined, including a brief description of the Pattern. -
Page 50: Sequence Programming Display
What are the numbers that were assigned to those Quick Views and Patterns when they were defined? What are the camera numbers that the Quick Views and Patterns were defined on? What are the camera numbers whose fixed shots you want to include? It is recommended that you to fill out the Setup Sequence Worksheet in Appendix A before you begin setting up the Sequence. - Page 51 column 4 When the fields in an event have dashes in them instead of values, the event is not defined. Leaving an event undefined instructs the Sequence to skip that event. When the T OUCH Ball enables you to move the cursor around on the LCD. The blinking square on the LCD indicates the cursor's location.
-
Page 52: Defining The Sequence
Defining the Sequence Tip: You must use the Main T The following procedure describes how to define the Sequence. 1. Press the Menu button on the keypad. The T OUCH menu appears: 2. Press the appropriate button—zoom or focus—to select Define Sequence. -
Page 53: Setting Up System Alarms
5. In the Act field, indicate the type of Action (Quick View, Pattern, or fixed shot) you are specifying for this event. Press View to indicate a Quick View or a fixed shot; press Pattern to indicate a Pattern. 6. Use the number buttons on the keypad to designate the specific number of this Quick View or Pattern. - Page 54 state, and this triggers an alarm. (Refer to your List of Inputs and Outputs in Appendix A to determine the normal and abnormal state for each input.) When an alarm is triggered, it can automatically call up one video action (either a Quick View, a Pattern, or a fixed shot) and initiate one output.
- Page 55 4. Press the appropriate button—zoom or focus—to select Alarm Actions. The information for that camera's first alarm input appears on the LCD. When you set up an alarm, you will indicate which Quick View, Pattern, or fixed shot will be called up when the alarm is triggered. You will also indicate which output initiates when this alarm is triggered.
- Page 56 Even though you can only see the information for one alarm input at a time, each camera can have four alarm inputs. When the T Tracker Ball enables you to move the cursor around on the LCD. The blinking square on the LCD indicates the cursor's location. Move the Tracker Ball left and right to move the cursor among the fields on the LCD.
-
Page 57: Speeddome Lt Auto Pan Programming
9. Move the Tracker Ball to the right. In the Out field, indicate the specific output that initiates when this alarm is triggered. Use the number buttons to enter the number. Remember, this output must be connected to the camera you assigned in Step 6. If you do not want an output to be initiated, leave this field blank. - Page 58 Although it appears to have three Patterns available to program, you can only program the Auto Pan feature for Pattern 1. Any extraneous movements made during the Auto Pan programming will be ignored when the programming is complete. Once the end point of the Auto Pan is set, the result will be a smooth pan between the start point and the end point of the Auto Pan.
- Page 59 3. When you have the perfect “starting point” picture displayed on the monitor, press the Menu button. The T OUCH menu appears: 4. Use the Tracker Ball to scroll through the menu selections until Record Pattern is displayed. 5. Press the appropriate button—zoom or focus—to select Record Pattern.
- Page 60 If you pressed an invalid number (any number greater than 3), the OUCH the Pattern. If this happens, simply press a valid number and continue with this procedure. 8. Move the camera until you see end point for the Auto Pan you are programming.
-
Page 61: Chapter 5: Touch Tracker Utilities
C H A P T E R OUCH RACKER In This Chapter Calibrating the Tracker Ball Resetting the Dome Selecting a Language Designating Main Versus Call T Toggling the Zoom and Focus Buttons Toggling Automatic/Manual Alarm Acknowledgment Displaying a Dome's ID Code Adjusting Camera V-Phase Special Utilities Utilities... -
Page 62: Calibrating The Tracker Ball
Calibrating the Tracker Ball Calibration “tunes” the Tracker Ball sensors for maximum range of motion and balance. If you need to calibrate the Tracker Ball, the following procedure describes how to do this. At any time during this procedure you can press Clear to exit the calibration process;... -
Page 63: Resetting The Dome
6. Immediately push the Tracker Ball all the way away from you until the LCD displays this prompt: 7. Remove your finger from the Tracker Ball. The LCD displays this prompt: 8. Press the Menu button to exit the menu/programming mode. The T OUCH camera control mode. -
Page 64: Selecting A Language
Selecting a Language Choose which language you would like the T appear in: • • • • 1. Press the Menu button on the keypad to display the menu. 2. Use the Tracker Ball to scroll through the menu items and press the appropriate button—... - Page 65 OUCH Functions Designate which external unit the system is connected to (quad splitter, multiplexer, PC, no unit) Select display mode (2x2, 3x3, 4x4, or full-screen format Select a camera Manually control a camera (pan, tilt, zoom, focus, iris) Flip a SpeedDome Initiate automatic system functions (Quick Views, Patterns, outputs)
- Page 66 I M P O R T A N T The following procedure describes how to toggle the current Main and Call OUCH RACKER OUCH RACKER as the Call. You can distinguish between the two T looking at their menus. The Main T items, while the Call T If you want to toggle the functionality of the T must do so on the current the Main T...
-
Page 67: Toggling The Zoom And Focus Buttons
The LCD displays the following prompt: 7. Press the Next button to designate this the Main T 8. Press the Menu button to exit the menu/programming mode on this OUCH The T OUCH mode. Toggling the Zoom and Focus Buttons The function of the zoom and focus buttons can be configured according to the preference of each individual user. - Page 68 The following procedure describes how to toggle the zoom and focus buttons. 1. Press the Menu button on the T to toggle. 2. Scroll through the menu items and then press the appropriate button— zoom or focus—to select Tog Zoom/Focus. The LCD displays the current arrangement of the zoom and focus buttons, for example: 3.
-
Page 69: Toggling Automatic/Manual Alarm Acknowledgment
Toggling Automatic/Manual Alarm Acknowledgment The default setting for the T after 60 seconds. You can, however, change this to have alarms manually acknowledged by the system operators. To toggle the Automatic/Manual Alarm Acknowledgment function, do the following: 1. Press the D button. If Automatic Alarm Acknowledgment is enabled, you will see the following: If Manual Alarm Acknowledgment is enabled, you will see the... -
Page 70: Displaying A Dome's Id Code
Displaying a Dome's ID Code The following procedure describes how to display the ID code for the currently selected dome. The ID code may be useful when diagnosing a problem. 1. Using the number buttons, enter the number of the dome whose ID code you want to display (for example, camera 3) and then press the Camera button. -
Page 71: Adjusting Camera V-Phase
Adjusting Camera V-Phase Use of this utility should be limited to authorized service personnel. To adjust the V-phase of a selected camera, do the following: 1. Press Menu. 2. Using the Tracker Ball, scroll down to Adjust V-Phase. 3. Press the Zoom or Focus button to select the Adjust V-Phase menu option. -
Page 72: Appendix A: Programming Worksheets
A P P E N D I X Programming Worksheets This Appendix contains worksheets that will make the task of programming your system a great deal easier. There are five different kinds of worksheets included in this appendix. The List of Quick Views worksheet allows you to keep a record of the Quick Views you have defined for your facility. - Page 73 The Setup Sequence worksheet allows you to determine which Quick Views, Patterns, and Fixed shots will be included in the Sequence before you actually begin setting up the Sequence. The Setup Alarms worksheet allows you to calculate all of the information associated with setting up alarms before you actually begin defining the alarms.
-
Page 74: List Of Quick Views
List of Quick Views We recommend that, as you define Quick Views to meet the needs of your facility, you then record those Quick Views in this Appendix. That way, you will have an easy way to access the following information: The approximate location of the domes at your facility Which domes have Quick Views defined for them How many Quick Views have been defined for each dome... - Page 75 List of Quick Views - ( Dome #:________ View Number: _____ View Number: _____ View Number: _____ View Number: _____ View Number: _____ View Number: _____ View Number: _____ View Number: _____ View Number: _____ View Number: _____ View Number: _____ View Number: _____ View Number: _____ View Number: _____...
- Page 76 List of Quick Views - Dome #:________ View Number: _____ View Number: _____ View Number: _____ View Number: _____ Dome #:________ View Number: _____ View Number: _____ View Number: _____ View Number: _____ Dome #:________ View Number: _____ View Number: _____ View Number: _____ View Number: _____ Dome #:________...
-
Page 77: List Of Patterns
List of Patterns We recommend that, as you define Patterns to meet the needs of your facility, you then record those Patterns in this Appendix. That way, you will have an easy way to access the following information: the approximate location of the domes at your facility which domes have Patterns defined for them how many Patterns have been defined for each dome a brief description of each Pattern... - Page 78 List of Patterns - Dome #:___ Pattern #: ___ Pattern #: ___ Pattern #: ___ Dome #:___ Pattern #: ___ Pattern #: ___ Pattern #: ___ Dome #:___ Pattern #: ___ Pattern #: ___ Pattern #: ___ Dome #:___ Pattern #: ___ Pattern #: ___ Pattern #: ___ Dome #:___...
- Page 79 List of Patterns - Dome #:___ Pattern #: ___ Pattern #: ___ Pattern #: ___ Dome #:___ Pattern #: ___ Pattern #: ___ Pattern #: ___ Dome #:___ Pattern #: ___ Pattern #: ___ Pattern #: ___ Dome #:___ Pattern #: ___ Pattern #: ___ Pattern #: ___ Dome #:___...
-
Page 80: List Of Inputs And Outputs
List of Inputs and Outputs This section lists those inputs and outputs (auxiliaries) that have been configured at your facility. It contains the following information: which domes have inputs and outputs configured a brief description of the inputs and outputs that have been configured the “normal”... - Page 81 List of Inputs and Outputs - Dome Number:______ :_______________________ Input 1 :_______________________ Input 2 :_______________________ Input 3 :_______________________ Input 4 :______________________ _____________ Output 1 :______________________ _____________ Output 2 :______________________ _____________ Output 3 :______________________ _____________ Output 4 Dome Number:______ :_______________________ Input 1 :_______________________ Input 2 :_______________________...
-
Page 82: List Of Inputs And Outputs
List of Inputs and Outputs - Dome Number:______ :_______________________ Input 1 :_______________________ Input 2 :_______________________ Input 3 :_______________________ Input 4 :______________________ _____________ Output 1 :______________________ _____________ Output 2 :______________________ _____________ Output 3 :______________________ _____________ Output 4 Dome Number:______ :_______________________ Input 1 :_______________________ Input 2 :_______________________... -
Page 83: Setup Sequence Worksheet
Setup Sequence Worksheet Fill out the Setup Sequence Worksheet before you begin actually setting up the Sequence. This worksheet enables you to determine the following: which events will be included in the Sequence The camera on which each event was defined the kind of event (Quick View, Pattern, or fixed shot) the specific number assigned to the event (this number was determined when the event was initially defined... - Page 84 Setup Sequence Worksheet- Event #_______ __________ __________ __________ __________ Event #______ __________ __________ __________ __________ Event #_____ __________ __________ __________ __________ Event #_______ __________ __________ __________ __________ Appendix A: Programming Worksheets (Make copies of the worksheet to support all events) Number of camera whose video will be displayed in this event? Action Type (Quick View, Pattern, or Fixed Shot).
-
Page 85: Setup Sequence Worksheet
Setup Sequence Worksheet- Event #______ __________ __________ __________ __________ Event #_______ __________ __________ __________ __________ Event #_______ __________ __________ __________ __________ Event #_______ __________ __________ __________ __________ A-14 (Make copies of the worksheet to support all events) Number of camera whose video will be displayed in this event? Action Type (Quick View, Pattern, or Fixed Shot). -
Page 86: Setup Alarms Worksheet
Setup Alarms Worksheet Fill out the Setup Alarms Worksheet before you begin actually setting up an alarm. This worksheet enables you to determine the following: which inputs on which domes will trigger an alarm when their state changes from normal to abnormal (remember, the normal and abnormal states for each input are listed on the List of Inputs &... - Page 87 Dome Number: 12 Input #1: Quick View __96__ __3__ There is a separate worksheet for each of the possible 16 cameras. Each camera's worksheet is further divided into four subsections—one for each of the possible four inputs. On the worksheets, notice that the subsection for Input #1 is worded differently than Inputs 2, 3, and 4 for that same camera.
- Page 88 Setup Alarms Worksheet- Dome Number: ___ Input #1: _________________________________________________ ________ ________ ________ ________ Input #2: _________________________________________________ ________ ________ ________ ________ Input #3: _________________________________________________ ________ ________ ________ ________ Input #4: _________________________________________________ ________ ________ ________ ________ Appendix A: Programming Worksheets (Make copies of the worksheet to support all alarms) Dome Type: _______ Location: ____________________________...
- Page 89 Setup Alarms Worksheet- Dome Number: ___ Input #1: _________________________________________________ _________ _________ _________ _________ Input #2: _________________________________________________ _________ _________ _________ _________ Input #3: _________________________________________________ _________ _________ _________ _________ Input #4: _________________________________________________ _________ _________ _________ _________ A-18 (Make copies of the worksheet to support all alarms) Dome Type: _______ Location: ____________________________...
-
Page 90: Appendix B: Software License Agreement
A P P E N D I X Software License Agreement By using the AD Touch Tracker 16 software, you accept the terms and conditions of this license agreement. Read this license agreement carefully. - Page 91 1. General. Software is being licensed to the Customer pursuant to the following terms and conditions, which supplement any purchase or lease agreement (the "Equipment Agreement") between Customer and Sensormatic Electronics Corporation ("SEC"). By accepting receipt of, or by using, such Software, the Customer agrees to be bound by the terms of this Software License Agreement (the "License Agreement").
- Page 92 will have the right to take possession of all copies of the Software and Documentation in the possession of Customer or to require Customer to destroy all such copies and certify such destruction in writing to SEC. 4. Ownership. Customer agrees and acknowledges that (i) SEC (or its suppliers) is the sole owner of the Software and Documentation (including all copies thereof, in whatever form or media, delivered to or made by Customer) and all patent, copyright and other intellectual...
- Page 93 information contained in the Software or Documentation to any party, except for Customer's employees and agents who require access to the Software for the purposes of Customer's internal business and who use it in accordance with the terms of this License Agreement. Customer will not use the Software for the provision of time-sharing services to others.
- Page 94 and workmanship under normal use. SEC's sole obligation under this warranty will be to replace any defective media returned to it free of charge. The period of this warranty will be 12 months from the date of the Equipment Agreement (the “Warranty Period”). EXCEPT AS SET FORTH IN THIS SECTION 6, SEC DISCLAIMS ANY WARRANTY, EXPRESS OR IMPLIED, WITH RESPECT TO THE SOFTWARE OR THE DOCUMENTATION OR THEIR OPERATION OR...
- Page 95 7. U.S. Government Restricted Rights. The Software and Documentation are provided with restricted rights. Use, duplication or disclosure by the U.S. Government is subject to restrictions as set forth in subparagraphs (c)(1)(ii) of the Rights in Technical Data and Computer Software Clause of Department of Defense Federal Acquisition Supplement (DFARS) 252.227-7013 or in subparagraph (g)(3)(i) of Federal Acquisition Regulations (FAR) 52.227-14, Alternate III, as applicable.
- Page 96 Glossary abnormal state The state of a dome input that will trigger an alarm if it has been configured to do so. For example, when a motion detector senses motion, that is the abnormal state for the input, and it will trigger an alarm. alarm The system's response when a dome input changes from its normal state to its abnormal state (if the system has been configured to respond to such a...
- Page 97 Apple Peel pattern A default pattern that a SpeedDome runs whereby the dome makes three complete revolutions starting at the ceiling line and tilting down 30° each revolution. automatic system function A system operation that, once you program it, can be initiated automatically via the T .
- Page 98 cursor The blinking square on the LCD when the T is in the OUCH RACKER menu/programming mode. It indicates the currently active field on the LCD. dome A camera housed inside a plastic dome. The AD Touch Tracker 16 system can be used to control programmable SpeedDome LT, SpeedDome, Outdoor SpeedDome, and SpeedDome Ultra.
- Page 99 input A device such as a smoke detector or twilight sensor that, when configured to do so, can trigger an alarm when it undergoes a change in state. iris The camera component that determines how much light enters the camera. By adjusting the iris, you can adjust the brightness and darkness of the video on the monitor.
- Page 100 mode of operation The current condition of the T operation: camera control mode, menu/programming mode, sequencing mode, and alarm mode. The T depending on its current mode of operation. See also “operational mode.” monitor The screen where camera video is displayed. Some configurations include one monitor;...
- Page 101 Outdoor SpeedDome A programmable camera that enables security personnel to track a target or survey an area. It is enclosed in special housing that protects the camera from weather conditions. It supports programmable features (presets and patterns), 360° continuous rotation, alarm inputs and outputs, and has a 10x fast zoom lens.
- Page 102 quad splitter The unit that some AD T 16 systems are connected to. It OUCH RACKER enables you to see video from up to 4 cameras simultaneously. Quick View A shot. The selected camera automatically and instantaneously calls up a view from a programmable dome, regardless of where that dome is currently pointing.
- Page 103 SpeedDome LT A programmable camera that enables security personnel to track a target or survey an area. This camera supports programmable features (presets and Auto Pan), 360° continuous rotation, and has a 12x optical zoom lens. This type of camera does not support pattern programming or alarm inputs and outputs.
- Page 104 OUCH RACKER The video control station that provides you with easy access to various video control features. Tracker Ball The portion of the T that enables you to pan and tilt the OUCH RACKER camera and scroll through the selections on the menu. utility A menu selection that either assists you in self-help system diagnostics, or provides you with a convenience feature for system operation.
- Page 105 Index 2x2 display format, 2-5 3x3 display format, 2-5 4x4 display format, 2-6 —A— Adjusting V-Phase, 5-11 Alarms clearing, 3-12 clearing automatically, 3-13 setting up, 4-11 toggling automatic / manual acknowledgment, 5- worksheets, A-15 Apple Peel pattern, 3-5 Auto Pan feature SpeedDome LT, 4-15 automatic alarm acknowledgment, 3-13 —C—...
- Page 106 Display Modes 2X2, 2-5 3X3, 2-5 4X4, 2-6 full-screen, 2-4, 2-6 quad display, 2-4 using multiplexers, 2-5 using quad splitters, 2-4 —E— equipment diagram, 1-4 —F— Features , 1-2, 5-5 OUCH RACKER focus, 3-4 toggle buttons, 5-7 full-screen display format, 2-4, 2-6...
- Page 107 running, 3-10 understanding, 4-7 worksheets, A-12 Set up alarms, 4-11 language, 5-4 pattern, 4-4 quick view, 4-2 Software License Agreement, B-1 special utilities, 5-11 SpeedDome Apple Peel pattern, 3-5 displaying ID, 5-10 flipping, 3-5 resetting, 5-3 SpeedDome LT auto pan programming, 4-15 System Alarms automatic acknowledgment, 3-13 clearing, 3-12...