
Subscribe to Our Youtube Channel
Related Manuals for LFA RTP 41 Standard


Summary of Contents for LFA RTP 41 Standard
- Page 1 RTP 41 Tablet Press User Manual ® We don’t just sell machines— we provide service.
- Page 2 Copyright Notice © LFA Machines Oxford Limited, published in 2021 by LFA Machines Oxford Limited 2021. Registered in England and Wales, company number 08428898, registered office for service Demar House 14 Church Road East Wittering, Chichester, West Sussex, PO20 8PS.
-
Page 3: Intended Use
Important Safety Information READ THIS BEFORE OPERATING MACHINE Intended Use General Hazards The intended use of this machine is to press dry In the case of an emergency during raw materials into tablet form. operation, immediately push the Potential misuse of this machine includes: Emergency Stop button. -
Page 4: Modes For Stopping
Important Safety Information READ THIS BEFORE OPERATING MACHINE Symbols WARNING WARNING This signals potential risk for personal injury. This signals potential risk for electrical shock. CAUTION This signals potential risk for damage to the machine or other parts. Modes for Stopping In the case of an emergency during automatic operation, immediately push the Emergency Stop button, turn the isolator, and unplug the RTP 41 ®... -
Page 5: Installation And Safety Assessment
LFA Machines has decided that we can not possibly foresee all of the environments or situations in which this machine could be used or installed and therefore have determined that the end user must install the machine in a way that is appropriate and safe for its use. -
Page 6: Table Of Contents
Components ® RTP 41 Electrical Components ® Preface Training On-Site/Off-Site Training Training via Video Chat/Phone LFA Articles LFA Videos Installation Tools and Materials Needed The Appropriate Workstation for the Machine Assembly Positioning the RTP 41 ® Controls Settings and Adjustment... -
Page 7: Rtp 41 ® Components
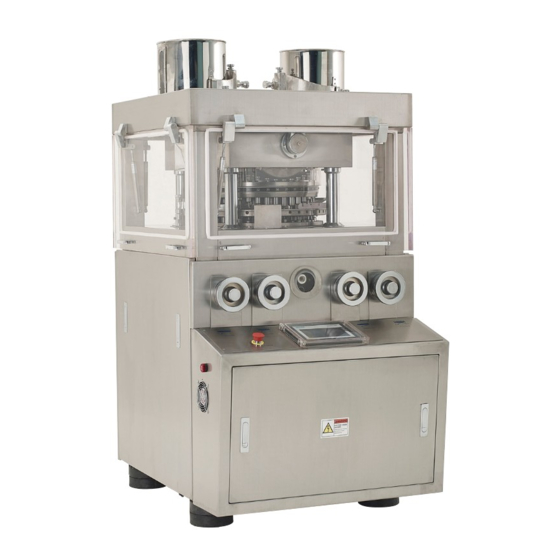
RTP 41 Components ® 1. Upper Roller Cams 5. Motor 2. Turret 6. Anti-Vibration Feet 3. Lower Roller Cams 4. Adjustment Controls and HMI... -
Page 8: Rtp 41 ® Electrical Components
RTP 41 Electrical Components ® WARNING Only qualified electricians should work with these controls. 1. Variable Frequency Drive (VFD) 5. Programmable Logic Controller 2. Breaker (PLC) for Human Machine Interface 3. Fuses (HMI) 4. Solenoid switches... -
Page 9: Preface
Preface The RTP 41 is a high speed rotary tablet press that comes equipped with 41 sets of Tooling, ® electronic controls, and semi-automatic lubrication. With its 4.0 kW motor and up to 80 kN of maximum pressure, the RTP 41 can produce up to 180,000 tablets per hour in several types ®... -
Page 10: Training
Using an online video chat system, an LFA technician can interact face-to-face with you and assist with your understanding of the machine. Or, if you prefer, LFA can provide training via phone for all customers who call the office. To set up a training, call or email your local LFA office:... -
Page 11: Installation
Installation Tools and Materials Needed Before you install and operate the RTP 41 , it is best to have the following tools and materials on ® hand for general operation and maintenance: • Forklift that is rated to lift at least 2,000 kg •... - Page 12 The shipping crate will contain the following: 1. The assembled RTP 41 ® 2. The Tooling (already installed)
- Page 13 3. Toolkit including: • Die Installation/Removal Bar • Grease guns • Crosshead screwdriver • Flathead screwdriver • Wrenches • Allen key set 4. Eyelet bolts 5. Anti-vibration feet 6. Ejection Chute...
-
Page 14: Assembly
® be installed in a cage. A risk assessment is required to be conducted before installation and operation of the machine. LFA Machines is able to advise on this. Please contact us for more information: Phone Phone +44 (0) 0345 165 20 25... -
Page 15: Positioning The Rtp 41
RTP 41 ® Because of its 1677 kg (around 3,696 lbs) weight, LFA does NOT recommend carrying the machine manually but rather with a forklift. At least two people should be involved (one operating the forklift and one stabilizing the machine) in removing the machine from the shipping container and placing it in the workspace. -
Page 16: Controls
Controls Basic Components A description of the principal components follows: • The Hoppers hold the dry materials that will be compressed. • The Fill Trays distributes the dry materials into the Die bores and their Take-Off Blades pushes tablets into the Ejection Chute. •... - Page 17 Control Console 1. Main operation control 2. Start/stop auxiliary machines (de-duster, Fill Trays) 3. Graph of machine speed 4. Parameters of speed, output, and run time 5. Settings for screen appearance, alarms, date, and other parameters Main Operation Control 1. Adjusts machine speed 2.
- Page 18 RTP 41 ® Process The basic mechanism of the RTP 41 involves filling the Tooling (Dies, Upper Punches, and Lower ® Punches) with powder, compressing the powder, and ejecting the tablets. Filling the Tooling with Powder The dry materials are poured into the Hoppers and funneled into the Fill Trays. As the machine operates, the Turret moves, which causes the Upper Punches to withdraw from the Dies.
- Page 19 How to Create Tablets with the RTP 41 ® Tools and Materials Needed • Raw material formulation • RTP 41 ® • Receptacle for finished tablets • Safety goggles • Disposable latex/rubber gloves (for food grade products and to protect hands from grease) •...
-
Page 20: Settings And Adjustment
Settings and Adjustment The RTP 41 ’s settings can be adjusted. Tuning the machine can help with changing the tablets’ ® characteristics. Fill Depth At times, a tablet will be too small or too large, and its weight must change. This simple adjustment determines the tablet’s weight. - Page 21 Fill Trays Height The size of granules in your powder can affect how smoothly dry materials are moved through the Fill Trays, which can affect how much powder is wasted. Sometimes this requires the Fill Trays' height to be adjusted. To watch a video of a Fill Tray calibration on a similar machine, go to https://www.lfatabletpresses.
- Page 22 3. Loosen both of the Fill Trays' Thumb Bolts with an Allen key. 4. Loosen both Fill Trays Scrapers and Take-Off Blades' screws with a crosshead screwdriver. 5. Run a feeler gauge between the Fill Trays and the Turret to determine the adjustment. 5.1 Note: Start at 0.15 mm and raise appropriately if there is no powder waste/damage to the Fill Trays.
- Page 23 Tablet Thickness Sometimes you will need to adjust the tablets' thickness so that the pressure level relative to the fill is high, which results in creating a solid tablet. Tools and Materials Needed • Raw material formulation • Disposable latex/rubber gloves (for food grade products and to protect hands from grease) •...
- Page 24 Turret Rotation Speed Machine operation speed determines how fast the Turret rotates, which affects the speed of the Tooling going through the Upper and Lower Rollers. Adjusting the machine operation speed can affect output and dwell time. To watch a video on dwell time go to https://www.lfatabletpresses.com/dwell-time-in-tablet- compression Tools and Materials Needed...
-
Page 25: Maintenance
Lubrication Regularly greasing your machine is vital to prolonging its operational life. Parts that are not greased properly can make the machine seize up and cause major problems later. LFA recommends maintaining a lubrication schedule for your RTP 41 , which can be found in this ®... - Page 26 2. Remove the Upper Punches and Lower Punches. 2.1 For additional assistance, please refer to the Tooling replacement instructions on page 3. Lubricate the heads of the Upper Punches and Lower Punches with NLGI Grade 1 grease. 4. Lubricate the barrels of the Upper Punches and Lower Punches with SAE 10 oil. 5.
- Page 27 7. Lubricate the pressure adjustment's grease nipple at the back of the machine with NLGI Grade 2 grease. 8. Lubricate the grease nipples on the Upper Roller Cams in the front and back of the machine. 9. Open the panel doors. 10.
- Page 28 Lubrication Schedule LFA recommends the following RTP 41 parts to be lubricated according to the following ® frequency: Part Location Image Frequency Type of Lubricant On top of Gearbox Visually inspect through Gearbox through the shaft's the eye glass and top...
- Page 29 Part Location Image Frequency Type of Lubricant Felt pads underneath Lower Roller Visually inspect and the Lower Roller SAE 10 Cams apply when dry. Cams...
-
Page 30: Dismantling For Repair And Replacement
® https://www.lfatabletpresses.com/products/pill-press-machine-spare-parts/rtp-41-parts Warranty To access LFA's warranty policy, go to https://www.lfatabletpresses.com/warranty If your part is eligible for warranty, have your part’s serial number on hand and please contact LFA: Phone Phone +44 (0) 0345 165 20 25 (682) 312-0309 Email Email sales@lfamachines.com... -
Page 31: Wear Parts And Causes Of Damage
Cause of Damage Tooling The Tooling can become chipped or broken. Lead times for a new set of Tooling can take as long as 6-8 weeks, so LFA recommends having a spare set or two. Fill Trays On the RTP 41 ®... -
Page 32: Tooling
Punches, and/or Dies you currently have are damaged, it is necessary to change the Tooling. To watch a video of a similar machine's Tooling change, go to https://www.lfatabletpresses.com/ rtp10i-tooling-change To buy new Tooling from LFA, simply go to https://www.lfatabletpresses.com/products/tablet- press-tooling Tools and Materials Needed •... - Page 33 4. Loosen both Fill Trays' Thumb Bolts with an Allen key. 5. Remove both of the Fill Trays from the Turret. 6. Open the right side panel door. 7. Rotate the machine manually until an Upper Punch is centered with the Upper Tracking's key.
- Page 34 8. Pull the Upper Punch upwards to remove it from the Turret. 9. Repeat steps 6-7 until all Upper Punches are removed. 10. Find the Lower Punch Retaining Puck underneath the Lower Punches. 11. Using one hand underneath and the other above the Lower Punch Retaining Puck, push it up from underneath and guide it with the other hand above and out of the machine.
- Page 35 19. Repeat steps 15-18 until all Dies are removed Note: To help ensure that the Dies are inserted correctly, LFA recommends using an Insertion Ring. You can order the Die Seat Cleaner and Insertion Ring on our website at https://www.
- Page 36 30. Insert a new Upper Punch through the top of the Turret. 30.1 Note: Lubricate the barrel of the Upper Punch. 31. Place the new Upper Punch's head on the Upper Tracking. 31.1 Note: Be sure that the new Upper Punch's head is above the Upper Tracking to prevent damage.
-
Page 37: Take-Off Blades And Fill Trays Scrapers
Take-Off Blades and Fill Trays Scrapers The Take-Off Blades and Scrapers are attached to each Fill Trays. They help keep the powder flowing into the Dies' bores and aid in tablet ejection. Tools and Materials Needed • Crosshead screwdriver • Wrench set •... - Page 38 3. Loosen both of the Fill Trays' Thumb Bolts with an Allen key. 4. Remove both Fill Trays from the Turret. 5. Loosen both Fill Trays' Scrapers and Take-Off Blades' screws with a crosshead screwdriver. 6. Remove both Fill Trays' Scrapers and Take-Off Blades. Replace the Take-Off Blades and Fill Trays Scrapers 7.
-
Page 39: Fill Trays
Fill Trays The Fill Trays help channel the dry materials into the Die bores and also pushes the tablets out of the way and into the Ejection Chute. This part is designed to wear to avoid damaging the Tooling and/or Turret, so it may need to be replaced. Tools and Materials Needed •... - Page 40 3. Loosen both of the Fill Trays' Thumb Bolts with an Allen key. 4. Remove both Fill Trays from the Turret. 5. Loosen both Fill Trays' Scrapers and Take-Off Blades' screws with a crosshead screwdriver. 6. Remove the both Fill Trays' Scrapers and Take-Off Blades. Replace the Fill Trays 7.
-
Page 41: Lower Tracking
Lower Tracking The Lower Tracking (the Fill Cam, Ejection Cam, and Dosing Cam) guides the Lower Punches' movement throughout the machine's operation. To watch a video of what worn Lower Tracking cams look like on a similar machine, go to https:// www.lfatabletpresses.com/rtp-9-inspecting-lower-cams Tools and Materials Needed... - Page 42 3. Remove the left, right, and back side panel doors. 4. Loosen the cams' screws with an Allen key underneath the machine. 5. Remove the cams from the machine. Replace the Lower Tracking 5. Position the new Fill Cam, Ejection Cam, and Dosing Cam over their screw holes. 6.
-
Page 43: Upper Roller Cams
Upper Roller Cams The Upper Roller Cams compress the Upper Punches to make tablets. Watch a video to see what a worn Upper Roller Cam looks like at https://www.lfatabletpresses. com/rtp-9-inspecting-roller-cams Tools and Materials Needed • Set of metric wrenches • Set of metric Allen keys with ball ends •... - Page 44 5. Loosen the black nut with a wrench on one side of the machine. 6. Rotate the black screw all the way to the left. 7. Remove the split pin and pull out the black round pin. 8. Loosen the screws that secure the Upper Roller Cam and remove it. 9.
-
Page 45: Troubleshooting
Troubleshooting Sometimes unavoidable issues will occur while operating the RTP 41 ® . Fortunately, there are several methods to remedy these issues. Common Machine/Part Issues Symptom Possible Cause Possible Solution Regularly oil and grease all the Grease point areas are dry. Grease Nipples and high friction areas. - Page 46 Powder sticks to the Upper Punches Adjust your formulation. If still an There are issues with the mix. issue, contact LFA for support. Powder sticks to the Lower Adjust your formulation. If still an There are issues with the mix.
-
Page 47: Common Tablet Issues
If the machine is able to make tablets There are problems with the with LFA's Firmapress , then the ® formulation of the granules and problem is your mix. Adjust your ingredients. -
Page 48: Jamming The Rtp
De-Jamming the RTP 41 ® A reason why a RTP 41 might jam is because the fill depth is set too low and the pressure is set ® too high. At its highest punch pressure force, the machine will automatically cut off. WARNING: To prevent any potential personal injury, ALWAYS unplug the RTP before de-jamming it. -
Page 49: Cleaning
Tooling and Fill Trays. It is important to clean the RTP 41 thoroughly to prevent ® rusting and cross contamination. LFA recommends that the machine be cleaned after each operation. Tools and Materials Needed • Container for excess powder • Cleaning brush •... - Page 50 Note: Before washing the Turret, LFA recommends using our Die Seat Cleaner. You can order the Die Seat Cleaner and Insertion Ring on our website at https://www.lfatabletpresses.com/die-seat- cleaner-insertion-ring Clean the Parts 6. Take one of the parts removed by the machine and bring it to the bowl of soapy water.
-
Page 52: Storing The Rtp
Storing the RTP 41 ® After its thorough cleaning, the RTP 41 ® needs to be stored in the proper conditions. It is important to store it in an environment in which the machine is safe from rusting. The RTP 41 ®... - Page 53 Lubricating the Grease Points and High-Traction Parts 1. Apply SAE 10 to the Turret Drive Shaft Oil Wells on top of the machine. 2. Apply NLGI Grade 2 grease to the fill depth adjustment's grease nipple. 3. Apply NLGI Grade 2 grease to the pressure adjustment's grease nipple. 4.
-
Page 54: Appendix
The adjustable amount of force that is used to Punch pressure press tablets. LFA trademarked term for rotary tablet press. ® Enables a tablet press to form tablets. It Tooling consists of Dies, Upper Punches, and Lower... -
Page 55: Description Of Rtp 41 ® Parts
Description of RTP 41 Parts ® Tooling Take-Off Blades and Fill Trays Scrapers The Tooling consists of the Dies, the Upper The Fill Trays Scrapers (non-metal) help keep Punches, and the Lower Punches. They all work the powder flowing into the Dies' bores, and as a set and compress the powder into tablets. - Page 56 Oil Well Pads The Turret Drive Shaft is lubricated by oil wells Center Die Grub Screw (10) located on the top of the machine. Inside Each of the Dies is secured to the Turret with the wells are felt pads that will need to be a grub screw, which can be damaged or lost.
-
Page 57: Material Of Contact Parts
Material of Contact Parts Contact Part Material Turret Cast iron 250 Ejection Tray SUS304 Hoppers SUS304 Tooling User specified (Upper Punches, Lower Punches, and Dies) Fill Trays Tin bronze QSN-6-3 Fill Trays Scrapers and Take-Off Blades Bakelite and copper coat Zn Technical Specifications Model RTP 41 (Standard) -
Page 58: Maintenance Checklist
Maintenance Checklist Before Operation □ Visually inspect the tablet press and the parts. □ Ensure all locking nuts are tight. □ Visually inspect grease nipples and regrease where necessary. □ Manually rotate the machine without powders to ensure that it is not jammed □... -
Page 59: Diagrams
Diagrams RTP 41 Dimensions ®... - Page 60 RTP 41 Electrical Diagram 1 ®...
- Page 61 RTP 41 Electrical Diagram 2 ®...
- Page 62 RTP 41 Electrical Diagram 3 ®...
-
Page 63: Resources
LFA products such as capsule fillers and LFA Website mixers. We regularly upload videos to give you In order to aid you in your tablet production,... - Page 64 LFA MACHINES Copyright © 2021 by LFA Machines www.lfamachines.com Germany Taiwan United Kingdom United States Business Parc Am Unit 4B 955 N Sylvania Ave 7F.-5, No. 2, Sec. 2 Trippelsberg 92 Murdock Road Fort Worth Taiwan Blvd., West Düsseldorf Bicester Texas Dist.,...
Need help?
Do you have a question about the RTP 41 Standard and is the answer not in the manual?
Questions and answers