Table of Contents
Advertisement
Quick Links
Advertisement
Table of Contents

Related Manuals for Vimar CLIMAPIU 01911


Summary of Contents for Vimar CLIMAPIU 01911
- Page 1 01911 Surface electronic chronothermostat - Instruction handbook CLIMAPIÙ...
- Page 2 Space for noting the three-digit PIN number used as the lockout password...........
- Page 3 WARNING ! When the display shows the symbol blinking, the supply batteries are running down. CHANGE THEM IMMEDIATELY. If the battery charge drops under the minimum level, the timer-thermostat output relay automati- cally switches OFF and it is no longer possible to perform any control operations by using the device.
-
Page 5: Table Of Contents
SUMMARY. The timer-thermostat 01911................Front view, controls and display . -
Page 6: The Timer-Thermostat 01911
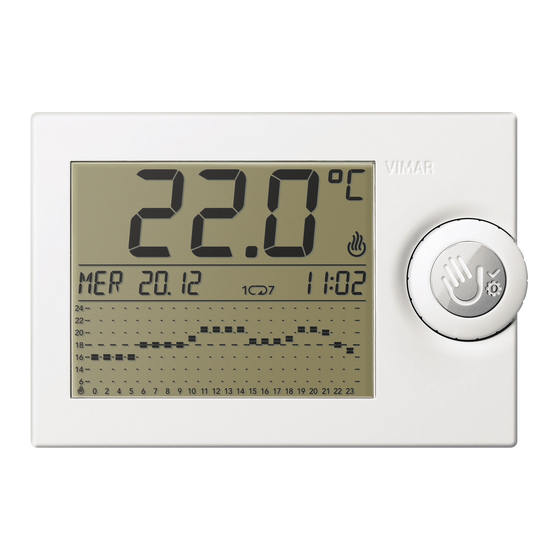
1. THE TIMER-THERMOSTAT 01911 2. FRONT VIEW, CONTROLS AND DISPLAY The Vimar 01911 timer-thermostat is able to assure ideal tempera- Indicators and controls ture conditions for every hour of the day. 1. Room temperature It is equipped with a large display for viewing the temperature and 2. - Page 7 Flat battery Daily programming Weekly programming Push-button for selecting settings and access to menus Handle for scrolling through menus and setting numerical values Vertical sliders for setting the temperature in corre- spondence with Automatic operation. N.B. If the display shows the symbol it means that the timer- thermostat is switching on the heating;...
- Page 8 Figure 2 Figure 3...
- Page 9 Figure 4 Figure 5...
-
Page 10: Description Of The Device
3. DESCRIPTION OF THE DEVICE 5. INSTALLATION Electronic timer-thermostat with sliders for ambient temperature The appliance must be installed on a wall at a height of 1.5 m off the control (heating and air conditioning), changeover relay output 5(2) floor in a suitable position for correctly detecting the ambient tem- A 250 V~, power supply with penlight batteries AA LR6 1.5 V (not perature. - Page 11 Figure 6...
-
Page 12: Connections
6. CONNECTIONS Circulation pumps, burners, solenoid valves. Motor-operated valves. CLOSE OPEN Figure 7 Figure 8... - Page 13 6.1 Phone dialler control • On opening the contact the timer-thermostat is forced onto: - Antifreeze mode if heating is on; It is possible to control the timer-thermostat remotely with a phone - OFF if air-conditioning is on. dialler connected to the dedicated terminals (see the figure below). •...
-
Page 14: Inserting/Changing The Batteries
7. INSERTING/CHANGING THE BATTERIES AA LR6 1,5 V ATTENTION! After replacing the battery, dispose of the old battery in the appropriate sorted refuse bins. Figure 10 Figure 11... -
Page 15: Button Functions
8. BUTTON FUNCTIONS - switches onto Manual if it was operating in a different mode; - switches onto the previously active mode if the timer-thermostat The surface-mounting timer-thermostat 01911 is used and pro- was operating in Manual mode; grammed with: - if it is on, it deletes the automatic temperature change. - Page 16 8.2 Rotary knob 8.3 Vertical sliders Using the 22 sliders that are accessed by opening the front of the device it is possible to: - set the desired temperature when the timer-thermostat is on daily Automatic mode; Turning the knob clockwise or anticlockwise scrolls through the vari- - set the desired temperatures, for each hour and for each day of the ous menu items and allows setting the parameters during the phase week, while configuring the weekly automatic program.
-
Page 17: Access To The Menus And Operating Modes
9. ACCESS TO MENUS AND OPERATING After entering a menu, if no operations are performed within a time of approximately 40 seconds, the timer-thermostat will exit MODES this menu without saving any settings made in the meantime. This chapter illustrates the procedures to follow in order to set and In all the menus, selecting the BACK, option will take you back program the timer-thermostat and the related operating modes. - Page 18 9.1 OFF 9.2 OFF TIMED When the timer-thermostat is OFF, the device is off. This option permits switching off the timer-thermostat for any length The display will in any case keep on showing the date, time and of time at the end of which the device will switch on, going back into room temperature.
- Page 19 The following figure, by way of example, shows the screen corre- Using the rotary knob, set the desired time interval. sponding to the OFF TIMED mode that will remain active until 18th The value can be set in the range from 1 hour to 1 year in steps January at 11:30 a.m.
- Page 20 9.3 ANTIFREEZ. 9.4 AUTO This option, which can only be set on heating, permits setting a In the AUTO operating mode, that is automatic, the timer-thermostat minimum temperature level so as to avoid damage to the pipes or to performs temperature control (both for heating and air-conditioning) prevent the temperature from falling under a safety level;...
- Page 21 The desired temperature values are set using the 22 vertical sliders. To adjust the temperature in the time period between midnight and 04:00 only two sliders will be used (one slider to set the temperature between 00:00 and 02:00 and one to set the temperature between 02:00 and 04:00) whereas, for the following hours, each slider will correspond to a specific hour of the day.
- Page 22 For all the procedures for configuring the weekly program or for • 9.4.1.1 To access weekly programming, the timer-thermostat must changing these temperature settings, see par. 9.4.1. be operating in weekly AUTO mode ; to activate this type of When operating with daily programming, the display will show the operation, see par.
- Page 23 • 9.4.1.3 At this stage, the timer-thermostat suggests the four differ- Press the selection button to confirm; the display shows the screen related to that day on which the temperature indicators ent options COPY, MODIFY, OTHER and CONCLUDE that can will blink.
- Page 24 > MODIFY is used to change the temperature settings for the > OTHER is used, for a selected day, to copy the same set- following day with the vertical sliders as described in par. tings made for the current day (that is the one that has just 10.2.
- Page 25 When the timer-thermostat is working in AUTO, mode, to change 9.4.2 CHANGING THE TEMPERATURE DURING AUTOMATIC OPERATION (OVERRIDE) the current temperature value it is sufficient to turn the knob briefly; the display will show: This option, which can be used when the timer-thermostat is operat- ing on AUTO in daily or weekly programming, is used for temporarily changing a previously set temperature value within the program.
- Page 26 9.5 MANUAL In this operating mode the timer-thermostat works by comparing the room temperature with the one set by the user. Access the main menu and press the selection button in cor- respondence with MANUAL; the display will show: Figure 24 In the above figure, for example, the temperature that has just been set will involve the time band from 11:00 to 13:00 hours.
- Page 27 9.6 MAN TIMED Press the selection button to confirm. This option permits switching on the timer-thermostat in MANUAL Using the rotary knob, set the desired time interval. operation for any length of time at the end of which the device will The value can be set in the range from 1 hour to 1 year in steps return to the previously active operating mode.
- Page 28 Note: To exit the MAN TIMED mode quickly, just briefly press the 9.7 SETTINGS selection button; you will thus go into the previous operating When the timer-thermostat display shows the SETTINGS, press mode (pressing the button a second time will set the MANUAL ;...
- Page 29 9.7.1 LANGUAGE 9.7.3 PROGR 1/7 This option is used to select the language in which all the menus and This option is used to select the type of operation, daily or weekly, of information will be shown on the display. the timer-thermostat on AUTO (automatic) mode.
- Page 30 By adjusting the temperature differential, the system can be pre- selection button to confirm each of the choices made (see vented from continually switching on or off; systems with high thermal figure 30). inertia (for example, with cast iron radiators) require a low temperature differential value, and systems with low thermal inertia (for example, fan coil units) require a higher value.
- Page 31 The PIN value 000 is equivalent to not setting the code for access- 9.7.7 °C/°F ing timer-thermostat use. This option is used to set the unit of measurement of the temperature If the PIN code is lost and it is no longer possible to access the on the timer-thermostat.
-
Page 32: Operation Of The Timer-Thermostat With The Radio-Frequency Module
; displaying the symbol therefore indicates installation of the - h HEAT. (hours of operation in which the timer-thermostat has radio module 01921.1 and, more generally, the lack of the relay operated on heating); module. - h AIRC. (hours of operation in which the timer-thermostat has Correct use of the radio module 01912.1 requires appropriate operated on air-conditioning);... -
Page 33: Initial Switch-On
11. INITIAL SWITCH-ON When it is switched on for the first time, the parameters of the timer- thermostat 01911 are set as follows (default settings): Parameter Default valuet Unit of measurement of temperature °C Time format 24 h Figure 32 Temperature differential 0,2 °C Set-point on MANUAL... -
Page 34: Main Characteristics
11.1 RESETTING THE TIMER-THERMOSTAT • astly press the selection button to confirm; the display will If it is necessary to reset the device, which involves resetting the show RESET OK. default parameters and as a result losing all the configurations and settings made, the procedure is as follows: •... -
Page 35: Installation Regulations
• Temperature differential: adjustable from 0.1 °C to 1 °C 13. INSTALLATION RULES. • Adjustment range: Installation should be carried out observing current installation - +4 °C - +15 °C on antifreeze regulations for electrical systems in the country where the products - +5 °C - +35 °C on heating or air conditioning are installed. - Page 36 Viale Vicenza, 14 - 36063 Marostica VI - Italy Tel. +39 0424 488 600 - Fax (Italia) +39 0424 488 188 Fax (Export) 0424 488 709 01911IEN 01 1512 www.vimar.com VIMAR - Marostica - Italy...
Need help?
Do you have a question about the CLIMAPIU 01911 and is the answer not in the manual?
Questions and answers