
Related Manuals for Triax TDcH Series


Summary of Contents for Triax TDcH Series
- Page 1 User Manual TDcH – compact Headend Article Article no. TDcH 16S-I-Q 492780 Compact Headnend TDcH 16S-Q 492790 Version V1.1 Date 2020/10...
-
Page 2: Table Of Contents
TDcH Compact Headend Content 1 Safety regulations and notes........................3 2 Revision history ............................6 3 TDcH Compact Headend ..........................6 Packing contents ....................................6 Technical data ...................................... 6 Description ......................................8 3.3.1 Features 3.3.2 Block diagram 1. Mounting the TDcH rack ..........................8 Installing the device.................................... -
Page 3: Safety Regulations And Notes
TDcH Compact Headend 1 Safety regulations and notes ATTENTION • Failure to comply with the specified precautionary measures may cause serious injury to persons or damage to property. • The assembly, installation, additional electrical wiring, servicing installation and commissioning may only be performed by suitably qualified persons, technicians or installers in compliance with safety regulations. - Page 4 TDcH Compact Headend To prevent fire, short circuit or shock hazard • Do not expose the unit to rain or moisture. • Install the unit in a dry location without infiltration or condensation of water. In case of the formation of condensation wait until the system is completely dried.
- Page 5 TDcH Compact Headend • Use coaxial cables with screening effectiveness of >85dB (Class A) at least or >95dB (Class A+) WEEE disposal Electronic devices should never be disposed of in the household rubbish. In accordance with directive 2002/96/EC of the European Parliament and the European Council from January 27, 2003 which addresses old electronic and electrical devices, such devices must be disposed of at a designated collection facility.
-
Page 6: Revision History
TDcH Compact Headend 2 Revision history Version 1.0 TDcH Compact Headend user manual - First release Version 1.1 Management Port description added 3 TDcH Compact Headend Packing contents 1 piece TDcH compact headend 1 piece Mains cable 2 pieces Wall mounting brackets 4 pieces Screws Technical data... - Page 7 TDcH Compact Headend Multistream chip set prepared but not supported with SW1.0 Symbol rate DVB-S QPSK: 1 – 45 MSymb/s Symbol rate DVB-S2 QPSK: 4.5 – 45 MSymb/s 8PSK: 4.5 – 45 MSymb/s 16APSK: 4.5 – 39 MSymb/s 32APSK: 4.5 – 32 Msymb/s Max.
-
Page 8: Description
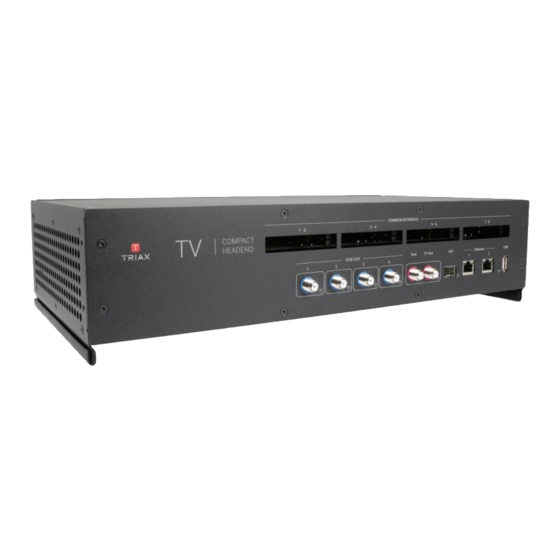
TDcH Compact Headend Description TDcH compact Headend supports DVB-S and DVB-S2 conversion to QAM with the possibility to decrypt services centrally in the headend. Built for both wall mounting and 19” racks and equipped with 4 DVB-S/S2 inputs, 16 DVB-S2X tuners, 16 QAM modulators and 8 CI (TDcH 16S-I-Q) slots. - Page 9 TDcH Compact Headend Ensure that the TDcH is correctly grounded, according to applicable national regulations. Ensure that min. 4 cm ventilation space is available on both sides of the equipment, so that the fans and ventilation holes are not covered! Potential equalisation: Equalise the potential (PE) in accordance with IEC/EN/DIN EN 60728.
-
Page 10: Device Overview
TDcH Compact Headend Device overview Connecting the device • Connect the SAT IF inputs to the corresponding outputs of an LNB or multi switch. Make sure that all inputs have the same level and are in the required level range! •... -
Page 11: Starting Service Tool
TDcH Compact Headend Currently the management GUI can be reached at this port. The port is configured to get the IP address via DCHP. 4.1.3 Starting service tool • Open a web browser window. • Enter http://192.168.0.100 in the web address field. Press Enter. •... -
Page 12: Tdch Interface (Gui)
TDcH Compact Headend TDcH interface (GUI) A. Information window B. Navigation bar C. Administrator and Dashboard menu D. Installation wizard function to continue or go one step back E. Save Configuration When logged in, you will be met by 7 panes 1. - Page 13 TDcH Compact Headend If there is an error in any part of the configuration, the user interface indicates this with a symbol in the relevant sector of the navigation menu. In other parts of the user interface the error symbol is also used to indicate an error or configuration failure.
- Page 14 TDcH Compact Headend This Dashboard is also for hotel employees to give an overview during a failure analysis or report an issue to the installer. In the Dashboard view you will find the overall TV Status. The window is divided in two sectors. The left side shows all notifications of the last 24 hours and the right side shows a status on TV service level.
- Page 15 TDcH Compact Headend When you are in the Dashboard mode and click on the error indication on the right side, a Channel Status Details window will pop up. In this window you can find the status over the last 24 hours. The window also shows where the failure has occurred, such as the tuner, CAM or output.
- Page 16 TDcH Compact Headend Settings Start with the folder “Settings” to set up the general settings and information of the TDcH compact headend. 4.3.1 IP address of this interface: This is the IP address of the Management port (Ethernet 1) of the compact Headend. It may be necessary to specify specific IP addresses for the headend to avoid network IP address conflicts.
- Page 17 TDcH Compact Headend 4.3.4 Default Gateway This is the Default Gateway in the network the Management Port is connected to. 4.3.5 Device Name: Description field to give the compact Headend or project any name. 4.3.6 Timezone: Click on the “Timezone” field to open the drop down and select the time zone where the compact headend is installed.
- Page 18 TDcH Compact Headend CH23 490,00 CH23 490,00 CH23 490,00 CH23 490,00 CH44 658,00 CH24 498,00 CH24 498,00 CH24 498,00 CH24 498,00 CH45 666,00 CH25 506,00 CH25 506,00 CH25 506,00 CH25 506,00 CH46 674,00 CH26 514,00 CH26 514,00 CH26 514,00 CH26 514,00 CH47 682,00...
- Page 19 TDcH Compact Headend 4.3.8 Device Description Text field for project description. 4.3.9 Installer Text field for the installer or company name who is responsible for the installation. 4.3.10 Installer Email and Phone Text field for the email address and phone number of the installer. Note: Please note that this information is used in the report Issue window which can be accessed from the Dashboard.
- Page 20 Select the required parameters for each input: 13/18V: for Vertical or Horizontal polarisation LOW/HIGH for the Band The input colour shows the setting following the same colour codes TRIAX uses on LNBs and multiswitches. Yellow: Horizontal, High Band Red: Vertical, High Band...
- Page 21 TDcH Compact Headend When you press the expand button you can open the DiSEqC settings: DiSEqC supports four satellite positions. Please select the needed positions if required. Additional to the DiSEqC settings the menu also shows the default values of the (Local-Oscillator-Frequency) LOF Low: Local Oscillator Frequency for the low band Frequencies LOF High:...
- Page 22 TDcH Compact Headend The “Tuner” folder shows all input tuners. The colour of the tuner number shows the status of each tuner. Grey: Tuner is not used Red: Tuner is not set up correctly or input signal is missing. Green: Tuner is locked and working. The first time the Compact Headend Service Tool displays the tuner configuration window in a new configuration, the configuration fields and the list of services will be empty or display default values.
- Page 23 TDcH Compact Headend To set up a tuner you have to follow the following steps: 1. Select the “Input”: • To select the required input / SAT-IF signal, click on the input field to open the drop-down list with the inputs you can choose from.
- Page 24 TDcH Compact Headend To delete the tuner input, press the “Delete x” – a warning will appear: A warning will appear: 4.5.1 Service List: Press Tuner number to see available streams, their type, name and SID + TSID and ONID Name: Name of the TV or Radio Service Type:...
- Page 25 TDcH Compact Headend The first time you display the CAM window in a new configuration the module list only displays the number and type of the CA modules that you have inserted in the TDcH. You have to configure the CAM modules individually. When you open the Configuration window for a CA module in a new configuration, only default values are displayed.
- Page 26 TDcH Compact Headend 4.6.1 CAM / Smart card You can insert 8 Conditional Access Modules (CAM) into the TDcH Each CA module is able to unscramble at least one service. Which services depend on the service provider of the CAM module and smart card. 4.6.2 CAM configuration At the first step you have to assign to a CAM module the transponder which contains the services the CAM module...
- Page 27 TDcH Compact Headend By clicking the expand button on the CAM menu the detailed configuration menu opens. Card speed: Open the drop-down list with the card speeds if you want a higher card speed than the default card speed. Select the required card speed.
- Page 28 TDcH Compact Headend Service list area (Associated Services) Select the service(s) that you want to descramble in the Service list area by clicking the service(s) at the selected button. Scrambled services are marked with a dollar sign - $. Used PIDs: This number shows how many PIDs the CAM is using for descrambling the TV services.
- Page 29 TDcH Compact Headend To descramble only selected audio PIDs you have to deselect the Descramble all audio PIDs checkbox. Deselecting the Descramble all audio PIDs checkbox displays a field with a drop-down list below the checkbox. Open the drop-down list and select the the language of the audio PID you want to descramble.
- Page 30 TDcH Compact Headend The first time the Service Tool displays the Configuration window for the output in a new configuration, the fields in the window will display default values and/or be empty, and the output will be disabled. Channel plan: Before starting the Output configuration please be sure that the channel plan is set in the Settings folder! Select input: Select under DESTINATION for each Input or CAM...
- Page 31 TDcH Compact Headend QAM output frequency: You can configure a QAM output frequency by using the specifications of the channel plan or by entering a frequency manually. Using the channel plan definitions: Open the drop-down list with the predefined channels and select the channel you want to use.
- Page 32 TDcH Compact Headend Service filtering: In the “Associated Services” field it is possible to deselect all Services which should not be included in the output. This function can be used: • to filter unwanted services from the output • to reduce the payload if the transponder is overloaded LOAD monitor The payload monitor is a real time monitor, which visually indicates the amount of data that is currently being...
-
Page 33: Network Settings
TDcH Compact Headend 4.8.1 Network Settings Country: Group of countries listed by the 3-letter country ID as described in the ISO 3166 standard. The “Private Descriptor” and “Descriptor Size (Bit)” are greyed out and will be set with the default setting depending on the country group Supported countries: AUT, CHE, DEU, ESP, HUN, ITA, NLD, POL, PRT... -
Page 34: Lcn
TDcH Compact Headend • choose “(custom)” and you can set the two settings to whatever you require. When selecting “(custom)” → notice the “Private Descriptor” and “Descriptor Size (Bit)” are possible to change. 4.8.2 Assign LCN numbers to desired services. LCN and HD-LCN numbers in the range 0 - 1023 can be set. When Continue is pressed, the next menu pane is shown. -
Page 35: Alphabetic Order
TDcH Compact Headend Service: Name of the TV or Radio Service Type: Type of the Service (HD, SD, TV, Radio, …) Service identifier of the service used at the Output TSID Transport stream identifier used at the output ONID Original network identifier of the service SOURCE Location from where the service is received CAM MODULE Used CAM module for decrypting the service... -
Page 36: Support
TDcH Compact Headend 5 Support Support information in your language will be found on our country sites. Go to www.triax.com and select your country. Registered users can access our support sites at: https://www.triax.com/mytriax If not a registered user, please create a login. - Page 37 TDcH Compact Headend Installer A person that installs, deploys and maintains the headend system Interface Transport Stream; According to standard ISO 13818-1 Elementary Stream; According to standard ISO 13818-1 Service According to ETSI EN 300 468...
Need help?
Do you have a question about the TDcH Series and is the answer not in the manual?
Questions and answers