
Related Manuals for Albrecht Elbo-track L/L


Summary of Contents for Albrecht Elbo-track L/L
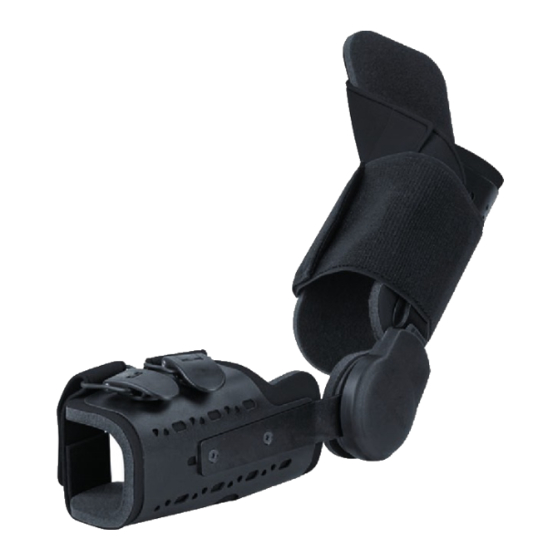
- Page 1 U S E R I N S T R U C T I O N S E L B O - T R A C K H I N G E D E L B O W B R A C E W I T H E X T E N S I O N A N D F L E X I O N L I M I T AT I O N O P T I O N A L LY W I T H A D J U S T A B L E H A N D L E...
-
Page 2: Table Of Contents
Elbo-track User Instructions Contents 1. Introduction ....................1.1. Foreword ..................... 1.2. Customer information .................. 1.3. Mode of operation ..................1.4. Application ....................1.5. Scope of delivery ..................1.6. Declaration of conformity ................1.7. Features ....................... 1.8. Indications ....................1.9. Contraindications .................. - Page 3 User Instructions 2.3. Setting the hinge for Elbo-track Bambini ............. 2.3.1. Remove the hinge cover ..............2.3.2. Setting the extension limitation ............2.3.3. Setting the flexion limitation ............. 2.3.4. Immobilisation ................... 2.3.5. Reattach the hinge cover ..............2.4. Attaching of the brace by the orthopaedic technician ........
-
Page 4: Introduction
User Instructions is not clear, or any instructions, operating procedures or safety information is not fully understandable, please contact the appropriate specialist retailer or albrecht GmbH directly, before you use the brace. This particularly applies to the safety instructions. 1.3. Mode of operation... -
Page 5: Features
• Easy handling and high wearing comfort joint • Post-traumatic and postoperative immobilization Elbo-track L/L, M/M, S/S and Junior: • Guided movement of the elbow joint • Extension limit can be adjusted in 15° intervals from 0° until 135° For any other indications, the physician must be consulted. -
Page 6: Safety Instructions
GmbH. If this the therapeutic effect of the brace and may is not obtained, the manufacturer may not lead to injury. -
Page 7: Adjustments By The Orthopaedic Technician
User Instructions 2. Adjustments by the orthopaedic technician 2.1. Fitting on the patient • Our braces are adjustable and constructed for fi tting to the patient. • The position of the movable components of the brace can be changed and they can be shaped. -
Page 8: Adjusting The Brace Components
Elbo-track User Instructions 2.1.2. Adjusting the brace components The brace components are adjustable. Loosen the screws on the brace components using the tool provided. Move the components into the desired position. Tighten the screws again. The brace components can be adjusted by shaping to the contour. -
Page 9: Assembling And Adjusting The Adjustable Handle
User Instructions 2.1.3. Assembling and adjusting the adjustable handle By loosening the two fixing screws you can remove the forearm shell from the hinge rod. Note: two longer screws are enclosed with the handle. Now place the mounting rod of the handle between the hinge rod and forearm shell. -
Page 10: Hinge Adjustments
Elbo-track User Instructions 2.2. Hinge adjustments 2.2.1. Opening the hinge cover Hinge with closed cover. Open the hinge cover by pushing it off the hinge with your fingers. Hinge with the stop pins in neutral position. In this position there is maximum extension and flexion of the brace. -
Page 11: Setting Extension, E.g. To 30
User Instructions 2.2.2. Setting extension, e.g. to 30° To set extension, pivot the brace into flexion. 5 W ithdraw the stop pin for extension from the 0 position and insert it in the The brace is now set to 30° desired hole for extension, 30°... -
Page 12: Immobilizing The Brace, E.g. At 30
Elbo-track User Instructions 2.2.4. Immobilizing the brace, e.g. at 30° 9 T o immobilize the brace, in this case at 30°, insert the stop pin for extension in the 30° hole for extension. Then pivot the brace in extension against the stop pin for extension. -
Page 13: Setting The Hinge For Elbo-Track Bambini
User Instructions 2.3. Setting the hinge for Elbo-track Bambini Extension and flexion can be limited in 10° steps by appropriate positioning of the stop pins. In order to set the Extension/ Flexion limitation and the immobilisation the follwing steps must be executed. 2.3.1. -
Page 14: Setting The Extension Limitation
Elbo-track User Instructions 2.3.2. Setting the extension limitation In order to set the extension limitation, bring the brace into flexion. Place the stop into the desired position. 2.3.3. Setting the flexion limitation In order to set the flexion limitation, bring the brace into extension. Place the stop into the desired position. -
Page 15: Immobilisation
User Instructions 2.3.4. Immobilisation In order to immobilize the brace, first set the the extension limtation. Move the hinge rod against the extension limitation and position the flexion stop adjacent to the hinge rod. 2.3.5. Reattach the hinge cover Make sure that both stops are placed in the holes. Reattach the cover and rotate it 90°... -
Page 16: Attaching Of The Brace By The Orthopaedic Technician
Elbo-track User Instructions 2.4. Attaching of the brace by the orthopaedic technician 2.4.1. Placing the brace on the arm Place the brace on the patient‘s arm from below. Ensure that the pivot point of the brace hinge coincides with the physiological elbow pivot point. -
Page 17: Setting The Strap Lengths And Adjusting Them As Necessary
User Instructions 2.4.2. Setting the strap lengths and adjusting them as necessary Adjust the straps to the desired length and shorten them if necessary. First close the narrow upper arm strap to hold it. Close the forearm strap nearer to the joint. Close the forearm strap further from the joint. -
Page 18: Handling By The Patient
Elbo-track User Instructions 3. Handling by the patient 3.1. Taking off the brace 1 - 4 Open the strap fasteners To remove the brace, simply open the clips and do not unthread the straps. 5 Remove the brace downwards Take off the brace. -
Page 19: Putting On The Brace
User Instructions 3.2. Putting on the brace Close the clips in the stated order. Place the brace on your arm from below. 2 - 5 Close the clips in the stated order. www.albrechtgmbh.com... -
Page 20: Cleaning, Maintenance And Disinfection
Elbo-track User Instructions 4. Cleaning, maintenance and disinfection The orthosis is designed to be maintenance-free. To ensure proper operation over the period of treatment the orthosis should be cleaned regularly (at least every 3 months) or as required, according to the following Hand wash at 30°C instructions. -
Page 21: Technical Data / Materials
17 - 21 cm 20 - 24 cm 28 - 39 cm 22 - 30 cm 850LL-L 850LL-R Elbo-track L/L with handle 17 - 21 cm 20 - 24 cm 28 - 39 cm 22 - 30 cm 8501LL-L 8501LL-R... -
Page 22: Transfer Of The Brace
Elbo-track User Instructions 7. Transfer of the brace The brace is not intended for single use, but rather is intended for multiple use by a single person. We do not recommend transfer to other users. Should this be desired however, please ensure to pass on the care and cleaning instructions and have the brace checked by an authorized specialist dealer for safe and proper operation. - Page 23 User Instructions www.albrechtgmbh.com...
- Page 24 P A T E N T S : E P 0 9 5 6 8 3 7 U S 6 , 3 7 5 , 6 3 2 V E R S I O N : E N 1 0 . 2 0 1 9 a l b r e c h t G m b H C H I E M S E E S T R A S S E 8 1 D - 8 3 2 3 3 B E R N A U A M C H I E M S E E / G E R M A N Y...
Need help?
Do you have a question about the Elbo-track L/L and is the answer not in the manual?
Questions and answers